Install DotNet Core SDK 2.2 For Ubuntu 16.04

Ref: https://dotnet.microsoft.com/download/linux-package-manager/ubuntu16-04/sdk-current

Register Microsoft key and feed
Before installing .NET, you’ll need to register the Microsoft key, register the product repository, and install required dependencies. This only needs to be done once per machine.

Open a terminal and run the following commands:

Install the .NET SDK
Update the products available for installation, then install the .NET SDK.

In your terminal, run the following commands:

OK. Check the dotnet version (dotnet –version) or more complete info (dotnet –info):


Create First DotNet App
ref: https://dotnet.microsoft.com/learn/dotnet/hello-world-tutorial/create

The dotnet command creates a new application of type console for you. The -o parameter creates a directory named myFirstApp where your app is stored, and populates it with the required files. The cd myFirstApp command puts you into the newly created app directory.

The main file in the myFirstApp folder is Program.cs. By default, it already contains the necessary code to write “Hello World!” to the Console.

Run your app
In your terminal, run the following command:

Congratulations, you’ve built and run your first .NET app!

Edit your code
Open Program.cs in any text editor (e.g. Notepad) and add a new line of code below the one that prints “Hello World!”, like the following:

Save the Program.cs file, and run your code again.

Create First ASP.Net App
ref: https://dotnet.microsoft.com/learn/web/aspnet-hello-world-tutorial/create
Create your app
In your terminal, run the following commands:

Run your app
In your terminal, run the following command:

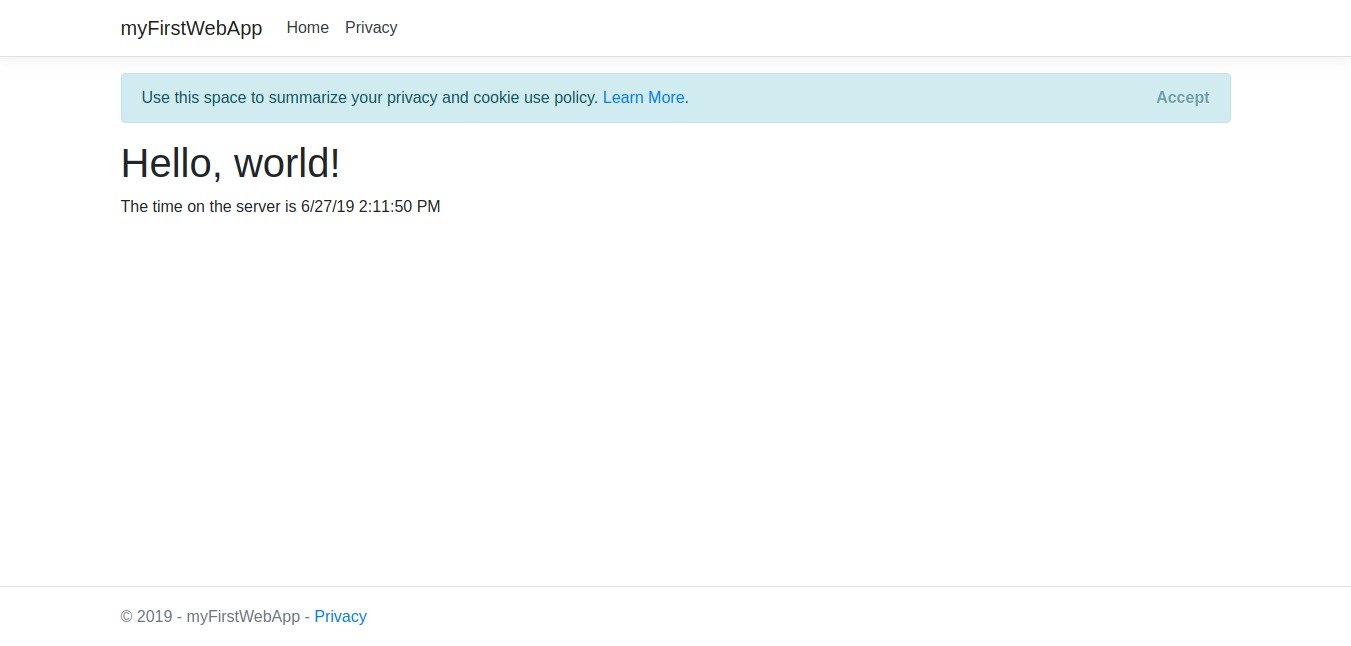
Then open it on your web browser: http://localhost:5000/
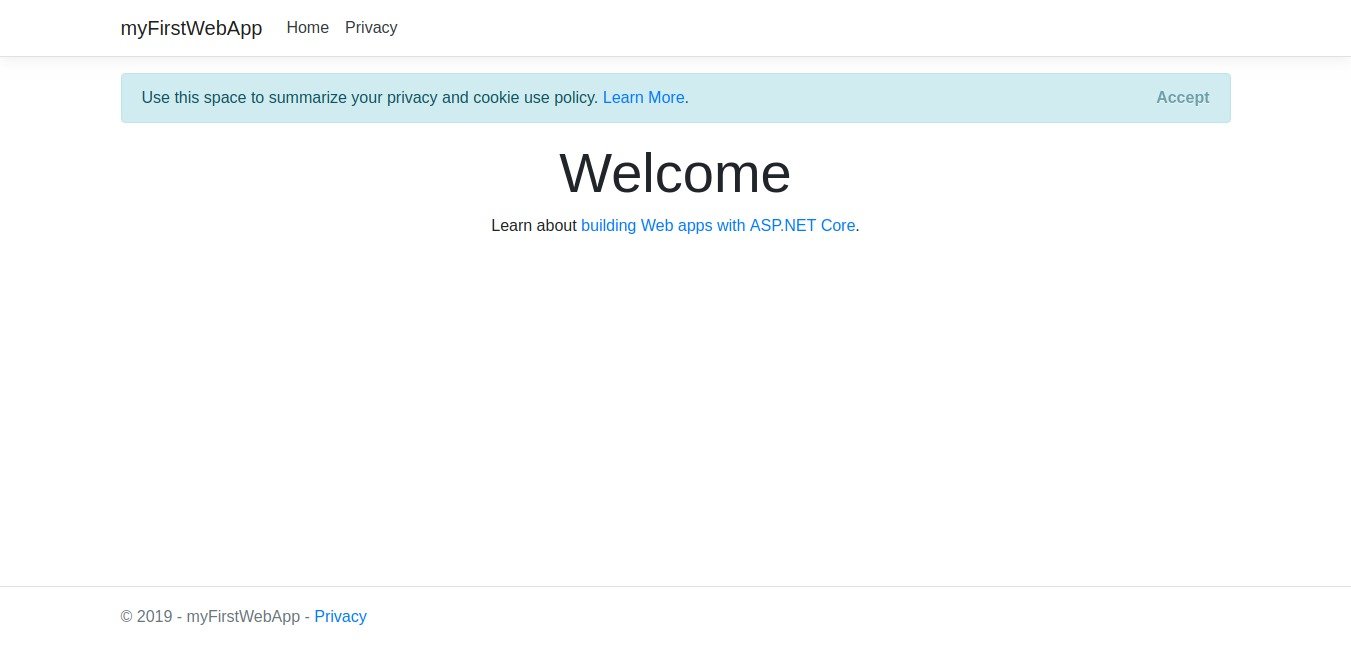
Edit your code
Open Pages/Index.cshtml in any text editor and replace all of the code with the following:

Save the file then refresh the browser to see the change:

Install Vue Storefront On Ubuntu 16.04

Ref: https://docs.vuestorefront.io/guide/installation/linux-mac.html#requirements
https://medium.com/the-vue-storefront-journal/vue-storefront-how-to-install-and-integrate-with-magento2-227767dd65b2

Requirements
– Docker (with docker-compose installed).
Already included in vue-storefront and vue-storefront-api Docker images (required locally, if you do not use containerization):
– Node.js Active LTS (>=8.0.0)

– Yarn (>=1.0.0)

– ImageMagick (to fit, resize and crop images)

First, Install Docker CE for ubuntu (https://docs.docker.com/install/linux/docker-ce/ubuntu/#install-using-the-repository)

Install using the repository
Before you install Docker CE for the first time on a new host machine, you need to set up the Docker repository. Afterward, you can install and update Docker from the repository.

SET UP THE REPOSITORY
Update the apt package index:

Install packages to allow apt to use a repository over HTTPS:

Add Docker’s official GPG key:

Verify that you now have the key with the fingerprint9DC8 5822 9FC7 DD38 854A E2D8 8D81 803C 0EBF CD88, by searching for the last 8 characters of the fingerprint.

Use the following command to set up the stable repository.

INSTALL DOCKER CE
Update the apt package index.

Install the latest version of Docker CE and containerd, or go to the next step to install a specific version:

Verify that Docker CE is installed correctly by running the hello-world image.

This command downloads a test image and runs it in a container. When the container runs, it prints an informational message and exits.
Check docker version: (https://docs.docker.com/engine/reference/commandline/cli/)

Docker CE is installed and running. The docker group is created but no users are added to it. You need to use sudo to run Docker commands. Continue to Linux postinstall to allow non-privileged users to run Docker commands and for other optional configuration steps.

It’s important to manage docker for non-root user (https://docs.docker.com/install/linux/linux-postinstall/)
Create the docker group.

Add your user to the docker group.

Logout and re-login  so that your group membership is re-evaluated.
Verify that you can run docker commands without sudo.


Install Docker Compose
https://docs.docker.com/compose/install/
On Linux, you can download the Docker Compose binary from the Compose repository release page on GitHub. Follow the instructions from the link, which involve running the curl command in your terminal to download the binaries. These step by step instructions are also included below. To ensure you have the latest version, check the Compose repository release page on GitHub.

Apply executable permissions to the binary:

Test the installation.

For installing ImageMagic for Ubuntu 16.04, PHP7.2-FPM and NGINX. pls see http://www.mariorodriguez.co/2018/01/17/install-enable-imagick-on-ubuntu-16.04.html and https://askubuntu.com/questions/769396/how-to-install-imagemagick-for-php7-on-ubuntu

In /etc/php/7.0/fpm/php.ini file, insert ‘extension=imagick.so’ line. then save.
Restart php7.2-fpm and nginx

Check the extension in phpinfo (http://localhost:8080/phpinfo.php)

Installation Vue StoreFront

To get started — first of all we need to install all projects on your local machine. Fortunately it’s very simple step because we do have CLI installer which installs vue-storefront and vue-storefront-api altogether.

First step is to get the VS from our github:

git clone https://github.com/DivanteLtd/vue-storefront.git vue-storefront

Go to the ‘vue-storefront’ directory

MAKE SURE YOU CHECK PORT 8080 (USUALLY IT BEING USED BY NGINX) BY ‘sudo netstat -plntu’. IF THE PORT IS BEING USED BY NGINX, PLS STOP IT FIRST ‘sudo service nginx stop’. PORT 8080 WOULD BE USED BY MAGENTO 2 BACKEND???
MAKE SURE YOU ALREADY ADD USER FOR DOCKER
<ERROR_YARN_INSTALLER_DOCKER_NON_ROOT>

SOLUTION: ADD USER FOR DOCKER. SEE THE ABOVE REVISED DOCKER INSTALL!
</ERROR_YARN_INSTALLER_DOCKER_NON_ROOT>
RUN ‘yarn build’ BEFORE ‘yarn installer’. DONT FORGET REMOVE ‘vue-storefront-api’ DIRECTORY

<ERROR_YARN_INSTALLER_STOREFRONT_NPM>

SOLUTION: https://docs.vuestorefront.io/guide/basics/recipes.html#how-to-prevent-an-error-can%E2%80%99t-build-storefront-npm
RUN: ‘yarn build’ BEFORE ‘yarn installer’.
</ERROR_YARN_INSTALLER_STOREFRONT_NPM>
WORKING!

IF THE NODE JS SERVER IS STOPPED, START/RESTART IT AGAIN BY RUNNING: ‘yarn dev’ in ‘vue-storefront’ directory and ‘vue-storefront-api’ directory. Make sure nginx that use port 8080 is stopped (check port : sudo netstat -plntu)

Then to open the frontend (vue-storefront): http://localhost:3000/ –> OK. BUT WHEN I CLICK ANY LINK ON THE PRODUCT, I GOT ‘The product, category or CMS page is not available in Offline mode. Redirecting to Home.’
to open the backend (vue-storefront-api): http://localhost:8080/ –> NOT OK! I got this printed: Cannot GET /
http://localhost:8080/api –> printed: {“version”:”0.1.0″}

Install Magento 2.3 PWA Studio On Ubuntu 16.04

Ref: https://magento-research.github.io/pwa-studio/venia-pwa-concept/setup/

Magento2.3 PWA Studio Setup

Are you prepared to try all benefits of Magento PWA Studio?


https://hackernoon.com/getting-started-with-magento-pwa-studio-with-poc-c54c33f8d038

Check Requirements:
It say my working environment need:
NodeJS >=10.14.1 LTS
Yarn >=1.13.0
Another source say: ‘You must have a version of node.js >= 8.0.0, and a version of npm >= 5.0.0. The latest LTS versions of both are recommended.’
Check my current:

I use NVM (http://myprojects.advchaweb.com/index.php/2018/01/24/ubuntu-16-04-3-installation-problem-and-solution/) to install node js. It seems my current didn’t fit the requirements. I need to install node js version 10.x.x and update yarn and npm.
CHECK INSTALLED NODE VERSION:

or use ‘nvm ls-remote’ to see all the node js list and version.
Use nvm to install node js v10..15.1. it’s a latest LTS version for v10.x.

It also make it the new version as an active node js version!

or use ‘nvm use 10.15.1’

but npm version now is v6.4.1. Yarn already installed for the previous node js version but not yet for the current v10.15.1 version. I need to install it again. NOTE: Yarn is more recommended than npm!
Install Yarn (https://yarnpkg.com/en/docs/install#debian-stable)
NOTE: I need to uninstall ‘cmdtest’ first (https://github.com/yarnpkg/yarn/issues/2821).

Check yarn version

INSTALL Magento 2.3 Backend
or INSTALL PWA Studio First??? –> I prefer to install the backend first!
NOTE: I need to use composer to install the backend.
check the composer version

When I use this composer version to download and install magento

it can’t download from repo. it’s did nothing after I supplied the repo.magento.com account for a long time! I NEED TO UPDATE COMPOSER!
But when I want to update the composer, I got an error ‘SHA384 is not supported by your openssl extension, could not verify the phar file integrity’

Based on this link https://github.com/composer/composer/issues/7669, to fix this problem I need to manually download and install composer. Follow this https://getcomposer.org/download/ to download and install composer. It’s almost same. But to install composer system wide, use ‘sudo php composer-setup.php –install-dir=/usr/local/bin –filename=composer’ instead of ‘php composer-setup.php’

To avoid warning like this:

so do like this:

NOTE: Also it recommended to install prestissimo (composer plugin) from https://github.com/hirak/prestissimo

I tried to install magento 2.3 via composer but failed for some reasons. Like the packages can’t be downloaded or it took a long time so I had to cancel it. Probably my slow internet speed and/or the magento repo problems affected the installation as well. I tried to download and install on the afternoon without no progress. The last time I successfully installed it when I tried it on the evening! So here is the working command:

Anyway it took almost 3 hours to complete the command!
Note: I stripped ‘magento/project-community-edition:2.3.0’ from the above command to make sure I got the latest version! It’s not mean it’d not work if I put the version back!
SO ‘/home/teddy/Documents/works/mce230-pwa’ is a Magento installation directory.

The next step is to install Magento by Command Line
First, go to the magento 2.3.0 root directory

Then run this command like this: Use https url like ‘https://mce230-pwa.test/’ for PWA because PWA only works with SSL???

SORRY, ONLY ADMIN CAN SHOW THIS!
Make sure you already create a new database ‘mce230_pwa’. Also match the database credential!
SORRY, ONLY ADMIN CAN SHOW THIS!
SO I completed the installation of magento 2.3 backend. Can I open it on the browser http://localhost/mce230-pwa ??? Should I set it on the web server like nginx or apache? Or it only can be run via node js server??? –> I’m gonna setup nginx for running it. But I need to create self-signed certificate first for enabling ssl (http://myprojects.advchaweb.com/index.php/2019/02/09/create-self-signed-certificate-with-nginx-on-ubuntu-16-04/)
Create a new file

Here is the file content:

Create the Certificate using OpenSSL

It’ll create two new files. There are mce230-pwa.test.crt and mce230-pwa.test.key. Then Copy those files to the Certificates folder on Ubuntu

OK. Now setup the nginx config. Create the config file

Here is the content:

NOTE: I set $MAGE_ROOT TO ‘pub’ DIR LIKE ‘set $MAGE_ROOT /home/teddy/Documents/works/mce230-pwa/pub’ INSTEAD OF JUST ‘set $MAGE_ROOT /home/teddy/Documents/works/mce230-pwa’. SO PWA THEME CAN DISPLAY THE CATEGORY & PRODUCTS IMAGE!
Enable file config

Register the host on my system

Like this:

CHECK THE NGINX SETTING AND RESTART IT:

Set file permission and owner:

Because the installation is already done by composer, then compile!

Give it a try! the frontend: https://mce230-pwa.test/ –> No product displayed because I didn’t install the sample data!
and the backend: https://mce230-pwa.test/admin_magento
user: admin
password: admin123

Now is the steps for installing PWA Studio.
clone it from the repository on current magento 2.3.0 root directory

You will see the pwa-studio directory in /mce230-pwa
Enter into this directoy:

Then run ‘yarn install’. It recommended to use it than ‘npm install’

Then Specify the Magento backend server in .env file. you can see the .env.dist file in
/mce230-wa/pwa-studio/packages/venia-concept/ directory. If you are not
able see, enable show hidden files. Now create .env file from this env.dist

Open this .env file and find MAGENTO_BACKEND_URL. Here configure your local Magento 2.3 instance, my case it is:

Now install sample data for venia-theme to make it good looking. Find the deployVeniaSampleData.sh file in
/mce230-pwa/pwa-studio/packages/venia-concept/ directory. and copy this file in your Magento root directory. Now it must look like
/mce230-pwa/deployVeniaSampleData.sh Now run:

This was tricky because I need several times to make it works. I also need to create a new file ‘auth.json’ and put it in the mce230-pwa directory because I got this error : ‘Could not authenticate against github.com’. ref is here https://www.bountysource.com/issues/64327845-add-shell-script-to-install-venia-sample-data-modules-via-composer. This error can be fixed with providing the github personal api token (https://github.blog/2013-05-16-personal-api-tokens/). So to get the token, go to your github account (https://github.com/settings/tokens) then generate ‘personal access token’. For the scopes, I think I need to select one or all of the options. At first, I didn’t select any scope and the bash script didn’t work. Then I selected all of them and the bash script worked again!. After you got the token, put it in auth.json file. Here is auth.json file content:

Replace “xxxxx” with your github personal access token!
SORRY, ONLY ADMIN CAN SHOW THIS!

<ERROR_I_GOT_PREVIOUSLY>
The problem when I forgot to provide the magento 2.3 root directory

The problem when I should create auth.json (https://www.bountysource.com/issues/64327845-add-shell-script-to-install-venia-sample-data-modules-via-composer)

</ERROR_I_GOT_PREVIOUSLY>

OK. After successful installation compile again:

Then I opened the frontend https://mce230-pwa.test –> No product on the homepage
Then I found some venia products on the links like on https://mce230-pwa.test/venia-accessories.html
But the products image CAN’T BE DISPLAYED!
The images refer to the cache directory in /mce230-pwa/pub/media/catalog/product/cache
I can fix this problem by regenerating the images (https://magento.stackexchange.com/questions/175224/regenerate-catalog-cache-images-issues). So I run

WARNING: It’d take a long time to complete it depend on how many the images and the computer resource. To regenerate the images in the sample venia theme on my pc, it took almost 30 minutes for 1287 products!

But I can’t find ‘venia’ theme on the admin page! I tried to create the symlink like

or just copied ‘/pwa-studio/packages/venia-concept’ into ‘app/design/frontend/Magento’ then rename ‘venia-concept’ to ‘venia’. But none of them display the venia theme in the admin themes content! –> NEED TO LEARN THIS LATER!

Then go back to pwa-studio directory /mce230-pwa/pwa-studio and
start Server. I run ‘yarn run build’ instead of ‘npm run build’. But before running this command, make sure the magento mode is developer.

Then run ‘yarn run build’

Need to recompile again if needed (NO NEED!)

Run server, Use any of the following commands from the project root directory to start: yarn run watch:venia

OR run ‘yarn run watch:all’

Then open it on your browser: https://magento-venia-concept-2hrkd.local.pwadev:8328/
OK. But it can’t show the products image!!!
Temporary solution for this problem is COPY THE CATEGORY AND PRODUCT IMAGES IN CATALOG DIR FROM pub/media/catalog TO the magento root directory –> NOT GOOD IF THERE IS NEW PRODUCT AND IMAGE! SO HERE IS THE BETTER WAY! SET MAGENTO ROOT DIRECTORY TO ‘pub’ DIR. MODIFY nginx CONFIG FILE

THEN MODIFY $MAGE_ROOT FROM

TO

I THINK IT NEED TO RECOMPILE!

<ERROR_IF_PWA_NOT_SSL>

It need SSL!
</ERROR_IF_PWA_NOT_SSL>

Install Magento 2.3 on Ubuntu 16.04 and Nginx

  1. Download the magento 2.3 with sample data from this link: https://magento.com/tech-resources/download
    I download the file Magento-CE-2.3.0_sample_data-2018-11-27-10-26-20.tar.bz2
  2. Extract the zip or tar.bz2 file to the web root. I extract the file into mce230 directory
  3. Check the php version (CLI and PHP-FPM). Make sure php version is 7.2

    change it to php 7.2

    check again

    Also check the php-fpm version: http://localhost:8080/phpinfo.php
    If not php 7.2, change it like this:

    Modify to enable php7.2-fpm

    Then save and restart nginx server.
    check again the php-fpm version: http://localhost:8080/phpinfo.php
    Now it’s PHP Version 7.2.14-1+ubuntu16.04.1+deb.sury.org+1
    NOTE: I foundSOME EXTENSIONS ARE MISSING. SO INSTALL THEM

     
  4. Create the config file

    Here is the content:

     
  5. Enable file config

     
  6. Register the host on my system

    Like this:

     
  7. CHECK THE NGINX SETTING AND RESTART IT:

     
  8. Set file permission and owner:

    Then

     
  9. Run the first installation: http://mce230.test
    It’d be redirected to http://mce230.test/setup/#/landing-install
    NOTE: Don’t forget to create a new database ‘mce230’ with utf8-general-ci via phpmyadmin (http://phpmyadmin.test:8080)
    OK. So here is My Store Address : http://mce230.test/
    and Magento Admin Address: http://mce230.test/admin_cereoy
    SORRY, ONLY ADMIN CAN SHOW THIS!

NOTE: Don’t forget to compile after finishing the installation. If not, you’d get the ugly page.


DONE

BUGS:
Sometimes the product images can’t be displayed! I tried to recompile with all the above commands but no avail
Solution: I need to resize the product images

I think no need to wait until 100% to resize the images! because it’d take a long time. just refresh the page if you think if the process is already pretty long

TO DISABLE THE CODE PROFILER ON THE M2 PAGE, MODIFY THE NGINX FILE (sudo gedit /etc/nginx/sites-available/mce230.test) THEN SET:

THEN RESTART NGINX SERVER: sudo service nginx reload


Install Redis and Combine With Varnish and Nginx for M2 On Ubuntu 16.04

Ref: https://www.digitalocean.com/community/tutorials/how-to-install-and-configure-redis-on-ubuntu-16-04
https://www.digitalocean.com/community/tutorials/how-to-install-and-secure-redis-on-ubuntu-18-04

Install Redis Server

Then modify /etc/redis/redis.conf file. In the file, find the supervised directive. Currently, this is set to no. Since we are running an operating system that uses the systemd init system, we can change this to systemd:

Next, find the dir directory. This option specifies the directory that Redis will use to dump persistent data. We need to pick a location that Redis will have write permission and that isn’t viewable by normal users.

We will use the /var/lib/redis directory for this, which we will create in a moment:

Save and close the file when you are finished.

Create a Redis systemd Unit File
Next, we can create a systemd unit file so that the init system can manage the Redis process.

Create and open the /etc/systemd/system/redis.service file to get started:

Inside, we can begin the [Unit] section by adding a description and defining a requirement that networking be available before starting this service. In the [Service] section, we need to specify the service’s behavior. For security purposes, we should not run our service as root. We should use a dedicated user and group, which we will call redis for simplicity. We will create these momentarily.

To start the service, we just need to call the redis-server binary, pointed at our configuration. To stop it, we can use the Redis shutdown command, which can be executed with the redis-cli binary. Also, since we want Redis to recover from failures when possible, we will set the Restart directive to “always”. Finally, in the [Install] section, we can define the systemd target that the service should attach to if enabled (configured to start at boot):
<DONT USE THIS SETTING>

</DONT USE THIS SETTING>

<USE THIS SETTING>

</USE THIS SETTING>
Save and close the file when you are finished. After saving and closing the file, I reloaded the systemd manager configuration:

Create the Redis User, Group and Directories
Now, we just have to create the user, group, and directory that we referenced in the previous two files.

Begin by creating the redis user and group. This can be done in a single command by typing:

Now, we can create the /var/lib/redis directory by typing:

We should give the redis user and group ownership over this directory:

Adjust the permissions so that regular users cannot access this location:

Start and Test Redis
Now, we are ready to start the Redis server.

Start the Redis Service

Check that the service had no errors by running:

I got the below error previously because the wrong setting in the redis.service file.

Check it on the terminal

Or make sure port 6379 only be using by redis

Test the Redis Instance Functionality
To test that your service is functioning correctly, connect to the Redis server with the command-line client:

Check that you can set keys by typing:

Enable Redis to Start at Boot
If all of your tests worked, and you would like to start Redis automatically when your server boots, you can enable the systemd service.

To do so, type:

Go to your magento root directory and open app/etc/env.php and add the below codes just before the last line.

Restart the Redis server

Check whether Redis server is working or not. Open your website and view some pages then  run the command

If you see this  keyspace. Then your Redis is configured properly. If you do not see anything below Keyspace then Redis have not cached anything. In this case check your configuration

To flush the Redis cache run the following command

Now your site is optimized with Varnish and Redis.

Benchmark
When I open https://fontaineind.test/ for the first time (varnish after fresh restart still caching so the page load still slower and redis also after first restart and flushdb command executed). I got this from redis-cli info:

Then I refresh the same page (varnish cache is kicking off and redis as well). I noticed the page load faster than only from varnish. But not much. Probably from 10-12 seconds to 8-9 seconds. Here is the output from redis-cli info:

I need to analyze these later.

Configure Varnish, SSL, Nginx and Magento 2 On Ubuntu 16.04

Ref: https://blog.hauri.me/magento-2-with-varnish-and-nginx-as-ssl-termination.html
https://www.absolute-design.co.uk/services/magento-ecommerce/using-nginx-for-ssl-termination-with-varnish-and-magento-2/
https://linuxize.com/post/configure-magento-2-to-use-varnish-on-centos-7/
https://www.digitalocean.com/community/tutorials/how-to-configure-nginx-with-ssl-as-a-reverse-proxy-for-jenkins

On a few last articles, I wrote about the Varnish and Nginx configuration also Self-signed certificate. Now I want to combine them all on my local magento 2 website https://fontaineind.test/. When I run the site, the varnish is not working. I need to configure it (and Nginx) to make it working again.

From many articles I found Varnish can’t work with SSL. Varnish does not support SSL, so we need to use another service as an SSL Termination Proxy, in our case that will be Nginx.

When a visitor opens your website over HTTPS on port 443 the request will be handled by Nginx which works as a proxy and passes the request to Varnish (on port 6081). Varnish checks if the request is cached or not. If it is cached, Varnish will return the cached data to Nginx without a request to the Magento application. If the request is not cached Varnish will pass the request to Nginx on port 8080 which will pull data from Magento and Varnish will cache the response.
If a visitor opens your website without SSL on port 80 then he will be redirected to the HTTPS on port 443 URL by Varnish. So here is the topology
I need to change the Varnish port back to 6081 because I need to redirect HTTP port 80 to HTTPS port 443. (This article said I can still use port 80 for varnish: https://medium.com/magebit/magento-2-full-ssl-with-varnish-d2cfed3d7df also https://www.getpagespeed.com/web-apps/magento/magento-2-nginx-config-ssl-termination-varnish) But I keep the nginx port to 8080. So modify /etc/default/varnish file like this:

Then also modify /etc/systemd/system/varnish.service file to change the varnish port back to 6081

Then modify /etc/varnish/default.vcl

I use host “fontaineind.test” here because I have many local websites. Usually it’s enough to use “localhost”. Port 8080 is the nginx port as the backend server. After saving the changes, I need to restart varnish server:

Don’t forget to verify the varnish port is 6081 now. Just see it by typing

Then I need to modify also the nginx setting for fontaineind.test.

Modify it like this:

So if the user use non-https (port 80) url like http://fontaineind.test/, It’d be redirected permanently (301) to https url like https://fontaineind.test/. Please see

Then if the user entering the https site (port 443), it’d use varnish proxy (port 6081)

If the page request is already exist in the varnish cache, it’d be returned immediately. But if not, it’d look it in the backend server (nginx port 8080).

This is very tricky. Because I use many local website, I have to use ‘listen fontaineind.test:8080;’ instead of just ‘listen 8080;’. It must same with the backend host in /etc/varnish/default.vcl.
NOTE: Somehow the other local websites would be redirected to fontaineind.test. So if I open for example phpmyadmin.test:8080. It’d be redirected to fontaineind.test. This is not expected. So If I want to open phpmyadmin, I need to stop varnish then change ‘listen fontaineind.test:8080;’ to ‘listen 8080;’. I still dont know how to solve this problem.

Don’t forget to modify env.php file in magento root (app/etc/env.php) like this:

So now varnish is working with SSL. Here is the response header on https://fontaineind.test/ (after first refresh)

You can see ‘Age’ and ‘x-varnish’ values.

Create Self-Signed Certificate With Nginx On Ubuntu 16.04

Ref: https://www.humankode.com/ssl/create-a-selfsigned-certificate-for-nginx-in-5-minutes
https://www.digitalocean.com/community/tutorials/how-to-create-a-self-signed-ssl-certificate-for-nginx-in-ubuntu-16-04

In this tutorial, I’m going to show you how you can create a self-signed SSL/TLS certificate and use it on Nginx in 5 minutes or less. I’m using Ubuntu for this tutorial, but if you’re on Mac OSX you can follow along as the syntax and commands are nearly identical.

Why Create a Self-Signed Certificate?
Self-signed certificates are useful for local development where you want to simulate an HTTPS environment. Take note that self-signed certificates are not meant for production, but they are ideal for localhost development.

An Overview of Creating a Self-Signed Certificate
Before continuing, let’s take a step back and look at the steps involved in generating a self-signed certificate for Nginx:

Generate a self-signed certificate using OpenSSL
Copy the certificate to the certificates folder on Ubuntu
Update the Nginx configuration file to load the certificate
Copy the certificate’s public key to the CA trusted root database to prevent Google Chrome from showing the site as insecure

Step 1: Generate a Self-Signed Certificate using OpenSSL
I’ll use OpenSSL to generate the certificate on Ubuntu. OpenSSL is installed on Mac OSX by default and the commands are exactly the same.

OpenSSL will generate 2 files which consist of a private key and a public key. Even though most people refer to an SSL/TLS certificate in the singular sense, it is the combination of the private key and the public key that makes a certificate.

Before running the OpenSSL command to generate a self-signed certificate, I’m going to create a certificate configuration file that will specify the certificate bits and the Subject Alternative Names. The Subject Alt Names are required in Google Chrome 58 and later, and is used to match the domain name and the certificate. If the domain name is not listed in the certificate’s Subject Alternative Names list, you’ll get a NET::ERR_CERT_COMMON_NAME_INVALID error message.

Create the Certificate Configuration File

I want to make a self-signed certificate for my local magento 2 site. The site is fontaineind.test
Here is the content of fontaineind.test.conf file:

Create the Certificate using OpenSSL

Here is the terminal output. For the inputs on the terminal asking like country name, etc, just click enter key to accept the default values:

It’ll create two new files. There are fontaineind.test.crt and fontaineind.test.key:

Step 2: Copy the Certificate Key Pair to the Certificates folder on Ubuntu
Copy the public key to the /etc/ssl/certs directory

Copy the private key to the /etc/ssl/private directory

Step 3: Update the Nginx Configuration File to Load the Certificate Key Pair

Change it like this:

Reload the Nginx configuration changes

Then don’t forget to change the secure url on the database. Just find it :

Change ‘http’ to ‘https’ for ‘web/secure/base_url’ and ‘web/secure/base_link_url’

NOTE: It’d be better to change to https also for ‘unsecure’ url
Open up the Google Chrome to Verify that Nginx Loads the Site Over HTTP and HTTPS
Since I haven’t added the self-signed certificate to Chrome’s CA Root store, Chrome shows the site as insecure. Click proceed to fontaineind.test to verify that Nginx is correctly configured
open: https://fontaineind.test/Step 4: Configure Chrome to Trust the Certificate and to Show the Site as Secure
Add the certificate to the trusted CA root store but need to check if ‘certutil’ if exist. If not install it with sudo apt install libnss3-tools:

Then run this on the terminal:

Close all the Google Chrome windows and reopen. Chrome is now showing the site as secure.Now I want to redirect all connection from http to https.
Make sure you changed the ‘unsecure’ url on the database to use https instead. Then modify the nginx setting for fontaineind.test

Then change like this:

Reload the nginx server. But if you check the nginx config setting, it’d show error like this:

It shows error about the certificate. Probably because it’s a self-signed certificate. Anyway we can ignore it on the development stage. If you open http://fontaineind.test:8080, it’d be redirected to https://fontaineind.test
So all good.

Install and Configure Varnish for Nginx and Magento 2 on Ubuntu 16.04

Ref:https://blog.pusher.com/speeding-up-your-website-using-varnish/
https://www.cyberciti.biz/faq/how-to-install-and-configure-varnish-cache-on-ubuntu-linux-16-04-lts/
https://www.howtoforge.com/tutorial/ubuntu-nginx-varnish/
https://amasty.com/blog/use-varnish-with-magento-2-for-better-end-user-experience/

Install Varnish:

Start/stop/restart the varnish service:

Check the varnish status (when active):

Varnish installed and it is a default configured to listen on port 6081 and 6082 for varnish admin:

When we open on the browser: http://localhost:6081/, we’d get a varnish error pageHowever http://localhost:6082/ will show page error.
We will be changing this so it listens on port 80 (fontaineind use the default port 6081 for varnish)  and Nginx listens on port 8080. To do this, edit your site’s Nginx configuration file. In our case, this file is /etc/nginx/sites-available/fontaineind.test.

modify

Save the file. Then restart nginx server:

When you open your website with the port 8080, http://fontaineind.test:8080, It’d show the website but the css seems missing! I think I need to clear the cache and rebuild the cache. but it show an expected error.

Another error when trying to show the magento 2 command:

Solution: THIS IS BECAUSE I USE PHP 7.2. CHANGE IT TO PHP 7.0

Then the magento 2 command is running well back.

also probably I need to change the base url to include the port 8080? –> NO NEED. we will take it later. Let’s continue.

Now that port 80 is free (NO. I NEED TO CHECK IT VIA sudo netstat -plntu | grep ‘:80’), let’s configure Varnish to be the one that responds. Open the file /etc/default/varnish for editing. Here is the default content.

Look for the line below:

change ‘-a :6081’ to ‘-a :80’:

Save the file.
NOTE: I also can change the malloc. malloc is RAM usage for Varnish. Default is 256m. I can change it to (for example) 1024m (1G)

Next, open the file /etc/varnish/default.vcl and check that the default backend is set to port 8080, because this is where Nginx serves from now. Look for the line below and make sure the .port is 8080. Here is the default content:

NOTE: For the explanation of vcl_recv, vcl_backend_response and vcl_deliver, pls read https://amasty.com/blog/use-varnish-with-magento-2-for-better-end-user-experience/
make sure the backend port is 8080

Once you have confirmed this, the next thing will be to copy the varnish.service file to our systemd directory. This will enable systemd to start varnish on port 80. Run the command below:

This will copy the varnish service file, and then open an editor with the contents.

Look for the ExecStart line:

Now change the -F -a :6081 to -F -a :80. Leave the localhost:6082 on the same line as it is. Now save and exit the file. Run the commands below to reload everything you have just configured:

The commands above will reload the system daemon, reload varnish, restart the varnish service, and restart Nginx.
NOTE: I need to check the varnish status as well. Varnish can’t start because port 80 already is use:

Check who is using port 80:

it seems nginx with pid 19110 is using both port 80 and 8080. or here is the complete list:

Solution: nginx use both ports 80 and 8080 because in sites-enabled directory there are many nginx setting for different websites that it still use port 80.

SO. REPLACE THE PORT 80 TO 8080 FOR ALL WEBSITE IN SITES-ENABLES DIRECTORY!!!
AFTER I CHANGED THE PORT IN ALL THE WEBSITE, NO MORE APPLICATION USE PORT 80 ANYMORE

OR

Nginx is using port 8080 now. I can start varnish and check the status:

NOTE: TO RUN THE OTHERS RUNNING WEBSITE (WITHOUT VARNISH RUINNING) THAT IT HAD BEEN WORKING PREVIOUSLY, I NEED TO ADD THE PORT 8080 AT THE END OF THE URL. FOR EXAMPLE:
http://localhost:8080/phpinfo.php
http://notarisfemira.test:8080/
http://phpmyadmin.test:8080

Now visit the IP of your web page and you should see nothing has changed. However, when you run it through the HTTP checker we used before, you should see that the headers have changed.
http://fontaineind.test/ –> First time run about 20 seconds

The second run (refresh) about 9 seconds

NOTE: I can see some variables like X-Varnish and Age. But why Age still 0 on the refresh page? It means it miss the cache.
In magento, I already enabled Page Cache and Block HTML cache.

Configure Magento to use Varnish
To configure Magento to use Varnish:

Log in to the Magento Admin as an administrator.
Click STORES > Configuration > ADVANCED > System > Full Page Cache.
From the Caching Application list, click Varnish Cache (recommended).
Enter a value in the TTL for public content field.
Expand Varnish Configuration and enter the following information:
Access list: localhost   –> 172.31.31.224 for fontaineind.com.au
Backend host: localhost   –> 172.31.31.224 for fontaineind.com.au
Backend port: 8080
Then click a button ‘Export VCL for Varnish 4’ -> It’d create a file ‘varnish.vcl’ and download it.
Here is the file content:

SO I need to modify the content of /etc/varnish/default.vcl according to this varnish.vcl.

Just copy and paste all content of varnish.vcl to all content in /etc/varnish/default.vcl. Then restart varnish: sudo service varnish restart
NOTE: IN THE DEV SERVER, I PREFER TO DISPLAY THE X-VARNISH AND AGE VARIABLES. SO I MODIFIED /etc/varnish/default.vcl LIKE THIS:

I also modified /home/teddy/Documents/works/fontaineind/app/etc/env.php to include the varnish setting:

clear and flush the cache. BUT Age still 0 !!!! EVEN WEIRDS, WHEN I CHANGED IN THE MAGENTO ADMIN THAT CACHE APPLICATION IS VARNISH THEN REFRESH THE WEBSITE (ALSO RESTART VARNISH), I GOT THE PAGE LOAD SLOWER!!! WHY?? –> SOLUTION: I NEED TO EXPORT VCL FILE LIKE ABOVE AND COPY THE CONTENT INTO /etc/varnish/default.vcl

NOW THE VARNISH IS WORKING!!!
THE SECOND AND MORE REFRESH WOULD MAKE THE PAGE LOAD FASTER. HERE IS THE RESPONSE:

SEE THE AGE = 42 AND X-Varnish: 131131 3