teddy@teddy-K43SJ:~/Documents/cpp/tesseract$ make training
make
make[1]: Entering directory `/home/teddy/Documents/cpp/tesseract'
make all-recursive
make[2]: Entering directory `/home/teddy/Documents/cpp/tesseract'
Making all in arch
make[3]: Entering directory `/home/teddy/Documents/cpp/tesseract/arch'
make[4]: Entering directory `/home/teddy/Documents/cpp/tesseract/arch'
make[4]: Nothing to be done for `all-am'.
make[4]: Leaving directory `/home/teddy/Documents/cpp/tesseract/arch'
make[3]: Leaving directory `/home/teddy/Documents/cpp/tesseract/arch'
Making all in ccutil
make[3]: Entering directory `/home/teddy/Documents/cpp/tesseract/ccutil'
make[4]: Entering directory `/home/teddy/Documents/cpp/tesseract/ccutil'
make[4]: Nothing to be done for `all-am'.
make[4]: Leaving directory `/home/teddy/Documents/cpp/tesseract/ccutil'
make[3]: Leaving directory `/home/teddy/Documents/cpp/tesseract/ccutil'
Making all in viewer
make[3]: Entering directory `/home/teddy/Documents/cpp/tesseract/viewer'
make[3]: Nothing to be done for `all'.
make[3]: Leaving directory `/home/teddy/Documents/cpp/tesseract/viewer'
Making all in cutil
make[3]: Entering directory `/home/teddy/Documents/cpp/tesseract/cutil'
make[3]: Nothing to be done for `all'.
make[3]: Leaving directory `/home/teddy/Documents/cpp/tesseract/cutil'
Making all in opencl
make[3]: Entering directory `/home/teddy/Documents/cpp/tesseract/opencl'
make[3]: Nothing to be done for `all'.
make[3]: Leaving directory `/home/teddy/Documents/cpp/tesseract/opencl'
Making all in ccstruct
make[3]: Entering directory `/home/teddy/Documents/cpp/tesseract/ccstruct'
make[3]: Nothing to be done for `all'.
make[3]: Leaving directory `/home/teddy/Documents/cpp/tesseract/ccstruct'
Making all in dict
make[3]: Entering directory `/home/teddy/Documents/cpp/tesseract/dict'
make[3]: Nothing to be done for `all'.
make[3]: Leaving directory `/home/teddy/Documents/cpp/tesseract/dict'
Making all in classify
make[3]: Entering directory `/home/teddy/Documents/cpp/tesseract/classify'
make[3]: Nothing to be done for `all'.
make[3]: Leaving directory `/home/teddy/Documents/cpp/tesseract/classify'
Making all in wordrec
make[3]: Entering directory `/home/teddy/Documents/cpp/tesseract/wordrec'
make[3]: Nothing to be done for `all'.
make[3]: Leaving directory `/home/teddy/Documents/cpp/tesseract/wordrec'
Making all in textord
make[3]: Entering directory `/home/teddy/Documents/cpp/tesseract/textord'
make[3]: Nothing to be done for `all'.
make[3]: Leaving directory `/home/teddy/Documents/cpp/tesseract/textord'
Making all in lstm
make[3]: Entering directory `/home/teddy/Documents/cpp/tesseract/lstm'
make[4]: Entering directory `/home/teddy/Documents/cpp/tesseract/lstm'
make[4]: Nothing to be done for `all-am'.
make[4]: Leaving directory `/home/teddy/Documents/cpp/tesseract/lstm'
make[3]: Leaving directory `/home/teddy/Documents/cpp/tesseract/lstm'
Making all in ccmain
make[3]: Entering directory `/home/teddy/Documents/cpp/tesseract/ccmain'
make[3]: Nothing to be done for `all'.
make[3]: Leaving directory `/home/teddy/Documents/cpp/tesseract/ccmain'
Making all in api
make[3]: Entering directory `/home/teddy/Documents/cpp/tesseract/api'
make[3]: Nothing to be done for `all'.
make[3]: Leaving directory `/home/teddy/Documents/cpp/tesseract/api'
Making all in .
make[3]: Entering directory `/home/teddy/Documents/cpp/tesseract'
make[3]: Leaving directory `/home/teddy/Documents/cpp/tesseract'
Making all in tessdata
make[3]: Entering directory `/home/teddy/Documents/cpp/tesseract/tessdata'
Making all in configs
make[4]: Entering directory `/home/teddy/Documents/cpp/tesseract/tessdata/configs'
make[4]: Nothing to be done for `all'.
make[4]: Leaving directory `/home/teddy/Documents/cpp/tesseract/tessdata/configs'
Making all in tessconfigs
make[4]: Entering directory `/home/teddy/Documents/cpp/tesseract/tessdata/tessconfigs'
make[4]: Nothing to be done for `all'.
make[4]: Leaving directory `/home/teddy/Documents/cpp/tesseract/tessdata/tessconfigs'
make[4]: Entering directory `/home/teddy/Documents/cpp/tesseract/tessdata'
make[4]: Nothing to be done for `all-am'.
make[4]: Leaving directory `/home/teddy/Documents/cpp/tesseract/tessdata'
make[3]: Leaving directory `/home/teddy/Documents/cpp/tesseract/tessdata'
Making all in doc
make[3]: Entering directory `/home/teddy/Documents/cpp/tesseract/doc'
make[3]: Nothing to be done for `all'.
make[3]: Leaving directory `/home/teddy/Documents/cpp/tesseract/doc'
make[2]: Leaving directory `/home/teddy/Documents/cpp/tesseract'
make[1]: Leaving directory `/home/teddy/Documents/cpp/tesseract'
make[1]: Entering directory `/home/teddy/Documents/cpp/tesseract/training'
depbase=`echo boxchar.lo | sed 's|[^/]*$|.deps/&|;s|\.lo$||'`;\
/bin/bash ../libtool --tag=CXX --mode=compile g++ -DHAVE_CONFIG_H -I. -I.. -g -Wall -O0 -DDEBUG -DUSE_STD_NAMESPACE -DPANGO_ENABLE_ENGINE -I../ccmain -I../api -I../ccutil -I../ccstruct -I../lstm -I../arch -I../viewer -I../textord -I../dict -I../classify -I../display -I../wordrec -I../cutil -I/usr/local/include/leptonica -pthread -I/usr/include/pango-1.0 -I/usr/include/glib-2.0 -I/usr/lib/x86_64-linux-gnu/glib-2.0/include -I/usr/include/cairo -I/usr/include/glib-2.0 -I/usr/lib/x86_64-linux-gnu/glib-2.0/include -I/usr/include/pixman-1 -I/usr/include/freetype2 -I/usr/include/libpng12 -g -O2 -std=c++11 -MT boxchar.lo -MD -MP -MF $depbase.Tpo -c -o boxchar.lo boxchar.cpp &&\
mv -f $depbase.Tpo $depbase.Plo
libtool: compile: g++ -DHAVE_CONFIG_H -I. -I.. -g -Wall -O0 -DDEBUG -DUSE_STD_NAMESPACE -DPANGO_ENABLE_ENGINE -I../ccmain -I../api -I../ccutil -I../ccstruct -I../lstm -I../arch -I../viewer -I../textord -I../dict -I../classify -I../display -I../wordrec -I../cutil -I/usr/local/include/leptonica -pthread -I/usr/include/pango-1.0 -I/usr/include/glib-2.0 -I/usr/lib/x86_64-linux-gnu/glib-2.0/include -I/usr/include/cairo -I/usr/include/glib-2.0 -I/usr/lib/x86_64-linux-gnu/glib-2.0/include -I/usr/include/pixman-1 -I/usr/include/freetype2 -I/usr/include/libpng12 -g -O2 -std=c++11 -MT boxchar.lo -MD -MP -MF .deps/boxchar.Tpo -c boxchar.cpp -fPIC -DPIC -o .libs/boxchar.o
boxchar.cpp: In static member function 'static void tesseract::BoxChar::TranslateBoxes(int, int, std::vector<tesseract::BoxChar*>*)':
boxchar.cpp:54:35: warning: comparison between signed and unsigned integer expressions [-Wsign-compare]
for (int i = 0; i < boxes->size(); ++i) {
^
boxchar.cpp: In static member function 'static void tesseract::BoxChar::PrepareToWrite(std::vector<tesseract::BoxChar*>*)':
boxchar.cpp:71:35: warning: comparison between signed and unsigned integer expressions [-Wsign-compare]
for (int i = 0; i < boxes->size(); ++i) {
^
boxchar.cpp: In static member function 'static void tesseract::BoxChar::InsertNewlines(bool, bool, std::vector<tesseract::BoxChar*>*)':
boxchar.cpp:85:35: warning: comparison between signed and unsigned integer expressions [-Wsign-compare]
for (int i = 0; i < boxes->size(); ++i) {
^
boxchar.cpp:88:64: warning: comparison between signed and unsigned integer expressions [-Wsign-compare]
if (prev_i < 0 || prev_i < i - 1 || i + 1 == boxes->size()) {
^
boxchar.cpp:94:49: warning: comparison between signed and unsigned integer expressions [-Wsign-compare]
} while (i >= 0 && i + 1 == boxes->size() &&
^
boxchar.cpp: In static member function 'static void tesseract::BoxChar::InsertSpaces(bool, bool, std::vector<tesseract::BoxChar*>*)':
boxchar.cpp:149:39: warning: comparison between signed and unsigned integer expressions [-Wsign-compare]
for (int i = 1; i + 1 < boxes->size(); ++i) {
^
boxchar.cpp:181:45: warning: comparison between signed and unsigned integer expressions [-Wsign-compare]
for (int j = i + 2; j < boxes->size() && (*boxes)[j]->box_ != nullptr &&
^
boxchar.cpp: In static member function 'static void tesseract::BoxChar::ReorderRTLText(std::vector<tesseract::BoxChar*>*)':
boxchar.cpp:207:43: warning: comparison between signed and unsigned integer expressions [-Wsign-compare]
for (int start = 0; start < boxes->size(); start = end + 1) {
^
boxchar.cpp:209:30: warning: comparison between signed and unsigned integer expressions [-Wsign-compare]
while (end < boxes->size() && (*boxes)[end]->ch_ != "\t") ++end;
^
boxchar.cpp: In static member function 'static bool tesseract::BoxChar::ContainsMostlyRTL(const std::vector<tesseract::BoxChar*>&)':
boxchar.cpp:218:34: warning: comparison between signed and unsigned integer expressions [-Wsign-compare]
for (int i = 0; i < boxes.size(); ++i) {
^
boxchar.cpp:224:46: warning: comparison between signed and unsigned integer expressions [-Wsign-compare]
for (int c = 0; c < boxes[i]->ch_.size(); ++c) {
^
boxchar.cpp: In static member function 'static bool tesseract::BoxChar::MostlyVertical(const std::vector<tesseract::BoxChar*>&)':
boxchar.cpp:247:34: warning: comparison between signed and unsigned integer expressions [-Wsign-compare]
for (int i = 1; i < boxes.size(); ++i) {
^
boxchar.cpp: In static member function 'static int tesseract::BoxChar::TotalByteLength(const std::vector<tesseract::BoxChar*>&)':
boxchar.cpp:266:34: warning: comparison between signed and unsigned integer expressions [-Wsign-compare]
for (int i = 0; i < boxes.size(); ++i) total_length += boxes[i]->ch_.size();
^
boxchar.cpp: In static member function 'static std::string tesseract::BoxChar::GetTesseractBoxStr(int, const std::vector<tesseract::BoxChar*>&)':
boxchar.cpp:305:34: warning: comparison between signed and unsigned integer expressions [-Wsign-compare]
for (int i = 0; i < boxes.size(); ++i) {
^
libtool: compile: g++ -DHAVE_CONFIG_H -I. -I.. -g -Wall -O0 -DDEBUG -DUSE_STD_NAMESPACE -DPANGO_ENABLE_ENGINE -I../ccmain -I../api -I../ccutil -I../ccstruct -I../lstm -I../arch -I../viewer -I../textord -I../dict -I../classify -I../display -I../wordrec -I../cutil -I/usr/local/include/leptonica -pthread -I/usr/include/pango-1.0 -I/usr/include/glib-2.0 -I/usr/lib/x86_64-linux-gnu/glib-2.0/include -I/usr/include/cairo -I/usr/include/glib-2.0 -I/usr/lib/x86_64-linux-gnu/glib-2.0/include -I/usr/include/pixman-1 -I/usr/include/freetype2 -I/usr/include/libpng12 -g -O2 -std=c++11 -MT boxchar.lo -MD -MP -MF .deps/boxchar.Tpo -c boxchar.cpp -o boxchar.o >/dev/null 2>&1
depbase=`echo commandlineflags.lo | sed 's|[^/]*$|.deps/&|;s|\.lo$||'`;\
/bin/bash ../libtool --tag=CXX --mode=compile g++ -DHAVE_CONFIG_H -I. -I.. -g -Wall -O0 -DDEBUG -DUSE_STD_NAMESPACE -DPANGO_ENABLE_ENGINE -I../ccmain -I../api -I../ccutil -I../ccstruct -I../lstm -I../arch -I../viewer -I../textord -I../dict -I../classify -I../display -I../wordrec -I../cutil -I/usr/local/include/leptonica -pthread -I/usr/include/pango-1.0 -I/usr/include/glib-2.0 -I/usr/lib/x86_64-linux-gnu/glib-2.0/include -I/usr/include/cairo -I/usr/include/glib-2.0 -I/usr/lib/x86_64-linux-gnu/glib-2.0/include -I/usr/include/pixman-1 -I/usr/include/freetype2 -I/usr/include/libpng12 -g -O2 -std=c++11 -MT commandlineflags.lo -MD -MP -MF $depbase.Tpo -c -o commandlineflags.lo commandlineflags.cpp &&\
mv -f $depbase.Tpo $depbase.Plo
libtool: compile: g++ -DHAVE_CONFIG_H -I. -I.. -g -Wall -O0 -DDEBUG -DUSE_STD_NAMESPACE -DPANGO_ENABLE_ENGINE -I../ccmain -I../api -I../ccutil -I../ccstruct -I../lstm -I../arch -I../viewer -I../textord -I../dict -I../classify -I../display -I../wordrec -I../cutil -I/usr/local/include/leptonica -pthread -I/usr/include/pango-1.0 -I/usr/include/glib-2.0 -I/usr/lib/x86_64-linux-gnu/glib-2.0/include -I/usr/include/cairo -I/usr/include/glib-2.0 -I/usr/lib/x86_64-linux-gnu/glib-2.0/include -I/usr/include/pixman-1 -I/usr/include/freetype2 -I/usr/include/libpng12 -g -O2 -std=c++11 -MT commandlineflags.lo -MD -MP -MF .deps/commandlineflags.Tpo -c commandlineflags.cpp -fPIC -DPIC -o .libs/commandlineflags.o
commandlineflags.cpp: In function 'void tesseract::ParseCommandLineFlags(const char*, int*, char***, bool)':
commandlineflags.cpp:163:20: warning: comparison between signed and unsigned integer expressions [-Wsign-compare]
for (i = 1; i < *argc; ++i) {
^
commandlineflags.cpp:217:23: warning: comparison between signed and unsigned integer expressions [-Wsign-compare]
if (i + 1 >= *argc) {
^
commandlineflags.cpp:249:23: warning: comparison between signed and unsigned integer expressions [-Wsign-compare]
if (i + 1 >= *argc) {
^
commandlineflags.cpp:298:23: warning: comparison between signed and unsigned integer expressions [-Wsign-compare]
if (i + 1 >= *argc) {
^
libtool: compile: g++ -DHAVE_CONFIG_H -I. -I.. -g -Wall -O0 -DDEBUG -DUSE_STD_NAMESPACE -DPANGO_ENABLE_ENGINE -I../ccmain -I../api -I../ccutil -I../ccstruct -I../lstm -I../arch -I../viewer -I../textord -I../dict -I../classify -I../display -I../wordrec -I../cutil -I/usr/local/include/leptonica -pthread -I/usr/include/pango-1.0 -I/usr/include/glib-2.0 -I/usr/lib/x86_64-linux-gnu/glib-2.0/include -I/usr/include/cairo -I/usr/include/glib-2.0 -I/usr/lib/x86_64-linux-gnu/glib-2.0/include -I/usr/include/pixman-1 -I/usr/include/freetype2 -I/usr/include/libpng12 -g -O2 -std=c++11 -MT commandlineflags.lo -MD -MP -MF .deps/commandlineflags.Tpo -c commandlineflags.cpp -o commandlineflags.o >/dev/null 2>&1
depbase=`echo commontraining.lo | sed 's|[^/]*$|.deps/&|;s|\.lo$||'`;\
/bin/bash ../libtool --tag=CXX --mode=compile g++ -DHAVE_CONFIG_H -I. -I.. -g -Wall -O0 -DDEBUG -DUSE_STD_NAMESPACE -DPANGO_ENABLE_ENGINE -I../ccmain -I../api -I../ccutil -I../ccstruct -I../lstm -I../arch -I../viewer -I../textord -I../dict -I../classify -I../display -I../wordrec -I../cutil -I/usr/local/include/leptonica -pthread -I/usr/include/pango-1.0 -I/usr/include/glib-2.0 -I/usr/lib/x86_64-linux-gnu/glib-2.0/include -I/usr/include/cairo -I/usr/include/glib-2.0 -I/usr/lib/x86_64-linux-gnu/glib-2.0/include -I/usr/include/pixman-1 -I/usr/include/freetype2 -I/usr/include/libpng12 -g -O2 -std=c++11 -MT commontraining.lo -MD -MP -MF $depbase.Tpo -c -o commontraining.lo commontraining.cpp &&\
mv -f $depbase.Tpo $depbase.Plo
libtool: compile: g++ -DHAVE_CONFIG_H -I. -I.. -g -Wall -O0 -DDEBUG -DUSE_STD_NAMESPACE -DPANGO_ENABLE_ENGINE -I../ccmain -I../api -I../ccutil -I../ccstruct -I../lstm -I../arch -I../viewer -I../textord -I../dict -I../classify -I../display -I../wordrec -I../cutil -I/usr/local/include/leptonica -pthread -I/usr/include/pango-1.0 -I/usr/include/glib-2.0 -I/usr/lib/x86_64-linux-gnu/glib-2.0/include -I/usr/include/cairo -I/usr/include/glib-2.0 -I/usr/lib/x86_64-linux-gnu/glib-2.0/include -I/usr/include/pixman-1 -I/usr/include/freetype2 -I/usr/include/libpng12 -g -O2 -std=c++11 -MT commontraining.lo -MD -MP -MF .deps/commontraining.Tpo -c commontraining.cpp -fPIC -DPIC -o .libs/commontraining.o
commontraining.cpp: In function 'void ReadTrainingSamples(const FEATURE_DEFS_STRUCT&, const char*, int, UNICHARSET*, FILE*, list_rec**)':
commontraining.cpp:430:32: warning: comparison between signed and unsigned integer expressions [-Wsign-compare]
for (i = 0; i < char_desc->NumFeatureSets; i++) {
^
libtool: compile: g++ -DHAVE_CONFIG_H -I. -I.. -g -Wall -O0 -DDEBUG -DUSE_STD_NAMESPACE -DPANGO_ENABLE_ENGINE -I../ccmain -I../api -I../ccutil -I../ccstruct -I../lstm -I../arch -I../viewer -I../textord -I../dict -I../classify -I../display -I../wordrec -I../cutil -I/usr/local/include/leptonica -pthread -I/usr/include/pango-1.0 -I/usr/include/glib-2.0 -I/usr/lib/x86_64-linux-gnu/glib-2.0/include -I/usr/include/cairo -I/usr/include/glib-2.0 -I/usr/lib/x86_64-linux-gnu/glib-2.0/include -I/usr/include/pixman-1 -I/usr/include/freetype2 -I/usr/include/libpng12 -g -O2 -std=c++11 -MT commontraining.lo -MD -MP -MF .deps/commontraining.Tpo -c commontraining.cpp -o commontraining.o >/dev/null 2>&1
depbase=`echo degradeimage.lo | sed 's|[^/]*$|.deps/&|;s|\.lo$||'`;\
/bin/bash ../libtool --tag=CXX --mode=compile g++ -DHAVE_CONFIG_H -I. -I.. -g -Wall -O0 -DDEBUG -DUSE_STD_NAMESPACE -DPANGO_ENABLE_ENGINE -I../ccmain -I../api -I../ccutil -I../ccstruct -I../lstm -I../arch -I../viewer -I../textord -I../dict -I../classify -I../display -I../wordrec -I../cutil -I/usr/local/include/leptonica -pthread -I/usr/include/pango-1.0 -I/usr/include/glib-2.0 -I/usr/lib/x86_64-linux-gnu/glib-2.0/include -I/usr/include/cairo -I/usr/include/glib-2.0 -I/usr/lib/x86_64-linux-gnu/glib-2.0/include -I/usr/include/pixman-1 -I/usr/include/freetype2 -I/usr/include/libpng12 -g -O2 -std=c++11 -MT degradeimage.lo -MD -MP -MF $depbase.Tpo -c -o degradeimage.lo degradeimage.cpp &&\
mv -f $depbase.Tpo $depbase.Plo
libtool: compile: g++ -DHAVE_CONFIG_H -I. -I.. -g -Wall -O0 -DDEBUG -DUSE_STD_NAMESPACE -DPANGO_ENABLE_ENGINE -I../ccmain -I../api -I../ccutil -I../ccstruct -I../lstm -I../arch -I../viewer -I../textord -I../dict -I../classify -I../display -I../wordrec -I../cutil -I/usr/local/include/leptonica -pthread -I/usr/include/pango-1.0 -I/usr/include/glib-2.0 -I/usr/lib/x86_64-linux-gnu/glib-2.0/include -I/usr/include/cairo -I/usr/include/glib-2.0 -I/usr/lib/x86_64-linux-gnu/glib-2.0/include -I/usr/include/pixman-1 -I/usr/include/freetype2 -I/usr/include/libpng12 -g -O2 -std=c++11 -MT degradeimage.lo -MD -MP -MF .deps/degradeimage.Tpo -c degradeimage.cpp -fPIC -DPIC -o .libs/degradeimage.o
libtool: compile: g++ -DHAVE_CONFIG_H -I. -I.. -g -Wall -O0 -DDEBUG -DUSE_STD_NAMESPACE -DPANGO_ENABLE_ENGINE -I../ccmain -I../api -I../ccutil -I../ccstruct -I../lstm -I../arch -I../viewer -I../textord -I../dict -I../classify -I../display -I../wordrec -I../cutil -I/usr/local/include/leptonica -pthread -I/usr/include/pango-1.0 -I/usr/include/glib-2.0 -I/usr/lib/x86_64-linux-gnu/glib-2.0/include -I/usr/include/cairo -I/usr/include/glib-2.0 -I/usr/lib/x86_64-linux-gnu/glib-2.0/include -I/usr/include/pixman-1 -I/usr/include/freetype2 -I/usr/include/libpng12 -g -O2 -std=c++11 -MT degradeimage.lo -MD -MP -MF .deps/degradeimage.Tpo -c degradeimage.cpp -o degradeimage.o >/dev/null 2>&1
depbase=`echo fileio.lo | sed 's|[^/]*$|.deps/&|;s|\.lo$||'`;\
/bin/bash ../libtool --tag=CXX --mode=compile g++ -DHAVE_CONFIG_H -I. -I.. -g -Wall -O0 -DDEBUG -DUSE_STD_NAMESPACE -DPANGO_ENABLE_ENGINE -I../ccmain -I../api -I../ccutil -I../ccstruct -I../lstm -I../arch -I../viewer -I../textord -I../dict -I../classify -I../display -I../wordrec -I../cutil -I/usr/local/include/leptonica -pthread -I/usr/include/pango-1.0 -I/usr/include/glib-2.0 -I/usr/lib/x86_64-linux-gnu/glib-2.0/include -I/usr/include/cairo -I/usr/include/glib-2.0 -I/usr/lib/x86_64-linux-gnu/glib-2.0/include -I/usr/include/pixman-1 -I/usr/include/freetype2 -I/usr/include/libpng12 -g -O2 -std=c++11 -MT fileio.lo -MD -MP -MF $depbase.Tpo -c -o fileio.lo fileio.cpp &&\
mv -f $depbase.Tpo $depbase.Plo
libtool: compile: g++ -DHAVE_CONFIG_H -I. -I.. -g -Wall -O0 -DDEBUG -DUSE_STD_NAMESPACE -DPANGO_ENABLE_ENGINE -I../ccmain -I../api -I../ccutil -I../ccstruct -I../lstm -I../arch -I../viewer -I../textord -I../dict -I../classify -I../display -I../wordrec -I../cutil -I/usr/local/include/leptonica -pthread -I/usr/include/pango-1.0 -I/usr/include/glib-2.0 -I/usr/lib/x86_64-linux-gnu/glib-2.0/include -I/usr/include/cairo -I/usr/include/glib-2.0 -I/usr/lib/x86_64-linux-gnu/glib-2.0/include -I/usr/include/pixman-1 -I/usr/include/freetype2 -I/usr/include/libpng12 -g -O2 -std=c++11 -MT fileio.lo -MD -MP -MF .deps/fileio.Tpo -c fileio.cpp -fPIC -DPIC -o .libs/fileio.o
libtool: compile: g++ -DHAVE_CONFIG_H -I. -I.. -g -Wall -O0 -DDEBUG -DUSE_STD_NAMESPACE -DPANGO_ENABLE_ENGINE -I../ccmain -I../api -I../ccutil -I../ccstruct -I../lstm -I../arch -I../viewer -I../textord -I../dict -I../classify -I../display -I../wordrec -I../cutil -I/usr/local/include/leptonica -pthread -I/usr/include/pango-1.0 -I/usr/include/glib-2.0 -I/usr/lib/x86_64-linux-gnu/glib-2.0/include -I/usr/include/cairo -I/usr/include/glib-2.0 -I/usr/lib/x86_64-linux-gnu/glib-2.0/include -I/usr/include/pixman-1 -I/usr/include/freetype2 -I/usr/include/libpng12 -g -O2 -std=c++11 -MT fileio.lo -MD -MP -MF .deps/fileio.Tpo -c fileio.cpp -o fileio.o >/dev/null 2>&1
depbase=`echo ligature_table.lo | sed 's|[^/]*$|.deps/&|;s|\.lo$||'`;\
/bin/bash ../libtool --tag=CXX --mode=compile g++ -DHAVE_CONFIG_H -I. -I.. -g -Wall -O0 -DDEBUG -DUSE_STD_NAMESPACE -DPANGO_ENABLE_ENGINE -I../ccmain -I../api -I../ccutil -I../ccstruct -I../lstm -I../arch -I../viewer -I../textord -I../dict -I../classify -I../display -I../wordrec -I../cutil -I/usr/local/include/leptonica -pthread -I/usr/include/pango-1.0 -I/usr/include/glib-2.0 -I/usr/lib/x86_64-linux-gnu/glib-2.0/include -I/usr/include/cairo -I/usr/include/glib-2.0 -I/usr/lib/x86_64-linux-gnu/glib-2.0/include -I/usr/include/pixman-1 -I/usr/include/freetype2 -I/usr/include/libpng12 -g -O2 -std=c++11 -MT ligature_table.lo -MD -MP -MF $depbase.Tpo -c -o ligature_table.lo ligature_table.cpp &&\
mv -f $depbase.Tpo $depbase.Plo
libtool: compile: g++ -DHAVE_CONFIG_H -I. -I.. -g -Wall -O0 -DDEBUG -DUSE_STD_NAMESPACE -DPANGO_ENABLE_ENGINE -I../ccmain -I../api -I../ccutil -I../ccstruct -I../lstm -I../arch -I../viewer -I../textord -I../dict -I../classify -I../display -I../wordrec -I../cutil -I/usr/local/include/leptonica -pthread -I/usr/include/pango-1.0 -I/usr/include/glib-2.0 -I/usr/lib/x86_64-linux-gnu/glib-2.0/include -I/usr/include/cairo -I/usr/include/glib-2.0 -I/usr/lib/x86_64-linux-gnu/glib-2.0/include -I/usr/include/pixman-1 -I/usr/include/freetype2 -I/usr/include/libpng12 -g -O2 -std=c++11 -MT ligature_table.lo -MD -MP -MF .deps/ligature_table.Tpo -c ligature_table.cpp -fPIC -DPIC -o .libs/ligature_table.o
libtool: compile: g++ -DHAVE_CONFIG_H -I. -I.. -g -Wall -O0 -DDEBUG -DUSE_STD_NAMESPACE -DPANGO_ENABLE_ENGINE -I../ccmain -I../api -I../ccutil -I../ccstruct -I../lstm -I../arch -I../viewer -I../textord -I../dict -I../classify -I../display -I../wordrec -I../cutil -I/usr/local/include/leptonica -pthread -I/usr/include/pango-1.0 -I/usr/include/glib-2.0 -I/usr/lib/x86_64-linux-gnu/glib-2.0/include -I/usr/include/cairo -I/usr/include/glib-2.0 -I/usr/lib/x86_64-linux-gnu/glib-2.0/include -I/usr/include/pixman-1 -I/usr/include/freetype2 -I/usr/include/libpng12 -g -O2 -std=c++11 -MT ligature_table.lo -MD -MP -MF .deps/ligature_table.Tpo -c ligature_table.cpp -o ligature_table.o >/dev/null 2>&1
depbase=`echo lstmtester.lo | sed 's|[^/]*$|.deps/&|;s|\.lo$||'`;\
/bin/bash ../libtool --tag=CXX --mode=compile g++ -DHAVE_CONFIG_H -I. -I.. -g -Wall -O0 -DDEBUG -DUSE_STD_NAMESPACE -DPANGO_ENABLE_ENGINE -I../ccmain -I../api -I../ccutil -I../ccstruct -I../lstm -I../arch -I../viewer -I../textord -I../dict -I../classify -I../display -I../wordrec -I../cutil -I/usr/local/include/leptonica -pthread -I/usr/include/pango-1.0 -I/usr/include/glib-2.0 -I/usr/lib/x86_64-linux-gnu/glib-2.0/include -I/usr/include/cairo -I/usr/include/glib-2.0 -I/usr/lib/x86_64-linux-gnu/glib-2.0/include -I/usr/include/pixman-1 -I/usr/include/freetype2 -I/usr/include/libpng12 -g -O2 -std=c++11 -MT lstmtester.lo -MD -MP -MF $depbase.Tpo -c -o lstmtester.lo lstmtester.cpp &&\
mv -f $depbase.Tpo $depbase.Plo
libtool: compile: g++ -DHAVE_CONFIG_H -I. -I.. -g -Wall -O0 -DDEBUG -DUSE_STD_NAMESPACE -DPANGO_ENABLE_ENGINE -I../ccmain -I../api -I../ccutil -I../ccstruct -I../lstm -I../arch -I../viewer -I../textord -I../dict -I../classify -I../display -I../wordrec -I../cutil -I/usr/local/include/leptonica -pthread -I/usr/include/pango-1.0 -I/usr/include/glib-2.0 -I/usr/lib/x86_64-linux-gnu/glib-2.0/include -I/usr/include/cairo -I/usr/include/glib-2.0 -I/usr/lib/x86_64-linux-gnu/glib-2.0/include -I/usr/include/pixman-1 -I/usr/include/freetype2 -I/usr/include/libpng12 -g -O2 -std=c++11 -MT lstmtester.lo -MD -MP -MF .deps/lstmtester.Tpo -c lstmtester.cpp -fPIC -DPIC -o .libs/lstmtester.o
libtool: compile: g++ -DHAVE_CONFIG_H -I. -I.. -g -Wall -O0 -DDEBUG -DUSE_STD_NAMESPACE -DPANGO_ENABLE_ENGINE -I../ccmain -I../api -I../ccutil -I../ccstruct -I../lstm -I../arch -I../viewer -I../textord -I../dict -I../classify -I../display -I../wordrec -I../cutil -I/usr/local/include/leptonica -pthread -I/usr/include/pango-1.0 -I/usr/include/glib-2.0 -I/usr/lib/x86_64-linux-gnu/glib-2.0/include -I/usr/include/cairo -I/usr/include/glib-2.0 -I/usr/lib/x86_64-linux-gnu/glib-2.0/include -I/usr/include/pixman-1 -I/usr/include/freetype2 -I/usr/include/libpng12 -g -O2 -std=c++11 -MT lstmtester.lo -MD -MP -MF .deps/lstmtester.Tpo -c lstmtester.cpp -o lstmtester.o >/dev/null 2>&1
depbase=`echo normstrngs.lo | sed 's|[^/]*$|.deps/&|;s|\.lo$||'`;\
/bin/bash ../libtool --tag=CXX --mode=compile g++ -DHAVE_CONFIG_H -I. -I.. -g -Wall -O0 -DDEBUG -DUSE_STD_NAMESPACE -DPANGO_ENABLE_ENGINE -I../ccmain -I../api -I../ccutil -I../ccstruct -I../lstm -I../arch -I../viewer -I../textord -I../dict -I../classify -I../display -I../wordrec -I../cutil -I/usr/local/include/leptonica -pthread -I/usr/include/pango-1.0 -I/usr/include/glib-2.0 -I/usr/lib/x86_64-linux-gnu/glib-2.0/include -I/usr/include/cairo -I/usr/include/glib-2.0 -I/usr/lib/x86_64-linux-gnu/glib-2.0/include -I/usr/include/pixman-1 -I/usr/include/freetype2 -I/usr/include/libpng12 -g -O2 -std=c++11 -MT normstrngs.lo -MD -MP -MF $depbase.Tpo -c -o normstrngs.lo normstrngs.cpp &&\
mv -f $depbase.Tpo $depbase.Plo
libtool: compile: g++ -DHAVE_CONFIG_H -I. -I.. -g -Wall -O0 -DDEBUG -DUSE_STD_NAMESPACE -DPANGO_ENABLE_ENGINE -I../ccmain -I../api -I../ccutil -I../ccstruct -I../lstm -I../arch -I../viewer -I../textord -I../dict -I../classify -I../display -I../wordrec -I../cutil -I/usr/local/include/leptonica -pthread -I/usr/include/pango-1.0 -I/usr/include/glib-2.0 -I/usr/lib/x86_64-linux-gnu/glib-2.0/include -I/usr/include/cairo -I/usr/include/glib-2.0 -I/usr/lib/x86_64-linux-gnu/glib-2.0/include -I/usr/include/pixman-1 -I/usr/include/freetype2 -I/usr/include/libpng12 -g -O2 -std=c++11 -MT normstrngs.lo -MD -MP -MF .deps/normstrngs.Tpo -c normstrngs.cpp -fPIC -DPIC -o .libs/normstrngs.o
normstrngs.cpp: In function 'bool tesseract::IsUTF8Whitespace(const char*)':
normstrngs.cpp:184:49: warning: comparison between signed and unsigned integer expressions [-Wsign-compare]
return SpanUTF8Whitespace(text) == strlen(text);
^
libtool: compile: g++ -DHAVE_CONFIG_H -I. -I.. -g -Wall -O0 -DDEBUG -DUSE_STD_NAMESPACE -DPANGO_ENABLE_ENGINE -I../ccmain -I../api -I../ccutil -I../ccstruct -I../lstm -I../arch -I../viewer -I../textord -I../dict -I../classify -I../display -I../wordrec -I../cutil -I/usr/local/include/leptonica -pthread -I/usr/include/pango-1.0 -I/usr/include/glib-2.0 -I/usr/lib/x86_64-linux-gnu/glib-2.0/include -I/usr/include/cairo -I/usr/include/glib-2.0 -I/usr/lib/x86_64-linux-gnu/glib-2.0/include -I/usr/include/pixman-1 -I/usr/include/freetype2 -I/usr/include/libpng12 -g -O2 -std=c++11 -MT normstrngs.lo -MD -MP -MF .deps/normstrngs.Tpo -c normstrngs.cpp -o normstrngs.o >/dev/null 2>&1
depbase=`echo pango_font_info.lo | sed 's|[^/]*$|.deps/&|;s|\.lo$||'`;\
/bin/bash ../libtool --tag=CXX --mode=compile g++ -DHAVE_CONFIG_H -I. -I.. -g -Wall -O0 -DDEBUG -DUSE_STD_NAMESPACE -DPANGO_ENABLE_ENGINE -I../ccmain -I../api -I../ccutil -I../ccstruct -I../lstm -I../arch -I../viewer -I../textord -I../dict -I../classify -I../display -I../wordrec -I../cutil -I/usr/local/include/leptonica -pthread -I/usr/include/pango-1.0 -I/usr/include/glib-2.0 -I/usr/lib/x86_64-linux-gnu/glib-2.0/include -I/usr/include/cairo -I/usr/include/glib-2.0 -I/usr/lib/x86_64-linux-gnu/glib-2.0/include -I/usr/include/pixman-1 -I/usr/include/freetype2 -I/usr/include/libpng12 -g -O2 -std=c++11 -MT pango_font_info.lo -MD -MP -MF $depbase.Tpo -c -o pango_font_info.lo pango_font_info.cpp &&\
mv -f $depbase.Tpo $depbase.Plo
libtool: compile: g++ -DHAVE_CONFIG_H -I. -I.. -g -Wall -O0 -DDEBUG -DUSE_STD_NAMESPACE -DPANGO_ENABLE_ENGINE -I../ccmain -I../api -I../ccutil -I../ccstruct -I../lstm -I../arch -I../viewer -I../textord -I../dict -I../classify -I../display -I../wordrec -I../cutil -I/usr/local/include/leptonica -pthread -I/usr/include/pango-1.0 -I/usr/include/glib-2.0 -I/usr/lib/x86_64-linux-gnu/glib-2.0/include -I/usr/include/cairo -I/usr/include/glib-2.0 -I/usr/lib/x86_64-linux-gnu/glib-2.0/include -I/usr/include/pixman-1 -I/usr/include/freetype2 -I/usr/include/libpng12 -g -O2 -std=c++11 -MT pango_font_info.lo -MD -MP -MF .deps/pango_font_info.Tpo -c pango_font_info.cpp -fPIC -DPIC -o .libs/pango_font_info.o
pango_font_info.cpp: In static member function 'static void tesseract::FontUtils::GetAllRenderableCharacters(const std::vector<std::basic_string<char> >&, std::vector<bool>*)':
pango_font_info.cpp:677:34: warning: comparison between signed and unsigned integer expressions [-Wsign-compare]
for (int i = 0; i < fonts.size(); ++i) {
^
pango_font_info.cpp: In static member function 'static std::string tesseract::FontUtils::BestFonts(const std::unordered_map<int, long int>&, std::vector<std::pair<const char*, std::vector<bool> > >*)':
pango_font_info.cpp:740:39: warning: comparison between signed and unsigned integer expressions [-Wsign-compare]
for (int i = 0; i < font_names.size(); ++i) {
^
pango_font_info.cpp:765:39: warning: comparison between signed and unsigned integer expressions [-Wsign-compare]
for (int i = 0; i < font_names.size(); ++i) {
^
pango_font_info.cpp: In static member function 'static bool tesseract::FontUtils::SelectFont(const char*, int, const std::vector<std::basic_string<char> >&, std::string*, std::vector<std::basic_string<char> >*)':
pango_font_info.cpp:800:38: warning: comparison between signed and unsigned integer expressions [-Wsign-compare]
for (int i = 0; i < all_fonts.size(); ++i) {
^
libtool: compile: g++ -DHAVE_CONFIG_H -I. -I.. -g -Wall -O0 -DDEBUG -DUSE_STD_NAMESPACE -DPANGO_ENABLE_ENGINE -I../ccmain -I../api -I../ccutil -I../ccstruct -I../lstm -I../arch -I../viewer -I../textord -I../dict -I../classify -I../display -I../wordrec -I../cutil -I/usr/local/include/leptonica -pthread -I/usr/include/pango-1.0 -I/usr/include/glib-2.0 -I/usr/lib/x86_64-linux-gnu/glib-2.0/include -I/usr/include/cairo -I/usr/include/glib-2.0 -I/usr/lib/x86_64-linux-gnu/glib-2.0/include -I/usr/include/pixman-1 -I/usr/include/freetype2 -I/usr/include/libpng12 -g -O2 -std=c++11 -MT pango_font_info.lo -MD -MP -MF .deps/pango_font_info.Tpo -c pango_font_info.cpp -o pango_font_info.o >/dev/null 2>&1
depbase=`echo stringrenderer.lo | sed 's|[^/]*$|.deps/&|;s|\.lo$||'`;\
/bin/bash ../libtool --tag=CXX --mode=compile g++ -DHAVE_CONFIG_H -I. -I.. -g -Wall -O0 -DDEBUG -DUSE_STD_NAMESPACE -DPANGO_ENABLE_ENGINE -I../ccmain -I../api -I../ccutil -I../ccstruct -I../lstm -I../arch -I../viewer -I../textord -I../dict -I../classify -I../display -I../wordrec -I../cutil -I/usr/local/include/leptonica -pthread -I/usr/include/pango-1.0 -I/usr/include/glib-2.0 -I/usr/lib/x86_64-linux-gnu/glib-2.0/include -I/usr/include/cairo -I/usr/include/glib-2.0 -I/usr/lib/x86_64-linux-gnu/glib-2.0/include -I/usr/include/pixman-1 -I/usr/include/freetype2 -I/usr/include/libpng12 -g -O2 -std=c++11 -MT stringrenderer.lo -MD -MP -MF $depbase.Tpo -c -o stringrenderer.lo stringrenderer.cpp &&\
mv -f $depbase.Tpo $depbase.Plo
libtool: compile: g++ -DHAVE_CONFIG_H -I. -I.. -g -Wall -O0 -DDEBUG -DUSE_STD_NAMESPACE -DPANGO_ENABLE_ENGINE -I../ccmain -I../api -I../ccutil -I../ccstruct -I../lstm -I../arch -I../viewer -I../textord -I../dict -I../classify -I../display -I../wordrec -I../cutil -I/usr/local/include/leptonica -pthread -I/usr/include/pango-1.0 -I/usr/include/glib-2.0 -I/usr/lib/x86_64-linux-gnu/glib-2.0/include -I/usr/include/cairo -I/usr/include/glib-2.0 -I/usr/lib/x86_64-linux-gnu/glib-2.0/include -I/usr/include/pixman-1 -I/usr/include/freetype2 -I/usr/include/libpng12 -g -O2 -std=c++11 -MT stringrenderer.lo -MD -MP -MF .deps/stringrenderer.Tpo -c stringrenderer.cpp -fPIC -DPIC -o .libs/stringrenderer.o
stringrenderer.cpp: In member function 'void tesseract::StringRenderer::SetWordUnderlineAttributes(const string&)':
stringrenderer.cpp:249:36: warning: comparison between signed and unsigned integer expressions [-Wsign-compare]
while (offset < page_text.length()) {
^
stringrenderer.cpp:251:36: warning: comparison between signed and unsigned integer expressions [-Wsign-compare]
if (offset == page_text.length()) break;
^
stringrenderer.cpp: In member function 'void tesseract::StringRenderer::ClearBoxes()':
stringrenderer.cpp:344:38: warning: comparison between signed and unsigned integer expressions [-Wsign-compare]
for (int i = 0; i < boxchars_.size(); ++i)
^
stringrenderer.cpp: In function 'void tesseract::MergeBoxCharsToWords(std::vector<tesseract::BoxChar*>*)':
stringrenderer.cpp:419:38: warning: comparison between signed and unsigned integer expressions [-Wsign-compare]
for (int i = 0; i < boxchars->size(); ++i) {
^
stringrenderer.cpp: In member function 'void tesseract::StringRenderer::ComputeClusterBoxes()':
stringrenderer.cpp:483:54: warning: comparison between signed and unsigned integer expressions [-Wsign-compare]
for (int i = 0; i < cluster_start_indices.size() - 1; ++i) {
^
stringrenderer.cpp:595:42: warning: comparison between signed and unsigned integer expressions [-Wsign-compare]
for (int i = 0; i < page_boxchars.size(); ++i) {
^
stringrenderer.cpp: In member function 'int tesseract::StringRenderer::StripUnrenderableWords(std::string*) const':
stringrenderer.cpp:626:37: warning: comparison between signed and unsigned integer expressions [-Wsign-compare]
while (offset < utf8_text->length()) {
^
stringrenderer.cpp:630:37: warning: comparison between signed and unsigned integer expressions [-Wsign-compare]
if (offset == utf8_text->length()) break;
^
stringrenderer.cpp: In member function 'int tesseract::StringRenderer::RenderAllFontsToImage(double, const char*, int, std::string*, Pix**)':
stringrenderer.cpp:868:48: warning: comparison between signed and unsigned integer expressions [-Wsign-compare]
for (int i = font_index_; i < all_fonts.size(); ++i) {
^
libtool: compile: g++ -DHAVE_CONFIG_H -I. -I.. -g -Wall -O0 -DDEBUG -DUSE_STD_NAMESPACE -DPANGO_ENABLE_ENGINE -I../ccmain -I../api -I../ccutil -I../ccstruct -I../lstm -I../arch -I../viewer -I../textord -I../dict -I../classify -I../display -I../wordrec -I../cutil -I/usr/local/include/leptonica -pthread -I/usr/include/pango-1.0 -I/usr/include/glib-2.0 -I/usr/lib/x86_64-linux-gnu/glib-2.0/include -I/usr/include/cairo -I/usr/include/glib-2.0 -I/usr/lib/x86_64-linux-gnu/glib-2.0/include -I/usr/include/pixman-1 -I/usr/include/freetype2 -I/usr/include/libpng12 -g -O2 -std=c++11 -MT stringrenderer.lo -MD -MP -MF .deps/stringrenderer.Tpo -c stringrenderer.cpp -o stringrenderer.o >/dev/null 2>&1
depbase=`echo tlog.lo | sed 's|[^/]*$|.deps/&|;s|\.lo$||'`;\
/bin/bash ../libtool --tag=CXX --mode=compile g++ -DHAVE_CONFIG_H -I. -I.. -g -Wall -O0 -DDEBUG -DUSE_STD_NAMESPACE -DPANGO_ENABLE_ENGINE -I../ccmain -I../api -I../ccutil -I../ccstruct -I../lstm -I../arch -I../viewer -I../textord -I../dict -I../classify -I../display -I../wordrec -I../cutil -I/usr/local/include/leptonica -pthread -I/usr/include/pango-1.0 -I/usr/include/glib-2.0 -I/usr/lib/x86_64-linux-gnu/glib-2.0/include -I/usr/include/cairo -I/usr/include/glib-2.0 -I/usr/lib/x86_64-linux-gnu/glib-2.0/include -I/usr/include/pixman-1 -I/usr/include/freetype2 -I/usr/include/libpng12 -g -O2 -std=c++11 -MT tlog.lo -MD -MP -MF $depbase.Tpo -c -o tlog.lo tlog.cpp &&\
mv -f $depbase.Tpo $depbase.Plo
libtool: compile: g++ -DHAVE_CONFIG_H -I. -I.. -g -Wall -O0 -DDEBUG -DUSE_STD_NAMESPACE -DPANGO_ENABLE_ENGINE -I../ccmain -I../api -I../ccutil -I../ccstruct -I../lstm -I../arch -I../viewer -I../textord -I../dict -I../classify -I../display -I../wordrec -I../cutil -I/usr/local/include/leptonica -pthread -I/usr/include/pango-1.0 -I/usr/include/glib-2.0 -I/usr/lib/x86_64-linux-gnu/glib-2.0/include -I/usr/include/cairo -I/usr/include/glib-2.0 -I/usr/lib/x86_64-linux-gnu/glib-2.0/include -I/usr/include/pixman-1 -I/usr/include/freetype2 -I/usr/include/libpng12 -g -O2 -std=c++11 -MT tlog.lo -MD -MP -MF .deps/tlog.Tpo -c tlog.cpp -fPIC -DPIC -o .libs/tlog.o
libtool: compile: g++ -DHAVE_CONFIG_H -I. -I.. -g -Wall -O0 -DDEBUG -DUSE_STD_NAMESPACE -DPANGO_ENABLE_ENGINE -I../ccmain -I../api -I../ccutil -I../ccstruct -I../lstm -I../arch -I../viewer -I../textord -I../dict -I../classify -I../display -I../wordrec -I../cutil -I/usr/local/include/leptonica -pthread -I/usr/include/pango-1.0 -I/usr/include/glib-2.0 -I/usr/lib/x86_64-linux-gnu/glib-2.0/include -I/usr/include/cairo -I/usr/include/glib-2.0 -I/usr/lib/x86_64-linux-gnu/glib-2.0/include -I/usr/include/pixman-1 -I/usr/include/freetype2 -I/usr/include/libpng12 -g -O2 -std=c++11 -MT tlog.lo -MD -MP -MF .deps/tlog.Tpo -c tlog.cpp -o tlog.o >/dev/null 2>&1
depbase=`echo unicharset_training_utils.lo | sed 's|[^/]*$|.deps/&|;s|\.lo$||'`;\
/bin/bash ../libtool --tag=CXX --mode=compile g++ -DHAVE_CONFIG_H -I. -I.. -g -Wall -O0 -DDEBUG -DUSE_STD_NAMESPACE -DPANGO_ENABLE_ENGINE -I../ccmain -I../api -I../ccutil -I../ccstruct -I../lstm -I../arch -I../viewer -I../textord -I../dict -I../classify -I../display -I../wordrec -I../cutil -I/usr/local/include/leptonica -pthread -I/usr/include/pango-1.0 -I/usr/include/glib-2.0 -I/usr/lib/x86_64-linux-gnu/glib-2.0/include -I/usr/include/cairo -I/usr/include/glib-2.0 -I/usr/lib/x86_64-linux-gnu/glib-2.0/include -I/usr/include/pixman-1 -I/usr/include/freetype2 -I/usr/include/libpng12 -g -O2 -std=c++11 -MT unicharset_training_utils.lo -MD -MP -MF $depbase.Tpo -c -o unicharset_training_utils.lo unicharset_training_utils.cpp &&\
mv -f $depbase.Tpo $depbase.Plo
libtool: compile: g++ -DHAVE_CONFIG_H -I. -I.. -g -Wall -O0 -DDEBUG -DUSE_STD_NAMESPACE -DPANGO_ENABLE_ENGINE -I../ccmain -I../api -I../ccutil -I../ccstruct -I../lstm -I../arch -I../viewer -I../textord -I../dict -I../classify -I../display -I../wordrec -I../cutil -I/usr/local/include/leptonica -pthread -I/usr/include/pango-1.0 -I/usr/include/glib-2.0 -I/usr/lib/x86_64-linux-gnu/glib-2.0/include -I/usr/include/cairo -I/usr/include/glib-2.0 -I/usr/lib/x86_64-linux-gnu/glib-2.0/include -I/usr/include/pixman-1 -I/usr/include/freetype2 -I/usr/include/libpng12 -g -O2 -std=c++11 -MT unicharset_training_utils.lo -MD -MP -MF .deps/unicharset_training_utils.Tpo -c unicharset_training_utils.cpp -fPIC -DPIC -o .libs/unicharset_training_utils.o
libtool: compile: g++ -DHAVE_CONFIG_H -I. -I.. -g -Wall -O0 -DDEBUG -DUSE_STD_NAMESPACE -DPANGO_ENABLE_ENGINE -I../ccmain -I../api -I../ccutil -I../ccstruct -I../lstm -I../arch -I../viewer -I../textord -I../dict -I../classify -I../display -I../wordrec -I../cutil -I/usr/local/include/leptonica -pthread -I/usr/include/pango-1.0 -I/usr/include/glib-2.0 -I/usr/lib/x86_64-linux-gnu/glib-2.0/include -I/usr/include/cairo -I/usr/include/glib-2.0 -I/usr/lib/x86_64-linux-gnu/glib-2.0/include -I/usr/include/pixman-1 -I/usr/include/freetype2 -I/usr/include/libpng12 -g -O2 -std=c++11 -MT unicharset_training_utils.lo -MD -MP -MF .deps/unicharset_training_utils.Tpo -c unicharset_training_utils.cpp -o unicharset_training_utils.o >/dev/null 2>&1
/bin/bash ../libtool --tag=CXX --mode=link g++ -g -O2 -std=c++11 -o libtesseract_training.la boxchar.lo commandlineflags.lo commontraining.lo degradeimage.lo fileio.lo ligature_table.lo lstmtester.lo normstrngs.lo pango_font_info.lo stringrenderer.lo tlog.lo unicharset_training_utils.lo ../cutil/libtesseract_cutil.la -lpthread
libtool: link: (cd .libs/libtesseract_training.lax/libtesseract_cutil.a && ar x "/home/teddy/Documents/cpp/tesseract/training/../cutil/.libs/libtesseract_cutil.a")
libtool: link: ar cru .libs/libtesseract_training.a .libs/boxchar.o .libs/commandlineflags.o .libs/commontraining.o .libs/degradeimage.o .libs/fileio.o .libs/ligature_table.o .libs/lstmtester.o .libs/normstrngs.o .libs/pango_font_info.o .libs/stringrenderer.o .libs/tlog.o .libs/unicharset_training_utils.o .libs/libtesseract_training.lax/libtesseract_cutil.a/bitvec.o .libs/libtesseract_training.lax/libtesseract_cutil.a/callcpp.o .libs/libtesseract_training.lax/libtesseract_cutil.a/cutil.o .libs/libtesseract_training.lax/libtesseract_cutil.a/cutil_class.o .libs/libtesseract_training.lax/libtesseract_cutil.a/danerror.o .libs/libtesseract_training.lax/libtesseract_cutil.a/efio.o .libs/libtesseract_training.lax/libtesseract_cutil.a/emalloc.o .libs/libtesseract_training.lax/libtesseract_cutil.a/freelist.o .libs/libtesseract_training.lax/libtesseract_cutil.a/oldlist.o .libs/libtesseract_training.lax/libtesseract_cutil.a/structures.o
libtool: link: ranlib .libs/libtesseract_training.a
libtool: link: rm -fr .libs/libtesseract_training.lax
libtool: link: ( cd ".libs" && rm -f "libtesseract_training.la" && ln -s "../libtesseract_training.la" "libtesseract_training.la" )
depbase=`echo tessopt.lo | sed 's|[^/]*$|.deps/&|;s|\.lo$||'`;\
/bin/bash ../libtool --tag=CXX --mode=compile g++ -DHAVE_CONFIG_H -I. -I.. -g -Wall -O0 -DDEBUG -DUSE_STD_NAMESPACE -DPANGO_ENABLE_ENGINE -I../ccmain -I../api -I../ccutil -I../ccstruct -I../lstm -I../arch -I../viewer -I../textord -I../dict -I../classify -I../display -I../wordrec -I../cutil -I/usr/local/include/leptonica -pthread -I/usr/include/pango-1.0 -I/usr/include/glib-2.0 -I/usr/lib/x86_64-linux-gnu/glib-2.0/include -I/usr/include/cairo -I/usr/include/glib-2.0 -I/usr/lib/x86_64-linux-gnu/glib-2.0/include -I/usr/include/pixman-1 -I/usr/include/freetype2 -I/usr/include/libpng12 -g -O2 -std=c++11 -MT tessopt.lo -MD -MP -MF $depbase.Tpo -c -o tessopt.lo tessopt.cpp &&\
mv -f $depbase.Tpo $depbase.Plo
libtool: compile: g++ -DHAVE_CONFIG_H -I. -I.. -g -Wall -O0 -DDEBUG -DUSE_STD_NAMESPACE -DPANGO_ENABLE_ENGINE -I../ccmain -I../api -I../ccutil -I../ccstruct -I../lstm -I../arch -I../viewer -I../textord -I../dict -I../classify -I../display -I../wordrec -I../cutil -I/usr/local/include/leptonica -pthread -I/usr/include/pango-1.0 -I/usr/include/glib-2.0 -I/usr/lib/x86_64-linux-gnu/glib-2.0/include -I/usr/include/cairo -I/usr/include/glib-2.0 -I/usr/lib/x86_64-linux-gnu/glib-2.0/include -I/usr/include/pixman-1 -I/usr/include/freetype2 -I/usr/include/libpng12 -g -O2 -std=c++11 -MT tessopt.lo -MD -MP -MF .deps/tessopt.Tpo -c tessopt.cpp -fPIC -DPIC -o .libs/tessopt.o
libtool: compile: g++ -DHAVE_CONFIG_H -I. -I.. -g -Wall -O0 -DDEBUG -DUSE_STD_NAMESPACE -DPANGO_ENABLE_ENGINE -I../ccmain -I../api -I../ccutil -I../ccstruct -I../lstm -I../arch -I../viewer -I../textord -I../dict -I../classify -I../display -I../wordrec -I../cutil -I/usr/local/include/leptonica -pthread -I/usr/include/pango-1.0 -I/usr/include/glib-2.0 -I/usr/lib/x86_64-linux-gnu/glib-2.0/include -I/usr/include/cairo -I/usr/include/glib-2.0 -I/usr/lib/x86_64-linux-gnu/glib-2.0/include -I/usr/include/pixman-1 -I/usr/include/freetype2 -I/usr/include/libpng12 -g -O2 -std=c++11 -MT tessopt.lo -MD -MP -MF .deps/tessopt.Tpo -c tessopt.cpp -o tessopt.o >/dev/null 2>&1
/bin/bash ../libtool --tag=CXX --mode=link g++ -g -O2 -std=c++11 -o libtesseract_tessopt.la tessopt.lo -lpthread
libtool: link: ar cru .libs/libtesseract_tessopt.a .libs/tessopt.o
libtool: link: ranlib .libs/libtesseract_tessopt.a
libtool: link: ( cd ".libs" && rm -f "libtesseract_tessopt.la" && ln -s "../libtesseract_tessopt.la" "libtesseract_tessopt.la" )
depbase=`echo ambiguous_words.o | sed 's|[^/]*$|.deps/&|;s|\.o$||'`;\
g++ -DHAVE_CONFIG_H -I. -I.. -g -Wall -O0 -DDEBUG -DUSE_STD_NAMESPACE -DPANGO_ENABLE_ENGINE -I../ccmain -I../api -I../ccutil -I../ccstruct -I../lstm -I../arch -I../viewer -I../textord -I../dict -I../classify -I../display -I../wordrec -I../cutil -I/usr/local/include/leptonica -pthread -I/usr/include/pango-1.0 -I/usr/include/glib-2.0 -I/usr/lib/x86_64-linux-gnu/glib-2.0/include -I/usr/include/cairo -I/usr/include/glib-2.0 -I/usr/lib/x86_64-linux-gnu/glib-2.0/include -I/usr/include/pixman-1 -I/usr/include/freetype2 -I/usr/include/libpng12 -g -O2 -std=c++11 -MT ambiguous_words.o -MD -MP -MF $depbase.Tpo -c -o ambiguous_words.o ambiguous_words.cpp &&\
mv -f $depbase.Tpo $depbase.Po
/bin/bash ../libtool --tag=CXX --mode=link g++ -g -O2 -std=c++11 -o ambiguous_words ambiguous_words.o libtesseract_training.la libtesseract_tessopt.la ../api/libtesseract.la -L/usr/local/lib -llept -lpthread
libtool: link: g++ -g -O2 -std=c++11 -o .libs/ambiguous_words ambiguous_words.o ./.libs/libtesseract_training.a ./.libs/libtesseract_tessopt.a ../api/.libs/libtesseract.so -L/usr/local/lib /usr/local/lib/liblept.so -lpthread -fopenmp
depbase=`echo classifier_tester.o | sed 's|[^/]*$|.deps/&|;s|\.o$||'`;\
g++ -DHAVE_CONFIG_H -I. -I.. -g -Wall -O0 -DDEBUG -DUSE_STD_NAMESPACE -DPANGO_ENABLE_ENGINE -I../ccmain -I../api -I../ccutil -I../ccstruct -I../lstm -I../arch -I../viewer -I../textord -I../dict -I../classify -I../display -I../wordrec -I../cutil -I/usr/local/include/leptonica -pthread -I/usr/include/pango-1.0 -I/usr/include/glib-2.0 -I/usr/lib/x86_64-linux-gnu/glib-2.0/include -I/usr/include/cairo -I/usr/include/glib-2.0 -I/usr/lib/x86_64-linux-gnu/glib-2.0/include -I/usr/include/pixman-1 -I/usr/include/freetype2 -I/usr/include/libpng12 -g -O2 -std=c++11 -MT classifier_tester.o -MD -MP -MF $depbase.Tpo -c -o classifier_tester.o classifier_tester.cpp &&\
mv -f $depbase.Tpo $depbase.Po
/bin/bash ../libtool --tag=CXX --mode=link g++ -g -O2 -std=c++11 -o classifier_tester classifier_tester.o libtesseract_training.la libtesseract_tessopt.la ../api/libtesseract.la -L/usr/local/lib -llept -lpthread
libtool: link: g++ -g -O2 -std=c++11 -o .libs/classifier_tester classifier_tester.o ./.libs/libtesseract_training.a ./.libs/libtesseract_tessopt.a ../api/.libs/libtesseract.so -L/usr/local/lib /usr/local/lib/liblept.so -lpthread -fopenmp
depbase=`echo cntraining.o | sed 's|[^/]*$|.deps/&|;s|\.o$||'`;\
g++ -DHAVE_CONFIG_H -I. -I.. -g -Wall -O0 -DDEBUG -DUSE_STD_NAMESPACE -DPANGO_ENABLE_ENGINE -I../ccmain -I../api -I../ccutil -I../ccstruct -I../lstm -I../arch -I../viewer -I../textord -I../dict -I../classify -I../display -I../wordrec -I../cutil -I/usr/local/include/leptonica -pthread -I/usr/include/pango-1.0 -I/usr/include/glib-2.0 -I/usr/lib/x86_64-linux-gnu/glib-2.0/include -I/usr/include/cairo -I/usr/include/glib-2.0 -I/usr/lib/x86_64-linux-gnu/glib-2.0/include -I/usr/include/pixman-1 -I/usr/include/freetype2 -I/usr/include/libpng12 -g -O2 -std=c++11 -MT cntraining.o -MD -MP -MF $depbase.Tpo -c -o cntraining.o cntraining.cpp &&\
mv -f $depbase.Tpo $depbase.Po
/bin/bash ../libtool --tag=CXX --mode=link g++ -g -O2 -std=c++11 -o cntraining cntraining.o libtesseract_training.la libtesseract_tessopt.la ../api/libtesseract.la -L/usr/local/lib -llept -lpthread
libtool: link: g++ -g -O2 -std=c++11 -o .libs/cntraining cntraining.o ./.libs/libtesseract_training.a ./.libs/libtesseract_tessopt.a ../api/.libs/libtesseract.so -L/usr/local/lib /usr/local/lib/liblept.so -lpthread -fopenmp
depbase=`echo combine_tessdata.o | sed 's|[^/]*$|.deps/&|;s|\.o$||'`;\
g++ -DHAVE_CONFIG_H -I. -I.. -g -Wall -O0 -DDEBUG -DUSE_STD_NAMESPACE -DPANGO_ENABLE_ENGINE -I../ccmain -I../api -I../ccutil -I../ccstruct -I../lstm -I../arch -I../viewer -I../textord -I../dict -I../classify -I../display -I../wordrec -I../cutil -I/usr/local/include/leptonica -pthread -I/usr/include/pango-1.0 -I/usr/include/glib-2.0 -I/usr/lib/x86_64-linux-gnu/glib-2.0/include -I/usr/include/cairo -I/usr/include/glib-2.0 -I/usr/lib/x86_64-linux-gnu/glib-2.0/include -I/usr/include/pixman-1 -I/usr/include/freetype2 -I/usr/include/libpng12 -g -O2 -std=c++11 -MT combine_tessdata.o -MD -MP -MF $depbase.Tpo -c -o combine_tessdata.o combine_tessdata.cpp &&\
mv -f $depbase.Tpo $depbase.Po
/bin/bash ../libtool --tag=CXX --mode=link g++ -g -O2 -std=c++11 -o combine_tessdata combine_tessdata.o ../api/libtesseract.la -L/usr/local/lib -llept -lpthread
libtool: link: g++ -g -O2 -std=c++11 -o .libs/combine_tessdata combine_tessdata.o ../api/.libs/libtesseract.so -L/usr/local/lib /usr/local/lib/liblept.so -lpthread -fopenmp
depbase=`echo dawg2wordlist.o | sed 's|[^/]*$|.deps/&|;s|\.o$||'`;\
g++ -DHAVE_CONFIG_H -I. -I.. -g -Wall -O0 -DDEBUG -DUSE_STD_NAMESPACE -DPANGO_ENABLE_ENGINE -I../ccmain -I../api -I../ccutil -I../ccstruct -I../lstm -I../arch -I../viewer -I../textord -I../dict -I../classify -I../display -I../wordrec -I../cutil -I/usr/local/include/leptonica -pthread -I/usr/include/pango-1.0 -I/usr/include/glib-2.0 -I/usr/lib/x86_64-linux-gnu/glib-2.0/include -I/usr/include/cairo -I/usr/include/glib-2.0 -I/usr/lib/x86_64-linux-gnu/glib-2.0/include -I/usr/include/pixman-1 -I/usr/include/freetype2 -I/usr/include/libpng12 -g -O2 -std=c++11 -MT dawg2wordlist.o -MD -MP -MF $depbase.Tpo -c -o dawg2wordlist.o dawg2wordlist.cpp &&\
mv -f $depbase.Tpo $depbase.Po
/bin/bash ../libtool --tag=CXX --mode=link g++ -g -O2 -std=c++11 -o dawg2wordlist dawg2wordlist.o libtesseract_tessopt.la ../api/libtesseract.la -L/usr/local/lib -llept -lpthread
libtool: link: g++ -g -O2 -std=c++11 -o .libs/dawg2wordlist dawg2wordlist.o ./.libs/libtesseract_tessopt.a ../api/.libs/libtesseract.so -L/usr/local/lib /usr/local/lib/liblept.so -lpthread -fopenmp
depbase=`echo lstmeval.o | sed 's|[^/]*$|.deps/&|;s|\.o$||'`;\
g++ -DHAVE_CONFIG_H -I. -I.. -g -Wall -O0 -DDEBUG -DUSE_STD_NAMESPACE -DPANGO_ENABLE_ENGINE -I../ccmain -I../api -I../ccutil -I../ccstruct -I../lstm -I../arch -I../viewer -I../textord -I../dict -I../classify -I../display -I../wordrec -I../cutil -I/usr/local/include/leptonica -pthread -I/usr/include/pango-1.0 -I/usr/include/glib-2.0 -I/usr/lib/x86_64-linux-gnu/glib-2.0/include -I/usr/include/cairo -I/usr/include/glib-2.0 -I/usr/lib/x86_64-linux-gnu/glib-2.0/include -I/usr/include/pixman-1 -I/usr/include/freetype2 -I/usr/include/libpng12 -g -O2 -std=c++11 -MT lstmeval.o -MD -MP -MF $depbase.Tpo -c -o lstmeval.o lstmeval.cpp &&\
mv -f $depbase.Tpo $depbase.Po
/bin/bash ../libtool --tag=CXX --mode=link g++ -g -O2 -std=c++11 -o lstmeval lstmeval.o libtesseract_training.la libtesseract_tessopt.la -licuuc -licudata ../api/libtesseract.la -L/usr/local/lib -llept -lpthread
libtool: link: g++ -g -O2 -std=c++11 -o .libs/lstmeval lstmeval.o ./.libs/libtesseract_training.a ./.libs/libtesseract_tessopt.a -licuuc -licudata ../api/.libs/libtesseract.so -L/usr/local/lib /usr/local/lib/liblept.so -lpthread -fopenmp
depbase=`echo lstmtraining.o | sed 's|[^/]*$|.deps/&|;s|\.o$||'`;\
g++ -DHAVE_CONFIG_H -I. -I.. -g -Wall -O0 -DDEBUG -DUSE_STD_NAMESPACE -DPANGO_ENABLE_ENGINE -I../ccmain -I../api -I../ccutil -I../ccstruct -I../lstm -I../arch -I../viewer -I../textord -I../dict -I../classify -I../display -I../wordrec -I../cutil -I/usr/local/include/leptonica -pthread -I/usr/include/pango-1.0 -I/usr/include/glib-2.0 -I/usr/lib/x86_64-linux-gnu/glib-2.0/include -I/usr/include/cairo -I/usr/include/glib-2.0 -I/usr/lib/x86_64-linux-gnu/glib-2.0/include -I/usr/include/pixman-1 -I/usr/include/freetype2 -I/usr/include/libpng12 -g -O2 -std=c++11 -MT lstmtraining.o -MD -MP -MF $depbase.Tpo -c -o lstmtraining.o lstmtraining.cpp &&\
mv -f $depbase.Tpo $depbase.Po
lstmtraining.cpp: In function ‘int main(int, char**)’:
lstmtraining.cpp:176:8: warning: unused variable ‘best_dumped’ [-Wunused-variable]
bool best_dumped = true;
^
lstmtraining.cpp:177:9: warning: unused variable ‘best_model_dump’ [-Wunused-variable]
char* best_model_dump = nullptr;
^
lstmtraining.cpp:178:10: warning: unused variable ‘best_model_size’ [-Wunused-variable]
size_t best_model_size = 0;
^
/bin/bash ../libtool --tag=CXX --mode=link g++ -g -O2 -std=c++11 -o lstmtraining lstmtraining.o libtesseract_training.la libtesseract_tessopt.la -licui18n -licuuc -licudata -licuuc -licudata ../api/libtesseract.la -L/usr/local/lib -llept -lpthread
libtool: link: g++ -g -O2 -std=c++11 -o .libs/lstmtraining lstmtraining.o ./.libs/libtesseract_training.a ./.libs/libtesseract_tessopt.a -licui18n -licuuc -licudata ../api/.libs/libtesseract.so -L/usr/local/lib /usr/local/lib/liblept.so -lpthread -fopenmp
depbase=`echo mftraining.o | sed 's|[^/]*$|.deps/&|;s|\.o$||'`;\
g++ -DHAVE_CONFIG_H -I. -I.. -g -Wall -O0 -DDEBUG -DUSE_STD_NAMESPACE -DPANGO_ENABLE_ENGINE -I../ccmain -I../api -I../ccutil -I../ccstruct -I../lstm -I../arch -I../viewer -I../textord -I../dict -I../classify -I../display -I../wordrec -I../cutil -I/usr/local/include/leptonica -pthread -I/usr/include/pango-1.0 -I/usr/include/glib-2.0 -I/usr/lib/x86_64-linux-gnu/glib-2.0/include -I/usr/include/cairo -I/usr/include/glib-2.0 -I/usr/lib/x86_64-linux-gnu/glib-2.0/include -I/usr/include/pixman-1 -I/usr/include/freetype2 -I/usr/include/libpng12 -g -O2 -std=c++11 -MT mftraining.o -MD -MP -MF $depbase.Tpo -c -o mftraining.o mftraining.cpp &&\
mv -f $depbase.Tpo $depbase.Po
depbase=`echo mergenf.o | sed 's|[^/]*$|.deps/&|;s|\.o$||'`;\
g++ -DHAVE_CONFIG_H -I. -I.. -g -Wall -O0 -DDEBUG -DUSE_STD_NAMESPACE -DPANGO_ENABLE_ENGINE -I../ccmain -I../api -I../ccutil -I../ccstruct -I../lstm -I../arch -I../viewer -I../textord -I../dict -I../classify -I../display -I../wordrec -I../cutil -I/usr/local/include/leptonica -pthread -I/usr/include/pango-1.0 -I/usr/include/glib-2.0 -I/usr/lib/x86_64-linux-gnu/glib-2.0/include -I/usr/include/cairo -I/usr/include/glib-2.0 -I/usr/lib/x86_64-linux-gnu/glib-2.0/include -I/usr/include/pixman-1 -I/usr/include/freetype2 -I/usr/include/libpng12 -g -O2 -std=c++11 -MT mergenf.o -MD -MP -MF $depbase.Tpo -c -o mergenf.o mergenf.cpp &&\
mv -f $depbase.Tpo $depbase.Po
/bin/bash ../libtool --tag=CXX --mode=link g++ -g -O2 -std=c++11 -o mftraining mftraining.o mergenf.o libtesseract_training.la libtesseract_tessopt.la -licuuc -licudata ../api/libtesseract.la -L/usr/local/lib -llept -lpthread
libtool: link: g++ -g -O2 -std=c++11 -o .libs/mftraining mftraining.o mergenf.o ./.libs/libtesseract_training.a ./.libs/libtesseract_tessopt.a -licuuc -licudata ../api/.libs/libtesseract.so -L/usr/local/lib /usr/local/lib/liblept.so -lpthread -fopenmp
depbase=`echo set_unicharset_properties.o | sed 's|[^/]*$|.deps/&|;s|\.o$||'`;\
g++ -DHAVE_CONFIG_H -I. -I.. -g -Wall -O0 -DDEBUG -DUSE_STD_NAMESPACE -DPANGO_ENABLE_ENGINE -I../ccmain -I../api -I../ccutil -I../ccstruct -I../lstm -I../arch -I../viewer -I../textord -I../dict -I../classify -I../display -I../wordrec -I../cutil -I/usr/local/include/leptonica -pthread -I/usr/include/pango-1.0 -I/usr/include/glib-2.0 -I/usr/lib/x86_64-linux-gnu/glib-2.0/include -I/usr/include/cairo -I/usr/include/glib-2.0 -I/usr/lib/x86_64-linux-gnu/glib-2.0/include -I/usr/include/pixman-1 -I/usr/include/freetype2 -I/usr/include/libpng12 -g -O2 -std=c++11 -MT set_unicharset_properties.o -MD -MP -MF $depbase.Tpo -c -o set_unicharset_properties.o set_unicharset_properties.cpp &&\
mv -f $depbase.Tpo $depbase.Po
/bin/bash ../libtool --tag=CXX --mode=link g++ -g -O2 -std=c++11 -o set_unicharset_properties set_unicharset_properties.o libtesseract_training.la libtesseract_tessopt.la -licui18n -licuuc -licudata -licuuc -licudata ../api/libtesseract.la -L/usr/local/lib -llept -lpthread
libtool: link: g++ -g -O2 -std=c++11 -o .libs/set_unicharset_properties set_unicharset_properties.o ./.libs/libtesseract_training.a ./.libs/libtesseract_tessopt.a -licui18n -licuuc -licudata ../api/.libs/libtesseract.so -L/usr/local/lib /usr/local/lib/liblept.so -lpthread -fopenmp
depbase=`echo shapeclustering.o | sed 's|[^/]*$|.deps/&|;s|\.o$||'`;\
g++ -DHAVE_CONFIG_H -I. -I.. -g -Wall -O0 -DDEBUG -DUSE_STD_NAMESPACE -DPANGO_ENABLE_ENGINE -I../ccmain -I../api -I../ccutil -I../ccstruct -I../lstm -I../arch -I../viewer -I../textord -I../dict -I../classify -I../display -I../wordrec -I../cutil -I/usr/local/include/leptonica -pthread -I/usr/include/pango-1.0 -I/usr/include/glib-2.0 -I/usr/lib/x86_64-linux-gnu/glib-2.0/include -I/usr/include/cairo -I/usr/include/glib-2.0 -I/usr/lib/x86_64-linux-gnu/glib-2.0/include -I/usr/include/pixman-1 -I/usr/include/freetype2 -I/usr/include/libpng12 -g -O2 -std=c++11 -MT shapeclustering.o -MD -MP -MF $depbase.Tpo -c -o shapeclustering.o shapeclustering.cpp &&\
mv -f $depbase.Tpo $depbase.Po
/bin/bash ../libtool --tag=CXX --mode=link g++ -g -O2 -std=c++11 -o shapeclustering shapeclustering.o libtesseract_training.la libtesseract_tessopt.la ../api/libtesseract.la -L/usr/local/lib -llept -lpthread
libtool: link: g++ -g -O2 -std=c++11 -o .libs/shapeclustering shapeclustering.o ./.libs/libtesseract_training.a ./.libs/libtesseract_tessopt.a ../api/.libs/libtesseract.so -L/usr/local/lib /usr/local/lib/liblept.so -lpthread -fopenmp
depbase=`echo text2image.o | sed 's|[^/]*$|.deps/&|;s|\.o$||'`;\
g++ -DHAVE_CONFIG_H -I. -I.. -g -Wall -O0 -DDEBUG -DUSE_STD_NAMESPACE -DPANGO_ENABLE_ENGINE -I../ccmain -I../api -I../ccutil -I../ccstruct -I../lstm -I../arch -I../viewer -I../textord -I../dict -I../classify -I../display -I../wordrec -I../cutil -I/usr/local/include/leptonica -pthread -I/usr/include/pango-1.0 -I/usr/include/glib-2.0 -I/usr/lib/x86_64-linux-gnu/glib-2.0/include -I/usr/include/cairo -I/usr/include/glib-2.0 -I/usr/lib/x86_64-linux-gnu/glib-2.0/include -I/usr/include/pixman-1 -I/usr/include/freetype2 -I/usr/include/libpng12 -g -O2 -std=c++11 -MT text2image.o -MD -MP -MF $depbase.Tpo -c -o text2image.o text2image.cpp &&\
mv -f $depbase.Tpo $depbase.Po
text2image.cpp: In function ‘std::string tesseract::StringReplace(const string&, const string&, const string&)’:
text2image.cpp:196:24: warning: comparison between signed and unsigned integer expressions [-Wsign-compare]
if (pos == string::npos) break;
^
text2image.cpp: In function ‘void tesseract::ExtractFontProperties(const string&, tesseract::StringRenderer*, const string&)’:
text2image.cpp:242:36: warning: comparison between signed and unsigned integer expressions [-Wsign-compare]
for (int b = 0; b < boxes.size(); b += 2) {
^
text2image.cpp:243:29: warning: comparison between signed and unsigned integer expressions [-Wsign-compare]
while (b < boxes.size() && IsWhitespaceBox(boxes[b])) ++b;
^
text2image.cpp:244:31: warning: comparison between signed and unsigned integer expressions [-Wsign-compare]
if (b + 1 >= boxes.size()) break;
^
text2image.cpp: In function ‘int main(int, char**)’:
text2image.cpp:425:40: warning: comparison between signed and unsigned integer expressions [-Wsign-compare]
for (int i = 0; i < all_fonts.size(); ++i) {
^
text2image.cpp:550:48: warning: comparison between signed and unsigned integer expressions [-Wsign-compare]
for (int i = 0, line = 1; i < offsets.size(); ++i) {
^
text2image.cpp:559:39: warning: comparison between signed and unsigned integer expressions [-Wsign-compare]
if (rand_utf8.length() > line * kCharsPerLine) {
^
text2image.cpp:591:56: warning: comparison between signed and unsigned integer expressions [-Wsign-compare]
for (int offset = 0; offset < strlen(to_render_utf8); ++im, ++page_num) {
^
text2image.cpp:667:43: warning: comparison between signed and unsigned integer expressions [-Wsign-compare]
for (int i = 0; i < font_names.size(); ++i) {
^
/bin/bash ../libtool --tag=CXX --mode=link g++ -g -O2 -std=c++11 -o text2image text2image.o libtesseract_training.la libtesseract_tessopt.la -licui18n -licuuc -licudata -licuuc -licudata ../api/libtesseract.la -licuuc -licudata -lpango-1.0 -lpangocairo-1.0 -lgobject-2.0 -lglib-2.0 -lcairo -lpangoft2-1.0 -lfontconfig -L/usr/local/lib -llept -lpthread
libtool: link: g++ -g -O2 -std=c++11 -o .libs/text2image text2image.o ./.libs/libtesseract_training.a ./.libs/libtesseract_tessopt.a -licui18n ../api/.libs/libtesseract.so -licuuc -licudata -lpango-1.0 -lpangocairo-1.0 -lgobject-2.0 -lglib-2.0 /usr/lib/x86_64-linux-gnu/libcairo.so -lpangoft2-1.0 -lfontconfig -L/usr/local/lib /usr/local/lib/liblept.so -lpthread -fopenmp
depbase=`echo unicharset_extractor.o | sed 's|[^/]*$|.deps/&|;s|\.o$||'`;\
g++ -DHAVE_CONFIG_H -I. -I.. -g -Wall -O0 -DDEBUG -DUSE_STD_NAMESPACE -DPANGO_ENABLE_ENGINE -I../ccmain -I../api -I../ccutil -I../ccstruct -I../lstm -I../arch -I../viewer -I../textord -I../dict -I../classify -I../display -I../wordrec -I../cutil -I/usr/local/include/leptonica -pthread -I/usr/include/pango-1.0 -I/usr/include/glib-2.0 -I/usr/lib/x86_64-linux-gnu/glib-2.0/include -I/usr/include/cairo -I/usr/include/glib-2.0 -I/usr/lib/x86_64-linux-gnu/glib-2.0/include -I/usr/include/pixman-1 -I/usr/include/freetype2 -I/usr/include/libpng12 -g -O2 -std=c++11 -MT unicharset_extractor.o -MD -MP -MF $depbase.Tpo -c -o unicharset_extractor.o unicharset_extractor.cpp &&\
mv -f $depbase.Tpo $depbase.Po
/bin/bash ../libtool --tag=CXX --mode=link g++ -g -O2 -std=c++11 -L/usr/local/lib -llept -o unicharset_extractor unicharset_extractor.o libtesseract_tessopt.la ../api/libtesseract.la -lpthread
libtool: link: g++ -g -O2 -std=c++11 -o .libs/unicharset_extractor unicharset_extractor.o -L/usr/local/lib /usr/local/lib/liblept.so ./.libs/libtesseract_tessopt.a ../api/.libs/libtesseract.so -lpthread -fopenmp
depbase=`echo wordlist2dawg.o | sed 's|[^/]*$|.deps/&|;s|\.o$||'`;\
g++ -DHAVE_CONFIG_H -I. -I.. -g -Wall -O0 -DDEBUG -DUSE_STD_NAMESPACE -DPANGO_ENABLE_ENGINE -I../ccmain -I../api -I../ccutil -I../ccstruct -I../lstm -I../arch -I../viewer -I../textord -I../dict -I../classify -I../display -I../wordrec -I../cutil -I/usr/local/include/leptonica -pthread -I/usr/include/pango-1.0 -I/usr/include/glib-2.0 -I/usr/lib/x86_64-linux-gnu/glib-2.0/include -I/usr/include/cairo -I/usr/include/glib-2.0 -I/usr/lib/x86_64-linux-gnu/glib-2.0/include -I/usr/include/pixman-1 -I/usr/include/freetype2 -I/usr/include/libpng12 -g -O2 -std=c++11 -MT wordlist2dawg.o -MD -MP -MF $depbase.Tpo -c -o wordlist2dawg.o wordlist2dawg.cpp &&\
mv -f $depbase.Tpo $depbase.Po
/bin/bash ../libtool --tag=CXX --mode=link g++ -g -O2 -std=c++11 -o wordlist2dawg wordlist2dawg.o libtesseract_tessopt.la ../api/libtesseract.la -L/usr/local/lib -llept -lpthread
libtool: link: g++ -g -O2 -std=c++11 -o .libs/wordlist2dawg wordlist2dawg.o ./.libs/libtesseract_tessopt.a ../api/.libs/libtesseract.so -L/usr/local/lib /usr/local/lib/liblept.so -lpthread -fopenmp
make[1]: Leaving directory `/home/teddy/Documents/cpp/tesseract/training'
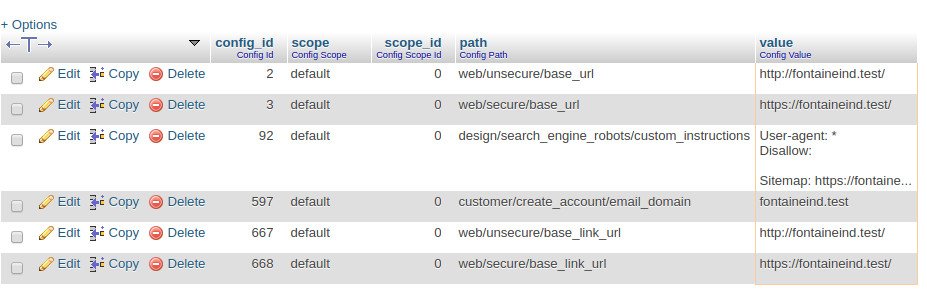 NOTE: It’d be better to change to https also for ‘unsecure’ url
 Step 4: Configure Chrome to Trust the Certificate and to Show the Site as Secure
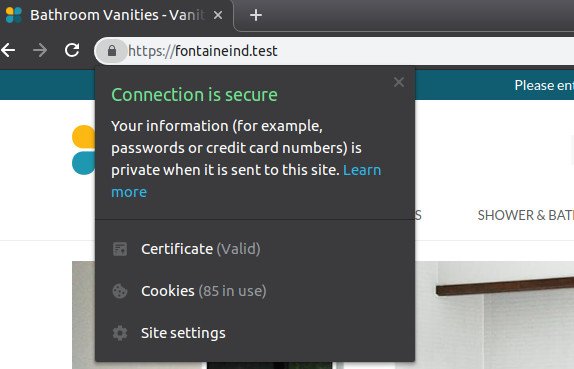 Now I want to redirect all connection from http to https.