teddy@teddy-K43SJ:~/Documents/cpp/cphalcon/build$ sudo ./install
Configuring for:
PHP Api Version: 20131106
Zend Module Api No: 20131226
Zend Extension Api No: 220131226
checking for grep that handles long lines and -e... /bin/grep
checking for egrep... /bin/grep -E
checking for a sed that does not truncate output... /bin/sed
checking whether the C compiler works... yes
checking for C compiler default output file name... a.out
checking for suffix of executables...
checking whether we are cross compiling... no
checking for suffix of object files... o
checking whether we are using the GNU C compiler... yes
checking whether gcc accepts -g... yes
checking for gcc option to accept ISO C89... none needed
checking how to run the C preprocessor... gcc -E
checking for icc... no
checking for suncc... no
checking whether gcc and cc understand -c and -o together... yes
checking for system library directory... lib
checking if compiler supports -R... no
checking if compiler supports -Wl,-rpath,... yes
checking build system type... x86_64-unknown-linux-gnu
checking host system type... x86_64-unknown-linux-gnu
checking target system type... x86_64-unknown-linux-gnu
checking for PHP prefix... /usr
checking for PHP includes... -I/usr/include/php/20131226 -I/usr/include/php/20131226/main -I/usr/include/php/20131226/TSRM -I/usr/include/php/20131226/Zend -I/usr/include/php/20131226/ext -I/usr/include/php/20131226/ext/date/lib
checking for PHP extension directory... /usr/lib/php/20131226
checking for PHP installed headers prefix... /usr/include/php/20131226
checking if debug is enabled... no
checking if zts is enabled... no
checking for re2c... no
configure: WARNING: You will need re2c 0.13.4 or later if you want to regenerate PHP parsers.
checking for gawk... gawk
checking whether to enable phalcon... yes, shared
checking whether HAVE_BUNDLED_PCRE is declared... no
checking whether HAVE_JSON is declared... no
checking how to print strings... printf
checking for a sed that does not truncate output... (cached) /bin/sed
checking for fgrep... /bin/grep -F
checking for ld used by gcc... /usr/bin/ld
checking if the linker (/usr/bin/ld) is GNU ld... yes
checking for BSD- or MS-compatible name lister (nm)... /usr/bin/nm -B
checking the name lister (/usr/bin/nm -B) interface... BSD nm
checking whether ln -s works... yes
checking the maximum length of command line arguments... 1572864
checking whether the shell understands some XSI constructs... yes
checking whether the shell understands "+="... yes
checking how to convert x86_64-unknown-linux-gnu file names to x86_64-unknown-linux-gnu format... func_convert_file_noop
checking how to convert x86_64-unknown-linux-gnu file names to toolchain format... func_convert_file_noop
checking for /usr/bin/ld option to reload object files... -r
checking for objdump... objdump
checking how to recognize dependent libraries... pass_all
checking for dlltool... no
checking how to associate runtime and link libraries... printf %s\n
checking for ar... ar
checking for archiver @FILE support... @
checking for strip... strip
checking for ranlib... ranlib
checking for gawk... (cached) gawk
checking command to parse /usr/bin/nm -B output from gcc object... ok
checking for sysroot... no
checking for mt... mt
checking if mt is a manifest tool... no
checking for ANSI C header files... yes
checking for sys/types.h... yes
checking for sys/stat.h... yes
checking for stdlib.h... yes
checking for string.h... yes
checking for memory.h... yes
checking for strings.h... yes
checking for inttypes.h... yes
checking for stdint.h... yes
checking for unistd.h... yes
checking for dlfcn.h... yes
checking for objdir... .libs
checking if gcc supports -fno-rtti -fno-exceptions... no
checking for gcc option to produce PIC... -fPIC -DPIC
checking if gcc PIC flag -fPIC -DPIC works... yes
checking if gcc static flag -static works... yes
checking if gcc supports -c -o file.o... yes
checking if gcc supports -c -o file.o... (cached) yes
checking whether the gcc linker (/usr/bin/ld -m elf_x86_64) supports shared libraries... yes
checking whether -lc should be explicitly linked in... no
checking dynamic linker characteristics... GNU/Linux ld.so
checking how to hardcode library paths into programs... immediate
checking whether stripping libraries is possible... yes
checking if libtool supports shared libraries... yes
checking whether to build shared libraries... yes
checking whether to build static libraries... no
configure: creating ./config.status
config.status: creating config.h
config.status: executing libtool commands
/bin/bash /home/teddy/Documents/cpp/cphalcon/build/php5/64bits/libtool --mode=compile gcc -I. -I/home/teddy/Documents/cpp/cphalcon/build/php5/64bits -DPHP_ATOM_INC -I/home/teddy/Documents/cpp/cphalcon/build/php5/64bits/include -I/home/teddy/Documents/cpp/cphalcon/build/php5/64bits/main -I/home/teddy/Documents/cpp/cphalcon/build/php5/64bits -I/usr/include/php/20131226 -I/usr/include/php/20131226/main -I/usr/include/php/20131226/TSRM -I/usr/include/php/20131226/Zend -I/usr/include/php/20131226/ext -I/usr/include/php/20131226/ext/date/lib -DPHALCON_RELEASE -DHAVE_CONFIG_H -march=native -mtune=native -O2 -fomit-frame-pointer -fvisibility=hidden -c /home/teddy/Documents/cpp/cphalcon/build/php5/64bits/phalcon.zep.c -o phalcon.lo
libtool: compile: gcc -I. -I/home/teddy/Documents/cpp/cphalcon/build/php5/64bits -DPHP_ATOM_INC -I/home/teddy/Documents/cpp/cphalcon/build/php5/64bits/include -I/home/teddy/Documents/cpp/cphalcon/build/php5/64bits/main -I/home/teddy/Documents/cpp/cphalcon/build/php5/64bits -I/usr/include/php/20131226 -I/usr/include/php/20131226/main -I/usr/include/php/20131226/TSRM -I/usr/include/php/20131226/Zend -I/usr/include/php/20131226/ext -I/usr/include/php/20131226/ext/date/lib -DPHALCON_RELEASE -DHAVE_CONFIG_H -march=native -mtune=native -O2 -fomit-frame-pointer -fvisibility=hidden -c /home/teddy/Documents/cpp/cphalcon/build/php5/64bits/phalcon.zep.c -fPIC -DPIC -o .libs/phalcon.o
/bin/bash /home/teddy/Documents/cpp/cphalcon/build/php5/64bits/libtool --mode=link gcc -DPHP_ATOM_INC -I/home/teddy/Documents/cpp/cphalcon/build/php5/64bits/include -I/home/teddy/Documents/cpp/cphalcon/build/php5/64bits/main -I/home/teddy/Documents/cpp/cphalcon/build/php5/64bits -I/usr/include/php/20131226 -I/usr/include/php/20131226/main -I/usr/include/php/20131226/TSRM -I/usr/include/php/20131226/Zend -I/usr/include/php/20131226/ext -I/usr/include/php/20131226/ext/date/lib -DPHALCON_RELEASE -DHAVE_CONFIG_H -march=native -mtune=native -O2 -fomit-frame-pointer -fvisibility=hidden -o phalcon.la -export-dynamic -avoid-version -prefer-pic -module -rpath /home/teddy/Documents/cpp/cphalcon/build/php5/64bits/modules phalcon.lo
libtool: link: gcc -shared -fPIC -DPIC .libs/phalcon.o -march=native -mtune=native -O2 -Wl,-soname -Wl,phalcon.so -o .libs/phalcon.so
libtool: link: ( cd ".libs" && rm -f "phalcon.la" && ln -s "../phalcon.la" "phalcon.la" )
/bin/bash /home/teddy/Documents/cpp/cphalcon/build/php5/64bits/libtool --mode=install cp ./phalcon.la /home/teddy/Documents/cpp/cphalcon/build/php5/64bits/modules
libtool: install: cp ./.libs/phalcon.so /home/teddy/Documents/cpp/cphalcon/build/php5/64bits/modules/phalcon.so
libtool: install: cp ./.libs/phalcon.lai /home/teddy/Documents/cpp/cphalcon/build/php5/64bits/modules/phalcon.la
libtool: finish: PATH="/usr/local/sbin:/usr/local/bin:/usr/sbin:/usr/bin:/sbin:/bin:/snap/bin:/sbin" ldconfig -n /home/teddy/Documents/cpp/cphalcon/build/php5/64bits/modules
----------------------------------------------------------------------
Libraries have been installed in:
/home/teddy/Documents/cpp/cphalcon/build/php5/64bits/modules
If you ever happen to want to link against installed libraries
in a given directory, LIBDIR, you must either use libtool, and
specify the full pathname of the library, or use the `-LLIBDIR'
flag during linking and do at least one of the following:
- add LIBDIR to the `LD_LIBRARY_PATH' environment variable
during execution
- add LIBDIR to the `LD_RUN_PATH' environment variable
during linking
- use the `-Wl,-rpath -Wl,LIBDIR' linker flag
- have your system administrator add LIBDIR to `/etc/ld.so.conf'
See any operating system documentation about shared libraries for
more information, such as the ld(1) and ld.so(8) manual pages.
----------------------------------------------------------------------
Build complete.
Don't forget to run 'make test'.
Installing shared extensions: /usr/lib/php/20131226/
Installing header files: /usr/include/php/20131226/
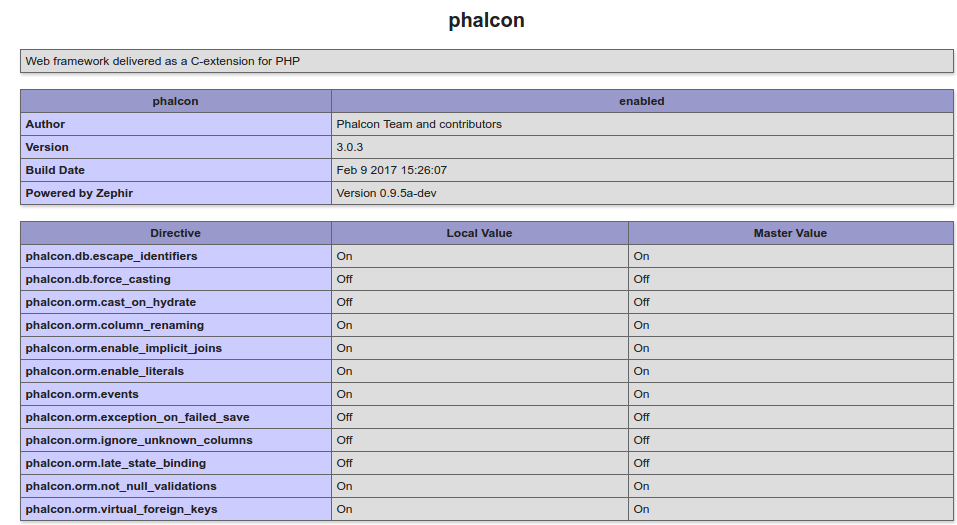
Thanks for compiling Phalcon!
Build succeed: Please restart your web server to complete the installation