ref: https://grandnode.com/how-to-install-grandnode-on-linux-ubuntu-1604
Install GrandNode eCommerce Platform on Ubuntu 16.04 | 18.04 | 18.10
Note: Make sure nginx, dotnet core 2.2 and mongodb 4.0 already installed!
Get and Clone it from github
|
1 2 3 4 5 6 7 8 9 |
teddy@teddy:~/Documents/dotnet$ git clone https://github.com/grandnode/grandnode.git Cloning into 'grandnode'... remote: Enumerating objects: 528, done. remote: Counting objects: 100% (528/528), done. remote: Compressing objects: 100% (320/320), done. remote: Total 77014 (delta 271), reused 369 (delta 205), pack-reused 76486 Receiving objects: 100% (77014/77014), 289.19 MiB | 201.00 KiB/s, done. Resolving deltas: 100% (55881/55881), done. Checking connectivity... done. |
Deploy and publish GrandNode. Publishing a .NET Core application bundles all the required run-time libraries (in the form of DLL’s) and copies across appsettings.json file as well as any public assets. We need to go to our application’s root directory. We will be able to pull in/download all the required NuGet packages, let’s do that now.
|
1 2 3 4 5 6 7 8 9 10 11 12 13 14 15 16 17 18 19 20 21 22 23 24 25 26 27 28 29 30 |
teddy@teddy:~/Documents/dotnet$ cd grandnode/ teddy@teddy:~/Documents/dotnet/grandnode$ dotnet restore GrandNode.sln Restore completed in 46.5 sec for /home/teddy/Documents/dotnet/grandnode/Grand.Data/Grand.Data.csproj. Restore completed in 46.5 sec for /home/teddy/Documents/dotnet/grandnode/Grand.Core/Grand.Core.csproj. Restore completed in 1.15 min for /home/teddy/Documents/dotnet/grandnode/Grand.Services/Grand.Services.csproj. Restore completed in 1.15 min for /home/teddy/Documents/dotnet/grandnode/Plugins/Grand.Plugin.DiscountRequirements.Standard/Grand.Plugin.DiscountRequirements.Standard.csproj. Restore completed in 1.15 min for /home/teddy/Documents/dotnet/grandnode/Grand.Framework/Grand.Framework.csproj. Restore completed in 22.37 sec for /home/teddy/Documents/dotnet/grandnode/Plugins/Grand.Plugin.ExternalAuth.Facebook/Grand.Plugin.ExternalAuth.Facebook.csproj. Restore completed in 1.15 min for /home/teddy/Documents/dotnet/grandnode/Plugins/Grand.Plugin.ExchangeRate.McExchange/Grand.Plugin.ExchangeRate.McExchange.csproj. Restore completed in 1.15 min for /home/teddy/Documents/dotnet/grandnode/Grand.Api/Grand.Api.csproj. Restore completed in 1.15 min for /home/teddy/Documents/dotnet/grandnode/Grand.Web/Grand.Web.csproj. Restore completed in 22.99 sec for /home/teddy/Documents/dotnet/grandnode/Plugins/Grand.Plugin.ExternalAuth.Google/Grand.Plugin.ExternalAuth.Google.csproj. Restore completed in 652.2 ms for /home/teddy/Documents/dotnet/grandnode/Plugins/Grand.Plugin.Payments.PayInStore/Grand.Plugin.Payments.PayInStore.csproj. Restore completed in 760.17 ms for /home/teddy/Documents/dotnet/grandnode/Plugins/Grand.Plugin.Feed.GoogleShopping/Grand.Plugin.Feed.GoogleShopping.csproj. Restore completed in 547.04 ms for /home/teddy/Documents/dotnet/grandnode/Plugins/Grand.Plugin.Shipping.ByWeight/Grand.Plugin.Shipping.ByWeight.csproj. Restore completed in 755.94 ms for /home/teddy/Documents/dotnet/grandnode/Plugins/Grand.Plugin.Payments.CashOnDelivery/Grand.Plugin.Payments.CashOnDelivery.csproj. Restore completed in 765.72 ms for /home/teddy/Documents/dotnet/grandnode/Plugins/Grand.Plugin.Payments.CheckMoneyOrder/Grand.Plugin.Payments.CheckMoneyOrder.csproj. Restore completed in 734.12 ms for /home/teddy/Documents/dotnet/grandnode/Plugins/Grand.Plugin.Payments.PayPalStandard/Grand.Plugin.Payments.PayPalStandard.csproj. Restore completed in 550.09 ms for /home/teddy/Documents/dotnet/grandnode/Plugins/Grand.Plugin.Widgets.GoogleAnalytics/Grand.Plugin.Widgets.GoogleAnalytics.csproj. Restore completed in 739.16 ms for /home/teddy/Documents/dotnet/grandnode/Plugins/Grand.Plugin.Shipping.FixedRateShipping/Grand.Plugin.Shipping.FixedRateShipping.csproj. Restore completed in 616.21 ms for /home/teddy/Documents/dotnet/grandnode/Plugins/Grand.Plugin.Tax.FixedRate/Grand.Plugin.Tax.FixedRate.csproj. Restore completed in 716.98 ms for /home/teddy/Documents/dotnet/grandnode/Plugins/Grand.Plugin.Shipping.ShippingPoint/Grand.Plugin.Shipping.ShippingPoint.csproj. Restore completed in 713.96 ms for /home/teddy/Documents/dotnet/grandnode/Plugins/Grand.Plugin.Tax.CountryStateZip/Grand.Plugin.Tax.CountryStateZip.csproj. Restore completed in 608.26 ms for /home/teddy/Documents/dotnet/grandnode/Plugins/Grand.Plugin.Widgets.Slider/Grand.Plugin.Widgets.Slider.csproj. Restore completed in 6.05 sec for /home/teddy/Documents/dotnet/grandnode/Plugins/Grand.Plugin.Payments.BrainTree/Grand.Plugin.Payments.BrainTree.csproj. Restore completed in 12.81 sec for /home/teddy/Documents/dotnet/grandnode/Tests/Grand.Core.Tests/Grand.Core.Tests.csproj. Restore completed in 13.4 sec for /home/teddy/Documents/dotnet/grandnode/Tests/Grand.Api.Tests/Grand.Api.Tests.csproj. Restore completed in 12.85 sec for /home/teddy/Documents/dotnet/grandnode/Tests/Grand.Services.Tests/Grand.Services.Tests.csproj. Restore completed in 13.1 sec for /home/teddy/Documents/dotnet/grandnode/Tests/Grand.Plugin.Tests/Grand.Plugin.Tests.csproj. |
After a while, when it’s completed we can build plugins and publish our application. It compiles our code and bundles all the required dependencies to specific directory.
|
1 2 3 4 5 6 7 8 9 10 11 12 13 14 15 16 17 18 19 20 21 |
teddy@teddy:~/Documents/dotnet/grandnode$ sudo dotnet build Plugins/Grand.Plugin.DiscountRequirements.Standard [sudo] password for teddy: Microsoft (R) Build Engine version 16.1.76+g14b0a930a7 for .NET Core Copyright (C) Microsoft Corporation. All rights reserved. Restore completed in 46.35 ms for /home/teddy/Documents/dotnet/grandnode/Grand.Core/Grand.Core.csproj. Restore completed in 46.36 ms for /home/teddy/Documents/dotnet/grandnode/Grand.Data/Grand.Data.csproj. Restore completed in 46.37 ms for /home/teddy/Documents/dotnet/grandnode/Grand.Framework/Grand.Framework.csproj. Restore completed in 46.36 ms for /home/teddy/Documents/dotnet/grandnode/Grand.Services/Grand.Services.csproj. Restore completed in 46.36 ms for /home/teddy/Documents/dotnet/grandnode/Plugins/Grand.Plugin.DiscountRequirements.Standard/Grand.Plugin.DiscountRequirements.Standard.csproj. Grand.Core -> /home/teddy/Documents/dotnet/grandnode/Grand.Core/bin/Debug/netcoreapp2.2/Grand.Core.dll Grand.Data -> /home/teddy/Documents/dotnet/grandnode/Grand.Data/bin/Debug/netcoreapp2.2/Grand.Data.dll Grand.Services -> /home/teddy/Documents/dotnet/grandnode/Grand.Services/bin/Debug/netcoreapp2.2/Grand.Services.dll Grand.Framework -> /home/teddy/Documents/dotnet/grandnode/Grand.Framework/bin/Debug/netcoreapp2.2/Grand.Framework.dll Grand.Plugin.DiscountRequirements.Standard -> /home/teddy/Documents/dotnet/grandnode/Grand.Web/Plugins/DiscountRequirements.Standard/Grand.Plugin.DiscountRequirements.Standard.dll Build succeeded. 0 Warning(s) 0 Error(s) Time Elapsed 00:00:08.12 |
OR IT’D BE BETTER TO USE SINGLE LINE COMMAND (sudo dotnet build Plugins/Grand.Plugin.ExchangeRate.McExchange && sudo dotnet build Plugins/Grand.Plugin.ExternalAuth.Facebook && sudo dotnet build Plugins/Grand.Plugin.Feed.GoogleShopping && sudo dotnet build Plugins/Grand.Plugin.Payments.CashOnDelivery && sudo dotnet build Plugins/Grand.Plugin.Payments.CheckMoneyOrder && sudo dotnet build Plugins/Grand.Plugin.Payments.PayInStore && sudo dotnet build Plugins/Grand.Plugin.Payments.PayPalStandard && sudo dotnet build Plugins/Grand.Plugin.Shipping.ByWeight && sudo dotnet build Plugins/Grand.Plugin.Shipping.FixedRateShipping && sudo dotnet build Plugins/Grand.Plugin.Shipping.ShippingPoint && sudo dotnet build Plugins/Grand.Plugin.Tax.CountryStateZip && sudo dotnet build Plugins/Grand.Plugin.Tax.FixedRate && sudo dotnet build Plugins/Grand.Plugin.Widgets.GoogleAnalytics && sudo dotnet build Plugins/Grand.Plugin.Widgets.Slider)
|
1 2 3 4 5 6 7 8 9 10 11 12 13 14 15 16 17 18 19 20 21 22 23 24 25 26 27 28 29 30 31 32 33 34 35 36 37 38 39 40 41 42 43 44 45 46 47 48 49 50 51 52 53 54 55 56 57 58 59 60 61 62 63 64 65 66 67 68 69 70 71 72 73 74 75 76 77 78 79 80 81 82 83 84 85 86 87 88 89 90 91 92 93 94 95 96 97 98 99 100 101 102 103 104 105 106 107 108 109 110 111 112 113 114 115 116 117 118 119 120 121 122 123 124 125 126 127 128 129 130 131 132 133 134 135 136 137 138 139 140 141 142 143 144 145 146 147 148 149 150 151 152 153 154 155 156 157 158 159 160 161 162 163 164 165 166 167 168 169 170 171 172 173 174 175 176 177 178 179 180 181 182 183 184 185 186 187 188 189 190 191 192 193 194 195 196 197 198 199 200 201 202 203 204 205 206 207 208 209 210 211 212 213 214 215 216 217 218 219 220 221 222 223 224 225 226 227 228 229 230 231 232 233 234 235 236 237 238 239 240 241 242 243 244 245 246 247 248 249 250 251 252 253 254 255 256 257 258 259 260 261 262 263 264 265 266 267 268 269 |
teddy@teddy:~/Documents/dotnet/grandnode$ sudo dotnet build Plugins/Grand.Plugin.ExchangeRate.McExchange && sudo dotnet build Plugins/Grand.Plugin.ExternalAuth.Facebook && sudo dotnet build Plugins/Grand.Plugin.Feed.GoogleShopping && sudo dotnet build Plugins/Grand.Plugin.Payments.CashOnDelivery && sudo dotnet build Plugins/Grand.Plugin.Payments.CheckMoneyOrder && sudo dotnet build Plugins/Grand.Plugin.Payments.PayInStore && sudo dotnet build Plugins/Grand.Plugin.Payments.PayPalStandard && sudo dotnet build Plugins/Grand.Plugin.Shipping.ByWeight && sudo dotnet build Plugins/Grand.Plugin.Shipping.FixedRateShipping && sudo dotnet build Plugins/Grand.Plugin.Shipping.ShippingPoint && sudo dotnet build Plugins/Grand.Plugin.Tax.CountryStateZip && sudo dotnet build Plugins/Grand.Plugin.Tax.FixedRate && sudo dotnet build Plugins/Grand.Plugin.Widgets.GoogleAnalytics && sudo dotnet build Plugins/Grand.Plugin.Widgets.Slider Microsoft (R) Build Engine version 16.1.76+g14b0a930a7 for .NET Core Copyright (C) Microsoft Corporation. All rights reserved. Restore completed in 37.77 ms for /home/teddy/Documents/dotnet/grandnode/Grand.Core/Grand.Core.csproj. Restore completed in 37.77 ms for /home/teddy/Documents/dotnet/grandnode/Grand.Data/Grand.Data.csproj. Restore completed in 37.77 ms for /home/teddy/Documents/dotnet/grandnode/Grand.Services/Grand.Services.csproj. Restore completed in 37.78 ms for /home/teddy/Documents/dotnet/grandnode/Grand.Framework/Grand.Framework.csproj. Restore completed in 37.79 ms for /home/teddy/Documents/dotnet/grandnode/Plugins/Grand.Plugin.ExchangeRate.McExchange/Grand.Plugin.ExchangeRate.McExchange.csproj. Grand.Core -> /home/teddy/Documents/dotnet/grandnode/Grand.Core/bin/Debug/netcoreapp2.2/Grand.Core.dll Grand.Data -> /home/teddy/Documents/dotnet/grandnode/Grand.Data/bin/Debug/netcoreapp2.2/Grand.Data.dll Grand.Services -> /home/teddy/Documents/dotnet/grandnode/Grand.Services/bin/Debug/netcoreapp2.2/Grand.Services.dll Grand.Framework -> /home/teddy/Documents/dotnet/grandnode/Grand.Framework/bin/Debug/netcoreapp2.2/Grand.Framework.dll Grand.Plugin.ExchangeRate.McExchange -> /home/teddy/Documents/dotnet/grandnode/Grand.Web/Plugins/ExchangeRate.McExchange/Grand.Plugin.ExchangeRate.McExchange.dll Build succeeded. 0 Warning(s) 0 Error(s) Time Elapsed 00:00:01.58 Microsoft (R) Build Engine version 16.1.76+g14b0a930a7 for .NET Core Copyright (C) Microsoft Corporation. All rights reserved. Restore completed in 39.53 ms for /home/teddy/Documents/dotnet/grandnode/Grand.Services/Grand.Services.csproj. Restore completed in 39.55 ms for /home/teddy/Documents/dotnet/grandnode/Grand.Framework/Grand.Framework.csproj. Restore completed in 39.53 ms for /home/teddy/Documents/dotnet/grandnode/Grand.Data/Grand.Data.csproj. Restore completed in 39.53 ms for /home/teddy/Documents/dotnet/grandnode/Grand.Core/Grand.Core.csproj. Restore completed in 39.55 ms for /home/teddy/Documents/dotnet/grandnode/Plugins/Grand.Plugin.ExternalAuth.Facebook/Grand.Plugin.ExternalAuth.Facebook.csproj. Grand.Core -> /home/teddy/Documents/dotnet/grandnode/Grand.Core/bin/Debug/netcoreapp2.2/Grand.Core.dll Grand.Data -> /home/teddy/Documents/dotnet/grandnode/Grand.Data/bin/Debug/netcoreapp2.2/Grand.Data.dll Grand.Services -> /home/teddy/Documents/dotnet/grandnode/Grand.Services/bin/Debug/netcoreapp2.2/Grand.Services.dll Grand.Framework -> /home/teddy/Documents/dotnet/grandnode/Grand.Framework/bin/Debug/netcoreapp2.2/Grand.Framework.dll Grand.Plugin.ExternalAuth.Facebook -> /home/teddy/Documents/dotnet/grandnode/Grand.Web/Plugins/ExternalAuth.Facebook/Grand.Plugin.ExternalAuth.Facebook.dll Build succeeded. 0 Warning(s) 0 Error(s) Time Elapsed 00:00:01.55 Microsoft (R) Build Engine version 16.1.76+g14b0a930a7 for .NET Core Copyright (C) Microsoft Corporation. All rights reserved. Restore completed in 62.04 ms for /home/teddy/Documents/dotnet/grandnode/Grand.Data/Grand.Data.csproj. Restore completed in 62.03 ms for /home/teddy/Documents/dotnet/grandnode/Grand.Core/Grand.Core.csproj. Restore completed in 62.04 ms for /home/teddy/Documents/dotnet/grandnode/Grand.Services/Grand.Services.csproj. Restore completed in 63.7 ms for /home/teddy/Documents/dotnet/grandnode/Plugins/Grand.Plugin.Feed.GoogleShopping/Grand.Plugin.Feed.GoogleShopping.csproj. Restore completed in 62.03 ms for /home/teddy/Documents/dotnet/grandnode/Grand.Framework/Grand.Framework.csproj. Grand.Core -> /home/teddy/Documents/dotnet/grandnode/Grand.Core/bin/Debug/netcoreapp2.2/Grand.Core.dll Grand.Data -> /home/teddy/Documents/dotnet/grandnode/Grand.Data/bin/Debug/netcoreapp2.2/Grand.Data.dll Grand.Services -> /home/teddy/Documents/dotnet/grandnode/Grand.Services/bin/Debug/netcoreapp2.2/Grand.Services.dll Grand.Framework -> /home/teddy/Documents/dotnet/grandnode/Grand.Framework/bin/Debug/netcoreapp2.2/Grand.Framework.dll Grand.Plugin.Feed.GoogleShopping -> /home/teddy/Documents/dotnet/grandnode/Grand.Web/Plugins/Feed.GoogleShopping/Grand.Plugin.Feed.GoogleShopping.dll Build succeeded. 0 Warning(s) 0 Error(s) Time Elapsed 00:00:01.59 Microsoft (R) Build Engine version 16.1.76+g14b0a930a7 for .NET Core Copyright (C) Microsoft Corporation. All rights reserved. Restore completed in 40.02 ms for /home/teddy/Documents/dotnet/grandnode/Grand.Core/Grand.Core.csproj. Restore completed in 40.01 ms for /home/teddy/Documents/dotnet/grandnode/Grand.Framework/Grand.Framework.csproj. Restore completed in 40.02 ms for /home/teddy/Documents/dotnet/grandnode/Plugins/Grand.Plugin.Payments.CashOnDelivery/Grand.Plugin.Payments.CashOnDelivery.csproj. Restore completed in 40.02 ms for /home/teddy/Documents/dotnet/grandnode/Grand.Data/Grand.Data.csproj. Restore completed in 40.01 ms for /home/teddy/Documents/dotnet/grandnode/Grand.Services/Grand.Services.csproj. Grand.Core -> /home/teddy/Documents/dotnet/grandnode/Grand.Core/bin/Debug/netcoreapp2.2/Grand.Core.dll Grand.Data -> /home/teddy/Documents/dotnet/grandnode/Grand.Data/bin/Debug/netcoreapp2.2/Grand.Data.dll Grand.Services -> /home/teddy/Documents/dotnet/grandnode/Grand.Services/bin/Debug/netcoreapp2.2/Grand.Services.dll Grand.Framework -> /home/teddy/Documents/dotnet/grandnode/Grand.Framework/bin/Debug/netcoreapp2.2/Grand.Framework.dll Grand.Plugin.Payments.CashOnDelivery -> /home/teddy/Documents/dotnet/grandnode/Grand.Web/Plugins/Payments.CashOnDelivery/Grand.Plugin.Payments.CashOnDelivery.dll Build succeeded. 0 Warning(s) 0 Error(s) Time Elapsed 00:00:01.55 Microsoft (R) Build Engine version 16.1.76+g14b0a930a7 for .NET Core Copyright (C) Microsoft Corporation. All rights reserved. Restore completed in 63.97 ms for /home/teddy/Documents/dotnet/grandnode/Grand.Core/Grand.Core.csproj. Restore completed in 63.97 ms for /home/teddy/Documents/dotnet/grandnode/Grand.Data/Grand.Data.csproj. Restore completed in 63.96 ms for /home/teddy/Documents/dotnet/grandnode/Plugins/Grand.Plugin.Payments.CheckMoneyOrder/Grand.Plugin.Payments.CheckMoneyOrder.csproj. Restore completed in 63.96 ms for /home/teddy/Documents/dotnet/grandnode/Grand.Services/Grand.Services.csproj. Restore completed in 65.61 ms for /home/teddy/Documents/dotnet/grandnode/Grand.Framework/Grand.Framework.csproj. Grand.Core -> /home/teddy/Documents/dotnet/grandnode/Grand.Core/bin/Debug/netcoreapp2.2/Grand.Core.dll Grand.Data -> /home/teddy/Documents/dotnet/grandnode/Grand.Data/bin/Debug/netcoreapp2.2/Grand.Data.dll Grand.Services -> /home/teddy/Documents/dotnet/grandnode/Grand.Services/bin/Debug/netcoreapp2.2/Grand.Services.dll Grand.Framework -> /home/teddy/Documents/dotnet/grandnode/Grand.Framework/bin/Debug/netcoreapp2.2/Grand.Framework.dll Grand.Plugin.Payments.CheckMoneyOrder -> /home/teddy/Documents/dotnet/grandnode/Grand.Web/Plugins/Payments.CheckMoneyOrder/Grand.Plugin.Payments.CheckMoneyOrder.dll Build succeeded. 0 Warning(s) 0 Error(s) Time Elapsed 00:00:01.61 Microsoft (R) Build Engine version 16.1.76+g14b0a930a7 for .NET Core Copyright (C) Microsoft Corporation. All rights reserved. Restore completed in 50.84 ms for /home/teddy/Documents/dotnet/grandnode/Grand.Core/Grand.Core.csproj. Restore completed in 50.79 ms for /home/teddy/Documents/dotnet/grandnode/Grand.Services/Grand.Services.csproj. Restore completed in 74.12 ms for /home/teddy/Documents/dotnet/grandnode/Grand.Data/Grand.Data.csproj. Restore completed in 74.87 ms for /home/teddy/Documents/dotnet/grandnode/Grand.Framework/Grand.Framework.csproj. Restore completed in 77.47 ms for /home/teddy/Documents/dotnet/grandnode/Plugins/Grand.Plugin.Payments.PayInStore/Grand.Plugin.Payments.PayInStore.csproj. Grand.Core -> /home/teddy/Documents/dotnet/grandnode/Grand.Core/bin/Debug/netcoreapp2.2/Grand.Core.dll Grand.Data -> /home/teddy/Documents/dotnet/grandnode/Grand.Data/bin/Debug/netcoreapp2.2/Grand.Data.dll Grand.Services -> /home/teddy/Documents/dotnet/grandnode/Grand.Services/bin/Debug/netcoreapp2.2/Grand.Services.dll Grand.Framework -> /home/teddy/Documents/dotnet/grandnode/Grand.Framework/bin/Debug/netcoreapp2.2/Grand.Framework.dll Grand.Plugin.Payments.PayInStore -> /home/teddy/Documents/dotnet/grandnode/Grand.Web/Plugins/Payments.PayInStore/Grand.Plugin.Payments.PayInStore.dll Build succeeded. 0 Warning(s) 0 Error(s) Time Elapsed 00:00:01.69 Microsoft (R) Build Engine version 16.1.76+g14b0a930a7 for .NET Core Copyright (C) Microsoft Corporation. All rights reserved. Restore completed in 42.95 ms for /home/teddy/Documents/dotnet/grandnode/Grand.Framework/Grand.Framework.csproj. Restore completed in 42.95 ms for /home/teddy/Documents/dotnet/grandnode/Grand.Core/Grand.Core.csproj. Restore completed in 42.95 ms for /home/teddy/Documents/dotnet/grandnode/Grand.Services/Grand.Services.csproj. Restore completed in 42.95 ms for /home/teddy/Documents/dotnet/grandnode/Grand.Data/Grand.Data.csproj. Restore completed in 42.95 ms for /home/teddy/Documents/dotnet/grandnode/Plugins/Grand.Plugin.Payments.PayPalStandard/Grand.Plugin.Payments.PayPalStandard.csproj. Grand.Core -> /home/teddy/Documents/dotnet/grandnode/Grand.Core/bin/Debug/netcoreapp2.2/Grand.Core.dll Grand.Data -> /home/teddy/Documents/dotnet/grandnode/Grand.Data/bin/Debug/netcoreapp2.2/Grand.Data.dll Grand.Services -> /home/teddy/Documents/dotnet/grandnode/Grand.Services/bin/Debug/netcoreapp2.2/Grand.Services.dll Grand.Framework -> /home/teddy/Documents/dotnet/grandnode/Grand.Framework/bin/Debug/netcoreapp2.2/Grand.Framework.dll Grand.Plugin.Payments.PayPalStandard -> /home/teddy/Documents/dotnet/grandnode/Grand.Web/Plugins/Payments.PayPalStandard/Grand.Plugin.Payments.PayPalStandard.dll Build succeeded. 0 Warning(s) 0 Error(s) Time Elapsed 00:00:01.60 Microsoft (R) Build Engine version 16.1.76+g14b0a930a7 for .NET Core Copyright (C) Microsoft Corporation. All rights reserved. Restore completed in 39.67 ms for /home/teddy/Documents/dotnet/grandnode/Grand.Framework/Grand.Framework.csproj. Restore completed in 39.67 ms for /home/teddy/Documents/dotnet/grandnode/Plugins/Grand.Plugin.Shipping.ByWeight/Grand.Plugin.Shipping.ByWeight.csproj. Restore completed in 39.67 ms for /home/teddy/Documents/dotnet/grandnode/Grand.Data/Grand.Data.csproj. Restore completed in 39.68 ms for /home/teddy/Documents/dotnet/grandnode/Grand.Services/Grand.Services.csproj. Restore completed in 39.68 ms for /home/teddy/Documents/dotnet/grandnode/Grand.Core/Grand.Core.csproj. Grand.Core -> /home/teddy/Documents/dotnet/grandnode/Grand.Core/bin/Debug/netcoreapp2.2/Grand.Core.dll Grand.Data -> /home/teddy/Documents/dotnet/grandnode/Grand.Data/bin/Debug/netcoreapp2.2/Grand.Data.dll Grand.Services -> /home/teddy/Documents/dotnet/grandnode/Grand.Services/bin/Debug/netcoreapp2.2/Grand.Services.dll Grand.Framework -> /home/teddy/Documents/dotnet/grandnode/Grand.Framework/bin/Debug/netcoreapp2.2/Grand.Framework.dll Grand.Plugin.Shipping.ByWeight -> /home/teddy/Documents/dotnet/grandnode/Grand.Web/Plugins/Shipping.ByWeight/Grand.Plugin.Shipping.ByWeight.dll Build succeeded. 0 Warning(s) 0 Error(s) Time Elapsed 00:00:01.61 Microsoft (R) Build Engine version 16.1.76+g14b0a930a7 for .NET Core Copyright (C) Microsoft Corporation. All rights reserved. Restore completed in 62.93 ms for /home/teddy/Documents/dotnet/grandnode/Grand.Services/Grand.Services.csproj. Restore completed in 62.94 ms for /home/teddy/Documents/dotnet/grandnode/Grand.Data/Grand.Data.csproj. Restore completed in 64.47 ms for /home/teddy/Documents/dotnet/grandnode/Plugins/Grand.Plugin.Shipping.FixedRateShipping/Grand.Plugin.Shipping.FixedRateShipping.csproj. Restore completed in 62.93 ms for /home/teddy/Documents/dotnet/grandnode/Grand.Framework/Grand.Framework.csproj. Restore completed in 62.93 ms for /home/teddy/Documents/dotnet/grandnode/Grand.Core/Grand.Core.csproj. Grand.Core -> /home/teddy/Documents/dotnet/grandnode/Grand.Core/bin/Debug/netcoreapp2.2/Grand.Core.dll Grand.Data -> /home/teddy/Documents/dotnet/grandnode/Grand.Data/bin/Debug/netcoreapp2.2/Grand.Data.dll Grand.Services -> /home/teddy/Documents/dotnet/grandnode/Grand.Services/bin/Debug/netcoreapp2.2/Grand.Services.dll Grand.Framework -> /home/teddy/Documents/dotnet/grandnode/Grand.Framework/bin/Debug/netcoreapp2.2/Grand.Framework.dll Grand.Plugin.Shipping.FixedRateShipping -> /home/teddy/Documents/dotnet/grandnode/Grand.Web/Plugins/Shipping.FixedRateShipping/Grand.Plugin.Shipping.FixedRateShipping.dll Build succeeded. 0 Warning(s) 0 Error(s) Time Elapsed 00:00:01.57 Microsoft (R) Build Engine version 16.1.76+g14b0a930a7 for .NET Core Copyright (C) Microsoft Corporation. All rights reserved. Restore completed in 39.36 ms for /home/teddy/Documents/dotnet/grandnode/Grand.Core/Grand.Core.csproj. Restore completed in 39.37 ms for /home/teddy/Documents/dotnet/grandnode/Grand.Services/Grand.Services.csproj. Restore completed in 39.37 ms for /home/teddy/Documents/dotnet/grandnode/Plugins/Grand.Plugin.Shipping.ShippingPoint/Grand.Plugin.Shipping.ShippingPoint.csproj. Restore completed in 39.36 ms for /home/teddy/Documents/dotnet/grandnode/Grand.Data/Grand.Data.csproj. Restore completed in 39.37 ms for /home/teddy/Documents/dotnet/grandnode/Grand.Framework/Grand.Framework.csproj. Grand.Core -> /home/teddy/Documents/dotnet/grandnode/Grand.Core/bin/Debug/netcoreapp2.2/Grand.Core.dll Grand.Data -> /home/teddy/Documents/dotnet/grandnode/Grand.Data/bin/Debug/netcoreapp2.2/Grand.Data.dll Grand.Services -> /home/teddy/Documents/dotnet/grandnode/Grand.Services/bin/Debug/netcoreapp2.2/Grand.Services.dll Grand.Framework -> /home/teddy/Documents/dotnet/grandnode/Grand.Framework/bin/Debug/netcoreapp2.2/Grand.Framework.dll Grand.Plugin.Shipping.ShippingPoint -> /home/teddy/Documents/dotnet/grandnode/Grand.Web/Plugins/Shipping.ShippingPoint/Grand.Plugin.Shipping.ShippingPoint.dll Build succeeded. 0 Warning(s) 0 Error(s) Time Elapsed 00:00:01.56 Microsoft (R) Build Engine version 16.1.76+g14b0a930a7 for .NET Core Copyright (C) Microsoft Corporation. All rights reserved. Restore completed in 40.27 ms for /home/teddy/Documents/dotnet/grandnode/Plugins/Grand.Plugin.Tax.CountryStateZip/Grand.Plugin.Tax.CountryStateZip.csproj. Restore completed in 40.27 ms for /home/teddy/Documents/dotnet/grandnode/Grand.Core/Grand.Core.csproj. Restore completed in 40.27 ms for /home/teddy/Documents/dotnet/grandnode/Grand.Services/Grand.Services.csproj. Restore completed in 40.27 ms for /home/teddy/Documents/dotnet/grandnode/Grand.Data/Grand.Data.csproj. Restore completed in 40.28 ms for /home/teddy/Documents/dotnet/grandnode/Grand.Framework/Grand.Framework.csproj. Grand.Core -> /home/teddy/Documents/dotnet/grandnode/Grand.Core/bin/Debug/netcoreapp2.2/Grand.Core.dll Grand.Data -> /home/teddy/Documents/dotnet/grandnode/Grand.Data/bin/Debug/netcoreapp2.2/Grand.Data.dll Grand.Services -> /home/teddy/Documents/dotnet/grandnode/Grand.Services/bin/Debug/netcoreapp2.2/Grand.Services.dll Grand.Framework -> /home/teddy/Documents/dotnet/grandnode/Grand.Framework/bin/Debug/netcoreapp2.2/Grand.Framework.dll Grand.Plugin.Tax.CountryStateZip -> /home/teddy/Documents/dotnet/grandnode/Grand.Web/Plugins/Tax.CountryStateZip/Grand.Plugin.Tax.CountryStateZip.dll Build succeeded. 0 Warning(s) 0 Error(s) Time Elapsed 00:00:01.58 Microsoft (R) Build Engine version 16.1.76+g14b0a930a7 for .NET Core Copyright (C) Microsoft Corporation. All rights reserved. Restore completed in 60.43 ms for /home/teddy/Documents/dotnet/grandnode/Grand.Framework/Grand.Framework.csproj. Restore completed in 60.43 ms for /home/teddy/Documents/dotnet/grandnode/Grand.Data/Grand.Data.csproj. Restore completed in 60.43 ms for /home/teddy/Documents/dotnet/grandnode/Plugins/Grand.Plugin.Tax.FixedRate/Grand.Plugin.Tax.FixedRate.csproj. Restore completed in 61.55 ms for /home/teddy/Documents/dotnet/grandnode/Grand.Core/Grand.Core.csproj. Restore completed in 60.42 ms for /home/teddy/Documents/dotnet/grandnode/Grand.Services/Grand.Services.csproj. Grand.Core -> /home/teddy/Documents/dotnet/grandnode/Grand.Core/bin/Debug/netcoreapp2.2/Grand.Core.dll Grand.Data -> /home/teddy/Documents/dotnet/grandnode/Grand.Data/bin/Debug/netcoreapp2.2/Grand.Data.dll Grand.Services -> /home/teddy/Documents/dotnet/grandnode/Grand.Services/bin/Debug/netcoreapp2.2/Grand.Services.dll Grand.Framework -> /home/teddy/Documents/dotnet/grandnode/Grand.Framework/bin/Debug/netcoreapp2.2/Grand.Framework.dll Grand.Plugin.Tax.FixedRate -> /home/teddy/Documents/dotnet/grandnode/Grand.Web/Plugins/Tax.FixedRate/Grand.Plugin.Tax.FixedRate.dll Build succeeded. 0 Warning(s) 0 Error(s) Time Elapsed 00:00:01.52 Microsoft (R) Build Engine version 16.1.76+g14b0a930a7 for .NET Core Copyright (C) Microsoft Corporation. All rights reserved. Restore completed in 43.64 ms for /home/teddy/Documents/dotnet/grandnode/Grand.Data/Grand.Data.csproj. Restore completed in 43.65 ms for /home/teddy/Documents/dotnet/grandnode/Grand.Core/Grand.Core.csproj. Restore completed in 43.61 ms for /home/teddy/Documents/dotnet/grandnode/Plugins/Grand.Plugin.Widgets.GoogleAnalytics/Grand.Plugin.Widgets.GoogleAnalytics.csproj. Restore completed in 43.65 ms for /home/teddy/Documents/dotnet/grandnode/Grand.Framework/Grand.Framework.csproj. Restore completed in 43.6 ms for /home/teddy/Documents/dotnet/grandnode/Grand.Services/Grand.Services.csproj. Grand.Core -> /home/teddy/Documents/dotnet/grandnode/Grand.Core/bin/Debug/netcoreapp2.2/Grand.Core.dll Grand.Data -> /home/teddy/Documents/dotnet/grandnode/Grand.Data/bin/Debug/netcoreapp2.2/Grand.Data.dll Grand.Services -> /home/teddy/Documents/dotnet/grandnode/Grand.Services/bin/Debug/netcoreapp2.2/Grand.Services.dll Grand.Framework -> /home/teddy/Documents/dotnet/grandnode/Grand.Framework/bin/Debug/netcoreapp2.2/Grand.Framework.dll Grand.Plugin.Widgets.GoogleAnalytics -> /home/teddy/Documents/dotnet/grandnode/Grand.Web/Plugins/Widgets.GoogleAnalytics/Grand.Plugin.Widgets.GoogleAnalytics.dll Build succeeded. 0 Warning(s) 0 Error(s) Time Elapsed 00:00:01.54 Microsoft (R) Build Engine version 16.1.76+g14b0a930a7 for .NET Core Copyright (C) Microsoft Corporation. All rights reserved. Restore completed in 43.12 ms for /home/teddy/Documents/dotnet/grandnode/Grand.Data/Grand.Data.csproj. Restore completed in 43.11 ms for /home/teddy/Documents/dotnet/grandnode/Grand.Api/Grand.Api.csproj. Restore completed in 43.11 ms for /home/teddy/Documents/dotnet/grandnode/Plugins/Grand.Plugin.Widgets.Slider/Grand.Plugin.Widgets.Slider.csproj. Restore completed in 43.1 ms for /home/teddy/Documents/dotnet/grandnode/Grand.Services/Grand.Services.csproj. Restore completed in 43.1 ms for /home/teddy/Documents/dotnet/grandnode/Grand.Core/Grand.Core.csproj. Restore completed in 46.67 ms for /home/teddy/Documents/dotnet/grandnode/Grand.Framework/Grand.Framework.csproj. Grand.Core -> /home/teddy/Documents/dotnet/grandnode/Grand.Core/bin/Debug/netcoreapp2.2/Grand.Core.dll Grand.Data -> /home/teddy/Documents/dotnet/grandnode/Grand.Data/bin/Debug/netcoreapp2.2/Grand.Data.dll Grand.Services -> /home/teddy/Documents/dotnet/grandnode/Grand.Services/bin/Debug/netcoreapp2.2/Grand.Services.dll Grand.Framework -> /home/teddy/Documents/dotnet/grandnode/Grand.Framework/bin/Debug/netcoreapp2.2/Grand.Framework.dll Grand.Api -> /home/teddy/Documents/dotnet/grandnode/Grand.Api/bin/Debug/netcoreapp2.2/Grand.Api.dll Grand.Plugin.Widgets.Slider -> /home/teddy/Documents/dotnet/grandnode/Grand.Web/Plugins/Widgets.Slider/Grand.Plugin.Widgets.Slider.dll Build succeeded. 0 Warning(s) 0 Error(s) Time Elapsed 00:00:02.64 |
Then publish the compiled Grand.Web in /home/teddy/Documents/works/grandnode (NOTE: BE CAREFULL WITH THE COMMAND FROM THE WEBSITE LIKE: sudo dotnet publish Grand.Web –c Release –o /var/webapps/GrandNode. THIS IS BECAUSE –c AND –o ARE NOT PROPER FONT. IT SHOULD BE -c AND -o ). IF YOU GET THIS ERROR:
|
1 2 3 4 5 6 7 |
Microsoft (R) Build Engine version 16.1.76+g14b0a930a7 for .NET Core Copyright (C) Microsoft Corporation. All rights reserved. MSBUILD : error MSB1008: Only one project can be specified. Switch: –c For switch syntax, type "MSBuild -help" |
IT MEANS THE FONT IS NOT CORRECT (ref: https://github.com/grandnode/grandnode/issues/356). SO HERE IS THE CORRECT ONE:
|
1 2 3 4 5 6 7 8 9 10 11 12 13 14 15 16 17 |
teddy@teddy:~/Documents/dotnet/grandnode$ sudo dotnet publish Grand.Web -c Release -o /home/teddy/Documents/works/grandnode Microsoft (R) Build Engine version 16.1.76+g14b0a930a7 for .NET Core Copyright (C) Microsoft Corporation. All rights reserved. Restore completed in 43.99 ms for /home/teddy/Documents/dotnet/grandnode/Grand.Api/Grand.Api.csproj. Restore completed in 43.98 ms for /home/teddy/Documents/dotnet/grandnode/Grand.Core/Grand.Core.csproj. Restore completed in 43.98 ms for /home/teddy/Documents/dotnet/grandnode/Grand.Services/Grand.Services.csproj. Restore completed in 43.99 ms for /home/teddy/Documents/dotnet/grandnode/Grand.Data/Grand.Data.csproj. Restore completed in 45.76 ms for /home/teddy/Documents/dotnet/grandnode/Grand.Framework/Grand.Framework.csproj. Restore completed in 50.24 ms for /home/teddy/Documents/dotnet/grandnode/Grand.Web/Grand.Web.csproj. Grand.Core -> /home/teddy/Documents/dotnet/grandnode/Grand.Core/bin/Release/netcoreapp2.2/Grand.Core.dll Grand.Data -> /home/teddy/Documents/dotnet/grandnode/Grand.Data/bin/Release/netcoreapp2.2/Grand.Data.dll Grand.Services -> /home/teddy/Documents/dotnet/grandnode/Grand.Services/bin/Release/netcoreapp2.2/Grand.Services.dll Grand.Framework -> /home/teddy/Documents/dotnet/grandnode/Grand.Framework/bin/Release/netcoreapp2.2/Grand.Framework.dll Grand.Api -> /home/teddy/Documents/dotnet/grandnode/Grand.Api/bin/Release/netcoreapp2.2/Grand.Api.dll Grand.Web -> /home/teddy/Documents/dotnet/grandnode/Grand.Web/bin/Release/netcoreapp2.2/Grand.Web.dll Grand.Web -> /home/teddy/Documents/works/grandnode/ |
In the next step we need to set the permissions so that the user that our service is running under (by default this will be www-data in this tutorial) can have the required access rights, we do this by running:
|
1 |
teddy@teddy:~$ sudo chown -R www-data:www-data /home/teddy/Documents/works/grandnode |
Test locally (https://docs.microsoft.com/en-US/aspnet/core/host-and-deploy/linux-nginx?view=aspnetcore-2.2)! Go to the root /home/teddy/Documents/works/grandnode. then run ‘dotnet Grand.Web.dll’
(NOTE: NEED TO USE ‘sudo ..’):
|
1 2 3 4 5 6 7 8 9 10 11 12 13 14 15 16 17 18 19 20 21 22 23 24 25 26 27 28 29 30 31 32 33 34 35 36 37 38 39 40 41 42 43 44 45 46 47 48 49 50 51 52 53 54 55 56 57 58 59 60 61 62 |
teddy@teddy:~$ cd Documents/works/grandnode/ teddy@teddy:~/Documents/works/grandnode$ dotnet Grand.Web.dll Application startup exception: System.Exception: Access to the path '/home/teddy/Documents/works/grandnode/Plugins/bin' is denied. Permission denied ---> System.UnauthorizedAccessException: Access to the path '/home/teddy/Documents/works/grandnode/Plugins/bin' is denied. ---> System.IO.IOException: Permission denied --- End of inner exception stack trace --- at System.IO.FileSystem.CreateDirectory(String fullPath) at System.IO.Directory.CreateDirectory(String path) at Grand.Core.Plugins.PluginManager.Initialize(ApplicationPartManager applicationPartManager, GrandConfig config) in /home/teddy/Documents/dotnet/grandnode/Grand.Core/Plugins/PluginManager.cs:line 79 --- End of inner exception stack trace --- at Grand.Core.Plugins.PluginManager.Initialize(ApplicationPartManager applicationPartManager, GrandConfig config) in /home/teddy/Documents/dotnet/grandnode/Grand.Core/Plugins/PluginManager.cs:line 189 at Grand.Core.Infrastructure.GrandEngine.Initialize(IServiceCollection services) in /home/teddy/Documents/dotnet/grandnode/Grand.Core/Infrastructure/GrandEngine.cs:line 155 at Grand.Framework.Infrastructure.Extensions.ServiceCollectionExtensions.ConfigureApplicationServices(IServiceCollection services, IConfiguration configuration) in /home/teddy/Documents/dotnet/grandnode/Grand.Framework/Infrastructure/Extensions/ServiceCollectionExtensions.cs:line 67 at Grand.Web.Startup.ConfigureServices(IServiceCollection services) in /home/teddy/Documents/dotnet/grandnode/Grand.Web/Startup.cs:line 44 --- End of stack trace from previous location where exception was thrown --- at Microsoft.AspNetCore.Hosting.ConventionBasedStartup.ConfigureServices(IServiceCollection services) at Microsoft.AspNetCore.Hosting.Internal.WebHost.EnsureApplicationServices() at Microsoft.AspNetCore.Hosting.Internal.WebHost.Initialize() --- End of stack trace from previous location where exception was thrown --- at Microsoft.AspNetCore.Hosting.Internal.WebHost.BuildApplication() crit: Microsoft.AspNetCore.Hosting.Internal.WebHost[6] Application startup exception System.Exception: Access to the path '/home/teddy/Documents/works/grandnode/Plugins/bin' is denied. Permission denied ---> System.UnauthorizedAccessException: Access to the path '/home/teddy/Documents/works/grandnode/Plugins/bin' is denied. ---> System.IO.IOException: Permission denied --- End of inner exception stack trace --- at System.IO.FileSystem.CreateDirectory(String fullPath) at System.IO.Directory.CreateDirectory(String path) at Grand.Core.Plugins.PluginManager.Initialize(ApplicationPartManager applicationPartManager, GrandConfig config) in /home/teddy/Documents/dotnet/grandnode/Grand.Core/Plugins/PluginManager.cs:line 79 --- End of inner exception stack trace --- at Grand.Core.Plugins.PluginManager.Initialize(ApplicationPartManager applicationPartManager, GrandConfig config) in /home/teddy/Documents/dotnet/grandnode/Grand.Core/Plugins/PluginManager.cs:line 189 at Grand.Core.Infrastructure.GrandEngine.Initialize(IServiceCollection services) in /home/teddy/Documents/dotnet/grandnode/Grand.Core/Infrastructure/GrandEngine.cs:line 155 at Grand.Framework.Infrastructure.Extensions.ServiceCollectionExtensions.ConfigureApplicationServices(IServiceCollection services, IConfiguration configuration) in /home/teddy/Documents/dotnet/grandnode/Grand.Framework/Infrastructure/Extensions/ServiceCollectionExtensions.cs:line 67 at Grand.Web.Startup.ConfigureServices(IServiceCollection services) in /home/teddy/Documents/dotnet/grandnode/Grand.Web/Startup.cs:line 44 --- End of stack trace from previous location where exception was thrown --- at Microsoft.AspNetCore.Hosting.ConventionBasedStartup.ConfigureServices(IServiceCollection services) at Microsoft.AspNetCore.Hosting.Internal.WebHost.EnsureApplicationServices() at Microsoft.AspNetCore.Hosting.Internal.WebHost.Initialize() --- End of stack trace from previous location where exception was thrown --- at Microsoft.AspNetCore.Hosting.Internal.WebHost.BuildApplication() Hosting environment: Production Content root path: /home/teddy/Documents/works/grandnode Now listening on: http://localhost:5000 Now listening on: https://localhost:5001 Application started. Press Ctrl+C to shut down. info: Microsoft.AspNetCore.Hosting.Internal.WebHost[1] Request starting HTTP/1.1 GET http://localhost:5000/ info: Microsoft.AspNetCore.Hosting.Internal.WebHost[2] Request finished in 5.3436ms 500 text/html; charset=utf-8 info: Microsoft.AspNetCore.Hosting.Internal.WebHost[1] Request starting HTTP/1.1 GET http://localhost:5000/favicon.ico info: Microsoft.AspNetCore.Hosting.Internal.WebHost[2] Request finished in 0.3189ms 500 text/html; charset=utf-8 info: Microsoft.AspNetCore.Hosting.Internal.WebHost[1] Request starting HTTP/1.1 GET http://localhost:5000/ info: Microsoft.AspNetCore.Hosting.Internal.WebHost[2] Request finished in 1.1609ms 500 text/html; charset=utf-8 info: Microsoft.AspNetCore.Hosting.Internal.WebHost[1] Request starting HTTP/1.1 GET http://localhost:5000/favicon.ico info: Microsoft.AspNetCore.Hosting.Internal.WebHost[2] Request finished in 0.4798ms 500 text/html; charset=utf-8 |
Then when I open it on my browser: http://localhost:5000/
I got this error:
|
1 2 |
An error occurred while starting the application. .NET Core 4.6.27617.05 X64 v4.0.0.0 | Microsoft.AspNetCore.Hosting version 2.2.0-rtm-35687 | Linux 4.15.0-38-generic #41~16.04.1-Ubuntu SMP Wed Oct 10 20:16:04 UTC 2018 | Need help? |
SOLUTION: use ‘sudo dotnet Grand.Web.dll’ INSTEAD OF ‘dotnet Grand.Web.dll’
|
1 2 3 4 5 6 7 8 9 10 11 12 13 14 15 16 17 18 19 20 21 22 23 24 25 26 27 28 29 30 31 32 33 34 35 36 37 38 39 40 41 42 43 44 45 46 47 48 49 50 51 52 53 54 55 56 57 58 59 60 61 62 63 64 65 66 67 68 69 70 71 72 73 74 75 76 77 78 79 80 81 82 83 84 85 86 87 88 89 90 91 92 |
teddy@teddy:~/Documents/works/grandnode$ sudo dotnet Grand.Web.dll info: Microsoft.AspNetCore.DataProtection.KeyManagement.XmlKeyManager[58] Creating key {b514a57a-957b-49bb-b1dd-ca7b6698e241} with creation date 2019-06-26 14:29:50Z, activation date 2019-06-26 14:29:50Z, and expiration date 2019-09-24 14:29:50Z. warn: Microsoft.AspNetCore.DataProtection.KeyManagement.XmlKeyManager[35] No XML encryptor configured. Key {b514a57a-957b-49bb-b1dd-ca7b6698e241} may be persisted to storage in unencrypted form. info: Microsoft.AspNetCore.DataProtection.Repositories.FileSystemXmlRepository[39] Writing data to file '/home/teddy/Documents/works/grandnode/App_Data/DataProtectionKeys/key-b514a57a-957b-49bb-b1dd-ca7b6698e241.xml'. Hosting environment: Production Content root path: /home/teddy/Documents/works/grandnode Now listening on: http://localhost:5000 Now listening on: https://localhost:5001 Application started. Press Ctrl+C to shut down. info: Microsoft.AspNetCore.Hosting.Internal.WebHost[1] Request starting HTTP/1.1 GET http://localhost:5000/ info: Microsoft.AspNetCore.Hosting.Internal.WebHost[2] Request finished in 17.4599ms 302 info: Microsoft.AspNetCore.Hosting.Internal.WebHost[1] Request starting HTTP/1.1 GET http://localhost:5000/install info: Microsoft.AspNetCore.Mvc.Internal.ControllerActionInvoker[3] Route matched with {action = "Index", controller = "Install", area = ""}. Executing controller action with signature Microsoft.AspNetCore.Mvc.IActionResult Index() on controller Grand.Web.Controllers.InstallController (Grand.Web). info: Microsoft.AspNetCore.Mvc.Internal.ControllerActionInvoker[1] Executing action method Grand.Web.Controllers.InstallController.Index (Grand.Web) - Validation state: Valid info: Microsoft.AspNetCore.Mvc.Internal.ControllerActionInvoker[2] Executed action method Grand.Web.Controllers.InstallController.Index (Grand.Web), returned result Microsoft.AspNetCore.Mvc.ViewResult in 39.2808ms. info: Microsoft.AspNetCore.Mvc.ViewFeatures.ViewResultExecutor[1] Executing ViewResult, running view Index. info: Microsoft.AspNetCore.Mvc.ViewFeatures.ViewResultExecutor[4] Executed ViewResult - view Index executed in 139.292ms. info: Microsoft.AspNetCore.Mvc.Internal.ControllerActionInvoker[2] Executed action Grand.Web.Controllers.InstallController.Index (Grand.Web) in 192.2036ms info: Microsoft.AspNetCore.Hosting.Internal.WebHost[2] Request finished in 516.017ms 200 text/html; charset=utf-8 info: Microsoft.AspNetCore.Hosting.Internal.WebHost[1] Request starting HTTP/1.1 GET http://localhost:5000/scripts/jquery-3.3.1.min.js info: Microsoft.AspNetCore.Hosting.Internal.WebHost[1] Request starting HTTP/1.1 GET http://localhost:5000/content/install/style.css info: Microsoft.AspNetCore.Hosting.Internal.WebHost[1] Request starting HTTP/1.1 GET http://localhost:5000/scripts/jquery.validate.min.js info: Microsoft.AspNetCore.Hosting.Internal.WebHost[1] Request starting HTTP/1.1 GET http://localhost:5000/scripts/jquery.validate.unobtrusive.min.js info: Microsoft.AspNetCore.Hosting.Internal.WebHost[1] Request starting HTTP/1.1 GET http://localhost:5000/scripts/public.common.js info: Microsoft.AspNetCore.Hosting.Internal.WebHost[1] Request starting HTTP/1.1 GET http://localhost:5000/content/bootstrap/bootstrap.min.css info: Microsoft.AspNetCore.StaticFiles.StaticFileMiddleware[2] Sending file. Request path: '/scripts/jquery.validate.unobtrusive.min.js'. Physical path: '/home/teddy/Documents/works/grandnode/wwwroot/scripts/jquery.validate.unobtrusive.min.js' info: Microsoft.AspNetCore.StaticFiles.StaticFileMiddleware[2] Sending file. Request path: '/scripts/jquery.validate.min.js'. Physical path: '/home/teddy/Documents/works/grandnode/wwwroot/scripts/jquery.validate.min.js' info: Microsoft.AspNetCore.StaticFiles.StaticFileMiddleware[2] Sending file. Request path: '/scripts/public.common.js'. Physical path: '/home/teddy/Documents/works/grandnode/wwwroot/scripts/public.common.js' info: Microsoft.AspNetCore.StaticFiles.StaticFileMiddleware[2] Sending file. Request path: '/content/install/style.css'. Physical path: '/home/teddy/Documents/works/grandnode/wwwroot/content/install/style.css' info: Microsoft.AspNetCore.StaticFiles.StaticFileMiddleware[2] Sending file. Request path: '/scripts/jquery-3.3.1.min.js'. Physical path: '/home/teddy/Documents/works/grandnode/wwwroot/scripts/jquery-3.3.1.min.js' info: Microsoft.AspNetCore.StaticFiles.StaticFileMiddleware[2] Sending file. Request path: '/content/bootstrap/bootstrap.min.css'. Physical path: '/home/teddy/Documents/works/grandnode/wwwroot/content/bootstrap/bootstrap.min.css' info: Microsoft.AspNetCore.Hosting.Internal.WebHost[2] Request finished in 16.7924ms 200 application/javascript info: Microsoft.AspNetCore.Hosting.Internal.WebHost[2] Request finished in 17.8938ms 200 text/css info: Microsoft.AspNetCore.Hosting.Internal.WebHost[2] Request finished in 17.7949ms 200 application/javascript info: Microsoft.AspNetCore.Hosting.Internal.WebHost[2] Request finished in 15.5796ms 200 application/javascript info: Microsoft.AspNetCore.Hosting.Internal.WebHost[2] Request finished in 15.568ms 200 application/javascript info: Microsoft.AspNetCore.Hosting.Internal.WebHost[2] Request finished in 14.8318ms 200 text/css info: Microsoft.AspNetCore.Hosting.Internal.WebHost[1] Request starting HTTP/1.1 GET http://localhost:5000/Themes/DefaultClean/Content/images/logo.png info: Microsoft.AspNetCore.Hosting.Internal.WebHost[1] Request starting HTTP/1.1 GET http://localhost:5000/content/bootstrap/bootstrap.min.js info: Microsoft.AspNetCore.Hosting.Internal.WebHost[1] Request starting HTTP/1.1 GET http://localhost:5000/content/bootstrap/popper.min.js info: Microsoft.AspNetCore.StaticFiles.StaticFileMiddleware[2] Sending file. Request path: '/content/bootstrap/bootstrap.min.js'. Physical path: '/home/teddy/Documents/works/grandnode/wwwroot/content/bootstrap/bootstrap.min.js' info: Microsoft.AspNetCore.StaticFiles.StaticFileMiddleware[2] Sending file. Request path: '/content/bootstrap/popper.min.js'. Physical path: '/home/teddy/Documents/works/grandnode/wwwroot/content/bootstrap/popper.min.js' info: Microsoft.AspNetCore.Hosting.Internal.WebHost[2] Request finished in 0.5154ms 200 application/javascript info: Microsoft.AspNetCore.StaticFiles.StaticFileMiddleware[2] Sending file. Request path: '/DefaultClean/Content/images/logo.png'. Physical path: '/home/teddy/Documents/works/grandnode/Themes/DefaultClean/Content/images/logo.png' info: Microsoft.AspNetCore.Hosting.Internal.WebHost[2] Request finished in 0.623ms 200 image/png info: Microsoft.AspNetCore.Hosting.Internal.WebHost[2] Request finished in 0.773ms 200 application/javascript info: Microsoft.AspNetCore.Hosting.Internal.WebHost[1] Request starting HTTP/1.1 GET http://localhost:5000/favicon.ico info: Microsoft.AspNetCore.StaticFiles.StaticFileMiddleware[2] Sending file. Request path: '/favicon.ico'. Physical path: '/home/teddy/Documents/works/grandnode/wwwroot/favicon.ico' info: Microsoft.AspNetCore.Hosting.Internal.WebHost[2] Request finished in 1.0115ms 200 image/x-icon |
Open it again in my browser: http://localhost:5000
OKAY. The first time it’ll be redirected to install page (http://localhost:5000/install)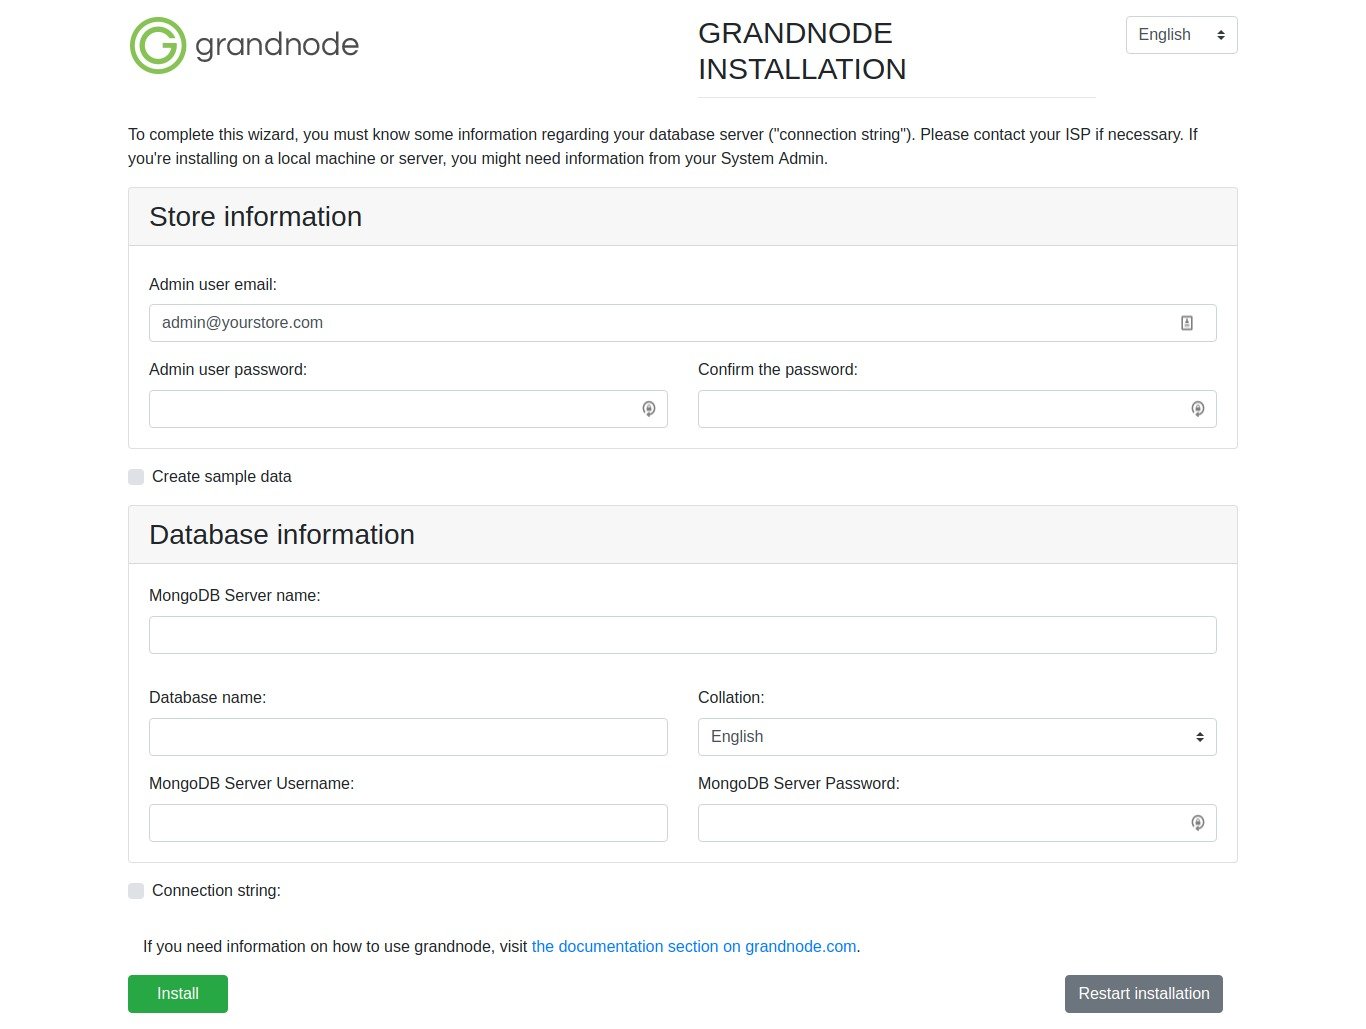 Here is the install setting:
Admin user email: admin@yourstore.com
Admin user password: teddy
MongoDB Server name: localhost
Database name: grandnode
MongoDB Server Username: grandnodeuser
MongoDB Server Password: grandnode
Then click ‘Install’ button.
wait until the installation is finished with this message
|
1 |
Application has been installed successfully, please restart application. |
Then shutdown the process in the terminal (CTRL + C) then start again with the above command ‘sudo dotnet Grand.Web.dll’
Then open again in your browser: http://localhost:5000/
Configure NGINX with GrandNode
Everything works fine, but we are not able to connect with our GrandNode from our computer. The reason is simple, GrandNode is running locally on our machine on port 5000. In thix example, we will present the simplest way of reverse-proxy traffic to your application. It will forward traffic from port 80 to your local machine on port 5000.
Create the config file:
|
1 |
teddy@teddy:~$ sudo gedit /etc/nginx/sites-available/grandnode.test |
Here is the content:
|
1 2 3 4 5 6 7 8 9 10 11 12 13 14 15 16 17 |
server { listen 80; listen [::]:80; root /home/teddy/Documents/works/grandnode; #your document root server_name www.grandnode.test grandnode.test ; # Your server name location / { proxy_pass http://localhost:5000; proxy_http_version 1.1; proxy_set_header Upgrade $http_upgrade; proxy_set_header Connection keep-alive; proxy_set_header Host $host; proxy_cache_bypass $http_upgrade; proxy_set_header X-Forwarded-For $proxy_add_x_forwarded_for; proxy_set_header X-Forwarded-Proto $scheme; } } |
NOTE: IF THIS APP IS NOT RUNNING, PLS COMMENT ‘proxy_pass’ COMMAND ABOVE (OR BETTER ALL ‘proxy_*’). BECAUSE IT’D MAKE NGINX CAN’T EXECUTE THE OTHER LOCAL WEBSITES (BECAUSE OF THE PROXY TO PORT 5000)!!!
then create a symbolic link:
|
1 |
sudo ln -s /etc/nginx/sites-available/grandnode.test /etc/nginx/sites-enabled/grandnode.test |
then register the host on my system:
|
1 |
sudo gedit /etc/hosts |
Add this:
|
1 2 3 |
... 127.0.0.1 grandnode.test ... |
Then test: Test: http://grandnode.test/
NOTE: MAKE SURE THE DOTNET APP IS ALREADY STARTED (‘sudo dotnet Grand.Web.dll’). IN THE PROD SERVER, TO MAKE SURE THIS APP ALWAYS START, I CAN CREATE THE SERVICE (SEE: https://docs.microsoft.com/en-US/aspnet/core/host-and-deploy/linux-nginx?view=aspnetcore-2.2)
Here is the look: http://grandnode.test/apple-macbook-pro-13-inch The admin page: http://grandnode.test/admin
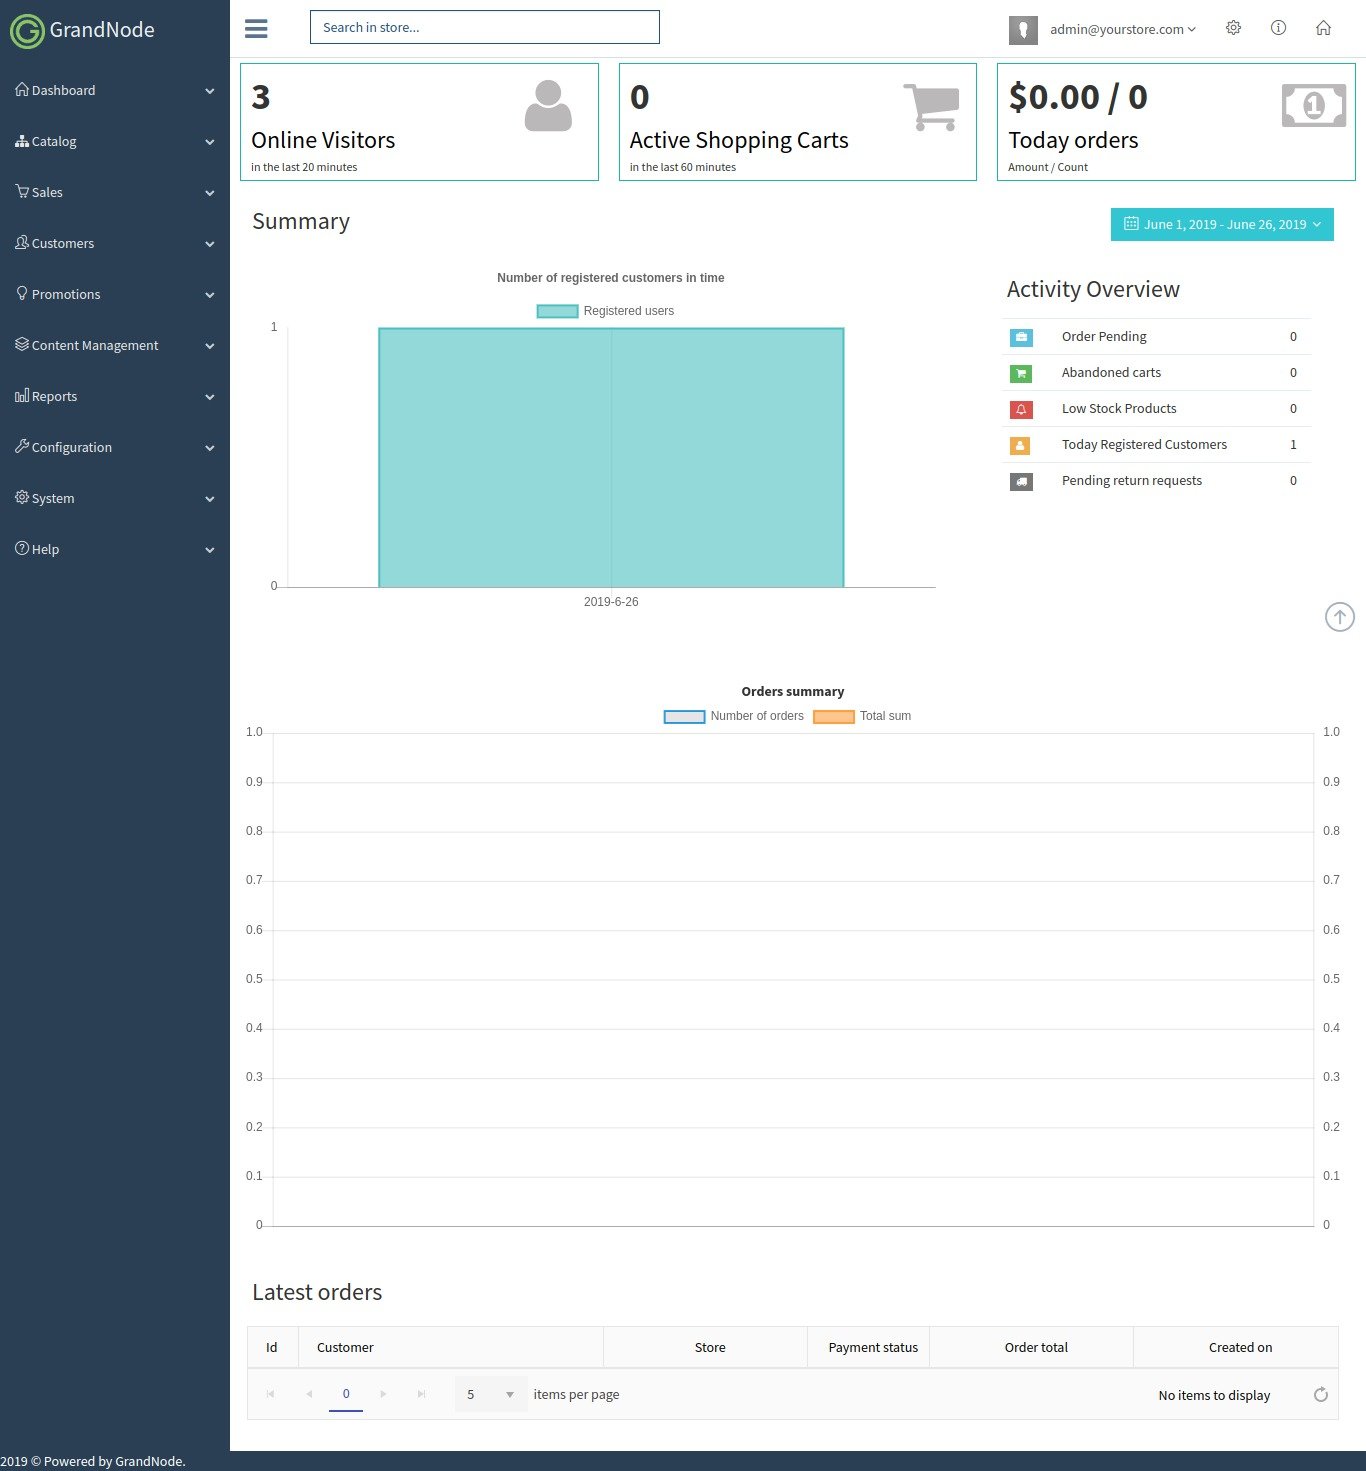 Install missing package:
he last touches. We need to update packages and install libgdiplus.
|
1 2 3 4 5 |
sudo apt-get update sudo apt-get –y install libgdiplus sudo ln -s /lib/x86_64-linux-gnu/libdl.so.2 /lib/x86_64-linux-gnu/libdl.so |