Use PHP7.3
Install it if not exist
|
|
sudo apt-get install php7.3 php7.3-fpm php7.3-mysql php7.3-curl php7.3-cgi php7.3-mbstring php-mcrypt php7.3-zip php7.3-xml php7.3-xmlrpc php-xdebug php7.3-intl php7.3-bcmath php7.3-soap php7.3-gd |
Use php7.3 as default php
|
|
sudo ln -sfn /usr/bin/php7.3 /etc/alternatives/php |
Check
|
|
php -v PHP 7.3.9-1+ubuntu16.04.1+deb.sury.org+1 (cli) (built: Sep 2 2019 12:54:04) ( NTS ) Copyright (c) 1997-2018 The PHP Group Zend Engine v3.3.9, Copyright (c) 1998-2018 Zend Technologies with Zend OPcache v7.3.9-1+ubuntu16.04.1+deb.sury.org+1, Copyright (c) 1999-2018, by Zend Technologies with Xdebug v2.7.2, Copyright (c) 2002-2019, by Derick Rethans |
TO ENABLE PHP 7.3 ON NGINX SERVER, PLS DO (MAKE SURE APACHE2 IS STOPPED IF IT’S RUNNING AND START NGINX):
IMPORTANT! ALSO NEED TO INSTALL php7.3-dev. THIS IS NEEDED WHEN I NEED TO COMPILE swoole SOURCE
|
|
sudo apt install php7.3-dev |
CHECK php-config SOULD POINT TO php7.3
|
|
teddy@teddy:~/Documents/swoole-src$ php-config Usage: /usr/bin/php-config [OPTION] Options: --prefix [/usr] --includes [-I/usr/include/php/20180731 -I/usr/include/php/20180731/main -I/usr/include/php/20180731/TSRM -I/usr/include/php/20180731/Zend -I/usr/include/php/20180731/ext -I/usr/include/php/20180731/ext/date/lib ] --ldflags [-L/usr/lib/php/20180731 ] --libs [-lcrypt -largon2 -lresolv -lcrypt -lz -lrt -lm -ldl -lnsl -lxml2 -lssl -lcrypto -lpcre2-8 -lsodium -lcrypt -largon2 -lcrypt ] --extension-dir [/usr/lib/php/20180731] --include-dir [/usr/include/php/20180731] --man-dir [/usr/share/man] --php-binary [/usr/bin/php7.3] --php-sapis [apache2handler cgi cli fpm ] --phpapi [20180731] --configure-options [--includedir=/usr/include --mandir=/usr/share/man --infodir=/usr/share/info --disable-silent-rules --libdir=/usr/lib/x86_64-linux-gnu --libexecdir=/usr/lib/x86_64-linux-gnu --disable-maintainer-mode --disable-dependency-tracking --prefix=/usr --enable-cli --disable-cgi --disable-phpdbg --with-config-file-path=/etc/php/7.3/cli --with-config-file-scan-dir=/etc/php/7.3/cli/conf.d --build=x86_64-linux-gnu --host=x86_64-linux-gnu --config-cache --cache-file=/build/php7.3-MkRzm_/php7.3-7.3.9/config.cache --libdir=${prefix}/lib/php --libexecdir=${prefix}/lib/php --datadir=${prefix}/share/php/7.3 --program-suffix=7.3 --sysconfdir=/etc --localstatedir=/var --mandir=/usr/share/man --disable-all --disable-debug --disable-rpath --disable-static --with-pic --with-layout=GNU --without-pear --enable-filter --with-openssl=yes --with-password-argon2=/usr --with-pcre-regex=/usr --enable-hash --with-mhash=/usr --enable-libxml --enable-session --with-sodium --with-system-tzdata --with-zlib=/usr --with-zlib-dir=/usr --enable-dtrace --enable-pcntl --with-libedit=shared,/usr build_alias=x86_64-linux-gnu host_alias=x86_64-linux-gnu CFLAGS=-g -O2 -fPIE -fstack-protector-strong -Wformat -Werror=format-security -O2 -Wall -pedantic -fsigned-char -fno-strict-aliasing -g] --version [7.3.9-1+ubuntu16.04.1+deb.sury.org+1] --vernum [70309] |
THE NGINX MAIN CONFIG IN /etc/nginx/nginx.conf
THE DEFAULT VIRTUALHOST IN /etc/nginx/sites-available/default
EDIT IT TO ENABLE PARSING PHP FILE:
|
|
sudo gedit /etc/nginx/sites-available/default |
Use php7.3-fpm for fastcgi_pass
1 2 3 4 5 6 7 8 9 10 11 12 13 14 15 16 17 |
... server { ... # pass the PHP scripts to FastCGI server listening on 127.0.0.1:9000 # location ~ \.php$ { include snippets/fastcgi-php.conf; ... fastcgi_pass unix:/run/php/php7.3-fpm.sock; # fastcgi_pass unix:/run/php/php7.2-fpm.sock; # fastcgi_pass unix:/run/php/php7.0-fpm.sock; # fastcgi_pass unix:/run/php/php5.6-fpm.sock; } ... } ... |
THEN CHANGE PHP7.3-FPM SETTING:
|
|
sudo gedit /etc/php/7.3/fpm/php.ini |
CHANGE THE CONTENT:
|
|
cgi.fix_pathinfo=0 upload_max_filesize = 2000M -> (default 2M) max_file_uploads = 2000 -> (default 20) post_max_size = 2000M -> (default 8M) max_execution_time = 6000 -> (default 30) in second max_input_time = 600 -> (default 60) in second memory_limit = 2560M -> (default 128M) |
THEN RESTART PHP7.3-FPM SERVICE:
|
|
sudo service php7.3-fpm restart |
CHECK NGINX SYNTAX: sudo nginx -t
RESTART NGINX: sudo service nginx restart
OPEN IT: http://localhost:8080/phpinfo.php (NEED TO CLEAR THE BROWSER CACHE FIRST)
INSTALL swoole FOR PHP7.3
IF YOU ALREADY INSTALLED IT FOR PHP7.2, YOU NEED TO REMOVE/UNINSTALL IT.
NOTE: TO UNINSTAL IT, USE PHP7.2 VERSION ON TERMINAL NOT PHP7.3
FIRST COMMENT IT from the cli php.ini and php-fpm php.ini files.
|
|
sudo gedit /etc/php/7.2/cli/php.ini |
THEN
THEN DO THE SAME FOR php-fpm php.ini file (sudo gedit /etc/php/7.2/fpm/php.ini).
USE pecl TO UNINSTALL IT
|
|
sudo pecl uninstall swoole Unable to remove "extension=swoole.so" from php.ini uninstall ok: channel://pecl.php.net/swoole-4.4.5 |
NOTE: IT’S ALSO IMPORTANT TO DELETE/REMOVE swoole.so FILE IN /usr/lib/php/20170718/swoole.so MANUALLY. BECAUSE PHP7.3 USE EXTENSION DIR IN /usr/lib/php/20180731, MAKE SURE IF ALREADY EXIST swoole.so IN IT. REMOVE IT MANUALLY AS WELL!
NOTE: I TRIED TO INSTALL swoole 4.4.5 FROM SOURCE & COMPILE IT (READ: https://github.com/swoole/swoole-src) BUT ALWAYS FAILED AND GOT THIS ERROR
|
|
PHP Warning: PHP Startup: Unable to load dynamic library 'swoole.so' (tried: /usr/lib/php/20180731/swoole.so (/usr/lib/php/20180731/swoole.so: undefined symbol: _zval_ptr_dtor), /usr/lib/php/20180731/swoole.so.so (/usr/lib/php/20180731/swoole.so.so: cannot open shared object file: No such file or directory)) in Unknown on line 0 |
I THINK THIS IS BECAUSE I MIXED THE INSTALLATION (FROM pecl AND FROM SOURCE) THEN FORGOT TO INSTALL php7.3-dev AND FORGOT TO REMOVE swoole.so MANUALLY IN /usr/lib/php/20180731/swoole.so
THEN INSTALL SWOOLE ON PHP7.3 TERMINAL
MAKE SURE THE PHP API VERSION FOR PHP7.3 IS ‘20180731’ NOT ‘20170718’
1 2 3 4 5 6 7 8 9 10 11 12 13 14 15 16 17 18 19 20 21 22 23 24 |
sudo pecl install swoole WARNING: channel "pecl.php.net" has updated its protocols, use "pecl channel-update pecl.php.net" to update downloading swoole-4.4.5.tgz ... Starting to download swoole-4.4.5.tgz (1,426,083 bytes) .........................................................................................................................................................................................................................................................................................done: 1,426,083 bytes 391 source files, building running: phpize Configuring for: PHP Api Version: 20180731 Zend Module Api No: 20180731 Zend Extension Api No: 320180731 enable sockets supports? [no] : yes enable openssl support? [no] : yes enable http2 support? [no] : yes enable mysqlnd support? [no] : yes building in /tmp/pear/temp/pear-build-rootdBmsXg/swoole-4.4.5 ... Build process completed successfully Installing '/usr/include/php/20180731/ext/swoole/config.h' Installing '/usr/lib/php/20180731/swoole.so' install ok: channel://pecl.php.net/swoole-4.4.5 configuration option "php_ini" is not set to php.ini location You should add "extension=swoole.so" to php.ini |
Then include the extension “extension=swoole.so” in php.ini file. For php-fpm, the php.ini file in “/etc/php/7.3/fpm/php.ini”
|
|
sudo gedit /etc/php/7.3/fpm/php.ini |
then add this new line:
|
|
... extension=swoole.so ... |
Save then restart php7.3-fpm service
|
|
sudo service php7.3-fpm restart |
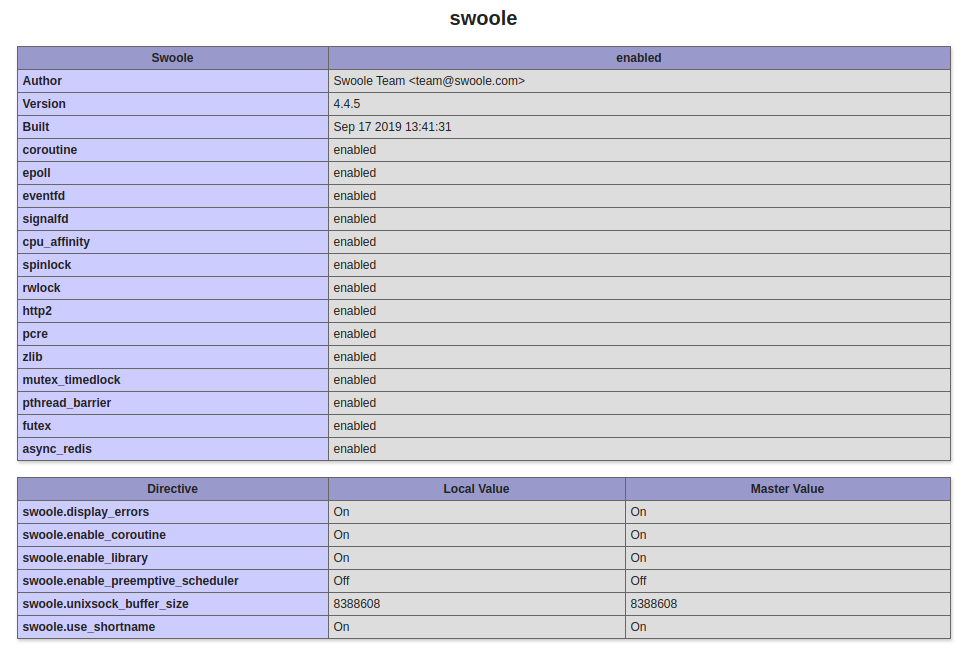
look it up phpinfo() result. It should show like this: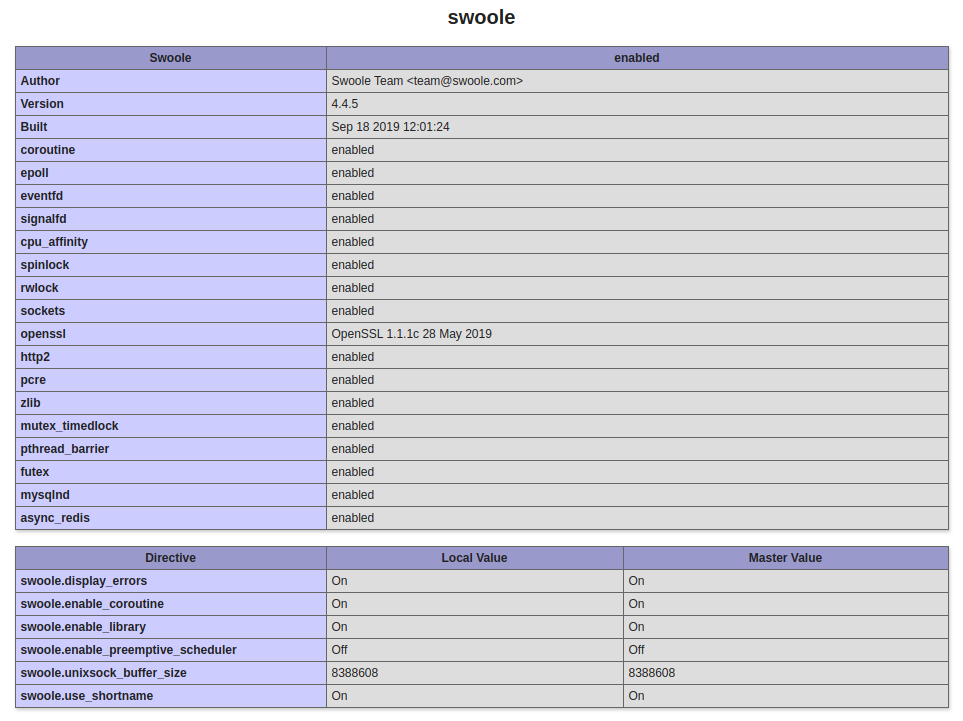 THEN IN CLI
|
|
teddy@teddy:~/Documents/swoole-src$ php -m | grep swoole swoole |
ADD loader73.so FILE.
Copy it manually (USE SUDO) TO php7.3 EXTENSION DIR (IN /usr/lib/php/20180731)
|
|
teddy@teddy:~/Documents/swoole-src$ sudo cp /home/teddy/Downloads/Ptcms_V4.2.8/loader73.so /usr/lib/php/20180731 |
THEN ADD THE EXTENSION ‘loader73.so’ IN php.ini FILE. For php-fpm, the php.ini file in “/etc/php/7.3/fpm/php.ini”
|
|
sudo gedit /etc/php/7.3/fpm/php.ini |
THEN ADD:
|
|
... extension=loader73.so ... |
PLS DO THE SAME IN php.ini FOR CLI IN /etc/php/7.3/cli/php.ini
THEN RESTART php7.3-fpm SERVICE
|
|
sudo service php7.3-fpm restart |
CHECK THE EXTENSION IN phpinfo (http://localhost:8080/phpinfo.php)
IT SHOULD SHOW LIKE THIS CHECK IN CLI
|
|
teddy@teddy:~/Documents/swoole-src$ php -m | grep loader you must remove the xdebug extension before use swoole_loader swoole_loader |
WE ALSO NEED TO DISABLE xdebug EXTENSION. CHECK IF xdebug IS ENABLED
|
|
teddy@teddy:~/Documents/swoole-src$ php -i | grep xdebug you must remove the xdebug extension before use swoole_loader /etc/php/7.3/cli/conf.d/20-xdebug.ini, xdebug xdebug support => enabled ... |
THEN I NEED TO DISABLE IT.
|
|
sudo gedit /etc/php/7.3/cli/conf.d/20-xdebug.ini |
THEN DISABLE xdebug BY ADDING ‘;’ IN FRONT OF THE LINE LIKE THIS:
|
|
;zend_extension=xdebug.so |
THEN RESTART php7.3-fpm SERVICE
|
|
sudo service php7.3-fpm restart |
MAKE THERE IS NO MORE WARNING ABOUT xdebug
|
|
teddy@teddy:~/Documents/swoole-src$ php -m | grep loader swoole_loader |
SAMPLE FILES IN /home/teddy/Downloads/Ptcms_V4.2.8 DIR
IN THE DIR, COPY ‘env.example.php’ TO ‘env.php’ FILE
RUN FROM TERMINAL
|
|
teddy@teddy:~/Downloads/Ptcms_V4.2.8/public$ php index.php |
THEN I GOT ERROR ABOUT MEMCACHE
|
|
#0 Kuxin\Response::error() called at [/home/teddy/Downloads/Ptcms_V4.2.8/kuxin/kuxin.php:179] #1 Kuxin\Kuxin::error() #2 trigger_error() called at [/home/teddy/Downloads/Ptcms_V4.2.8/kuxin/cache/memcached.php:25] #3 Kuxin\Cache\Memcached->__construct() #4 ReflectionClass->newInstanceArgs() called at [/home/teddy/Downloads/Ptcms_V4.2.8/kuxin/loader.php:55] #5 Kuxin\Loader::instance() called at [/home/teddy/Downloads/Ptcms_V4.2.8/kuxin/cache.php:34] #6 Kuxin\Cache->__construct() #7 ReflectionClass->newInstanceArgs() called at [/home/teddy/Downloads/Ptcms_V4.2.8/kuxin/loader.php:55] #8 Kuxin\Loader::instance() called at [/home/teddy/Downloads/Ptcms_V4.2.8/kuxin/di.php:24] #9 Kuxin\DI::Cache() called at [/home/teddy/Downloads/Ptcms_V4.2.8/app/plugin/configcache/configcache.php:18] #10 App\Plugin\ConfigCache\ConfigCache->handle() called at [/home/teddy/Downloads/Ptcms_V4.2.8/kuxin/plugin.php:27] #11 Kuxin\Plugin::call() called at [/home/teddy/Downloads/Ptcms_V4.2.8/kuxin/kuxin.php:72] #12 Kuxin\Kuxin::start() called at [/home/teddy/Downloads/Ptcms_V4.2.8/kuxin/kuxin.php:193] #13 include(/home/teddy/Downloads/Ptcms_V4.2.8/kuxin/kuxin.php) called at [/home/teddy/Downloads/Ptcms_V4.2.8/public/index.php:5] 您尚未安装memcached扩展[/home/teddy/Downloads/Ptcms_V4.2.8/kuxin/cache/memcached.php:25] |
MAKE SURE memcached SERVICE IS RUNNING
|
|
sudo service --status-all |
OR
|
|
teddy@teddy:~$ sudo service memcached status ● memcached.service - memcached daemon Loaded: loaded (/lib/systemd/system/memcached.service; enabled; vendor preset Active: active (running) since Rab 2019-09-18 08:36:16 WIB; 5h 40min ago Main PID: 1314 (memcached) Tasks: 6 Memory: 2.0M CPU: 792ms CGroup: /system.slice/memcached.service └─1314 /usr/bin/memcached -m 64 -p 11211 -u memcache -l 127.0.0.1 Sep 18 08:36:16 teddy systemd[1]: Started memcached daemon. |
ALSO CHECK IF memcached EXTENSION IS INSTALLED
|
|
teddy@teddy:~$ php -i | grep memcached |
IF THERE IS NO OUTPUT, THEN INSTALL IT (REF: https://serverpilot.io/docs/how-to-install-the-php-memcache-extension)
|
|
sudo apt-get -y install gcc make autoconf libc-dev pkg-config sudo apt-get -y install zlib1g-dev sudo apt-get -y install libmemcached-dev sudo pecl install memcached |
HERE IS THE PROCESS
1 2 3 4 5 6 7 8 9 10 11 12 13 14 15 16 17 18 19 20 21 22 23 24 25 26 27 28 29 |
teddy@teddy:~$ sudo pecl install memcached WARNING: channel "pecl.php.net" has updated its protocols, use "pecl channel-update pecl.php.net" to update pecl/memcached can optionally use PHP extension "igbinary" (version >= 2.0) pecl/memcached can optionally use PHP extension "msgpack" (version >= 2.0) downloading memcached-3.1.3.tgz ... Starting to download memcached-3.1.3.tgz (82,673 bytes) ....................done: 82,673 bytes 15 source files, building running: phpize Configuring for: PHP Api Version: 20180731 Zend Module Api No: 20180731 Zend Extension Api No: 320180731 libmemcached directory [no] : no --disable-memcached-sasl zlib directory [no] : use system fastlz [no] : enable igbinary serializer [no] : enable msgpack serializer [no] : enable json serializer [no] : enable server protocol [no] : enable sasl [yes] : enable sessions [yes] : building in /tmp/pear/temp/pear-build-rootNVsfwe/memcached-3.1.3 ... Build process completed successfully Installing '/usr/lib/php/20180731/memcached.so' install ok: channel://pecl.php.net/memcached-3.1.3 configuration option "php_ini" is not set to php.ini location You should add "extension=memcached.so" to php.ini |
THEN MODIFY /etc/php/7.3/fpm/php.ini AND /etc/php/7.3/cli/php.ini FILE THEN ADD THE EXTENSION extension=memcached.so
THEN RESTART THE SERVICES
|
|
teddy@teddy:~$ sudo service php7.3-fpm restart teddy@teddy:~$ sudo service nginx restart |