- Go to https://apps.twitter.com/
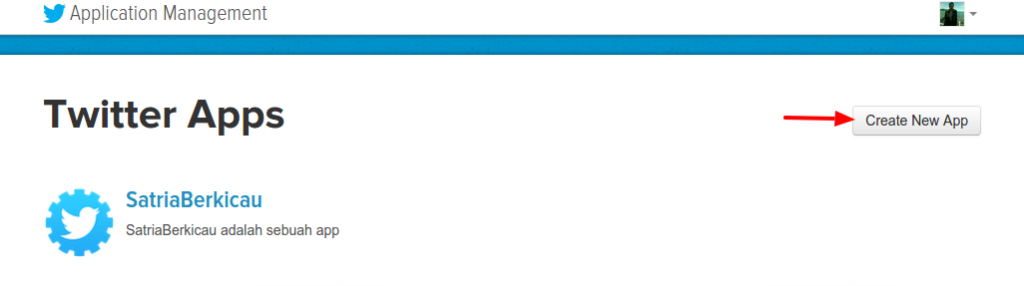 Then click ‘Create New App’
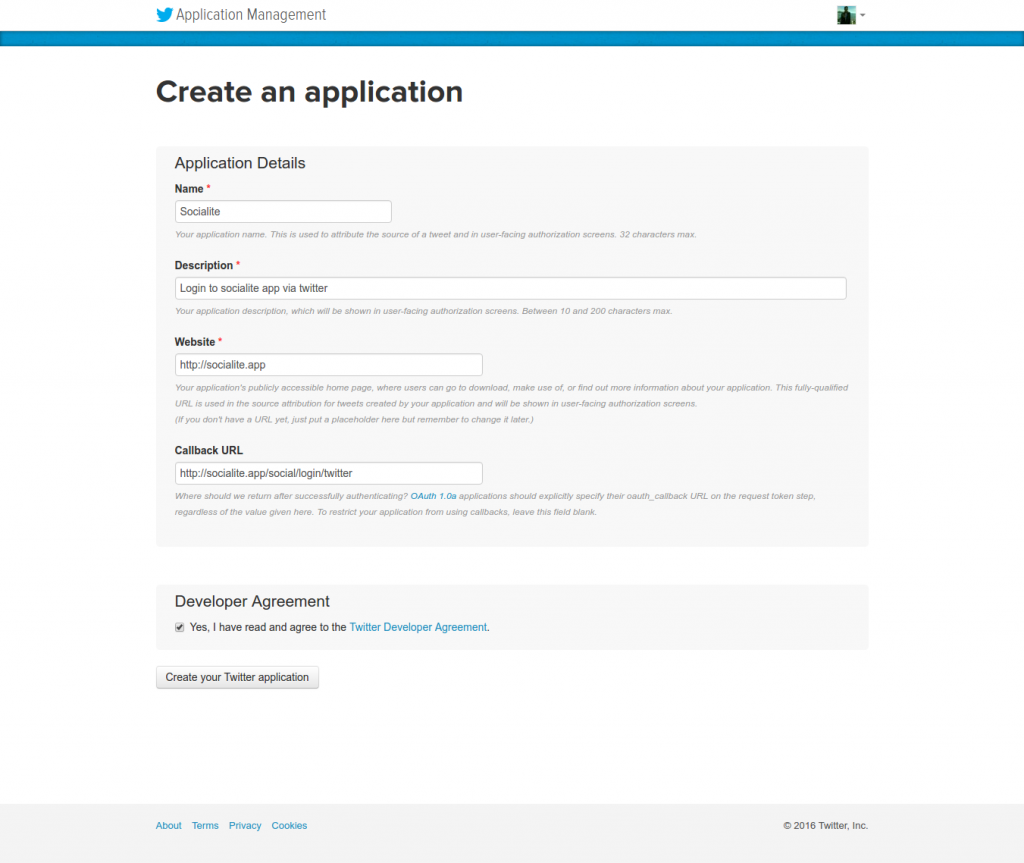
 - Fill out the form for ‘Socialite’ App
 NOTE:
NOTE:
If you get an error like “Error
You must add your mobile phone to your Twitter profile before creating an application. Please read https://support.twitter.com/articles/110250-adding-your-mobile-number-to-your-account-via-web1.5k for more information” THEN go to https://twitter.com/settings/add_phone (you must logged in first) OR Settings->Mobile THEN ADD YOUR MOBILE PHONE!
If you get an error like “Error
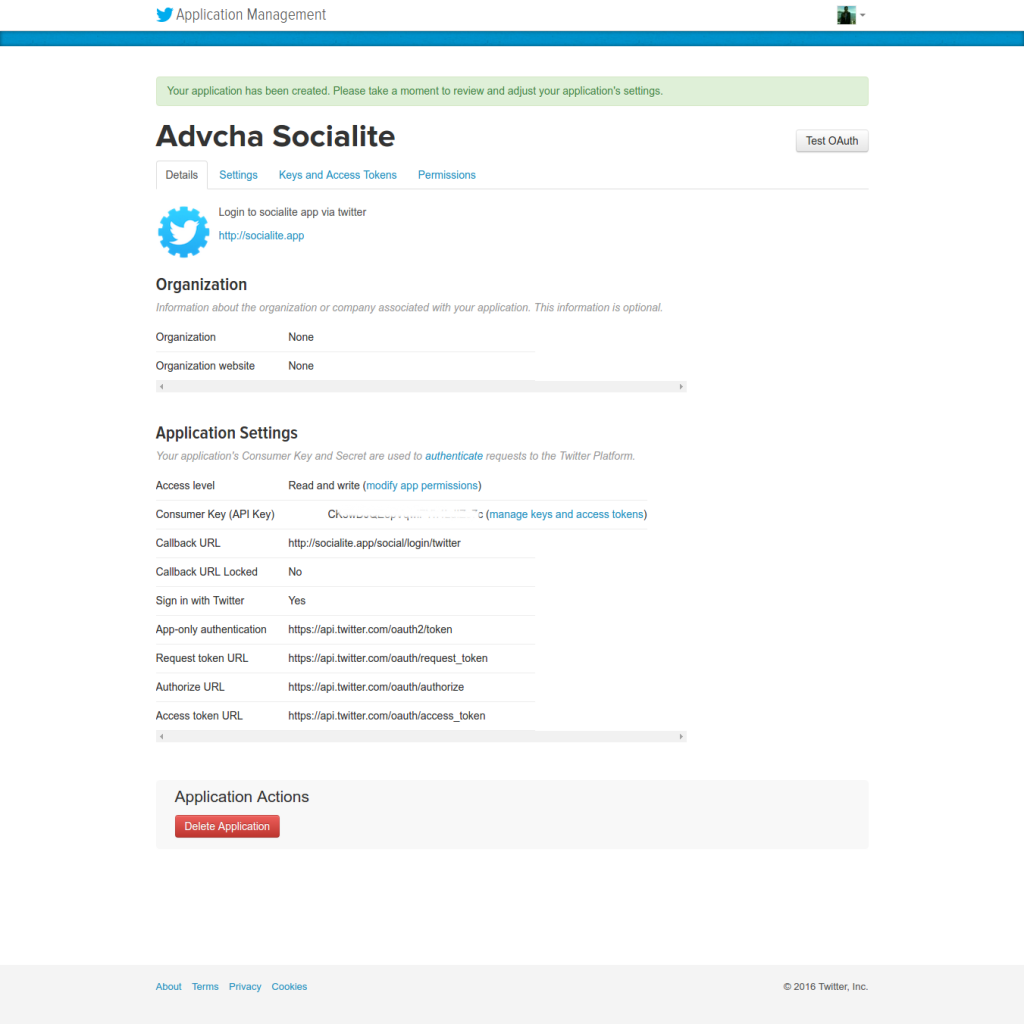
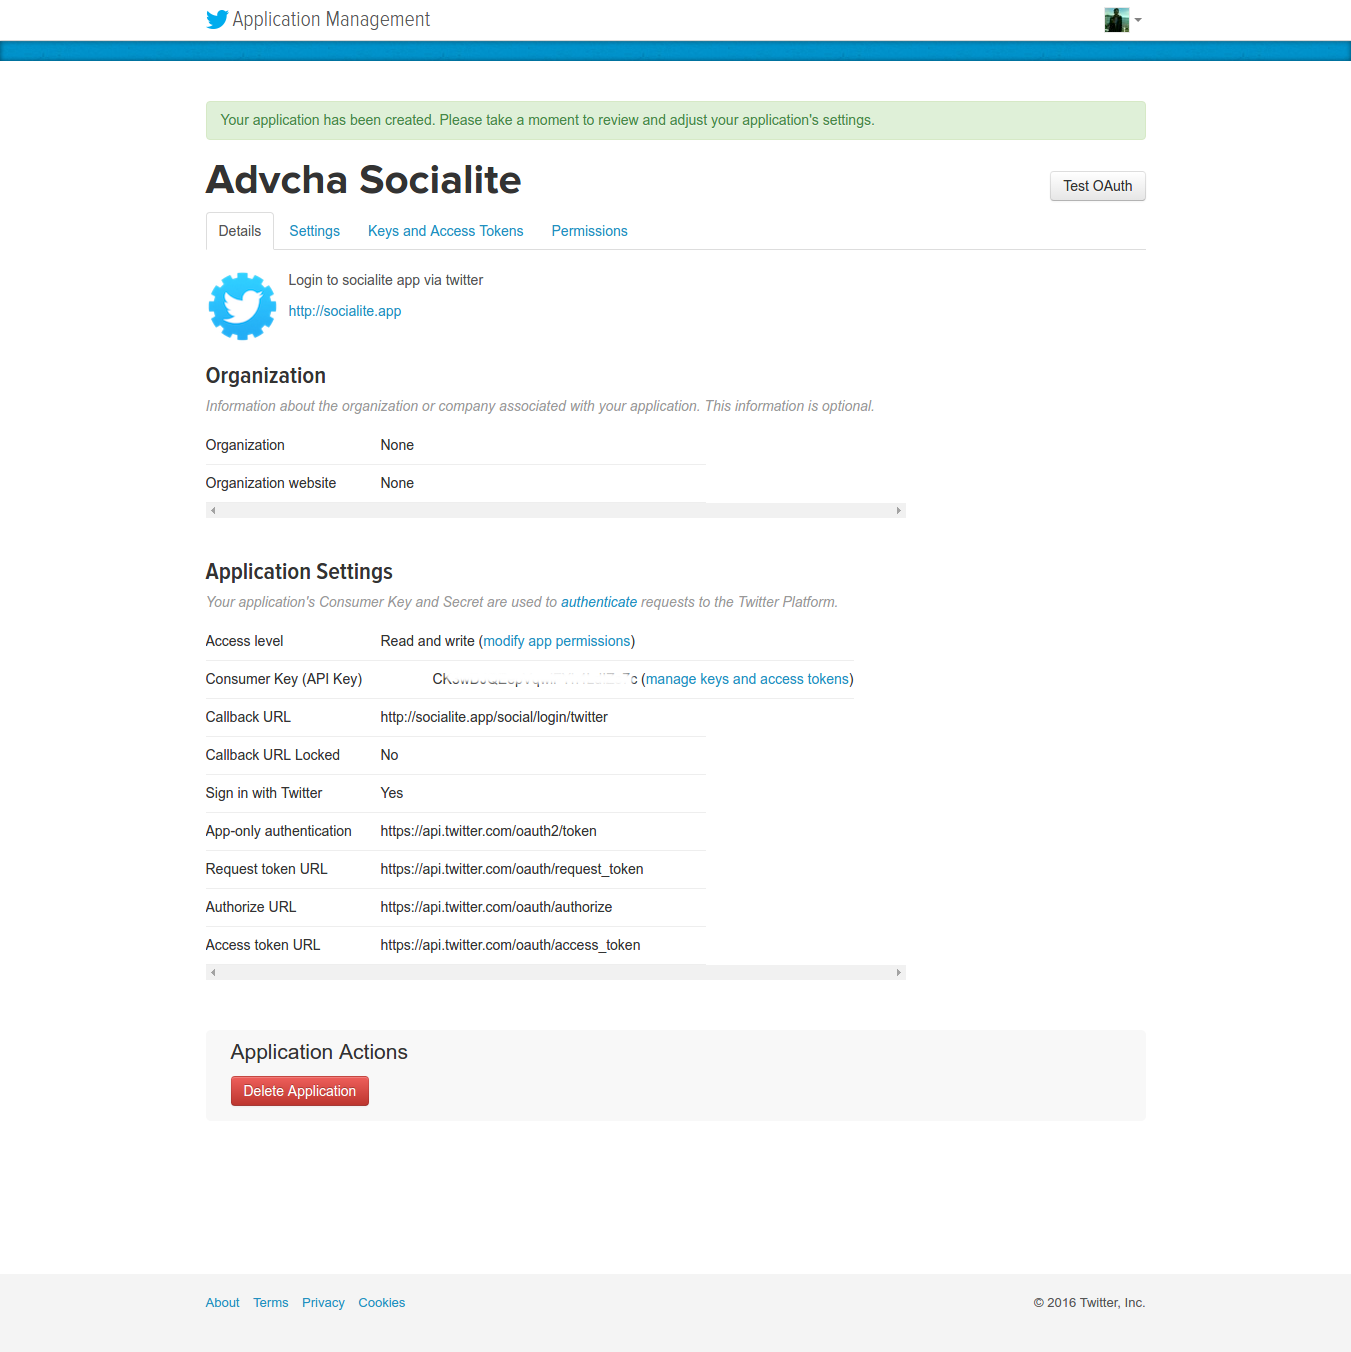
The client application failed validation: Socialite is already taken for Name.” THEN CHANGE THE APP NAME. AT LAST I USED ‘Advcha Socialite’ - If everything is okay, here is the app details (https://apps.twitter.com/app/13139442)
Author: admin

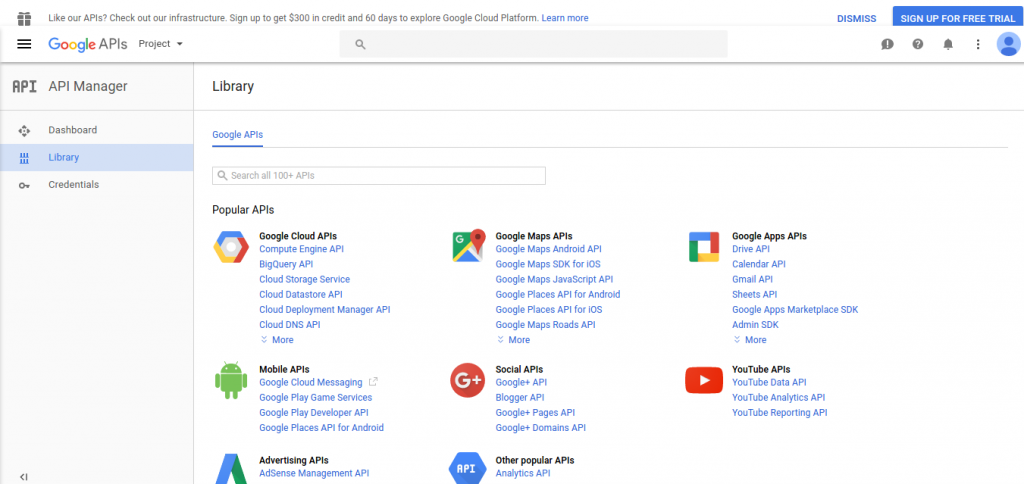
Google APIs
Ref: Create Project in Google Developer Console
- Open Google Developer Console. Here is the screen
- To create a new project, Click Project -> Create Project

Here is the new project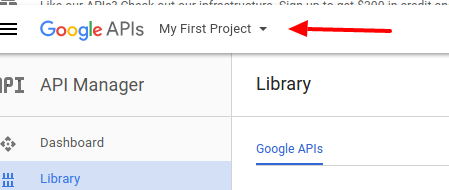
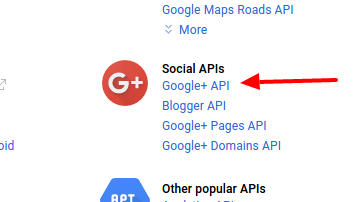
- I want to use Social APIs google+ API, so click ‘Google+ API’
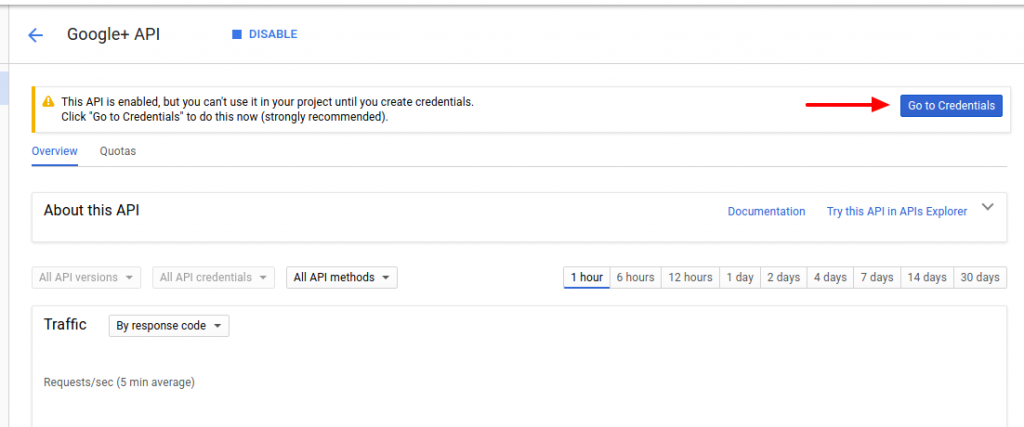
- The url would be like this: https://console.developers.google.com/apis/api/plus/overview?project=my-first-project-150703. Then click ‘Enable’
 This will enable the Google+ API
 - Then click ‘Go to credential’
 I have to create the credential first!
 - Here is the credential setting
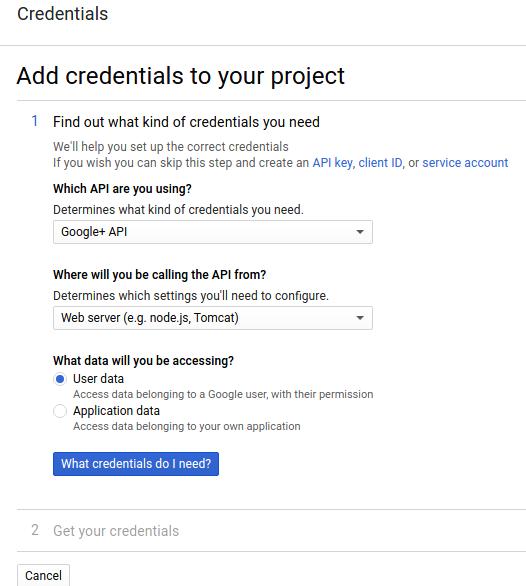 Then click ‘What credentials do I need?’
 - Create the oauth 2.0 setting
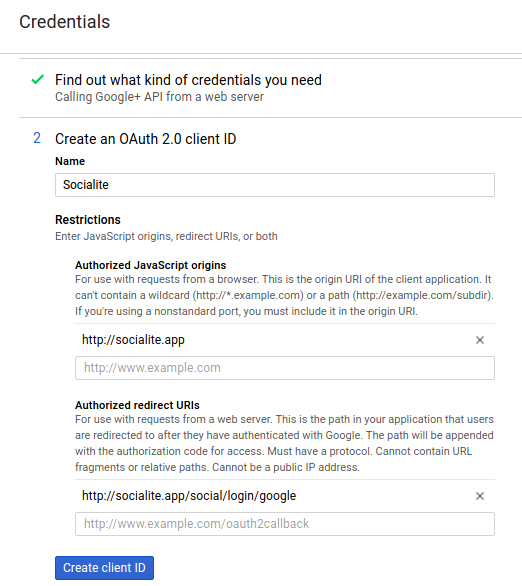 Click ‘Create client ID’
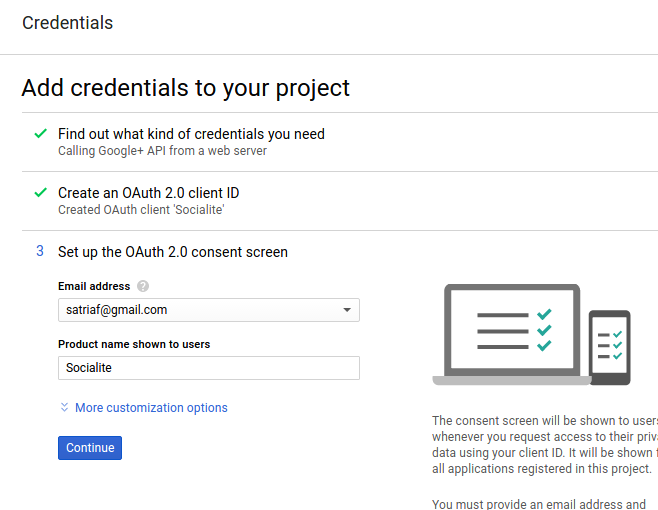
 - Then set the product name ‘Socialite’
- Then I got my credential for google+
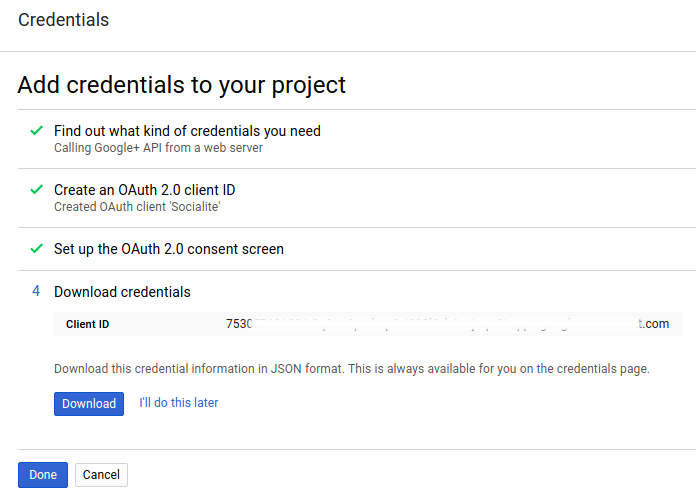 Then click ‘Done’. We’re finished!
 - Here is the dashboard for my app
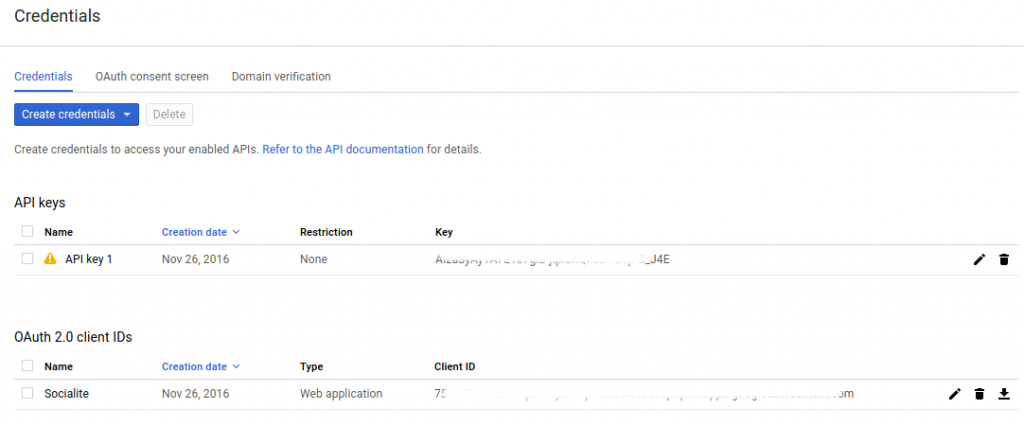
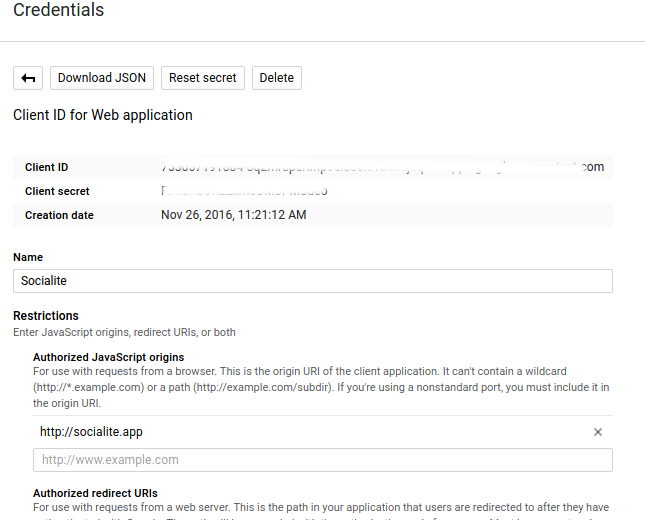
- To see the credential details like Client ID and Client Secret for ‘Socialite’ app, click ‘Socialite’ app


Laravel Socialite
Source: https://github.com/laravel/socialite
I want to practice ‘socialite’ app given by Laravel 5.3 documentation. Installation:
- Open hosts file and Add a new domain ‘socialite.app’ at the file
1teddy@teddy-K43SJ:~/Homestead$ sudo gedit /etc/hosts
Add this line in the file:
1192.168.10.10 socialite.app - Edit ‘Homestead.yaml’ file in ~/.homestead/ to add the new domain ‘socialite.app’ and set the mapping
123456...sites:...- map: socialite.appto: /home/vagrant/Code/socialite/public... - Start vagrant with ‘vagrant up’ or if it already started up, refresh it with ‘vagrant provision’ then go into the ssh with ‘vagrant ssh’
- Go into ‘Code’ directory then create a new laravel project ‘socialite’
12345678vagrant@homestead:~$ cd Code/vagrant@homestead:~/Code$ composer create-project --prefer-dist laravel/laravel socialiteInstalling laravel/laravel (v5.3.16)- Installing laravel/laravel (v5.3.16)Loading from cache...> php artisan key:generateApplication key [base64:KYHaOwFIHGLog5xgPO5v1qjP/MDMKO9OL6ajTQGdQ4Q=] set successfully. - Test it at our browser with http://socialite.app/. If the laravel screen is showed up, we are on the right path.
- Go into the new project ‘socialite’ root directory then add a dependency ‘laravel/socialite’
123456789101112131415161718192021222324252627282930vagrant@homestead:~/Code$ cd socialite/vagrant@homestead:~/Code/socialite$ composer require laravel/socialiteUsing version ^2.0 for laravel/socialite./composer.json has been updatedLoading composer repositories with package informationUpdating dependencies (including require-dev)- Installing guzzlehttp/promises (1.3.0)Loading from cache- Installing psr/http-message (1.0.1)Loading from cache- Installing guzzlehttp/psr7 (1.3.1)Loading from cache- Installing guzzlehttp/guzzle (6.2.2)Loading from cache- Installing league/oauth1-client (1.7.0)Downloading: 100%- Installing laravel/socialite (v2.0.20)Downloading: 100%Writing lock fileGenerating autoload files> Illuminate\Foundation\ComposerScripts::postUpdate> php artisan optimizeGenerating optimized class loaderThe compiled class file has been removed.
- Configuration
After installing the Socialite library, register the Laravel\Socialite\SocialiteServiceProvider in your config/app.php configuration file:
12345678...'providers' => [...Laravel\Socialite\SocialiteServiceProvider::class,],...
Also, add the Socialite facade to the aliases array in your app configuration file:
12345678...'aliases' => [...'Socialite' => Laravel\Socialite\Facades\Socialite::class,],...
- You will also need to add credentials for the OAuth services your application utilizes. These credentials should be placed in your config/services.php configuration file, and should use the key facebook, twitter, linkedin, google, github or bitbucket, depending on the providers your application requires. For example for facebook credentials:
12345678910111213<?phpreturn [...'facebook' => ['client_id' => env('FB_APP_ID'),'client_secret' => env('FB_APP_SECRET'),'redirect' => env('FB_REDIRECT'),],];
we will use env file (.env) to store facebook credentials.
123FB_APP_ID=xxxxxxxFB_APP_SECRET=xxxxxxFB_REDIRECT=http://socialite.app/auth/facebook/callback
REMEMBER ‘http://socialite.app/auth/facebook/callback’ IS CALLBACK URL (AFTER THE SUCCESSFUL LOGIN ON FACEBOOK). ALSO IT MUST MATCH WITH ROUTE ‘auth/facebook/callback’ IN /routes/web.php LATER! - Basic Usage
Next, you are ready to authenticate users! You will need two routes: one for redirecting the user to the OAuth provider, and another for receiving the callback from the provider after authentication. We will access Socialite using the Socialite facade. Please create a new controller file ‘AuthController.php’ in /app/Http/Controllers/Auth/ to work with facebook login:
1234567891011121314151617181920212223242526272829303132333435363738<?phpnamespace App\Http\Controllers\Auth;use App\Http\Controllers\Controller;use Socialite;class AuthController extends Controller{/*** Redirect the user to the GitHub authentication page.** @return Response*/public function redirectToProvider(){return Socialite::driver('facebook')->redirect();}/*** Obtain the user information from GitHub.** @return Response*/public function handleProviderCallback(){$user = Socialite::driver('facebook')->user();//var_dump($user);// $user->token;$data=array('name'=>$user->name,'login_via'=>'Facebook');return view('home')->with('data',$data);//return redirect()->to('/')->with('data',$data);}}
NOTE: DONT FORGET TO ADD ‘use App\Http\Controllers\Controller;’ BEFORE ‘use Socialite;’ BECAUSE I GOT AN ERROR ABOUT IT! - Creating Views. Create two new blade files. They are /resources/views/home.blade.php and /resources/views/master.blade.php:
master.blade.php:
123456789101112131415161718192021<!doctype html><html lang="en"><head><meta charset="UTF-8"><meta name="_token" content="{{ csrf_token() }}"/><title>Social Login</title><link href="https://maxcdn.bootstrapcdn.com/bootstrap/3.3.5/css/bootstrap.min.css" rel="stylesheet"><style>body {padding-top : 70px;}</style></head><body><div class="container">@yield('content')</div><script src="http://code.jquery.com/jquery-2.1.4.min.js"></script></body></html>
home.blade.php:
1234567891011121314@extends('master')@section('content')@if(!empty($data))<h1>Hello {{$data['name']}}, You logged in via {{ $data['login_via'] }}</h1>@else<div class="row"><div class="col-md-6 col-md-offset-3"><h2>Login Using Social Sites</h2><a class="btn btn-primary" href="{{ url('/auth/facebook') }}">Facebook</a></div></div>@endif@stop
url(‘/auth/facebook’) would redirect the page to facebookpage! - Set the routes. Edit /routes/web.php like this:
1234567Route::get('/', function () {//return view('welcome');return view('home');});Route::get('auth/facebook', 'Auth\AuthController@redirectToProvider');Route::get('auth/facebook/callback', 'Auth\AuthController@handleProviderCallback');
We set the root (‘/’) url would open the home page (home.blade.php) - Test it! http://socialite.app/
Here is the screen If we click ‘Facebook’ link, it would redirect us to facebook page. The url would be like this: https://www.facebook.com/v2.8/dialog/oauth?client_id=166568033366882&redirect_uri=http%3A%2F%2Fsocialite.app&scope=email&response_type=code&state=es6ub834Woh7xDxTvdqru84U7kwiRJkftD83HFz7
If I get this page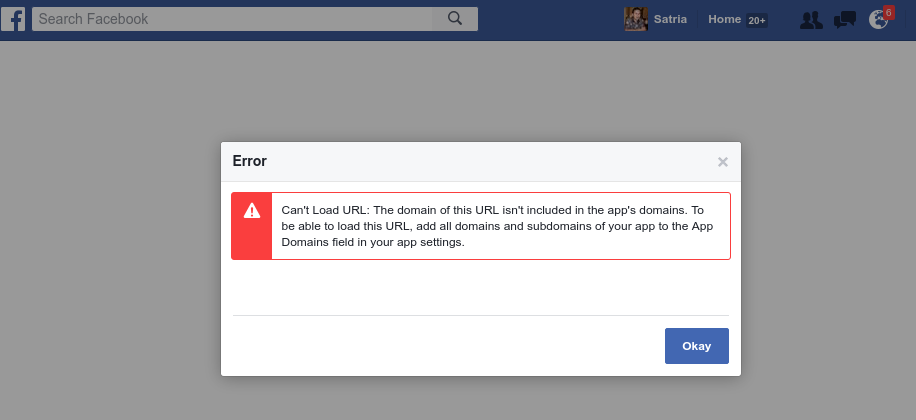 Then I need to modify my facebook app to add this domain (http://socialite.app/) at ‘Site URL’ box. To do it, Open your app from https://developers.facebook.com/apps, then Click your app. Then at Settings->Basic->at Site Url fill with this domain name: http://socialite.app/. Then Save and fix any error.
Here is the oauth2 output from facebook for successful login:
Here is the callback result the successful facebook login
- How to add the others social links (twitter, github, google plus and linkedin)?
Please read Complete Laravel 5 Socialite tutorial to find out how to do it.
You need to setup your apps for the above social app to get the credentials like Client ID and Client Secret and the redirect URL.
To setup Google+ app, please read Google APIs
To setup twitter app, please read Twitter Socialite App
To setup github app, please read Github App
To setup linkedin app, please read Linkedin Oauth2 App
Then modify .env file to include above credentials:
- Here I want to make the redirect URL to be uniform like this:
12345678910111213141516171819FB_APP_ID=XXXFB_APP_SECRET=XXXFB_REDIRECT=http://socialite.app/social/login/facebookGOOGLE_APP_ID=XXXGOOGLE_APP_SECRET=XXXGOOGLE_REDIRECT=http://socialite.app/social/login/googleTWITTER_APP_ID=XXXTWITTER_APP_SECRET=XXXTWITTER_REDIRECT=http://socialite.app/social/login/twitterGITHUB_APP_ID=XXXGITHUB_APP_SECRET=XXXGITHUB_REDIRECT=http://socialite.app/social/login/githubLINKEDIN_APP_ID=XXXLINKEDIN_APP_SECRET=XXXLINKEDIN_REDIRECT=http://socialite.app/social/login/linkedin
So modify our social routes in /routes/web.app like this:
12Route::get('social/login/redirect/{provider}', ['uses' => 'Auth\AuthController@redirectToProvider', 'as' => 'social.login']);Route::get('social/login/{provider}', 'Auth\AuthController@handleProviderCallback');
- Modify /config/services.php to get all the credentials from .env file
12345678910111213141516171819202122232425262728293031323334353637<?phpreturn [...'facebook' => ['client_id' => env('FB_APP_ID'),'client_secret' => env('FB_APP_SECRET'),'redirect' => env('FB_REDIRECT'),],'twitter' => ['client_id' => env('TWITTER_APP_ID'),'client_secret' => env('TWITTER_APP_SECRET'),'redirect' => env('TWITTER_REDIRECT'),],'google' => ['client_id' => env('GOOGLE_APP_ID'),'client_secret' => env('GOOGLE_APP_SECRET'),'redirect' => env('GOOGLE_REDIRECT'),],'github' => ['client_id' => env('GITHUB_APP_ID'),'client_secret' => env('GITHUB_APP_SECRET'),'redirect' => env('GITHUB_REDIRECT'),],'linkedin' => ['client_id' => env('LINKEDIN_APP_ID'),'client_secret' => env('LINKEDIN_APP_SECRET'),'redirect' => env('LINKEDIN_REDIRECT'),],];
- Modify /resources/views/home.blade.php to include all the social app
123456789101112131415161718@extends('master')@section('content')@if(!empty($data))<h1>Hello {{$data['name']}}, You logged in via {{ $data['login_via'] }}</h1>@else<div class="row"><div class="col-md-6 col-md-offset-3"><h2>Login Using Social Sites</h2><a class="btn btn-primary" href="{{ route('social.login','facebook') }}">Facebook</a><a class="btn btn-primary" href="{{ route('social.login','twitter') }}">Twitter</a><a class="btn btn-primary" href="{{ route('social.login','google') }}">Google+</a><a class="btn btn-primary" href="{{ route('social.login','github') }}">Github</a><a class="btn btn-primary" href="{{ route('social.login','linkedin') }}">Linkedin</a></div></div>@endif@stop - Modify /app/Http/Controllers/Auth/AuthController.php to add a parameter $provider
1234567891011121314151617181920...class AuthController extends Controller{public function redirectToProvider($provider){return Socialite::driver($provider)->redirect();}public function handleProviderCallback($provider){$user = Socialite::driver($provider)->user();$data=array('name'=>$user->name,'login_via'=>$provider);return view('home')->with('data',$data);}} - Run on your browser
 Login via Facebook RUN WELL LIKE BEFORE!
Login via Twitter, For the first time we are needed to authorize the application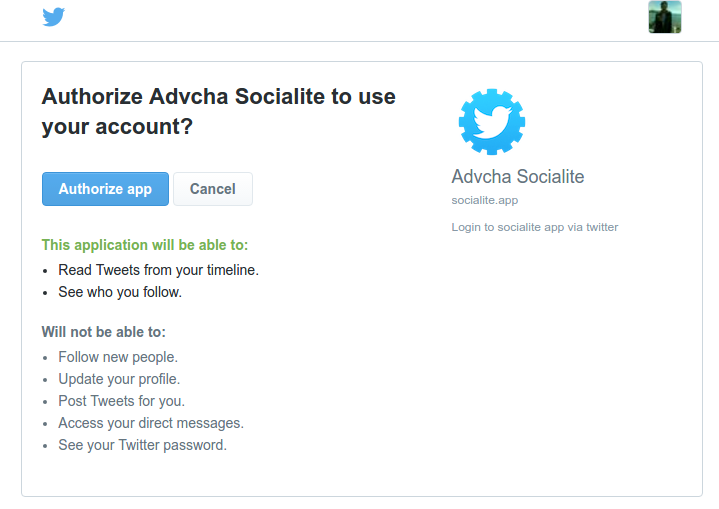 Click ‘Authorize app’. If nothing wrong, here is the callback result
Login via Google, For the first time we are needed to authorize the application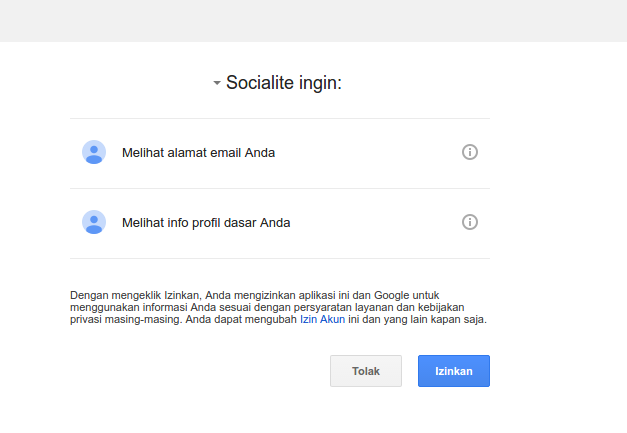 Click ‘Izinkan’. If nothing wrong, here is the callback result
Login via Github, For the first time we are needed to authorize the application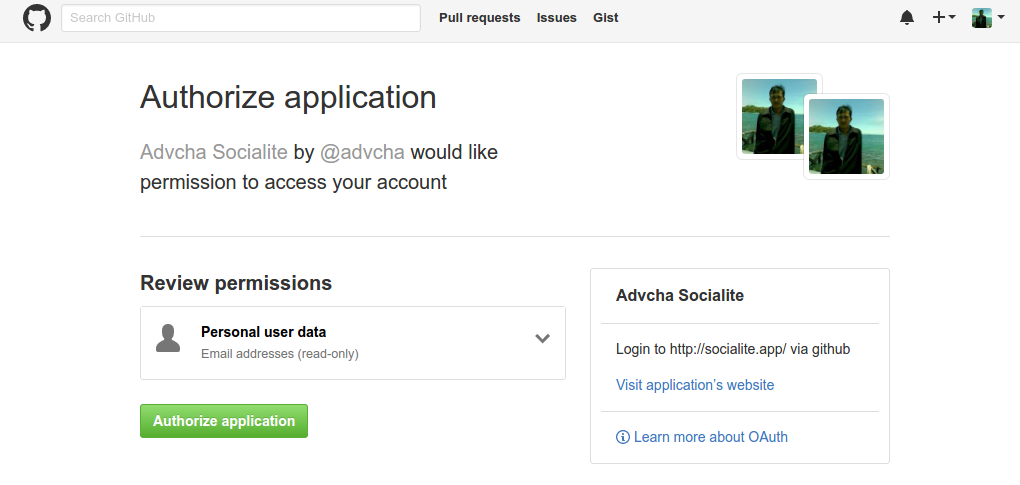 Click ‘Authorize application’. If nothing wrong, here is the callback result
Login via Linkedin, For the first time we are needed to authorize the application Click ‘Allow’. If nothing wrong, here is the callback result
- OKAY! EVERYTHING RUN WELL. THE NEXT STEP IS TO USE DATABASE/SESSION TO SAVE THE LOGIN INFORMATION!
For this, please read : Laravel 5.2 Socialite Facebook Login and Using Github authentication for login with Laravel Socialite.
Laravel Homestead VirtualBox Vagrant
Url: https://laravel.com/docs/5.3/homestead
Quick Tip: Get a Homestead Vagrant VM Up and Running
Getting Started with Laravel Homestead
Introduction
Laravel strives to make the entire PHP development experience delightful, including your local development environment. Vagrant provides a simple, elegant way to manage and provision Virtual Machines.
Laravel Homestead is an official, pre-packaged Vagrant box that provides you a wonderful development environment without requiring you to install PHP, a web server, and any other server software on your local machine. No more worrying about messing up your operating system! Vagrant boxes are completely disposable. If something goes wrong, you can destroy and re-create the box in minutes!
Homestead runs on any Windows, Mac, or Linux system, and includes the Nginx web server, PHP 7.0, MySQL, Postgres, Redis, Memcached, Node, and all of the other goodies you need to develop amazing Laravel applications.
Installation:
- Install VirtualBox (https://www.virtualbox.org/wiki/Linux_Downloads)
- Install Vagrant (https://www.vagrantup.com/downloads.html)
- Installing The Homestead Vagrant Box
1234567891011121314teddy@teddy-K43SJ:~$ vagrant box add laravel/homestead==> box: Loading metadata for box 'laravel/homestead'box: URL: https://atlas.hashicorp.com/laravel/homesteadThis box can work with multiple providers! The providers that itcan work with are listed below. Please review the list and choosethe provider you will be working with.1) virtualbox2) vmware_desktopEnter your choice: 1==> box: Adding box 'laravel/homestead' (v0.6.0) for provider: virtualboxbox: Downloading: https://atlas.hashicorp.com/laravel/boxes/homestead/versions/0.6.0/providers/virtualbox.box==> box: Successfully added box 'laravel/homestead' (v0.6.0) for 'virtualbox'!
- Installing Homestead
12345678teddy@teddy-K43SJ:~$ cd ~teddy@teddy-K43SJ:~$ git clone https://github.com/laravel/homestead.git HomesteadCloning into 'Homestead'...remote: Counting objects: 1675, done.remote: Total 1675 (delta 0), reused 0 (delta 0), pack-reused 1675Receiving objects: 100% (1675/1675), 261.38 KiB | 152.00 KiB/s, done.Resolving deltas: 100% (989/989), done.Checking connectivity... done.
Please check ‘Homestead’ directory at Home (/home/teddy) - Once you have cloned the Homestead repository, run the bash init.sh command from the Homestead directory to create the Homestead.yaml configuration file. The Homestead.yaml file will be placed in the ~/.homestead hidden directory:
123teddy@teddy-K43SJ:~$ cd Homestead/teddy@teddy-K43SJ:~/Homestead$ bash init.shHomestead initialized!
123teddy@teddy-K43SJ:~/Homestead$ cd ~/.homestead/teddy@teddy-K43SJ:~/.homestead$ lsafter.sh aliases Homestead.yaml
- Configuring Homestead. Setting Your Provider
The provider key in your ~/.homestead/Homestead.yaml file indicates which Vagrant provider should be used: virtualbox, vmware_fusion, or vmware_workstation. You may set this to the provider you prefer:
1teddy@teddy-K43SJ:~/.homestead$ gedit Homestead.yaml
Here is the file content looks like:
12345678910111213141516171819202122232425262728293031323334---ip: "192.168.10.10"memory: 2048cpus: 1provider: virtualboxauthorize: ~/.ssh/id_rsa.pubkeys:- ~/.ssh/id_rsafolders:- map: ~/Codeto: /home/vagrant/Codesites:- map: homestead.appto: /home/vagrant/Code/Laravel/publicdatabases:- homestead# blackfire:# - id: foo# token: bar# client-id: foo# client-token: bar# ports:# - send: 50000# to: 5000# - send: 7777# to: 777# protocol: udp
- Configuring Shared Folders
I prefer to let it as is (please see ‘folders’ in ~.homestead/Homestead.yaml file above)–> DON’T DO THIS, IF ‘map’ VALUE STILL ‘~/Code’, PLEASE MODIFY IT (CHECK YOUR WEB DIRECTORY IS BETTER) BECAUSE I GOT THIS ERROR:
1234567teddy@teddy-K43SJ:~/Homestead$ vagrant upBringing machine 'homestead-7' up with 'virtualbox' provider...There are errors in the configuration of this machine. Please fixthe following errors and try again:vm:* The host path of the shared folder is missing: ~/Code
MODIFY IT TO ‘~/Documents/works/laravel’ LIKE THIS:
12345...folders:- map: ~/Documents/works/laravelto: /home/vagrant/Code... - Configuring Nginx Sites
I prefer to let it as is (please see ‘sites’ in ~.homestead/Homestead.yaml file above)
If you change the sites property after provisioning the Homestead box, you should re-run vagrant reload –provision to update the Nginx configuration on the virtual machine. - Configure SSH Key (IF NOT EXIST IN /home/teddy/.ssh/)
1teddy@teddy-K43SJ:~/Homestead$ ssh-keygen -t rsa -C "advcha@yahoo.com" - The Hosts File
You must add the “domains” for your Nginx sites to the hosts file on your machine. The hosts file will redirect requests for your Homestead sites into your Homestead machine. On Mac and Linux, this file is located at /etc/hosts.
1teddy@teddy-K43SJ:~/.homestead$ sudo gedit /etc/hosts
Add this line in the file:
1192.168.10.10 homestead.app
Make sure the IP address listed is the one set in your ~/.homestead/Homestead.yaml file. Once you have added the domain to your hosts file and launched the Vagrant box you will be able to access the site via your web browser: - Launching The Vagrant Box
Once you have edited the Homestead.yaml to your liking, run the vagrant up command from your Homestead directory. Vagrant will boot the virtual machine and automatically configure your shared folders and Nginx sites.
123teddy@teddy-K43SJ:~/.homestead$ cd ~teddy@teddy-K43SJ:~$ cd Homestead/teddy@teddy-K43SJ:~/Homestead$ vagrant up
BUT I GOT THIS ERROR:
123456789101112131415161718192021222324252627/home/teddy/Homestead/scripts/homestead.rb:109:in `read': No such file or directory @ rb_sysopen - /home/teddy/.ssh/id_rsa (Errno::ENOENT)from /home/teddy/Homestead/scripts/homestead.rb:109:in `block (2 levels) in configure'from /opt/vagrant/embedded/gems/gems/vagrant-1.8.7/plugins/kernel_v2/config/vm_provisioner.rb:72:in `call'from /opt/vagrant/embedded/gems/gems/vagrant-1.8.7/plugins/kernel_v2/config/vm_provisioner.rb:72:in `add_config'from /opt/vagrant/embedded/gems/gems/vagrant-1.8.7/plugins/kernel_v2/config/vm.rb:324:in `provision'from /home/teddy/Homestead/scripts/homestead.rb:106:in `block in configure'from /home/teddy/Homestead/scripts/homestead.rb:105:in `each'from /home/teddy/Homestead/scripts/homestead.rb:105:in `configure'from /home/teddy/Homestead/Vagrantfile:30:in `block in <top (required)>'from /opt/vagrant/embedded/gems/gems/vagrant-1.8.7/lib/vagrant/config/v2/loader.rb:37:in `call'from /opt/vagrant/embedded/gems/gems/vagrant-1.8.7/lib/vagrant/config/v2/loader.rb:37:in `load'from /opt/vagrant/embedded/gems/gems/vagrant-1.8.7/lib/vagrant/config/loader.rb:113:in `block (2 levels) in load'from /opt/vagrant/embedded/gems/gems/vagrant-1.8.7/lib/vagrant/config/loader.rb:107:in `each'from /opt/vagrant/embedded/gems/gems/vagrant-1.8.7/lib/vagrant/config/loader.rb:107:in `block in load'from /opt/vagrant/embedded/gems/gems/vagrant-1.8.7/lib/vagrant/config/loader.rb:104:in `each'from /opt/vagrant/embedded/gems/gems/vagrant-1.8.7/lib/vagrant/config/loader.rb:104:in `load'from /opt/vagrant/embedded/gems/gems/vagrant-1.8.7/lib/vagrant/vagrantfile.rb:28:in `initialize'from /opt/vagrant/embedded/gems/gems/vagrant-1.8.7/lib/vagrant/environment.rb:746:in `new'from /opt/vagrant/embedded/gems/gems/vagrant-1.8.7/lib/vagrant/environment.rb:746:in `vagrantfile'from /opt/vagrant/embedded/gems/gems/vagrant-1.8.7/lib/vagrant/environment.rb:492:in `host'from /opt/vagrant/embedded/gems/gems/vagrant-1.8.7/lib/vagrant/environment.rb:214:in `block in action_runner'from /opt/vagrant/embedded/gems/gems/vagrant-1.8.7/lib/vagrant/action/runner.rb:33:in `call'from /opt/vagrant/embedded/gems/gems/vagrant-1.8.7/lib/vagrant/action/runner.rb:33:in `run'from /opt/vagrant/embedded/gems/gems/vagrant-1.8.7/lib/vagrant/environment.rb:479:in `hook'from /opt/vagrant/embedded/gems/gems/vagrant-1.8.7/lib/vagrant/environment.rb:728:in `unload'from /opt/vagrant/embedded/gems/gems/vagrant-1.8.7/bin/vagrant:192:in `ensure in <main>'from /opt/vagrant/embedded/gems/gems/vagrant-1.8.7/bin/vagrant:192:in `<main>'
SOLUTION: (ref: Problem launching vagrant on Homestead)
From this error
1No such file or directory @ rb_sysopen - /home/teddy/.ssh/id_rsa (Errno::ENOENT)
I didn’t find ‘id_rsa’ file in /home/teddy/.ssh/ directory. I need to configure my SSH location like this:
123456789101112131415161718192021teddy@teddy-K43SJ:~/Homestead$ ssh-keygen -t rsa -C "advcha@yahoo.com"Generating public/private rsa key pair.Enter file in which to save the key (/home/teddy/.ssh/id_rsa):Enter passphrase (empty for no passphrase):Enter same passphrase again:Your identification has been saved in /home/teddy/.ssh/id_rsa.Your public key has been saved in /home/teddy/.ssh/id_rsa.pub.The key fingerprint is:b6:7b:c7:0c:c9:d1:3d:a7:8b:8f:56:25:52:2b:6a:48 advcha@yahoo.comThe key's randomart image is:+--[ RSA 2048]----+| || . || . o . || E . + = o|| .So + o * || ...* o || .. + o . || .. *.. || .. o... |+-----------------+
SEE MY MODIFICATION AT #9.
Then I run ‘vagrant up’ again. BUT GOT ANOTHER ERROR:
1234567teddy@teddy-K43SJ:~/Homestead$ vagrant upBringing machine 'homestead-7' up with 'virtualbox' provider...There are errors in the configuration of this machine. Please fixthe following errors and try again:vm:* The host path of the shared folder is missing: ~/Code
SOLUTION: (ref: Vagrant: The host path of the shared folder is missing)
SEE MY MODIFICATION AT #7 ABOVE!
RUN ‘vagrant up’ again! SUCCESS:
123456789101112131415161718192021222324252627282930313233343536373839404142434445464748495051525354555657585960teddy@teddy-K43SJ:~/Homestead$ vagrant upBringing machine 'homestead-7' up with 'virtualbox' provider...==> homestead-7: Importing base box 'laravel/homestead'...==> homestead-7: Matching MAC address for NAT networking...==> homestead-7: Checking if box 'laravel/homestead' is up to date...==> homestead-7: Setting the name of the VM: homestead-7==> homestead-7: Clearing any previously set network interfaces...==> homestead-7: Preparing network interfaces based on configuration...homestead-7: Adapter 1: nathomestead-7: Adapter 2: hostonly==> homestead-7: Forwarding ports...homestead-7: 80 (guest) => 8000 (host) (adapter 1)homestead-7: 443 (guest) => 44300 (host) (adapter 1)homestead-7: 3306 (guest) => 33060 (host) (adapter 1)homestead-7: 5432 (guest) => 54320 (host) (adapter 1)homestead-7: 22 (guest) => 2222 (host) (adapter 1)==> homestead-7: Running 'pre-boot' VM customizations...==> homestead-7: Booting VM...==> homestead-7: Waiting for machine to boot. This may take a few minutes...homestead-7: SSH address: 127.0.0.1:2222homestead-7: SSH username: vagranthomestead-7: SSH auth method: private keyhomestead-7:homestead-7: Vagrant insecure key detected. Vagrant will automatically replacehomestead-7: this with a newly generated keypair for better security.homestead-7:homestead-7: Inserting generated public key within guest...homestead-7: Removing insecure key from the guest if it's present...homestead-7: Key inserted! Disconnecting and reconnecting using new SSH key...==> homestead-7: Machine booted and ready!==> homestead-7: Checking for guest additions in VM...==> homestead-7: Setting hostname...==> homestead-7: Configuring and enabling network interfaces...==> homestead-7: Mounting shared folders...homestead-7: /vagrant => /home/teddy/Homesteadhomestead-7: /home/vagrant/Code => /home/teddy/Documents/works/laravel==> homestead-7: Running provisioner: file...==> homestead-7: Running provisioner: shell...homestead-7: Running: inline script==> homestead-7:==> homestead-7: ssh-rsa AAAAB3NzaC1yc2EAAAADAQABAAABAQDFs0+Hb8l+48Eq9Ac6kXclhIuecnLDF6W5jocqSQBcLjdixzCnwnvciW26PvUp2HEjzkzAX8s56Zx4v4cBJUoRRx7yxU60y3HeFDOFzrZEicnI/10iwnmedFcm6SdvhhQvenVev8neZjI4SCnjAKvoTgu/RKkHiU9wBVXhb7gHl0qkvo5333I9l8bMqjWQqdD7GDTjfdrbddQD0QrxR+aU+Hbpo6E1w7htbQ0iic/Nif4oXjRQrQpgwHKA591oGyfAlqDNrQ361SZehIO0ZIBv/3+am5696AluSTkm5DZW1TdidMChFKVIah9VcSZ3K+yRvtpavpCsJwfrnFLsjq+9 advcha@yahoo.com==> homestead-7: Running provisioner: shell...homestead-7: Running: inline script==> homestead-7: Running provisioner: shell...homestead-7: Running: /tmp/vagrant-shell20161122-2322-u1zhuj.sh==> homestead-7: Running provisioner: shell...homestead-7: Running: script: Creating Site: homestead.app==> homestead-7: Running provisioner: shell...homestead-7: Running: script: Restarting Nginx==> homestead-7: Running provisioner: shell...homestead-7: Running: script: Creating MySQL Database==> homestead-7: Running provisioner: shell...homestead-7: Running: script: Creating Postgres Database==> homestead-7: Running provisioner: shell...homestead-7: Running: script: Clear Variables==> homestead-7: Running provisioner: shell...homestead-7: Running: script: Update Composer==> homestead-7: You are already using composer version 1.2.2 (stable channel).==> homestead-7: Running provisioner: shell...homestead-7: Running: /tmp/vagrant-shell20161122-2322-tjn045.sh
WE CAN SEE VAGRANT INSTALLED ALSO PHP, NGINX, MYSQL, POSTGRESQL,ETC.
Or you can see it from VirtualBox (Open Applications -> System Tools -> Oracle VM VirtualBox) THIS GUI MORE CONVENIENT. I CAN ‘START’, ‘PAUSE’ OR ‘CLOSE->POWER OFF’ THE VIRTUAL MACHINE!
NOTE: START MUST BE FROM TERMINAL BY TYPING ‘vagrant up’. I CAN USE GUI TO START IT UP BECAUSE IT’S ALWAYS ASK FOR LOGIN AND PASSWORD THAT I DONT KNOW!
USE ‘vagrant provision’ TO RELOAD/REFRESH VM!
TO SHUTDOWN THE VM (NO! USE SUSPEND INSTEAD. SEE BELOW), PLEASE TYPE ‘vagrant destroy –force’
READ (https://www.vagrantup.com/docs/cli/destroy.html): “The destroy command does not remove a box that may have been installed on your computer during vagrant up. Thus, even if you run vagrant destroy, the box installed in the system will still be present on the hard drive. To return your computer to the state as it was before vagrant up command, you need to use vagrant box remove.”
USE SUSPEND INSTEAD OF SHUTDOWN (ref:https://scotch.io/tutorials/getting-started-with-laravel-homestead)
12teddy@teddy-K43SJ:~/Homestead$ vagrant suspend==> homestead-7: Saving VM state and suspending execution...
SOMETIMES I FORGOT TO SUSPEND THE VM BEFORE HIBERNATING MY LAPTOP. IT’D MAKE MY LAPTOP VERY SLOW. THE TERMINAL WOULD NOT RESPOND ANYMORE FOR ANYKEY BUT I CAN OPEN THE NEW ONE OR NEW TAB. USUALLY THE VM STATUS IS PAUSED.
1234567891011teddy@teddy-K43SJ:~/Homestead$ vagrant statusCurrent machine states:homestead-7 paused (virtualbox)The VM is paused. This VM may have been paused via the VirtualBoxGUI or the VBoxManage command line interface. To unpause, pleaseuse the VirtualBox GUI and/or VBoxManage command line interface sothat vagrant would be able to control the VM again.teddy@teddy-K43SJ:~/Homestead$ vagrant provision==> homestead-7: VM is not currently running. Please, first bring it up with `vagrant up` then run this command.
I HAVE TO OPEN THE VirtualBox GUI AND DO Close -> Save State MANUALLY TO STOP THE CURRENT PROCESS!
123456teddy@teddy-K43SJ:~/Homestead$ vagrant statusCurrent machine states:homestead-7 saved (virtualbox)To resume this VM, simply run `vagrant up`.
- Use SSH to get into the VM (ref: https://www.sitepoint.com/quick-tip-get-homestead-vagrant-vm-running/)
123456789101112teddy@teddy-K43SJ:~/Homestead$ vagrant sshWelcome to Ubuntu 16.04.1 LTS (GNU/Linux 4.4.0-38-generic x86_64)* Documentation: https://help.ubuntu.com* Management: https://landscape.canonical.com* Support: https://ubuntu.com/advantage4 packages can be updated.0 updates are security updates.vagrant@homestead:~$
It seems vagrant INSTALLED ubuntu 16.04 AS VM!
I can check the PHP version like this:
123456vagrant@homestead:~$ php -vPHP 7.0.13-1+deb.sury.org~xenial+1 (cli) ( NTS )Copyright (c) 1997-2016 The PHP GroupZend Engine v3.0.0, Copyright (c) 1998-2016 Zend Technologieswith Zend OPcache v7.0.13-1+deb.sury.org~xenial+1, Copyright (c) 1999-2016, by Zend Technologieswith blackfire v1.14.1~linux-x64-non_zts70, https://blackfire.io, by Blackfireio Inc.
I can browse the files and directories in it:
123456vagrant@homestead:~$ lsCodevagrant@homestead:~$ cd Code/vagrant@homestead:~/Code$ lsblog composer.lock latihan-crudcomposer.json crud-materialize mylaravelproject - Run http://homestead.app
But before we do this, WE NEED TO ADD A FEW DIRECTORIES AND FILE. BECAUSE WE KNOW THE WEB ROOT FOR OUR VM IS ‘/home/vagrant/Code’ IS MAPPED TO ‘~/Documents/works/laravel’ (SEE ~/.homestead/Homestead.yaml). FOR ‘homestead.app’ (IS MAPPED TO ‘/home/vagrant/Code/Laravel/public’), ADD A NEW DIRECTORY ‘Laravel’ in /Documents/works/laravel/, THEN ADD ‘public’ DIRECTORY IN IT. THEN ADD A NEW FILE ‘index.php’ IN IT. SO THE FULL PATH IS ‘/Documents/works/laravel/Laravel/public/index.php’. In the PHP file, just add a line of code:
123<?phpphpinfo();?>
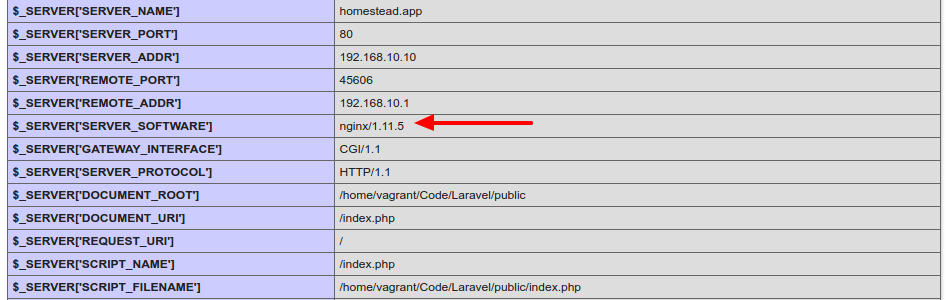
THEN RUN http://homestead.app/ IN OUR BROWSER!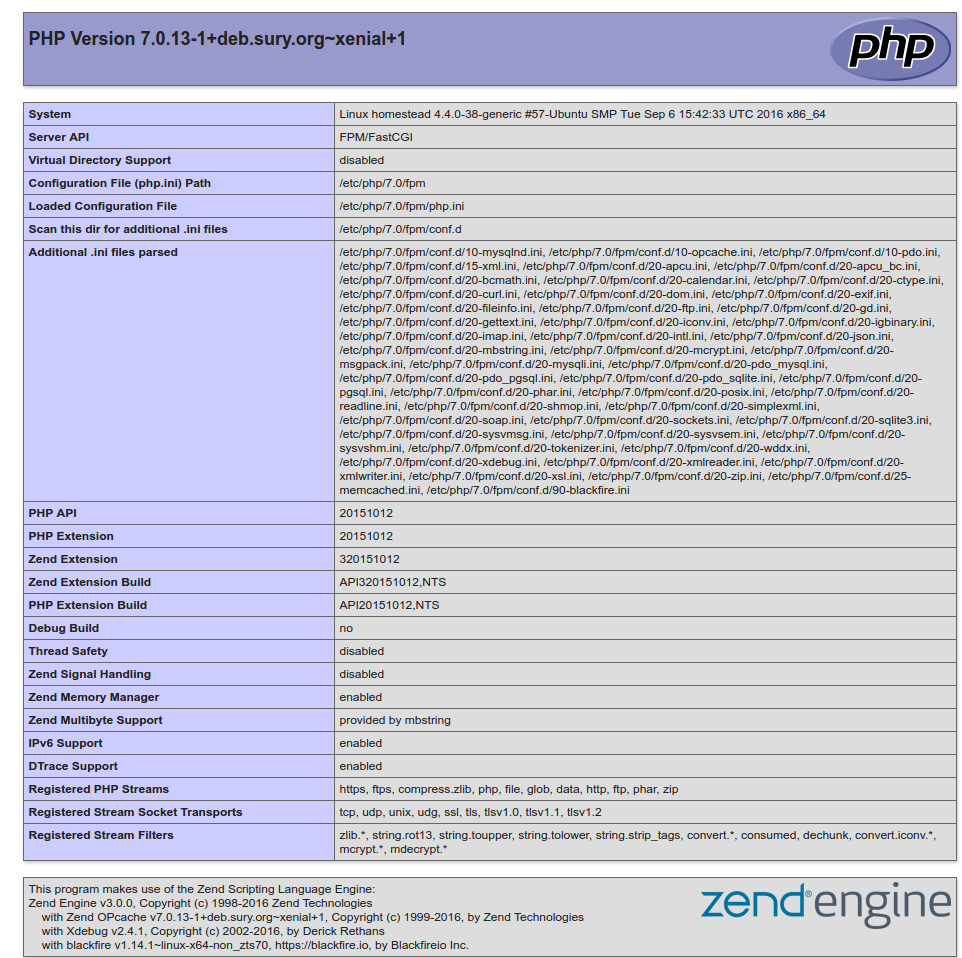 I can see I’m using NGINX as a webserver instead of Apache
HOW TO RUN MYSQL DATABASE???
SOLUTION:
REMEMBER: VAGRANT MUST BE IN ‘UP’ MODE FOR THIS SITUATION!
Login to ssh (‘vagrant ssh’) then check the mysql location with ‘which mysql’
1234567891011121314teddy@teddy-K43SJ:~/Homestead$ vagrant sshWelcome to Ubuntu 16.04.1 LTS (GNU/Linux 4.4.0-38-generic x86_64)* Documentation: https://help.ubuntu.com* Management: https://landscape.canonical.com* Support: https://ubuntu.com/advantage4 packages can be updated.0 updates are security updates.Last login: Wed Nov 23 07:27:28 2016 from 10.0.2.2vagrant@homestead:~$ which mysql/usr/bin/mysql
From ~/.homestead/Homestead.yaml, here is the databases:
12databases:- homestead
To connect to mysql server at VM, use default user:
12user: homesteadpassword: secret
12345678910111213141516vagrant@homestead:~$ mysql -uhomestead -psecretmysql: [Warning] Using a password on the command line interface can be insecure.Welcome to the MySQL monitor. Commands end with ; or \g.Your MySQL connection id is 11Server version: 5.7.16-0ubuntu0.16.04.1 (Ubuntu)Copyright (c) 2000, 2016, Oracle and/or its affiliates. All rights reserved.Oracle is a registered trademark of Oracle Corporation and/or itsaffiliates. Other names may be trademarks of their respectiveowners.Type 'help;' or '\h' for help. Type '\c' to clear the current input statement.mysql> quitBye
So MYSQL Server version is 5.7.16
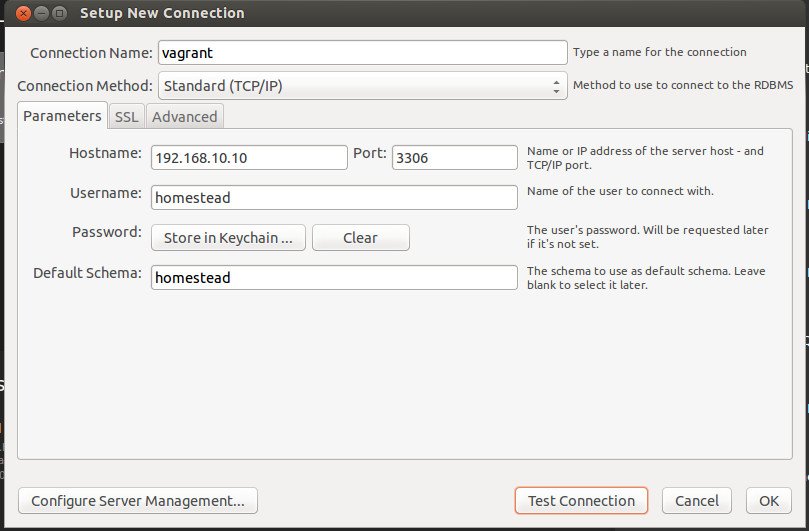
For better for myself to connect to the mysql server, I tried to install the latest mysql client ‘MySQL Workbench’ from https://dev.mysql.com/downloads/workbench/.
<OLD>
Currently the version is 6.3.8. But when I installed it, I got dependenci error “Dependency is not satisfiable: libatkmm-1.6-1v5 (>=2.24.0)”. I checked again the downloaded file (mysql-workbench-community-6.3.8-1ubu1604-amd64.deb), IT’S APPARENTLY FOR UBUNTU 16.04!
</OLD>
<NEW>
Ref: http://elementaryos.stackexchange.com/questions/6779/cant-install-mysql-workbench-dependency-is-not-satisfiable
Download MySQL Workbench for Ubuntu 14.04 here http://cdn.mysql.com//archives/mysql-workbench/mysql-workbench-community-6.3.6-1ubu1404-amd64.deb THEN INSTALL. SUCCESS!
</NEW>
CONFIGURE MySQL Worbench TO CONNECT MySQL Server AT VM:
123456Connection Name: vagrantHostname: 192.168.10.10User: homesteadPassword: secretPort: 3306Default Schema: homestead
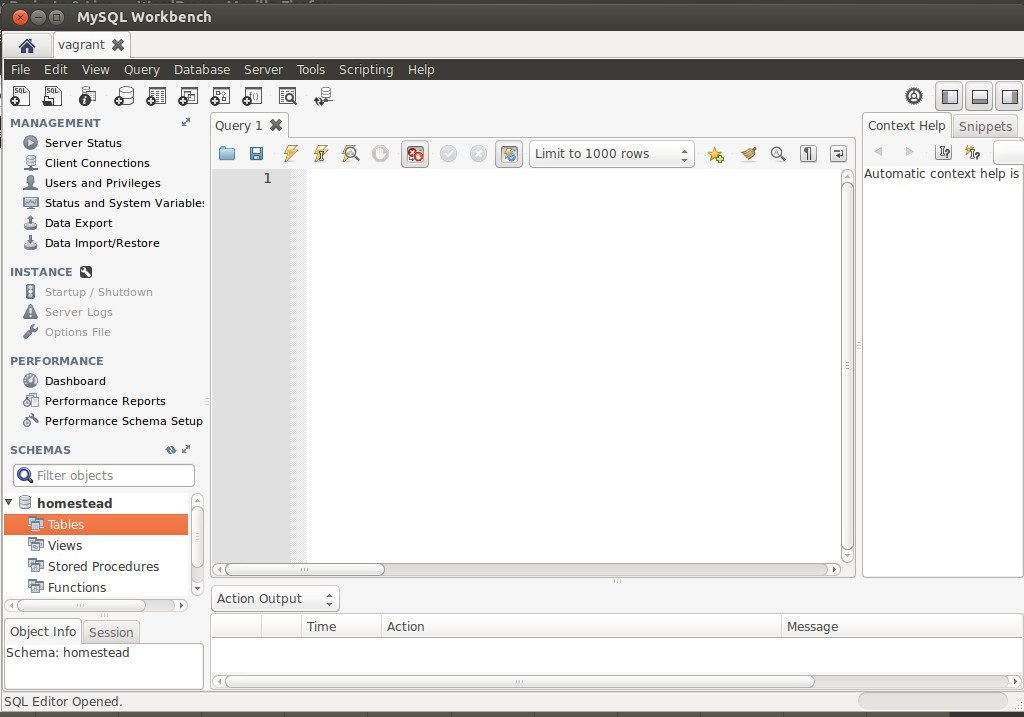 Now I can see the database ‘homestead’. I also can create any table!
WHERE IS NGINX CONFIGURATION FILE???
SOLUTION:
Use ‘vagrant ssh’ TO GET INTO THE HOME DIRECTORY OF VM. THEN GO TO THE ROOT DIRECTORY
1234567891011121314151617181920212223teddy@teddy-K43SJ:~/Homestead$ vagrant sshWelcome to Ubuntu 16.04.1 LTS (GNU/Linux 4.4.0-38-generic x86_64)* Documentation: https://help.ubuntu.com* Management: https://landscape.canonical.com* Support: https://ubuntu.com/advantage4 packages can be updated.0 updates are security updates.Last login: Wed Nov 23 07:51:16 2016 from 10.0.2.2vagrant@homestead:~$ lsCodevagrant@homestead:~$ cd ..vagrant@homestead:/home$ lsvagrantvagrant@homestead:/home$ cd ..vagrant@homestead:/$ lsbin home lib64 opt sbin tmp vmlinuzboot initrd.img lost+found proc snap usr vmlinuz.olddev initrd.img.old media root srv vagrantetc lib mnt run sys var
THE NGINX CONF FILE IN /etc/nginx/nginx.conf
1234567vagrant@homestead:/$ cd /etc/nginx/vagrant@homestead:/etc/nginx$ lsconf.d koi-win proxy_params sslfastcgi.conf mime.types scgi_params uwsgi_paramsfastcgi_params modules-available sites-available win-utfhhvm.conf modules-enabled sites-enabledkoi-utf nginx.conf snippets
USE ‘nano’ TO OPEN/EDIT THE FILE
1vagrant@homestead:/$ nano /etc/nginx/nginx.conf
Here is the file content:
1234567891011121314151617181920212223242526272829303132333435363738394041424344454647484950515253545556575859606162636465666768697071727374757677787980818283848586user vagrant;worker_processes auto;pid /run/nginx.pid;include /etc/nginx/modules-enabled/*.conf;events {worker_connections 768;# multi_accept on;}http {### Basic Settings##sendfile on;tcp_nopush on;tcp_nodelay on;keepalive_timeout 65;types_hash_max_size 2048;# server_tokens off;server_names_hash_bucket_size 64;# server_name_in_redirect off;include /etc/nginx/mime.types;default_type application/octet-stream;### SSL Settings##ssl_protocols TLSv1 TLSv1.1 TLSv1.2; # Dropping SSLv3, ref: POODLEssl_prefer_server_ciphers on;### Logging Settings##access_log /var/log/nginx/access.log;error_log /var/log/nginx/error.log;### Gzip Settings##gzip on;gzip_disable "msie6";# gzip_vary on;# gzip_proxied any;# gzip_comp_level 6;# gzip_buffers 16 8k;# gzip_http_version 1.1;# gzip_types text/plain text/css application/json application/javascrip$### Virtual Host Configs##include /etc/nginx/conf.d/*.conf;include /etc/nginx/sites-enabled/*;}#mail {# # See sample authentication script at:# # http://wiki.nginx.org/ImapAuthenticateWithApachePhpScript## # auth_http localhost/auth.php;# # pop3_capabilities "TOP" "USER";# # imap_capabilities "IMAP4rev1" "UIDPLUS";## server {# listen localhost:110;# protocol pop3;# proxy on;# }## server {# listen localhost:143;# protocol imap;# proxy on;# }#}
TIPS FOR USING NANO:
TO ‘COPY’ THE TEXT AT THE TERMINAL, JUST USE MOUSE & DRAG THEN Edit->Copy
TO ‘EXIT’ THE TERMINAL, PRESS ‘Ctrl+X’
use CTRL-O to Save/overwrite the changes then ENTER - HOW TO CREATE NEW PROJECT ON VAGRANT???
OK!. Make sure to run the VM (‘vagrant up’) and go to the ssh (‘vagrant ssh’). I want to clone the laravel 5 project here (Please read Install Laravel 5 On Ubuntu 14.04) For the first time, check our git and composer:
1234vagrant@homestead:~$ git --versiongit version 2.7.4vagrant@homestead:~$ composer --versionComposer version 1.2.2 2016-11-03 17:43:15
GO TO ‘/Code’ DIRECTORY FIRST!
1vagrant@homestead:~$ cd Code/
NOTE: THIS IS A REMAINDER! I MADE A MISTAKE FOR THE FIRST TIME SO I HAVE TO MOVE THE LARAVEL PROJECT INTO ‘/Code’ DIRECTORY!
1vagrant@homestead:~$ mv laravelvagrant/ Code/
OK. Create the Laravel project with name ‘laravelvagrant’
1234567vagrant@homestead:~/Code$ composer create-project --prefer-dist laravel/laravel laravelvagrantInstalling laravel/laravel (v5.3.16)- Installing laravel/laravel (v5.3.16)Downloading: 100%...> php artisan key:generateApplication key [base64:n13iBSiaaoRlpmuP9Mu1B4aL1SUSv2oCMEveVnY8NbQ=] set successfully.
CHECK THE NEW PROJECT ‘laravelvagrant’!
123vagrant@homestead:~/Code$ lsblog composer.lock Laravel latihan-crudcomposer.json crud-materialize laravelvagrant mylaravelproject
We want to run this new project, BUT we need to modify ‘Homestead.yaml’ file first to map ‘homestead.app’ to our new project ‘laravelvagrant’. Here is the modification:
123sites:- map: homestead.appto: /home/vagrant/Code/laravelvagrant/public
We changed from ‘/home/vagrant/Code/Laravel/public’ to ‘/home/vagrant/Code/laravelvagrant/public’
THEN WE NEED TO REFRESH OUR VM WITH ‘vagrant provision’! (exit from ssh first!). Then IT’S READY TO RUN homestead.app (http://homestead.app/) ON OUR BROWSER! HERE IS THE WELCOME SCREEN
- I have a test from interviewed.com (https://upwork.interviewed.com/candidate/interviews/905600) from upwork.com about my understanding for PHP things to go into the enterprise level!. Here is the description:
“This project assumes your computer is already set up with minimal development tools including Git, Vagrant, Composer, etc. If you don’t already have these installed, you may want to switch to the computer that you normally develop on or follow these instructions.This project uses Laravel 5.3, PHP 7.0, and SQLite (so that database is portable without seeds).Download the project and start your server:
https://github.com/prehire/php-23093023909ad09a09
View the project in your browser and click around: http://homestead.appMost people allocate about 1 hour to this project, but you can invest up to 4 hours if you want to. Because the project has a time limit, you can’t pause once you’ve started.”
OK! I already setup vagrant and virtualbox
Run the VM and go into the ssh
Then clone the project ‘https://github.com/prehire/php-23093023909ad09a09.git’
1234567891011vagrant@homestead:~/Code$ git clone https://github.com/prehire/php-23093023909ad09a09.gitCloning into 'php-23093023909ad09a09'...remote: Counting objects: 152, done.remote: Total 152 (delta 0), reused 0 (delta 0), pack-reused 152Receiving objects: 100% (152/152), 174.46 KiB | 191.00 KiB/s, done.Resolving deltas: 100% (30/30), done.Checking connectivity... done.vagrant@homestead:~/Code$ lsblog crud-materialize latihan-crudcomposer.json Laravel mylaravelprojectcomposer.lock laravelvagrant php-23093023909ad09a09
Go into the project ‘php-23093023909ad09a09’ then install the dependencies via composer
123456789101112vagrant@homestead:~/Code$ cd php-23093023909ad09a09/vagrant@homestead:~/Code/php-23093023909ad09a09$ composer installLoading composer repositories with package informationInstalling dependencies (including require-dev) from lock file- Installing nikic/php-parser (v2.1.1)Loading from cache...Generating autoload files> Illuminate\Foundation\ComposerScripts::postInstall> php artisan optimizeGenerating optimized class loaderThe compiled class file has been removed.
Now we want to test it on our browser BUT REMEMBER TO MODIFY ‘Homestead.yaml’ FIRST!
123sites:- map: homestead.appto: /home/vagrant/Code/php-23093023909ad09a09/public
THEN EXIT FROM SSH & REFRESH OUR VM WITH ‘vagrant provision’!
REFRESH OUR BROWSER (http://homestead.app/). HERE IS THE HOMEPAGE SCREEN! The App with 4 top menu: Homework (http://homestead.app/booking OR http://homestead.app/ –> HOMEPAGE), Booking (http://homestead.app/booking), Customer (http://homestead.app/customer) and Cleaner (http://homestead.app/cleaner). Here are the screens for each of them:
Booking Customer
 Cleaner
 OK. THE SETUP IS OKAY. WHAT IS THE TASK FOR THIS PROJECT???
USE PDO INSTEAD OF MYSQL!!! SETUP IT FIRST OR TRY THE AVAILABLE PROJECT IN http://myprojects.advchaweb.com/index.php/2017/01/11/cleaner-booking/ TO MAKE SURE PDO WORK IN HOMESTEAD!


Laravel CRUD With MaterializeCSS
Source: Tutorial CRUD Sederhana Laravel 5.2 dengan Materializecss Part I
& Tutorial CRUD Sederhana Laravel 5.2 dengan Materializecss Part II
MaterializeCSS source: http://materializecss.com/getting-started.html (I don’t use sass, so download the newest version http://materializecss.com/bin/materialize-v0.97.7.zip)
- Create a new laravel project named ‘crud-materialize’
123456789101112131415161718192021222324252627282930313233343536373839404142434445464748495051525354555657585960616263646566676869707172737475767778798081828384858687888990919293949596979899100101102103104105106107108109110111112113114115116117118119120121122123124125126127128129130131132133134135136137138139140141142143144145146147148149150151152153154155156157158159160161162163164165166167168169170171172173174175176177178179180181182183184185186187188189190191192193194195196197198199200201202203204205206207208209210211212213214215216217218219220221222223224225226227228229230231232233234235236237238239240241242243244245246247248249250251252253254255teddy@teddy-K43SJ:~/Documents/works/laravel$ composer create-project --prefer-dist laravel/laravel crud-materializeInstalling laravel/laravel (v5.3.16)- Installing laravel/laravel (v5.3.16)Loading from cacheCreated project in crud-materialize> php -r "file_exists('.env') || copy('.env.example', '.env');"Loading composer repositories with package informationUpdating dependencies (including require-dev)- Installing vlucas/phpdotenv (v2.4.0)Loading from cache- Installing symfony/polyfill-mbstring (v1.2.0)Loading from cache- Installing symfony/var-dumper (v3.1.6)Downloading: 100%- Installing symfony/translation (v3.1.6)Downloading: 100%- Installing symfony/routing (v3.1.6)Loading from cache- Installing symfony/process (v3.1.6)Loading from cache- Installing psr/log (1.0.2)Loading from cache- Installing symfony/debug (v3.1.6)Loading from cache- Installing symfony/http-foundation (v3.1.6)Downloading: 100%- Installing symfony/event-dispatcher (v3.1.6)Downloading: 100%- Installing symfony/http-kernel (v3.1.6)Downloading: 100%- Installing symfony/finder (v3.1.6)Loading from cache- Installing symfony/console (v3.1.6)Downloading: 100%- Installing swiftmailer/swiftmailer (v5.4.3)Loading from cache- Installing paragonie/random_compat (v2.0.3)Loading from cache- Installing ramsey/uuid (3.5.1)Loading from cache- Installing jakub-onderka/php-console-color (0.1)Loading from cache- Installing jakub-onderka/php-console-highlighter (v0.3.2)Loading from cache- Installing dnoegel/php-xdg-base-dir (0.1)Loading from cache- Installing nikic/php-parser (v2.1.1)Loading from cache- Installing psy/psysh (v0.7.2)Loading from cache- Installing nesbot/carbon (1.21.0)Loading from cache- Installing mtdowling/cron-expression (v1.1.0)Loading from cache- Installing monolog/monolog (1.21.0)Loading from cache- Installing league/flysystem (1.0.32)Loading from cache- Installing symfony/polyfill-util (v1.2.0)Loading from cache- Installing symfony/polyfill-php56 (v1.2.0)Loading from cache- Installing jeremeamia/superclosure (2.2.0)Loading from cache- Installing doctrine/inflector (v1.1.0)Loading from cache- Installing classpreloader/classpreloader (3.0.0)Loading from cache- Installing laravel/framework (v5.3.21)Downloading: 100%- Installing fzaninotto/faker (v1.6.0)Loading from cache- Installing hamcrest/hamcrest-php (v1.2.2)Loading from cache- Installing mockery/mockery (0.9.5)Loading from cache- Installing symfony/yaml (v3.1.6)Downloading: 100%- Installing sebastian/version (2.0.0)Loading from cache- Installing sebastian/resource-operations (1.0.0)Loading from cache- Installing sebastian/recursion-context (1.0.2)Loading from cache- Installing sebastian/object-enumerator (1.0.0)Loading from cache- Installing sebastian/global-state (1.1.1)Loading from cache- Installing sebastian/exporter (1.2.2)Loading from cache- Installing sebastian/environment (1.3.8)Loading from cache- Installing sebastian/diff (1.4.1)Loading from cache- Installing sebastian/comparator (1.2.0)Loading from cache- Installing doctrine/instantiator (1.0.5)Loading from cache- Installing phpunit/php-text-template (1.2.1)Loading from cache- Installing phpunit/phpunit-mock-objects (3.4.0)Loading from cache- Installing phpunit/php-timer (1.0.8)Loading from cache- Installing phpunit/php-file-iterator (1.4.1)Loading from cache- Installing sebastian/code-unit-reverse-lookup (1.0.0)Loading from cache- Installing phpunit/php-token-stream (1.4.8)Loading from cache- Installing phpunit/php-code-coverage (4.0.1)Loading from cache- Installing webmozart/assert (1.1.0)Loading from cache- Installing phpdocumentor/reflection-common (1.0)Loading from cache- Installing phpdocumentor/type-resolver (0.2)Loading from cache- Installing phpdocumentor/reflection-docblock (3.1.1)Loading from cache- Installing phpspec/prophecy (v1.6.1)Loading from cache- Installing myclabs/deep-copy (1.5.4)Loading from cache- Installing phpunit/phpunit (5.6.2)Downloading: 100%- Installing symfony/css-selector (v3.1.6)Loading from cache- Installing symfony/dom-crawler (v3.1.6)Downloading: 100%symfony/var-dumper suggests installing ext-symfony_debug ()symfony/translation suggests installing symfony/config ()symfony/routing suggests installing doctrine/annotations (For using the annotation loader)symfony/routing suggests installing symfony/config (For using the all-in-one router or any loader)symfony/routing suggests installing symfony/dependency-injection (For loading routes from a service)symfony/routing suggests installing symfony/expression-language (For using expression matching)symfony/event-dispatcher suggests installing symfony/dependency-injection ()symfony/http-kernel suggests installing symfony/browser-kit ()symfony/http-kernel suggests installing symfony/class-loader ()symfony/http-kernel suggests installing symfony/config ()symfony/http-kernel suggests installing symfony/dependency-injection ()paragonie/random_compat suggests installing ext-libsodium (Provides a modern crypto API that can be used to generate random bytes.)ramsey/uuid suggests installing ircmaxell/random-lib (Provides RandomLib for use with the RandomLibAdapter)ramsey/uuid suggests installing ext-libsodium (Provides the PECL libsodium extension for use with the SodiumRandomGenerator)ramsey/uuid suggests installing ext-uuid (Provides the PECL UUID extension for use with the PeclUuidTimeGenerator and PeclUuidRandomGenerator)ramsey/uuid suggests installing moontoast/math (Provides support for converting UUID to 128-bit integer (in string form).)ramsey/uuid suggests installing ramsey/uuid-doctrine (Allows the use of Ramsey\Uuid\Uuid as Doctrine field type.)ramsey/uuid suggests installing ramsey/uuid-console (A console application for generating UUIDs with ramsey/uuid)psy/psysh suggests installing ext-pdo-sqlite (The doc command requires SQLite to work.)monolog/monolog suggests installing aws/aws-sdk-php (Allow sending log messages to AWS services like DynamoDB)monolog/monolog suggests installing doctrine/couchdb (Allow sending log messages to a CouchDB server)monolog/monolog suggests installing ext-amqp (Allow sending log messages to an AMQP server (1.0+ required))monolog/monolog suggests installing ext-mongo (Allow sending log messages to a MongoDB server)monolog/monolog suggests installing graylog2/gelf-php (Allow sending log messages to a GrayLog2 server)monolog/monolog suggests installing mongodb/mongodb (Allow sending log messages to a MongoDB server via PHP Driver)monolog/monolog suggests installing php-amqplib/php-amqplib (Allow sending log messages to an AMQP server using php-amqplib)monolog/monolog suggests installing php-console/php-console (Allow sending log messages to Google Chrome)monolog/monolog suggests installing rollbar/rollbar (Allow sending log messages to Rollbar)monolog/monolog suggests installing ruflin/elastica (Allow sending log messages to an Elastic Search server)monolog/monolog suggests installing sentry/sentry (Allow sending log messages to a Sentry server)league/flysystem suggests installing league/flysystem-aws-s3-v2 (Allows you to use S3 storage with AWS SDK v2)league/flysystem suggests installing league/flysystem-aws-s3-v3 (Allows you to use S3 storage with AWS SDK v3)league/flysystem suggests installing league/flysystem-azure (Allows you to use Windows Azure Blob storage)league/flysystem suggests installing league/flysystem-cached-adapter (Flysystem adapter decorator for metadata caching)league/flysystem suggests installing league/flysystem-copy (Allows you to use Copy.com storage)league/flysystem suggests installing league/flysystem-dropbox (Allows you to use Dropbox storage)league/flysystem suggests installing league/flysystem-eventable-filesystem (Allows you to use EventableFilesystem)league/flysystem suggests installing league/flysystem-rackspace (Allows you to use Rackspace Cloud Files)league/flysystem suggests installing league/flysystem-sftp (Allows you to use SFTP server storage via phpseclib)league/flysystem suggests installing league/flysystem-webdav (Allows you to use WebDAV storage)league/flysystem suggests installing league/flysystem-ziparchive (Allows you to use ZipArchive adapter)laravel/framework suggests installing aws/aws-sdk-php (Required to use the SQS queue driver and SES mail driver (~3.0).)laravel/framework suggests installing doctrine/dbal (Required to rename columns and drop SQLite columns (~2.4).)laravel/framework suggests installing guzzlehttp/guzzle (Required to use the Mailgun and Mandrill mail drivers and the ping methods on schedules (~5.3|~6.0).)laravel/framework suggests installing league/flysystem-aws-s3-v3 (Required to use the Flysystem S3 driver (~1.0).)laravel/framework suggests installing league/flysystem-rackspace (Required to use the Flysystem Rackspace driver (~1.0).)laravel/framework suggests installing pda/pheanstalk (Required to use the beanstalk queue driver (~3.0).)laravel/framework suggests installing predis/predis (Required to use the redis cache and queue drivers (~1.0).)laravel/framework suggests installing pusher/pusher-php-server (Required to use the Pusher broadcast driver (~2.0).)laravel/framework suggests installing symfony/psr-http-message-bridge (Required to use psr7 bridging features (0.2.*).)sebastian/global-state suggests installing ext-uopz (*)phpunit/phpunit-mock-objects suggests installing ext-soap (*)phpunit/php-code-coverage suggests installing ext-xdebug (>=2.4.0)phpunit/phpunit suggests installing phpunit/php-invoker (~1.1)phpunit/phpunit suggests installing ext-xdebug (*)Writing lock fileGenerating autoload files> Illuminate\Foundation\ComposerScripts::postUpdate> php artisan optimizeGenerating optimized class loaderThe compiled class file has been removed.> php artisan key:generateApplication key [base64:bcsSsz8gPXQrB5rmUX4zXCmfkbIt6QW7IFiC/01QpRQ=] set successfully.
- Download materialize from the above link if haven’t downloaded it. Then extract the file. Here is how the folders and files look after extracting
 Only 3 folders (css, fonts and js) and 2 files.
Then copy/cut the above folders and file into ‘public’ in our laravel project directory (/crud-materialize/public/). It’ll merge the css and js folders. - Go into the project directory ‘crud-materialize’ then create a controller with name ‘CrudController’
123teddy@teddy-K43SJ:~/Documents/works/laravel$ cd crud-materialize/teddy@teddy-K43SJ:~/Documents/works/laravel/crud-materialize$ php artisan make:controller CrudController --resourceController created successfully.
We can look up the new file CrudController.php in /app/Http/Controllers/ directory. - Modify CrudController.php then edit ‘index’ function to call our view. It’d be like this:
1234public function index(){return view('show');}
- Modify /routes/web.php to change the default route (welcome) to call index function in CrudController:
1234/*Route::get('/', function () {return view('welcome');});*/Route::get('/','CrudController@index'); - It’s time to mess with the views. Create a new directory ‘layouts’ in /resources/views/. Then in it (layouts), create two blades files: index.blade.php and header.blade.php. Also create a new blade file show.blade.php in /resources/views/:
/resources/views/layouts/index.blade.php:
123456789101112131415161718192021222324252627282930313233<!DOCTYPE html><html><head><title>CRUD Laravel With Materializecss</title><link rel="stylesheet" href="{{asset('css/materialize.min.css')}}"><link href="https://fonts.googleapis.com/icon?family=Material+Icons" rel="stylesheet"><meta content="width=device-width, initial-scale=1, maximum-scale=1, user-scalable=no" name="viewport">@section('css')@show</head><body>@section('header')@include('layouts.header')@show<div class="container">@yield('content')</div><script src="https://code.jquery.com/jquery-2.1.1.min.js"></script><script src="{{asset('js/materialize.min.js')}}"></script><script type="text/javascript">(function($){$(function(){$('.button-collapse').sideNav();}); // end of document ready})(jQuery); // end of jQuery name space</script></body></html>
/resources/views/layouts/header.blade.php:
12345678910111213<nav class="pink accent-3" role="navigation"><div class="nav-wrapper container"><a id="logo-container" href="#" class="brand-logo">Laravel</a><ul class="right hide-on-med-and-down"><li><a href="{{ url('/')}}">Home</a></li></ul><ul id="nav-mobile" class="side-nav"><li><a href="{{ url('/')}}">Home</a></li></ul><a href="#" data-activates="nav-mobile" class="button-collapse"><i class="material-icons">menu</i></a></div></nav>
/resources/views/show.blade.php:
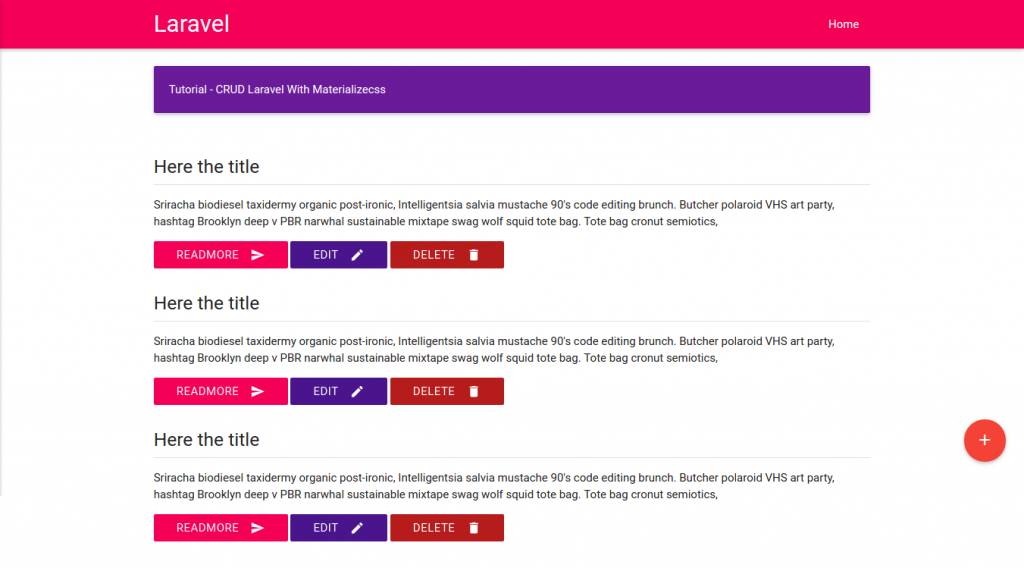
123456789101112131415161718192021222324252627282930313233343536373839404142434445464748495051525354555657@extends('layouts.index')@section('content')<div class="section"><div class="card-panel purple darken-3 white-text">Tutorial - CRUD Laravel With Materializecss</div></div><div class="section"><div class="row"><div class="col s12"><h5>Here the title</h5><div class="divider"></div><p>Sriracha biodiesel taxidermy organic post-ironic, Intelligentsia salvia mustache 90's code editing brunch. Butcher polaroid VHS art party, hashtag Brooklyn deep v PBR narwhal sustainable mixtape swag wolf squid tote bag. Tote bag cronut semiotics,</p><button class="btn btn-flat pink accent-3 waves-effect waves-light white-text">Readmore <i class="material-icons right">send</i></button><button class="btn btn-flat purple darken-4 waves-effect waves-light white-text">Edit <i class="material-icons right">mode_edit</i></button><button class="btn btn-flat red darken-4 waves-effect waves-light white-text">Delete <i class="material-icons right">delete</i></button></div></div><div class="row"><div class="col s12"><h5>Here the title</h5><div class="divider"></div><p>Sriracha biodiesel taxidermy organic post-ironic, Intelligentsia salvia mustache 90's code editing brunch. Butcher polaroid VHS art party, hashtag Brooklyn deep v PBR narwhal sustainable mixtape swag wolf squid tote bag. Tote bag cronut semiotics,</p><button class="btn btn-flat pink accent-3 waves-effect waves-light white-text">Readmore <i class="material-icons right">send</i></button><button class="btn btn-flat purple darken-4 waves-effect waves-light white-text">Edit <i class="material-icons right">mode_edit</i></button><button class="btn btn-flat red darken-4 waves-effect waves-light white-text">Delete <i class="material-icons right">delete</i></button></div></div><div class="row"><div class="col s12"><h5>Here the title</h5><div class="divider"></div><p>Sriracha biodiesel taxidermy organic post-ironic, Intelligentsia salvia mustache 90's code editing brunch. Butcher polaroid VHS art party, hashtag Brooklyn deep v PBR narwhal sustainable mixtape swag wolf squid tote bag. Tote bag cronut semiotics,</p><button class="btn btn-flat pink accent-3 waves-effect waves-light white-text">Readmore <i class="material-icons right">send</i></button><button class="btn btn-flat purple darken-4 waves-effect waves-light white-text">Edit <i class="material-icons right">mode_edit</i></button><button class="btn btn-flat red darken-4 waves-effect waves-light white-text">Delete <i class="material-icons right">delete</i></button></div></div></div><div class="fixed-action-btn horizontal" style="bottom: 45px; right: 24px;"><a class="btn-floating btn-large red"><i class="large material-icons">add</i></a></div>@endsection
- Turn on the server (‘php artisan serve’) and see the look (http://localhost:8000/)
- Setting database! Modify .env file in /crud-materialize/ directory to set the database setting:
123456DB_CONNECTION=mysqlDB_HOST=127.0.0.1DB_PORT=3306DB_DATABASE=crud-materializeDB_USERNAME=your-usernameDB_PASSWORD=your-password
Now we’re not going to use phpmyadmin to create the database. We’ll do it by ‘php artisan migrate’ commandI dont know how to do it and it seems more complicated than I expected so I create the database ‘crud-materialize’ (collation: utf8-general-ci) through phpmyadmin. - Create a new table ‘crud’
12teddy@teddy-K43SJ:~/Documents/works/laravel/crud-materialize$ php artisan make:migration create_crud_table --create=crudCreated Migration: 2016_10_29_030815_create_crud_table
Check /database/migrations/ directory for the script to create ‘crud’ table (2016_10_29_030815_create_crud_table.php). It’d also create two more scripts to create ‘users’ (2014_10_12_000000_create_users_table.php) and ‘password_reset’ table (2014_10_12_100000_create_password_resets_table.php) automatically (if they are not existed yet!). It’s safe to remove its or leave its because we only focus on the ‘crud’ table. - Edit 2016_10_29_030815_create_crud_table.php to add two more fields (‘title’ and ‘content’).
Defaultly, there are two fields available in the file, they are ‘id’ and timestamps. Just insert the above two more fields between them
123456789public function up(){Schema::create('crud', function (Blueprint $table) {$table->increments('id');$table->string('title');$table->text('content');$table->timestamps();});} - Migrate (push) the tables to our database
12345teddy@teddy-K43SJ:~/Documents/works/laravel/crud-materialize$ php artisan migrateMigration table created successfully.Migrated: 2014_10_12_000000_create_users_tableMigrated: 2014_10_12_100000_create_password_resets_tableMigrated: 2016_10_29_030815_create_crud_table
Check those tables in ‘crud-materialize’ database. - Create a new model ‘Crud’
12teddy@teddy-K43SJ:~/Documents/works/laravel/crud-materialize$ php artisan make:model CrudModel created successfully.
Check a new file ‘Crud.php’ in /app/ directory! - Modify Crud.php like this:
1234567class Crud extends Model{protected $table = 'crud';protected $primaryKey = 'id';protected $fillable = ['title','content'];public $timestamps = true;}
Then create a new data in ‘crud’ table via phpmyadmin:
‘title’: ‘Title 1’
‘content’: ‘Content 1 Content 1 Content 1 Content 1 Content 1’ - Retrieve the new data through CrudController
12345678910111213...use App\Crud;class CrudController extends Controller{public function index(){$data=Crud::orderBy('id','DESC')->paginate(10);//return view('show');return view('show')->with('data',$data);}...}
We’ll throw the ‘data’ into our view ‘show’. - Modify show.blade.php in /resources/views/ to get and show the data from CrudController above
123456789101112131415161718...<div class="section">@foreach($data as $d)<div class="row"><div class="col s12"><h5>{{$d->title}}</h5><div class="divider"></div><p>{!!substr($d->content,0,100) !!}...</p><button class="btn btn-flat pink accent-3 waves-effect waves-light white-text">Readmore <i class="material-icons right">send</i></button><button class="btn btn-flat purple darken-4 waves-effect waves-light white-text">Edit <i class="material-icons right">mode_edit</i></button><button class="btn btn-flat red darken-4 waves-effect waves-light white-text">Delete <i class="material-icons right">delete</i></button></div></div>@endforeach</div>...
We use ‘foreach’ loop, so just use one ‘row’ class and remove the others two. - Test!

- Now we want to make the Add, Edit and Delete buttons can be functioned properly. For the Add function, modify /app/Http/Controllers/CrudController.php at ‘create’ function to view ‘add’:
1234public function create(){return view('add');}
Then create a new route for this in /routes/web.app:
1Route::get('/add','CrudController@create');
Create a new blade file ‘add.blade.php’ in /resources/views/ to show the form:
123456789101112131415161718192021222324252627@extends('layouts.index')@section('content')<div class="section"><div class="card-panel purple darken-3 white-text">Tutorial - CRUD Laravel With Materializecss</div></div><div class="section"><form action="{{ url('store') }}" method="POST">{{ csrf_field() }}<div class="row"><div class="input-field col s12"><input type="text" class="validate" name="title"><label for="title">Title</label></div></div><div class="row"><div class="input-field col s12"><textarea id="textarea1" class="materialize-textarea" name="content"></textarea><label for="textarea1">Content</label></div></div><button type="submit" class="btn btn-flat pink accent-3 waves-effect waves-light white-text right">Submit <i class="material-icons right">send</i></button></form></div>@endsection
In ‘show.blade.php’ we can add an url to ‘add’ route when anyone click the ‘add’ button:
1234567...<div class="fixed-action-btn horizontal" style="bottom: 45px; right: 24px;"><a class="btn-floating btn-large red" href="{{url('add')}}"><i class="large material-icons">add</i></a></div>...
OK. Here is the add form when we click the add (+) button (http://localhost:8000/add) Now we’re going to make ‘Submit’ button work. First, add a new route for ‘store’ in /routes/web.app. ATTENTION! Here we use POST (Route::post) NOT GET (Route::get):
1Route::post('/store','CrudController@store');
Then modify ‘store’ function in /app/Http/Controllers/CrudController.php to validate and store the form:
1234567891011121314public function store(Request $request){$this->validate($request, ['title'=>'required','content'=>'required']);$add=new Crud();$add->title=$request['title'];$add->content=$request['content'];$add->save();return redirect()->to('/');}
OK. Try to add a new data (http://localhost:8000/add)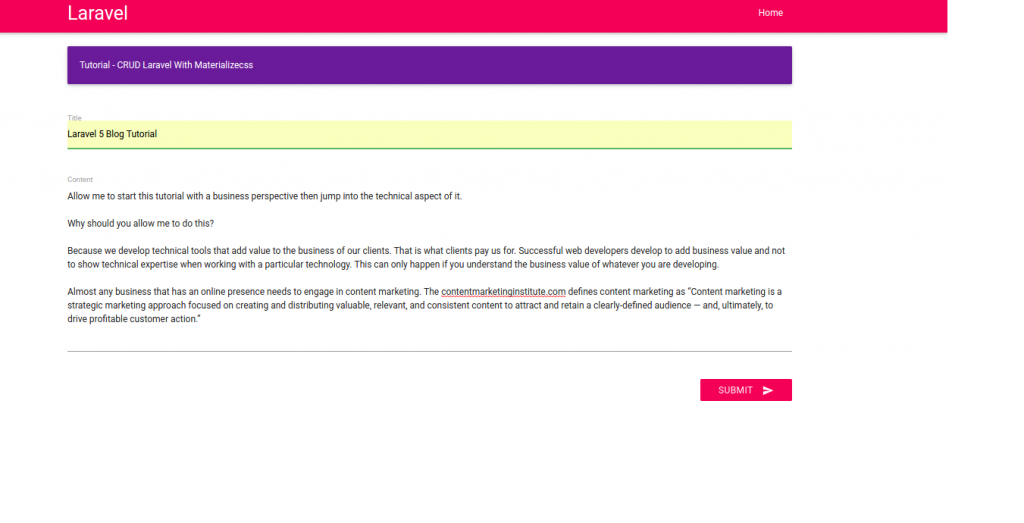 Here is the result
- Show individual data. We want to show the data if anyone click ‘Readmore’ button.
Add a new route ‘read’ that need ‘id’ parameter in /routes/web.app:
1Route::get('/read/{id}','CrudController@show');
Apply the route at ‘Readmore’ link in /resources/views/show.blade.php:
1<a href="{{url('read',$d->id)}}" class="btn btn-flat pink accent-3 waves-effect waves-light white-text">Readmore <i class="material-icons right">send</i></a>
Modify ‘show’ function in /app/Http/Controllers/CrudController.php to get the data based on id and show the data by throwing it to our new view ‘showdata’:
12345public function show($id){$show=Crud::find($id);return view('showdata')->with('show',$show);}
Create a new blade file ‘showdata.blade.php’ in /resources/views/ like this:
1234567891011121314151617181920212223@extends('layouts.index')@section('content')<div class="section"><div class="card-panel purple darken-3 white-text">Tutorial - CRUD Laravel With Materializecss</div></div><div class="section"><div class="row"><div class="col s12"><h5>{{ $show->title }}</h5><div class="divider"></div><p>{!! $show->content !!}</p><a href="{{url('/')}}" class="btn btn-flat pink accent-3 waves-effect waves-light white-text">Back <i class="material-icons right">undo</i></a></div></div></div>@endsection
OK. Test it by clicking ‘Readmore’ or directly by url like http://localhost:8000/read/2 I added a new ‘Back’ button. please see the complete materialize icon. Click ‘Back’ button to redirect back to the homepage.
 - Pagination. To show the pagination, we need to add more data. Just use ‘add’ button. Now we want to show just two data per page. So modify ‘index’ function in /app/Http/Controllers/CrudController.php like this:
12345public function index(){$data=Crud::orderBy('id','DESC')->paginate(2); //display 2 data per pagereturn view('show')->with('data',$data);}
To show the pagination counter and the pages, modify /resources/views/show.blade.php to add ‘{{$data->render()}}’ just before @endsection:
123...{{$data->render()}}@endsection
Here is the result (the url would be like http://localhost:8000/?page=1):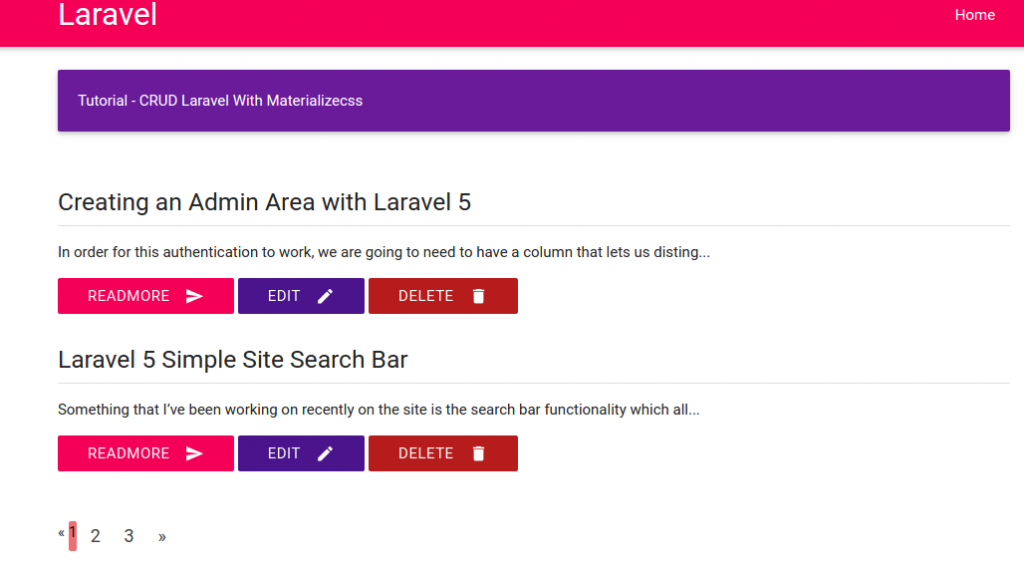
- Edit data.
Create two new routes in /routes/web.php. the first to edit the data and the last to update the changes:
12Route::get('/edit/{id}','CrudController@edit');Route::post('/update/{id}','CrudController@update');
Modify ‘edit’ and ‘update’ function in /app/Http/Controllers/CrudController.php:
123456789101112131415161718...public function edit($id){//$data=Crud::find($id); //SAME WITH BELOW$data=Crud::where('id',$id)->first();return view('edit')->with('data',$data);}...public function update(Request $request, $id){$update=Crud::where('id',$id)->first();$update->title=$request['title'];$update->content=$request['content'];$update->update();return redirect()->to('/');}...
Then create a new blade file ‘edit.blade.php’ in /resources/views/. this file basically same with ‘add.blade.php’ but the form url and the input values are different:
12345678910111213141516171819202122232425262728@extends('layouts.index')@section('content')<div class="section"><div class="card-panel purple darken-3 white-text">Tutorial - CRUD Laravel With Materializecss</div></div><div class="section"><form action="{{ url('update',$data->id) }}" method="POST">{{ csrf_field() }}<div class="row"><div class="input-field col s12"><input type="text" class="validate" name="title" value="{{$data->title}}"><label for="title">Title</label></div></div><div class="row"><div class="input-field col s12"><textarea id="textarea1" class="materialize-textarea" name="content">{{$data->content}}</textarea><label for="textarea1">Content</label></div></div><a href="{{url('/')}}" class="btn btn-flat purple accent-3 waves-effect waves-light white-text">Back <i class="material-icons right">undo</i></a><button type="submit" class="btn btn-flat pink accent-3 waves-effect waves-light white-text right">Submit <i class="material-icons right">send</i></button></form></div>@endsection
Dont forget to modify ‘Edit’ button/link in ‘show.blade.php’ to add the ‘edit’ route:
123...<a href="{{url('edit',$d->id)}}" class="btn btn-flat purple darken-4 waves-effect waves-light white-text">Edit <i class="material-icons right">mode_edit</i></a>...
- Delete data.
Create a new route ‘delete’ in /routes/web.php:
1Route::get('/delete/{id}','CrudController@destroy');
Then modify ‘destroy’ function in /app/Http/Controllers/CrudController.php to delete the data:
1234567public function destroy($id){$delete=Crud::find($id);$delete->delete();return redirect()->to('/');}
Modify ‘Delete’ button/link in /resources/views/show.blade.php to apply the delete route and give javascript confirmation about the deletion:
1<a href="{{url('delete',$d->id)}}" onclick="return confirm('Are you sure to delete this data?')" class="btn btn-flat red darken-4 waves-effect waves-light white-text">Delete <i class="material-icons right">delete</i></a>
FINISH!
NEXT: Add User authentication and comment section! - User Authentication.
Use default scaffolding ‘auth’
12teddy@teddy-K43SJ:~/Documents/works/laravel/crud-materialize$ php artisan make:authAuthentication scaffolding generated successfully.
Like I said before, it’ll create user authentication (login, register, password, etc) automatically. Please check the views in /resources/views/auth/ directory!
Also check the routes in /routes/web.php. It’ll create two new routes:
1234...Auth::routes();Route::get('/home', 'HomeController@index');
About this route ‘Auth::routes()’, from http://stackoverflow.com/questions/39196968/laravel-5-3-new-authroutes/39197278#39197278, it said
1Auth::routes() is just a helper class that helps you generate all the routes required for user authentication. You can browse the code here https://github.com/laravel/framework/blob/5.3/src/Illuminate/Routing/Router.php instead.
More read https://laracasts.com/discuss/channels/laravel/laravel-53-routing-as-authroutes?page=1. - Modify /resources/views/layouts/header.blade.php, to add new links ‘login’ and ‘register’:
1234567<ul class="right hide-on-med-and-down"><li><a href="{{ url('/')}}">Home</a></li>@if(Route::has('login'))<li><a href="{{ url('/login')}}">Login</a></li><li><a href="{{ url('/register')}}">Register</a></li>@endif</ul>
Here is the looks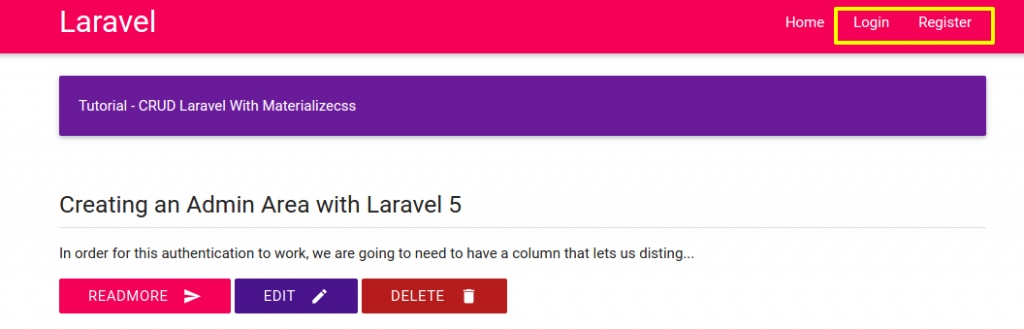 Click ‘Login’ link, it’d display the login page. But we can see the layout (header, color, etc) is different with our homepage.
 - Edit /resources/views/auth/login.blade.php.
Replace the first line ‘@extends(‘layouts.app’)’ with ‘@extends(‘layouts.index’)’. When we refresh our website, the header show the same layout with our homepage. But the others element are still different. ‘auth’ scaffolding create the views based on bootstrap css but we use materialize css for homepage. Modify login.blade.php to add some elements like validation, error,etc like this: NOTE: somehow {!! csrf_field() !!} DIDN’T WORK (verifycsrftoken error) SO I WRITE {{ csrf_field() }}
1234567891011121314151617181920212223242526272829303132333435363738394041424344454647484950@extends('layouts.index')@section('content')<div class="section"><div class="card-panel purple darken-3 white-text">Tutorial - CRUD Laravel With Materializecss</div></div><div class="section"><form id="formValidate" action="{{ url('/login') }}" method="POST">{{ csrf_field() }}<div class="row {{ $errors->has('email') ? ' has-error' : '' }}"><div class="input-field col s6 push-s3"><i class="small material-icons prefix">email</i><input id="email" type="email" class="validate" name="email" value="{{ old('email') }}" data-error=".errorEmail" required><label for="email">E-Mail Address</label><div class="errorEmail">@if ($errors->has('email'))<div class="error">{{ $errors->first('email') }}</div>@endif</div></div></div><div class="row {{ $errors->has('password') ? ' has-error' : '' }}"><div class="input-field col s6 push-s3"><i class="small material-icons prefix">vpn_key</i><input id="password" type="password" class="validate" name="password" data-error=".errorPassword" required><label for="password">Password</label><div class="errorPassword">@if ($errors->has('password'))<div class="error">{{ $errors->first('password') }}</div>@endif</div></div></div><div class="row"><div class="input-field col s6 push-s3"><input id="remember" type="checkbox" class="checkbox" name="remember"><label for="remember">Remember Me</label></div></div><div class="row"><div class="input-field col s6 push-s3"><button type="submit" class="btn btn-flat pink accent-3 waves-effect waves-light white-text">Login <i class="material-icons right">send</i></button><a href="{{url('/password/reset')}}" class="btn btn-flat purple accent-3 waves-effect waves-light white-text">Forgot Your Password? <i class="material-icons right">help</i></a></div></div></form></div>@endsection
The validations need jquery-validation library, so download and put the jquery files (jquery.validate.min.js and additional-methods.min.js) in /public/js/. Then link them in /resources/views/layouts/index.blade.php also write the jquery validation (here i changed the jquery to the newer version 1.11.2). Please read Forms Validation to learn more about the validation form for materialize css.
123456789101112131415161718192021222324252627282930313233343536373839404142434445464748495051525354555657585960616263<script src="https://code.jquery.com/jquery-1.11.2.min.js"></script><script src="{{asset('js/materialize.min.js')}}"></script><script src="{{asset('js/jquery-validation/jquery.validate.min.js')}}"></script><script src="{{asset('js/jquery-validation/additional-methods.min.js')}}"></script><script type="text/javascript">(function($){$(function(){$('.button-collapse').sideNav();$("#formValidate").validate({rules: {uname: {required: true,minlength: 5},email: {required: true,email:true},password: {required: true,minlength: 5},cpassword: {required: true,minlength: 5,equalTo: "#password"},curl: {required: true,url:true},crole:"required",ccomment: {required: true,minlength: 15},cgender:"required",cagree:"required",},//For custom messagesmessages: {uname:{required: "Enter a username",minlength: "Enter at least 5 characters"},curl: "Enter your website",},errorElement : 'div',errorPlacement: function(error, element) {var placement = $(element).data('error');if (placement) {$(placement).append(error)} else {error.insertAfter(element);}}});}); // end of document ready})(jQuery); // end of jQuery name space</script>
We also need to create a new css file ‘style.css’ in /public/css/ to style the error messages:
123456789101112.input-field div.error {position: relative;top: -1rem;left: 0rem;font-size: 0.8rem;color: #FF4081;margin-left: 3rem;-webkit-transform: translateY(0%);-ms-transform: translateY(0%);-o-transform: translateY(0%);transform: translateY(0%);}
Don’t forget to link the css in /resources/views/layouts/index.blade.php
1234...<link rel="stylesheet" href="{{asset('css/materialize.min.css')}}"><link rel="stylesheet" href="{{asset('css/style.css')}}">...
Here is the result (http://localhost:8000/login) To find out the materialize icons, see https://material.io/icons/. Note: the naming for displaying the icon for materialize css is pretty tricky. For example to show icon for name/username like ‘account box’, we have to write it with underscore (_). so it should be ‘account_box’:
1<i class="small material-icons prefix">account_box</i>
- Do the same for ‘Register’ link.
Here is the modification for /resources/views/auth/register.blade.php
1234567891011121314151617181920212223242526272829303132333435363738394041424344454647484950515253545556575859606162@extends('layouts.index')@section('content')<div class="section"><div class="card-panel purple darken-3 white-text">Register</div></div><div class="section"><form id="formValidate" action="{{ url('/register') }}" method="POST">{{ csrf_field() }}<div class="row {{ $errors->has('name') ? ' has-error' : '' }}"><div class="input-field col s6 push-s3"><i class="small material-icons prefix">account_box</i><input id="name" type="text" class="validate" name="name" value="{{ old('name') }}" data-error=".errorName" required><label for="name">Name</label><div class="errorName">@if ($errors->has('name'))<div class="error">{{ $errors->first('name') }}</div>@endif</div></div></div><div class="row {{ $errors->has('email') ? ' has-error' : '' }}"><div class="input-field col s6 push-s3"><i class="small material-icons prefix">email</i><input id="email" type="email" class="validate" name="email" value="{{ old('email') }}" data-error=".errorEmail" required><label for="email">E-Mail Address</label><div class="errorEmail">@if ($errors->has('email'))<div class="error">{{ $errors->first('email') }}</div>@endif</div></div></div><div class="row {{ $errors->has('password') ? ' has-error' : '' }}"><div class="input-field col s6 push-s3"><i class="small material-icons prefix">lock_outline</i><input id="password" type="password" class="validate" name="password" data-error=".errorPassword" required><label for="password">Password</label><div class="errorPassword">@if ($errors->has('password'))<div class="error">{{ $errors->first('password') }}</div>@endif</div></div></div><div class="row"><div class="input-field col s6 push-s3"><i class="small material-icons prefix">lock_outline</i><input id="password-confirm" type="password" class="validate" name="password_confirmation" data-error=".errorPasswordConfirmation" required><label for="password">Confirm Password</label><div class="errorPasswordConfirmation"></div></div></div><div class="row"><div class="input-field col s6 push-s3"><button type="submit" class="btn btn-flat pink accent-3 waves-effect waves-light white-text">Register <i class="material-icons right">send</i></button></div></div></form></div>@endsection
Here is the looks We need to modify a few things like the page redirection after the log in and the register. I also notice the dropdown menu to show the logged in user still not correct. For modifying the redirection page, it’s simple. Modify the controllers (LoginController.php and RegisterController.php) in /app/Http/Controllers/Auth/ directory. Set $redirectTo variable to the homepage (‘/’) instead of ‘/home’ like this:
12//protected $redirectTo = '/home';protected $redirectTo = '/';
Then for the dropdown menu, we need to modify /resources/views/layouts/header.blade.php like this:
12345678910111213141516171819202122232425262728293031323334353637383940<nav class="pink accent-3" role="navigation"><div class="nav-wrapper container"><div class="col s12"><a id="logo-container" href="#" class="brand-logo">Laravel</a><ul class="right hide-on-med-and-down"><li><a href="{{ url('/')}}">Home</a></li><!-- Authentication Links -->@if (Auth::guest())<li><a href="{{ url('/login') }}">Login</a></li><li><a href="{{ url('/register') }}">Register</a></li>@else<li><a href="#" class="dropdown-button" data-beloworigin="true" data-activates="dropdown1">{{ Auth::user()->name }} <i class="small material-icons prefix right">arrow_drop_down</i></a><ul id="dropdown1" class="dropdown-content pink accent-3"><li><a href="{{ url('/logout') }}"onclick="event.preventDefault();document.getElementById('logout-form').submit();">Logout</a><form id="logout-form" action="{{ url('/logout') }}" method="POST" style="display: none;">{{ csrf_field() }}</form></li></ul></li>@endif</ul><ul id="nav-mobile" class="side-nav"><li><a href="{{ url('/')}}">Home</a></li></ul><a href="#" data-activates="nav-mobile" class="button-collapse"><i class="material-icons">menu</i></a></div></div></nav>
To find out the complete dropdown function for materialized css, please see http://materializecss.com/dropdown.html and http://demo.geekslabs.com/materialize/v3.1/ui-navbar.html.
I also need to make a slightly modification in /public/css/style.css to make the dropdown display the correct font color:
123.dropdown-content li>a, .dropdown-content li>span {color: #ffffff;}
Here is the looks:
- Now, we want to restrict some functions like ‘Add’, ‘Edit’ and ‘Delete’ can only be proceeded when the user is logged in. So we’re going to check the logged in user (‘Auth::check()’) in /app/Http/Controllers/CrudController.php for some functions ‘create’, ‘edit’ and ‘destroy’ like this: (ref: Authentication and Check if user is logged in):
1234567891011121314151617181920212223242526272829303132...public function create(){if(Auth::check()){return view('add');}else{return redirect()->to('/login');}}...public function edit($id){if(Auth::check()){//$data=Crud::find($id); //SAME WITH BELOW$data=Crud::where('id',$id)->first();return view('edit')->with('data',$data);}else{return redirect()->to('/login');}}...public function destroy($id){if(Auth::check()){$delete=Crud::find($id);$delete->delete();return redirect()->to('/');}else{return redirect()->to('/login');}}
OK. When we click the Add, edit and delete icon/buttons, it’d redirect us to the login page if we haven’t logged in!
NEXT: User access/level, go to / proceed to the aim page after logging in, admin panel and comments!

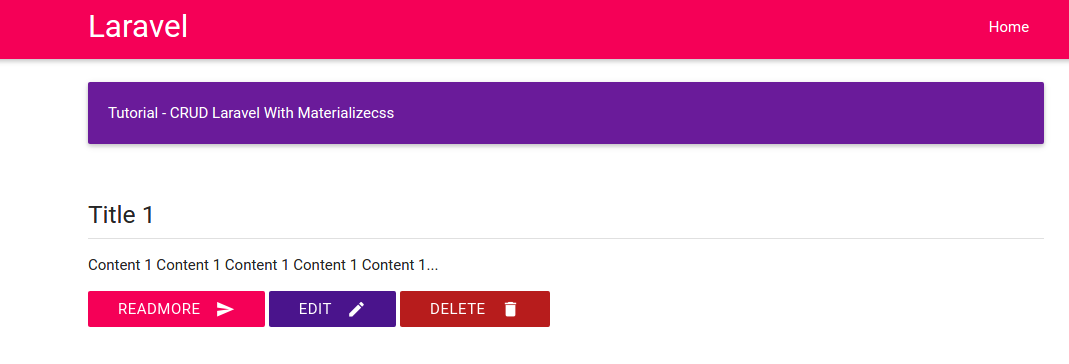


Fast CRUD With Laravel 5
Source: https://gilacoding.com/read/membuat-crud-laravel-hanya-dengan-5-menit
- Create a new laravel project named ‘latihan-crud’
Type this command: composer create-project –prefer-dist laravel/laravel latihan-crud
123456789101112131415161718192021222324252627282930313233343536373839404142434445464748495051525354555657585960616263646566676869707172737475767778798081828384858687888990919293949596979899100101102103104105106107108109110111112113114115116117118119120121122123124125126127128129130131132133134135136137138139140141142143144145146147148149150151152153154155156157158159160161162163164165166167168169170171172173174175176177178179180181182183184185186187188189190191192193194195196197198199200201202203204205206207208209210211212213214215216217218219220221222223224225226227228229230231232233234235236237238239240241242243244245246247248249250251252253254255256teddy@teddy-K43SJ:~/Documents/works/laravel$ composer create-project --prefer-dist laravel/laravel latihan-crudWarning: This development build of composer is over 60 days old. It is recommended to update it by running "/usr/local/bin/composer self-update" to get the latest version.Installing laravel/laravel (v5.3.16)- Installing laravel/laravel (v5.3.16)Downloading: 100%Created project in latihan-crud> php -r "file_exists('.env') || copy('.env.example', '.env');"Loading composer repositories with package informationUpdating dependencies (including require-dev)- Installing vlucas/phpdotenv (v2.4.0)Downloading: 100%- Installing symfony/polyfill-mbstring (v1.2.0)Loading from cache- Installing symfony/var-dumper (v3.1.5)Downloading: 100%- Installing symfony/translation (v3.1.5)Downloading: 100%- Installing symfony/routing (v3.1.5)Downloading: 100%- Installing symfony/process (v3.1.5)Downloading: 100%- Installing psr/log (1.0.2)Downloading: 100%- Installing symfony/debug (v3.1.5)Downloading: 100%- Installing symfony/http-foundation (v3.1.5)Downloading: 100%- Installing symfony/event-dispatcher (v3.1.5)Loading from cache- Installing symfony/http-kernel (v3.1.5)Downloading: 100%- Installing symfony/finder (v3.1.5)Downloading: 100%- Installing symfony/console (v3.1.5)Downloading: 100%- Installing swiftmailer/swiftmailer (v5.4.3)Loading from cache- Installing paragonie/random_compat (v2.0.3)Downloading: 100%- Installing ramsey/uuid (3.5.1)Downloading: 100%- Installing jakub-onderka/php-console-color (0.1)Loading from cache- Installing jakub-onderka/php-console-highlighter (v0.3.2)Loading from cache- Installing dnoegel/php-xdg-base-dir (0.1)Loading from cache- Installing nikic/php-parser (v2.1.1)Downloading: 100%- Installing psy/psysh (v0.7.2)Loading from cache- Installing nesbot/carbon (1.21.0)Loading from cache- Installing mtdowling/cron-expression (v1.1.0)Loading from cache- Installing monolog/monolog (1.21.0)Loading from cache- Installing league/flysystem (1.0.32)Downloading: 100%- Installing symfony/polyfill-util (v1.2.0)Loading from cache- Installing symfony/polyfill-php56 (v1.2.0)Loading from cache- Installing jeremeamia/superclosure (2.2.0)Loading from cache- Installing doctrine/inflector (v1.1.0)Loading from cache- Installing classpreloader/classpreloader (3.0.0)Loading from cache- Installing laravel/framework (v5.3.19)Downloading: 100%- Installing fzaninotto/faker (v1.6.0)Loading from cache- Installing hamcrest/hamcrest-php (v1.2.2)Loading from cache- Installing mockery/mockery (0.9.5)Loading from cache- Installing symfony/yaml (v3.1.5)Downloading: 100%- Installing sebastian/version (2.0.0)Downloading: 100%- Installing sebastian/resource-operations (1.0.0)Downloading: 100%- Installing sebastian/recursion-context (1.0.2)Loading from cache- Installing sebastian/object-enumerator (1.0.0)Downloading: 100%- Installing sebastian/global-state (1.1.1)Loading from cache- Installing sebastian/exporter (1.2.2)Loading from cache- Installing sebastian/environment (1.3.8)Downloading: 100%- Installing sebastian/diff (1.4.1)Loading from cache- Installing sebastian/comparator (1.2.0)Loading from cache- Installing doctrine/instantiator (1.0.5)Loading from cache- Installing phpunit/php-text-template (1.2.1)Loading from cache- Installing phpunit/phpunit-mock-objects (3.4.0)Downloading: 100%- Installing phpunit/php-timer (1.0.8)Loading from cache- Installing phpunit/php-file-iterator (1.4.1)Loading from cache- Installing sebastian/code-unit-reverse-lookup (1.0.0)Downloading: 100%- Installing phpunit/php-token-stream (1.4.8)Loading from cache- Installing phpunit/php-code-coverage (4.0.1)Downloading: 100%- Installing webmozart/assert (1.1.0)Downloading: 100%- Installing phpdocumentor/reflection-common (1.0)Loading from cache- Installing phpdocumentor/type-resolver (0.2)Loading from cache- Installing phpdocumentor/reflection-docblock (3.1.1)Downloading: 100%- Installing phpspec/prophecy (v1.6.1)Loading from cache- Installing myclabs/deep-copy (1.5.4)Downloading: 100%- Installing phpunit/phpunit (5.6.1)Downloading: 100%- Installing symfony/css-selector (v3.1.5)Downloading: 100%- Installing symfony/dom-crawler (v3.1.5)Downloading: 100%symfony/var-dumper suggests installing ext-symfony_debug ()symfony/translation suggests installing symfony/config ()symfony/routing suggests installing doctrine/annotations (For using the annotation loader)symfony/routing suggests installing symfony/config (For using the all-in-one router or any loader)symfony/routing suggests installing symfony/dependency-injection (For loading routes from a service)symfony/routing suggests installing symfony/expression-language (For using expression matching)symfony/event-dispatcher suggests installing symfony/dependency-injection ()symfony/http-kernel suggests installing symfony/browser-kit ()symfony/http-kernel suggests installing symfony/class-loader ()symfony/http-kernel suggests installing symfony/config ()symfony/http-kernel suggests installing symfony/dependency-injection ()paragonie/random_compat suggests installing ext-libsodium (Provides a modern crypto API that can be used to generate random bytes.)ramsey/uuid suggests installing ircmaxell/random-lib (Provides RandomLib for use with the RandomLibAdapter)ramsey/uuid suggests installing ext-libsodium (Provides the PECL libsodium extension for use with the SodiumRandomGenerator)ramsey/uuid suggests installing ext-uuid (Provides the PECL UUID extension for use with the PeclUuidTimeGenerator and PeclUuidRandomGenerator)ramsey/uuid suggests installing moontoast/math (Provides support for converting UUID to 128-bit integer (in string form).)ramsey/uuid suggests installing ramsey/uuid-doctrine (Allows the use of Ramsey\Uuid\Uuid as Doctrine field type.)ramsey/uuid suggests installing ramsey/uuid-console (A console application for generating UUIDs with ramsey/uuid)psy/psysh suggests installing ext-pdo-sqlite (The doc command requires SQLite to work.)monolog/monolog suggests installing aws/aws-sdk-php (Allow sending log messages to AWS services like DynamoDB)monolog/monolog suggests installing doctrine/couchdb (Allow sending log messages to a CouchDB server)monolog/monolog suggests installing ext-amqp (Allow sending log messages to an AMQP server (1.0+ required))monolog/monolog suggests installing ext-mongo (Allow sending log messages to a MongoDB server)monolog/monolog suggests installing graylog2/gelf-php (Allow sending log messages to a GrayLog2 server)monolog/monolog suggests installing mongodb/mongodb (Allow sending log messages to a MongoDB server via PHP Driver)monolog/monolog suggests installing php-amqplib/php-amqplib (Allow sending log messages to an AMQP server using php-amqplib)monolog/monolog suggests installing php-console/php-console (Allow sending log messages to Google Chrome)monolog/monolog suggests installing rollbar/rollbar (Allow sending log messages to Rollbar)monolog/monolog suggests installing ruflin/elastica (Allow sending log messages to an Elastic Search server)monolog/monolog suggests installing sentry/sentry (Allow sending log messages to a Sentry server)league/flysystem suggests installing league/flysystem-aws-s3-v2 (Allows you to use S3 storage with AWS SDK v2)league/flysystem suggests installing league/flysystem-aws-s3-v3 (Allows you to use S3 storage with AWS SDK v3)league/flysystem suggests installing league/flysystem-azure (Allows you to use Windows Azure Blob storage)league/flysystem suggests installing league/flysystem-cached-adapter (Flysystem adapter decorator for metadata caching)league/flysystem suggests installing league/flysystem-copy (Allows you to use Copy.com storage)league/flysystem suggests installing league/flysystem-dropbox (Allows you to use Dropbox storage)league/flysystem suggests installing league/flysystem-eventable-filesystem (Allows you to use EventableFilesystem)league/flysystem suggests installing league/flysystem-rackspace (Allows you to use Rackspace Cloud Files)league/flysystem suggests installing league/flysystem-sftp (Allows you to use SFTP server storage via phpseclib)league/flysystem suggests installing league/flysystem-webdav (Allows you to use WebDAV storage)league/flysystem suggests installing league/flysystem-ziparchive (Allows you to use ZipArchive adapter)laravel/framework suggests installing aws/aws-sdk-php (Required to use the SQS queue driver and SES mail driver (~3.0).)laravel/framework suggests installing doctrine/dbal (Required to rename columns and drop SQLite columns (~2.4).)laravel/framework suggests installing guzzlehttp/guzzle (Required to use the Mailgun and Mandrill mail drivers and the ping methods on schedules (~5.3|~6.0).)laravel/framework suggests installing league/flysystem-aws-s3-v3 (Required to use the Flysystem S3 driver (~1.0).)laravel/framework suggests installing league/flysystem-rackspace (Required to use the Flysystem Rackspace driver (~1.0).)laravel/framework suggests installing pda/pheanstalk (Required to use the beanstalk queue driver (~3.0).)laravel/framework suggests installing predis/predis (Required to use the redis cache and queue drivers (~1.0).)laravel/framework suggests installing pusher/pusher-php-server (Required to use the Pusher broadcast driver (~2.0).)laravel/framework suggests installing symfony/psr-http-message-bridge (Required to use psr7 bridging features (0.2.*).)sebastian/global-state suggests installing ext-uopz (*)phpunit/phpunit-mock-objects suggests installing ext-soap (*)phpunit/php-code-coverage suggests installing ext-xdebug (>=2.4.0)phpunit/phpunit suggests installing phpunit/php-invoker (~1.1)phpunit/phpunit suggests installing ext-xdebug (*)Writing lock fileGenerating autoload files> Illuminate\Foundation\ComposerScripts::postUpdate> php artisan optimizeGenerating optimized class loaderThe compiled class file has been removed.> php artisan key:generateApplication key [base64:2uccC5SynOBfgPZAA1zWrAQRWroPmxdMxnCT0KkXSew=] set successfully.
- Modify .env file in /laravel/latihan-crud/ directory to set the database setting:
123456DB_CONNECTION=mysqlDB_HOST=127.0.0.1DB_PORT=3306DB_DATABASE=latihan-crudDB_USERNAME=(your db username)DB_PASSWORD=(your db password) - Create the new database ‘latihan-crud’ on phpmyadmin
- Install new package ‘crud-generator’ from ‘appzcoder’: composer require appzcoder/crud-generator
DONT FORGET TO GO INTO ‘latihan-crud’ DIRECTORY FIRST!
1234567891011121314teddy@teddy-K43SJ:~/Documents/works/laravel/latihan-crud$ composer require appzcoder/crud-generatorUsing version ^1.2 for appzcoder/crud-generator./composer.json has been updatedLoading composer repositories with package informationUpdating dependencies (including require-dev)- Installing appzcoder/crud-generator (v1.2.2)Loading from cacheWriting lock fileGenerating autoload files> Illuminate\Foundation\ComposerScripts::postUpdate> php artisan optimizeGenerating optimized class loaderThe compiled class file has been removed.
Look up ‘appzcoder’ directory in /latihan-crud/vendor/ - Add the new package ‘Appzcoder\CrudGenerator\CrudGeneratorServiceProvider::class’ in /config/app.php in ‘providers’
12345678910111213141516171819202122...'providers' => [/** Laravel Framework Service Providers...*/...Illuminate\View\ViewServiceProvider::class,/** Package Service Providers...*////** Application Service Providers...*/...App\Providers\RouteServiceProvider::class,Appzcoder\CrudGenerator\CrudGeneratorServiceProvider::class,],
- Install another package ‘laravelcollective/html’
1234567891011121314teddy@teddy-K43SJ:~/Documents/works/laravel/latihan-crud$ composer require laravelcollective/htmlUsing version ^5.3 for laravelcollective/html./composer.json has been updatedLoading composer repositories with package informationUpdating dependencies (including require-dev)- Installing laravelcollective/html (v5.3.0)Downloading: 100%Writing lock fileGenerating autoload files> Illuminate\Foundation\ComposerScripts::postUpdate> php artisan optimizeGenerating optimized class loaderThe compiled class file has been removed.
Then do the same with #5 to add the new package ‘Collective\Html\HtmlServiceProvider::class,’ in /config/app.php in ‘providers’:
123456789101112131415161718192021'providers' => [/** Laravel Framework Service Providers...*/...Illuminate\View\ViewServiceProvider::class,/** Package Service Providers...*////** Application Service Providers...*/...Appzcoder\CrudGenerator\CrudGeneratorServiceProvider::class,Collective\Html\HtmlServiceProvider::class,],
- In the same file (app.php), add the new facades ‘Form’ and ‘HTML’ (????) in ‘aliases’ section:
12345678910...'aliases' => [...,'Form' => Collective\Html\FormFacade::class,...'HTML' => Collective\Html\HtmlFacade::class,...], - Do ‘composer update’ to update the dependencies
123456789teddy@teddy-K43SJ:~/Documents/works/laravel/latihan-crud$ composer updateLoading composer repositories with package informationUpdating dependencies (including require-dev)Nothing to install or updateGenerating autoload files> Illuminate\Foundation\ComposerScripts::postUpdate> php artisan optimizeGenerating optimized class loaderThe compiled class file has been removed. - Then publish our files and setting
1234567teddy@teddy-K43SJ:~/Documents/works/laravel/latihan-crud$ php artisan vendor:publishCopied Directory [/vendor/laravel/framework/src/Illuminate/Notifications/resources/views] To [/resources/views/vendor/notifications]Copied Directory [/vendor/laravel/framework/src/Illuminate/Pagination/resources/views] To [/resources/views/vendor/pagination]Copied File [/vendor/appzcoder/crud-generator/config/crudgenerator.php] To [/config/crudgenerator.php]Copied File [/vendor/appzcoder/crud-generator/publish/app.blade.php] To [/resources/views/layouts/app.blade.php]Copied Directory [/vendor/appzcoder/crud-generator/src/stubs] To [/resources/crud-generator]Publishing complete for tag []! - Create a new class ‘Posts’ for our crud generator with two fields ‘title’ and
<OLD>
1php artisan crud:generate Posts --fields="title#string, body#text"
BUT I GOT THIS ERROR:
12345678teddy@teddy-K43SJ:~/Documents/works/laravel/latihan-crud$ php artisan crud:generate Posts --fields="title#string, body#text"Controller created successfully.Model created successfully.Migration created successfully.[ErrorException]Undefined index: string, body
</OLD
<NEW>
From this https://packagist.org/packages/appzcoder/crud-generator, I found the source of the error, I supposed to use ‘;’ (“title#string; body#text”) instead of ‘,’ (“title#string, body#text”) between the fields like this (DONT USE THIS COMMAND. THIS IS ONLY JUST A CORRECT COMMAND)
123456teddy@teddy-K43SJ:~/Documents/works/laravel/latihan-crud$ php artisan crud:generate Posts --fields="title#string; content#text; category#select#options=technology,tips,health" --view-path=admin --controller-namespace=Admin --route-group=adminController created successfully.Model already exists!Migration created successfully.View created successfully.Crud/Resource route added to /home/teddy/Documents/works/laravel/latihan-crud/routes/web.php
USE THIS COMMAND INSTEAD TO MAKE IT CONSISTENT WITH THE ORIGINAL TUTORIAL:
123456teddy@teddy-K43SJ:~/Documents/works/laravel/latihan-crud$ php artisan crud:generate Posts --fields="title#string; body#text"Controller already exists!Model already exists!Migration created successfully.View created successfully.Crud/Resource route added to /home/teddy/Documents/works/laravel/latihan-crud/routes/web.php
</NEW>
The script for the table migration would be exist in /database/migrations/ directory (IF YOU FIND MORE THAN ONE SCRIPT WITH SAME TABLE ‘Posts’ LIKE ‘2016_10_22_081014_create_posts_table.php’ AND ‘2016_10_22_074719_create_posts_table.php’, PLS REMOVE THE OLD ONE FIRST! OR WE’D GET THIS ERROR: “Cannot declare class CreatePostsTable, because the name is already in use”)
1234567teddy@teddy-K43SJ:~/Documents/works/laravel/latihan-crud$ php artisan migrateMigration table created successfully.PHP Fatal error: Cannot declare class CreatePostsTable, because the name is already in use in /home/teddy/Documents/works/laravel/latihan-crud/database/migrations/2016_10_22_075907_create_posts_table.php on line 33[Symfony\Component\Debug\Exception\FatalErrorException]Cannot declare class CreatePostsTable, because the name is already in use - Push the table script to our database with ‘php artisan migrate’
123teddy@teddy-K43SJ:~/Documents/works/laravel/latihan-crud$ php artisan migrateMigrated: 2014_10_12_000000_create_users_tableMigrated: 2014_10_12_100000_create_password_resets_tableMigrated: 2016_10_22_081014_create_posts_table
Check our database to make sure the new table ‘posts’ is already created! SOMEHOW THE OTHERS TABLES ‘migrations’, ‘users’ AND ‘password_resets’ ARE CREATED ALSO! - Test on the browser. Start the server: ‘php artisan serve’ then open on our browser : http://localhost:8000/ –> It shows the laravel welcome page!
Remember, A new route ‘posts’ is already created automatically from previous step, so to see the CRUD in action, pls go to http://localhost:8000/posts
- Add new data.
Click the ‘+’ blue icon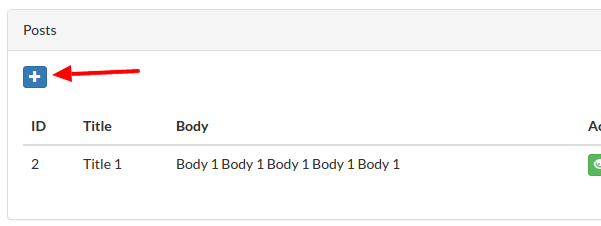 then fill the form with the fields ‘Title’ and ‘Body’. Then press ‘Create’ Button
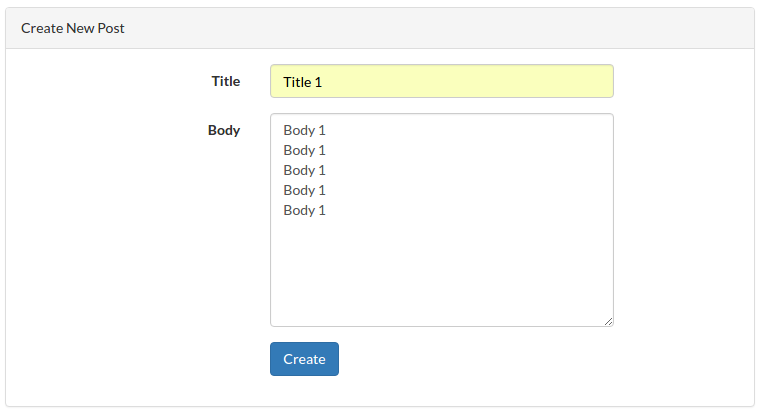 But I got this error:
1SQLSTATE[HY000]: General error: 1364 Field 'body' doesn't have a default value (SQL: insert into `posts` (`title`, `updated_at`, `created_at`) values (Title 1, 2016-10-22 09:27:24, 2016-10-22 09:27:24))
I found the solution! In ‘Post’ class in /app/Post.php, at ‘$fillable’ variable, It’s only has ‘title’ field But there is no ‘body’ field!
12345678910111213class Post extends Model{.../*** Attributes that should be mass-assignable.** @var array*/protected $fillable = ['title'];}
So add ‘body’ field like this:
123456789101112class Post extends Model{.../*** Attributes that should be mass-assignable.** @var array*/protected $fillable = ['title','body'];}
Then repeat the creation of new data! Here is the expected result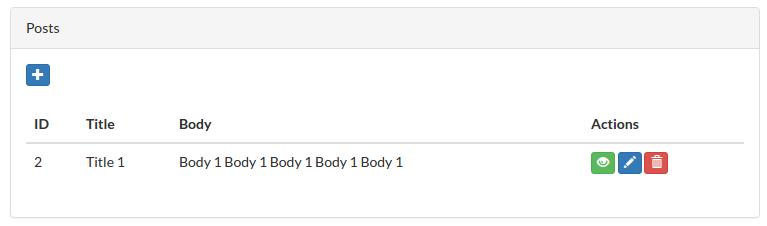 Membuat Login Laravel 5 2 dengan username dan Hak akses
 - At the right top of the page, there are two links ‘login’ and ‘register’ but none of them are working. To make them work, we need to create the authentication to create users like this: php artisan make:auth
12teddy@teddy-K43SJ:~/Documents/works/laravel/latihan-crud$ php artisan make:authAuthentication scaffolding generated successfully.
Dont forget to stop the server first by clicking CTRL+C!
The above command would create some views for login, register, password, etc. Please check them in /resources/views/auth/ directory!
This also create automatically a few new routes in /routes/web.php
1234...Auth::routes();Route::get('/home', 'HomeController@index'); - Now we can try them on our browser
Remember, we dont need to create/migrate the user table because we already did this at the previous step (#11) when we did the first migration!
Now the links ‘login’ and ‘register’ are working!
Here is the register page: http://localhost:8000/register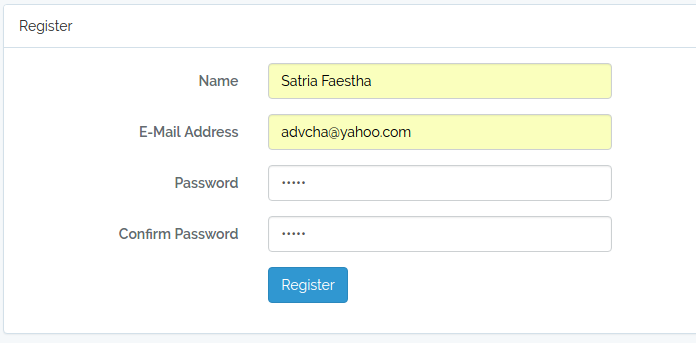 I use password: satria. Successful registration would be redirected to http://localhost:8000/home
 The links ‘login’ and ‘register’ also be showed up on the initial page http://localhost:8000/
 - Change/set default route ‘/’
In /routes/web.php, the default route for http://localhost:8000/ would go to the welcome page in /resources/views/welcome.blade.php. Here is the default route
123Route::get('/', function () {return view('welcome');});
We want to change it to go to our login page! We have the login page in /resources/views/auth/login.blade.php. So here is the modified route
12345Route::get('/', function () {//return view('welcome');return view('auth/login');//return redirect()->route('posts');});
Now each our homepage http://localhost:8000/ is opened, it’d open the login page!
If we want to set the default route to the post page, please modify /routes/web.php like this:
1Route::get('/', 'PostsController@index');
Now, if we open http://localhost:8000/, it’d show the list of the post page!
LEARN ALSO THIS:
Laravel Admin Panel
An admin panel for managing users, roles, permissions & crud.
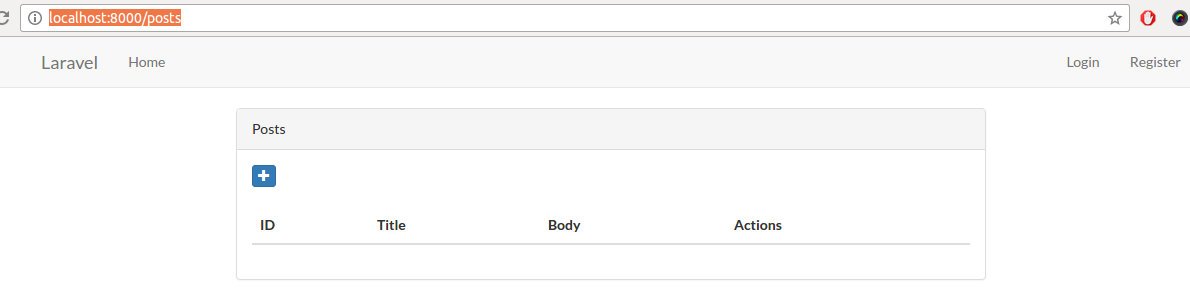
OSClass First Plugin Tutorial
OSCLASS PLUGIN TUTORIAL
1. Create a new directory in any directory. name it ‘my_firstplugin’.
2. Create a new file in the directory. name it ‘index.php’.
3. open the file and add these lines in it :
/*
Plugin Name: My First Plugin
Short Name: my_firstplugin
Plugin URI: –
Description: A first osclass plugin for tutorial purpopse.
Version: 1.00
Author: Satria
Author URI: –
*/
above is ‘plugin info’
4. to make the plugin installable, add this function : osc_register_plugin. so
/**
* (hook: install) Make installation operations
* It creates the database schema and sets some preferences.
* @returns void.
*/
function my_firstplugin_install() {
}
osc_register_plugin(osc_plugin_path(__FILE__), ‘my_firstplugin_install’);
then add two hooks to initialize (load/init) the plugin and to uninstall the plugin, respectively :
/**
* (hook: init) Registers scripts and styles.
* @returns void.
*/
function my_firstplugin_load() {
}
osc_add_hook(‘init’, ‘my_firstplugin_load’);
/**
* (hook: uninstall) Make un-installation operations
* It destroys the database schema and unsets some preferences.
* @returns void.
*/
function my_firstplugin_uninstall() {
}
osc_add_hook(osc_plugin_path(__FILE__) . ‘_uninstall’, ‘my_firstplugin_uninstall’);
5. those are the minimum requirement (install, uninstall and load) to create an osclass plugin. Zip the directory (so it’ll be my_firstplugin.zip) then open the oc-admin page and add the plugin from the zip file.
if there is an error “There was a problem adding the plugin” when installing the plugin then just copy and paste the plugin directory in oc-content/plugins/ directory
6. From admin page, we can install/uninstall and enable/disable our plugin but this plugin dont have any functionality yet. we will add some scripts so we can display the links/menu in admin page to configure the plugin. In the index.php file, add this hook ‘admin_menu’ so it’ll be :
/**
* (hook: admin_menu) Display the admin menu
* @returns html.
*/
function my_firstplugin_admin_menu() {
echo ‘<h3><a href=”#”>My First Plugin</a></h3>
<ul>
<li><a href=”‘ . osc_admin_render_plugin_url(osc_plugin_folder(__FILE__) . ‘/admin/link1.php’) . ‘”>» ‘ . __(‘Link 1’, ‘my_firstplugin’) . ‘</a><li>
<li><a href=”‘ . osc_admin_render_plugin_url(osc_plugin_folder(__FILE__) . ‘/admin/link2.php’) . ‘”>» ‘ . __(‘Link 2’, ‘my_firstplugin’) . ‘</a></li>
</ul>’;
}
osc_add_hook(‘admin_menu’, ‘my_firstplugin_admin_menu’);
EDIT : if we have osclass version higher than 320 then we better to edit the above function like this :
/**
* (hook: admin_menu) Display the admin menu
* @returns html.
*/
function my_firstplugin_admin_menu() {
if(osc_version()<320) {
echo ‘<h3><a href=”#”>My First Plugin</a></h3>
<ul>
<li><a href=”‘ . osc_admin_render_plugin_url(osc_plugin_folder(__FILE__) . ‘/admin/link1.php’) . ‘”>» ‘ . __(‘Link 1’, ‘my_firstplugin’) . ‘</a><li>
<li><a href=”‘ . osc_admin_render_plugin_url(osc_plugin_folder(__FILE__) . ‘/admin/link2.php’) . ‘”>» ‘ . __(‘Link 2’, ‘my_firstplugin’) . ‘</a></li>
</ul>’;
}else{
osc_add_admin_submenu_divider(‘plugins’, __(‘My First Plugin’, ‘my_firstplugin’), ‘my_firstplugin_divider’, ‘administrator’);
osc_add_admin_submenu_page(‘plugins’, ‘» ‘.__(‘Link 1’, ‘my_firstplugin’), osc_admin_render_plugin_url(osc_plugin_folder(__FILE__) . ‘/admin/link1.php’), ‘my_firstplugin_link1’, ‘administrator’);
osc_add_admin_submenu_page(‘plugins’, ‘» ‘.__(‘Link 2’, ‘my_firstplugin’), osc_admin_render_plugin_url(osc_plugin_folder(__FILE__) . ‘/admin/link2.php’), ‘my_firstplugin_link2’, ‘administrator’);
}
}
//osc_add_hook(‘admin_menu’, ‘my_firstplugin_admin_menu’);
if(osc_version()<320) {
osc_add_hook(‘admin_menu’, ‘my_firstplugin_admin_menu’);
} else {
osc_add_hook(‘admin_menu_init’, ‘my_firstplugin_admin_menu’);
}
dont forget to add a new directory ‘admin’ in the plugin. then add two new files in it : link1.php and link2.php. the files will display the html content. you can add any html file in its.
7. Ok. great. then how to add any content on the front page by our plugin? Without any plugin we can add any content in oc-content/themes/your-theme/main.php. ‘your-theme’ is curent activated theme, it could be ‘bender’ (default theme). we can insert any html/php code in main.php file like <p>TEST</p> or <?php echo “Great”; ?>. If we want to make it better, we can include any php/html file and add this code <?php osc_current_web_theme_path(‘your_file.php’) ; ?> dont forget to add the new file your_file.php and fill it with any html/php code.
8. Ok. now we want to connect to database and pull some data to be displayed in the admin page.
in index.php file below the plugin info, add a line :
require_once ‘model/myfirstplugin_model.php’;
then add a new directory ‘model’ and a file ‘myfirstplugin_model.php’ in it.
we want to display all city in a table t_city on link1.php file. so add these lines in myfirstplugin_model.php file :
<?php
/**
* Data Access Object (DAO) for messages.
* Performs operations on database.
* @author Satria
* @package my_firstplugin
* @subpackage Model
* @since 1.00
*/
class MyFirstPluginModel extends DAO {
function __construct() {
parent::__construct();
}
/**
* Singleton.
*/
private static $instance;
/**
* Singleton constructor.
* @return an MadhouseMessengerDAO object.
*/
public static function newInstance() {
if(!self::$instance instanceof self) {
self::$instance = new self;
}
return self::$instance;
}
/**
* Return table name city
* @return string
*/
public function getTable_City()
{
return DB_TABLE_PREFIX.’t_city’;
}
/**
* Get all city
*
* @return array
*/
public function getAllCity()
{
$this->dao->select();
$this->dao->from( $this->getTable_City() ) ;
$this->dao->orderBy(‘s_name’, ‘ASC’) ;
$results = $this->dao->get();
if( !$results ) {
return array() ;
}
return $results->result();
}
}
then edit link1.php file so it’ll be :
<div id=”settings_form” style=”border: 1px solid #ccc; background: #eee; “>
<div style=”padding: 20px;”>
<div>
<fieldset>
<legend><?php _e(‘My First Plugin Link 1 : All City Name’); ?></legend>
<!–p>
<?php _e(‘Congratulation. This is a link 1 content’, ‘my_firstplugin’); ?>
</p–>
<?php
$city = MyFirstPluginModel::newInstance()->getAllCity();
foreach($city as $c){
echo $c[‘s_name’].'<br>’;
}
?>
<p>
<?php _e(‘Created by Satria Faestha. Osclass version : ‘.osc_version(), ‘my_firstplugin ‘); ?>
</p>
</fieldset>
</div>
</div>
</div>
then open link1.php on admin page. All city name will be displayed on the page.
You can play with the query like just show 5 top city, etc.
9. Now we want to add our own table so when we install the plugin, our table will be created and ready to be used. otherwise if we want to uninstall the plugin, the tables will be deleted.
Add these two sql file in sql directory (create a new directory ‘sql’). they are myfirstplugin.sql and add_data.sql
in myfirstplugin.sql :
CREATE TABLE /*TABLE_PREFIX*/t_my_firstplugin (
pk_i_id INT(2) UNSIGNED NOT NULL AUTO_INCREMENT,
s_name VARCHAR(255),
PRIMARY KEY (pk_i_id)
) ENGINE=InnoDB DEFAULT CHARACTER SET ‘UTF8’ COLLATE ‘UTF8_GENERAL_CI’;
in add_data.sql :
INSERT INTO /*TABLE_PREFIX*/t_my_firstplugin (pk_i_id, s_name) VALUES (1,’Satria Faestha’);
INSERT INTO /*TABLE_PREFIX*/t_my_firstplugin (pk_i_id, s_name) VALUES (2,’Ermillya Roza’);
INSERT INTO /*TABLE_PREFIX*/t_my_firstplugin (pk_i_id, s_name) VALUES (3,’Sarah Almahyrah’);
INSERT INTO /*TABLE_PREFIX*/t_my_firstplugin (pk_i_id, s_name) VALUES (4,’Alim Alhikmah’);
in myfirstplugin_model.php add these lines :
/**
* Import sql file
* @param type $file
*/
public function import($file)
{
$path = osc_plugin_resource($file) ;
$sql = file_get_contents($path);
if(! $this->dao->importSQL($sql) ){
throw new Exception( “Error importSQL::MyFirstPluginModel<br>”.$file ) ;
}
}
/**
* Remove data and tables related to the plugin.
*/
public function uninstall()
{
$this->dao->query(sprintf(‘DROP TABLE ‘.DB_TABLE_PREFIX.’t_my_firstplugin’) ) ;
}
then in index.php file edit these functions :
function my_firstplugin_install() {
MyFirstPluginModel::newInstance()->import(‘my_firstplugin/sql/myfirstplugin.sql’);
MyFirstPluginModel::newInstance()->import(‘my_firstplugin/sql/add_data.sql’);
}
osc_register_plugin(osc_plugin_path(__FILE__), ‘my_firstplugin_install’);
and
function my_firstplugin_uninstall() {
MyFirstPluginModel::newInstance()->uninstall();
}
osc_add_hook(osc_plugin_path(__FILE__) . ‘_uninstall’, ‘my_firstplugin_uninstall’);
then do uninstall (if our plugin still installed) and install the plugin. you can see the new table t_my_firstplugin in our database. you can add new function in the model file to pull the content :
public function getMyFirstPluginData()
{
$this->dao->select();
$this->dao->from( $this->getTable_MyFirstPlugin() ) ;
//$this->dao->orderBy(‘s_name’, ‘ASC’) ;
$this->dao->orderBy(‘pk_i_id’, ‘ASC’) ;
$results = $this->dao->get();
if( !$results ) {
return array() ;
}
return $results->result();
}
then in link2.php file, edit the content so it’ll be :
<div id=”settings_form” style=”border: 1px solid #ccc; background: #eee; “>
<div style=”padding: 20px;”>
<div>
<fieldset>
<legend><?php _e(‘My First Plugin Link 2’); ?></legend>
<p>
<?php
$data = MyFirstPluginModel::newInstance()->getMyFirstPluginData();
foreach($data as $d){
echo $d[‘s_name’].'<br>’;
}
?>
</p>
</fieldset>
</div>
</div>
</div>
10. We also want the data in our table can be added, edited and/or deleted.
Docker Installation
For linux, download from http://docs.docker.com/engine/installation/linux/. For Ubuntu, read and follow the step here.
- Check the kernel machine. The kernel should be newer than 3.1. Also docker requires 64-bit Ubuntu.
12teddy@teddy-K43SJ:~$ uname -r4.4.0-38-generic
My kernel version is 4.4.0-38 (PASS) - Update APT source
Update system
1sudo apt-get update
Update package information, ensure that APT works with the https method, and that CA certificates are installed.
1234567teddy@teddy-K43SJ:~$ sudo apt-get install apt-transport-https ca-certificatesReading package lists... DoneBuilding dependency treeReading state information... Doneapt-transport-https is already the newest version.ca-certificates is already the newest version.ca-certificates set to manually installed.
Add the new GPG key
1234567teddy@teddy-K43SJ:~$ sudo apt-key adv --keyserver hkp://p80.pool.sks-keyservers.net:80 --recv-keys 58118E89F3A912897C070ADBF76221572C52609DExecuting: gpg --ignore-time-conflict --no-options --no-default-keyring --homedir /tmp/tmp.WSnymkJUMh --no-auto-check-trustdb --trust-model always --keyring /etc/apt/trusted.gpg --primary-keyring /etc/apt/trusted.gpg --keyring /etc/apt/trusted.gpg.d/alexmurray-indicator-sensors-daily.gpg --keyring /etc/apt/trusted.gpg.d/bhdouglass-indicator-remindor.gpg --keyring /etc/apt/trusted.gpg.d/damien-moore-codeblocks-stable.gpg --keyring /etc/apt/trusted.gpg.d/danielrichter2007-grub-customizer.gpg --keyring /etc/apt/trusted.gpg.d/font-manager-staging.gpg --keyring /etc/apt/trusted.gpg.d/geany-dev-ppa.gpg --keyring /etc/apt/trusted.gpg.d/george-edison55-nitroshare.gpg --keyring /etc/apt/trusted.gpg.d/jfi-psensor-unstable.gpg --keyring /etc/apt/trusted.gpg.d/kirillshkrogalev-ffmpeg-next.gpg --keyring /etc/apt/trusted.gpg.d/linrunner-tlp.gpg --keyring /etc/apt/trusted.gpg.d/maarten-baert-simplescreenrecorder.gpg --keyring /etc/apt/trusted.gpg.d/mc3man-trusty-media.gpg --keyring /etc/apt/trusted.gpg.d/n-muench-programs-ppa2.gpg --keyring /etc/apt/trusted.gpg.d/obsproject-obs-studio.gpg --keyring /etc/apt/trusted.gpg.d/ondrej-php.gpg --keyring /etc/apt/trusted.gpg.d/ondrej-php5-5_6.gpg --keyring /etc/apt/trusted.gpg.d/ondrej-php5-compat.gpg --keyring /etc/apt/trusted.gpg.d/osmoma-audio-recorder.gpg --keyring /etc/apt/trusted.gpg.d/recoll-backports-recoll-1_15-on.gpg --keyring /etc/apt/trusted.gpg.d/tsvetko_tsvetkov-trusty-backports.gpg --keyring /etc/apt/trusted.gpg.d/tuxonice-ppa.gpg --keyring /etc/apt/trusted.gpg.d/ubuntu-audio-dev-alsa-daily.gpg --keyring /etc/apt/trusted.gpg.d/umang-indicator-stickynotes.gpg --keyring /etc/apt/trusted.gpg.d/webupd8team-brackets.gpg --keyring /etc/apt/trusted.gpg.d/webupd8team-java.gpg --keyring /etc/apt/trusted.gpg.d/wine-wine-builds.gpg --keyring /etc/apt/trusted.gpg.d/xorg-edgers-ppa.gpg --keyserver hkp://p80.pool.sks-keyservers.net:80 --recv-keys 58118E89F3A912897C070ADBF76221572C52609Dgpg: requesting key 2C52609D from hkp server p80.pool.sks-keyservers.net?: p80.pool.sks-keyservers.net: Host not foundgpgkeys: HTTP fetch error 7: couldn't connect: Successgpg: no valid OpenPGP data found.gpg: Total number processed: 0
Then Open the /etc/apt/sources.list.d/docker.list file in your favorite editor. If the file doesn’t exist, create it.
1teddy@teddy-K43SJ:~$ sudo gedit /etc/apt/sources.list.d/docker.list
Make sure the file is empty or remove any existing entries. Add this on file for Ubuntu Trusty 14.04 (LTS)
1deb https://apt.dockerproject.org/repo ubuntu-trusty main
Save and close the file.
Update the system
1sudo apt-get update
Purge the old repo if it exists.
123456teddy@teddy-K43SJ:~$ sudo apt-get purge lxc-dockerReading package lists... DoneBuilding dependency treeReading state information... DonePackage 'lxc-docker' is not installed, so not removed...
Verify that APT is pulling from the right repository.
12345678910teddy@teddy-K43SJ:~$ apt-cache policy docker-enginedocker-engine:Installed: (none)Candidate: 1.12.1-0~trustyVersion table:1.12.1-0~trusty 0500 https://apt.dockerproject.org/repo/ ubuntu-trusty/main amd64 Packages1.12.0-0~trusty 0500 https://apt.dockerproject.org/repo/ ubuntu-trusty/main amd64 Packages...
CONT….
Another My Ubuntu 14.04 Installation, Problem and Solutions
When I want to update my system,
|
1 |
sudo apt-get update |
I got this error on my terminal
|
1 2 3 4 5 6 7 8 9 10 |
... Ign http://ppa.launchpad.net trusty/main Translation-en Fetched 5.775 kB in 1min 29s (64,7 kB/s) W: GPG error: http://download.opensuse.org Release: The following signatures were invalid: KEYEXPIRED 1460070962 W: GPG error: http://ppa.launchpad.net trusty Release: The following signatures were invalid: BADSIG A9E15C2F2B944FEE Launchpad PPA for Alex Murray W: Failed to fetch http://kambing.ui.ac.id/ubuntu/dists/trusty-updates/main/binary-amd64/Packages Hash Sum mismatch W: Failed to fetch http://kambing.ui.ac.id/ubuntu/dists/trusty-updates/main/binary-i386/Packages Hash Sum mismatch E: Some index files failed to download. They have been ignored, or old ones used instead. |
Solution:
For
|
1 |
W: GPG error: http://download.opensuse.org Release: The following signatures were invalid: KEYEXPIRED 1460070962 |
from “GPG error:The following signatures were invalid: KEYEXPIRED”, It’s safe to IGNORE the GPG error. From this How can I fix a 404 Error when using a PPA or updating my package lists?, I CAN LEARN ABOUT THE PPA, HOW TO HANDLE THE ERROR AND DELETE/REMOVE PPA.
For
|
1 |
W: GPG error: http://ppa.launchpad.net trusty Release: The following signatures were invalid: BADSIG A9E15C2F2B944FEE Launchpad PPA for Alex Murray |
from “GPG error: Release: The following signatures were invalid: BADSIG” and How can i rebuild my ubuntu package lists??, It said to backup my current ppa list then do clean update??? BUT I HAVEN’T DONE IT YET!!! BUSY WITH ANOTHER THING
PHP/Apache error??
I got this message when I’m trying to repair the software update (I got my linux package broken in order to make upwork time tracker software working)
|
1 2 3 4 5 6 7 8 9 10 11 12 13 14 15 16 17 18 19 20 21 22 23 24 25 26 27 28 29 30 31 32 33 34 35 36 37 |
installArchives() failed: (Reading database ... (Reading database ... 5% (Reading database ... 10% (Reading database ... 15% (Reading database ... 20% (Reading database ... 25% (Reading database ... 30% (Reading database ... 35% (Reading database ... 40% (Reading database ... 45% (Reading database ... 50% (Reading database ... 55% (Reading database ... 60% (Reading database ... 65% (Reading database ... 70% (Reading database ... 75% (Reading database ... 80% (Reading database ... 85% (Reading database ... 90% (Reading database ... 95% (Reading database ... 100% (Reading database ... 1135829 files and directories currently installed.) Preparing to unpack .../libnss3_2%3a3.23-0ubuntu0.14.04.1_amd64.deb ... Unpacking libnss3:amd64 (2:3.23-0ubuntu0.14.04.1) over (2:3.19.2.1-0ubuntu0.14.04.2) ... Setting up php5-mapscript (6.4.1-2) ... /var/lib/dpkg/info/php5-mapscript.postinst: 11: /var/lib/dpkg/info/php5-mapscript.postinst: php5enmod: not found dpkg: error processing package php5-mapscript (--configure): subprocess installed post-installation script returned error exit status 127 Setting up libnss3:amd64 (2:3.23-0ubuntu0.14.04.1) ... Processing triggers for libc-bin (2.19-0ubuntu6.9) ... Errors were encountered while processing: php5-mapscript Error in function: Setting up php5-mapscript (6.4.1-2) ... /var/lib/dpkg/info/php5-mapscript.postinst: 11: /var/lib/dpkg/info/php5-mapscript.postinst: php5enmod: not found dpkg: error processing package php5-mapscript (--configure): subprocess installed post-installation script returned error exit status 127 |
I got this error
|
1 2 3 4 5 6 7 8 |
Unable to mount Data Error mounting system-managed device /dev/sdb3: Command-line `mount"/media/data"' exited with non-zero exit status 14: The disk contains an unclean file system (0, 0). Metadata kept in Windows cache, refused to mount. Failed to mount '/dev/sdb3': Operation not permitted The NTFS partition is in an unsafe state. Please resume and shutdown Windows fully (no hibernation or fast restarting), or mount the volume read-only with the 'ro' mount option |
when trying to access another disk (sdb3).
Solution: Start to windows 10 then restart/shutdown it. It took a few minutes to completely restart/shutdown windows 10. If I didn’t patient enough, the above error would be displayed again when I use ubuntu and try to access another partition. If I dont want to do the above (restart to windows again), I can use a trick from this http://askubuntu.com/questions/462381/cant-mount-ntfs-drive-the-disk-contains-an-unclean-file-system. but i never try it!
Installation of Cinnamon 2.8 Linux Desktop Environment (DE)
I need to install this DE because I see my screen pixel has black horizontal line and it’s growing everyday. I suspected it’s caused by the bottom panel bar of my Gnome classic DE can’t be hidden (auto hide) so the panel always appear and the black line precisely at the border between the panel and the rest of screen.–> I DECIDED TO NOT INSTALL THIS DE RIGHT NOW, MAY BE SOMEDAY LATER. I FOUND A WAY TO AUTO HIDE THE BOTTOM (AND THE TOP) PANEL OF GNOME BY SELECTING ‘GNOME FLASHBACK (METACITY)’ INSTEAD OF ‘GNOME FLASHBACK (COMPIZ)’ I OFTEN TO USE WHEN I LOG IN MY UBUNTU MACHINE. BASED ON THIS LINK auto-hide bottom panel using classic gnome ?, I CAN USE ‘Alt + right click or Super Key + Alt + right click in an open panel area.’ THEN CLICK ‘Properties’ THEN CHECK ‘Autohide’. DONE!
When I update my system via ‘sudo apt-get update’ or via Software Updater, I got this error:
|
1 2 3 4 5 |
teddy@teddy-K43SJ:~/Documents/cpp/tesseract$ sudo apt-get update ... Fetched 26,8 kB in 1min 1s (440 B/s) Reading package lists... Done W: GPG error: https://packagecloud.io trusty InRelease: The following signatures couldn't be verified because the public key is not available: NO_PUBKEY 37BBEE3F7AD95B3F |
Solution: (ref: https://chrisjean.com/fix-apt-get-update-the-following-signatures-couldnt-be-verified-because-the-public-key-is-not-available/)
So add the key ’37BBEE3F7AD95B3F’ like this:
|
1 2 3 4 5 6 |
teddy@teddy-K43SJ:~/Documents/cpp/tesseract$ sudo apt-key adv --keyserver keyserver.ubuntu.com --recv-keys 37BBEE3F7AD95B3F Executing: gpg --ignore-time-conflict --no-options --no-default-keyring --homedir /tmp/tmp.6fptqKXqfo --no-auto-check-trustdb --trust-model always --keyring /etc/apt/trusted.gpg --primary-keyring /etc/apt/trusted.gpg --keyring /etc/apt/trusted.gpg.d/alexmurray-indicator-sensors-daily.gpg --keyring /etc/apt/trusted.gpg.d/bhdouglass-indicator-remindor.gpg --keyring /etc/apt/trusted.gpg.d/damien-moore-codeblocks-stable.gpg --keyring /etc/apt/trusted.gpg.d/danielrichter2007-grub-customizer.gpg --keyring /etc/apt/trusted.gpg.d/debian-archive-squeeze-automatic.gpg --keyring /etc/apt/trusted.gpg.d/debian-archive-squeeze-stable.gpg --keyring /etc/apt/trusted.gpg.d/debian-archive-wheezy-automatic.gpg --keyring /etc/apt/trusted.gpg.d/debian-archive-wheezy-stable.gpg --keyring /etc/apt/trusted.gpg.d/font-manager-staging.gpg --keyring /etc/apt/trusted.gpg.d/geany-dev-ppa.gpg --keyring /etc/apt/trusted.gpg.d/george-edison55-nitroshare.gpg --keyring /etc/apt/trusted.gpg.d/jfi-psensor-unstable.gpg --keyring /etc/apt/trusted.gpg.d/kirillshkrogalev-ffmpeg-next.gpg --keyring /etc/apt/trusted.gpg.d/linrunner-tlp.gpg --keyring /etc/apt/trusted.gpg.d/maarten-baert-simplescreenrecorder.gpg --keyring /etc/apt/trusted.gpg.d/mc3man-trusty-media.gpg --keyring /etc/apt/trusted.gpg.d/n-muench-programs-ppa2.gpg --keyring /etc/apt/trusted.gpg.d/obsproject-obs-studio.gpg --keyring /etc/apt/trusted.gpg.d/ondrej-php.gpg --keyring /etc/apt/trusted.gpg.d/ondrej-php5-5_6.gpg --keyring /etc/apt/trusted.gpg.d/ondrej-php5-compat.gpg --keyring /etc/apt/trusted.gpg.d/osmoma-audio-recorder.gpg --keyring /etc/apt/trusted.gpg.d/recoll-backports-recoll-1_15-on.gpg --keyring /etc/apt/trusted.gpg.d/sandromani-gimagereader.gpg --keyring /etc/apt/trusted.gpg.d/tsvetko_tsvetkov-trusty-backports.gpg --keyring /etc/apt/trusted.gpg.d/tuxonice-ppa.gpg --keyring /etc/apt/trusted.gpg.d/ubuntu-audio-dev-alsa-daily.gpg --keyring /etc/apt/trusted.gpg.d/umang-indicator-stickynotes.gpg --keyring /etc/apt/trusted.gpg.d/webupd8team-brackets.gpg --keyring /etc/apt/trusted.gpg.d/webupd8team-java.gpg --keyring /etc/apt/trusted.gpg.d/webupd8team-sublime-text-3.gpg --keyring /etc/apt/trusted.gpg.d/wine-wine-builds.gpg --keyring /etc/apt/trusted.gpg.d/xorg-edgers-ppa.gpg --keyserver keyserver.ubuntu.com --recv-keys 37BBEE3F7AD95B3F gpg: requesting key 7AD95B3F from hkp server keyserver.ubuntu.com gpg: key D59097AB: public key "packagecloud ops (production key) <ops@packagecloud.io>" imported gpg: Total number processed: 1 gpg: imported: 1 (RSA: 1) |
OSClass Sub Domain Setting
First try to install the newest osclass version. Here I use 3.6.1 version. Install it locally. It works! here is the url : http://localhost/works/osclass361. user and password for the admin page (/oc-admin/) is ‘admin’ and ‘admin’.
Setup the virtualhost
|
1 |
sudo gedit /etc/apache2/sites-available/osclass361.dev.conf |
Here is the content
|
1 2 3 4 5 6 7 8 9 10 11 12 13 14 |
<VirtualHost *:80> ServerName osclass361.dev ServerAlias www.osclass361.dev DocumentRoot /home/teddy/Documents/works/osclass361 <Directory /home/teddy/Documents/works/osclass361> AllowOverride All Allow from All Require all granted </Directory> ErrorLog /var/log/apache2/osclass361_error.log CustomLog /var/log/apache2/osclass361_access.log combined </VirtualHost> |
Then enable the website and reload Apache service using below command
|
1 2 |
sudo a2ensite osclass361.dev sudo service apache2 reload |
Then register the above local site. open
|
1 |
sudo gedit /etc/hosts |
Then type
|
1 |
127.0.0.1 osclass361.dev |
Then restart apache
Then set the permalink for SEF url in the admin page on Show more -> Settings -> permalinks (http://localhost/works/osclass361/oc-admin/index.php?page=settings&action=permalinks) then Check ‘Enable friendly urls’ then Save Changes! It’ll create .htaccess file
|
1 2 3 4 5 6 7 8 |
<IfModule mod_rewrite.c> RewriteEngine On RewriteBase /works/osclass361/ RewriteRule ^index\.php$ - [L] RewriteCond %{REQUEST_FILENAME} !-f RewriteCond %{REQUEST_FILENAME} !-d RewriteRule . /works/osclass361/index.php [L] </IfModule> |
Then modify config.php file. Edit these two lines
|
1 2 3 |
define('REL_WEB_URL', '/works/osclass361/'); define('WEB_PATH', 'http://localhost/works/osclass361/'); |
to
|
1 2 3 |
define('REL_WEB_URL', '/'); define('WEB_PATH', 'http://www.osclass361.dev/'); |
Test the site on your browser: http://www.osclass361.dev/ or just osclass361.dev/ Here is how it looks  Because I still have a little listing available, I need to post some of them. NOW it is time to setup the subdomain. I want to use ‘City’ as the subdomain based and use wildcard * to make it simpler. From this article Use categories, countries, regions or cities as subdomains, I’ll follow the guidelines:
1. go to admin Show More -> Settings -> Advanced (http://www.osclass361.dev/oc-admin/index.php?page=settings&action=advanced) then set:
|
1 2 |
Subdomain type: City based Host: osclass361.dev |
2. Use DNS wildcard
|
1 |
sudo gedit /etc/hosts |
modify from
|
1 |
127.0.0.1 osclass361.dev |
to
|
1 |
127.0.0.1 *.osclass361.dev |
3. Modify virtualhost. use *.osclass361.dev instead of www.osclass361.dev on ServerAlias
|
1 |
sudo gedit /etc/apache2/sites-available/osclass361.dev.conf |
|
1 2 3 4 5 6 7 8 9 10 11 12 13 14 |
<VirtualHost *:80> ServerName osclass361.dev ServerAlias *.osclass361.dev DocumentRoot /home/teddy/Documents/works/osclass361 <Directory /home/teddy/Documents/works/osclass361> AllowOverride All Allow from All Require all granted </Directory> ErrorLog /var/log/apache2/osclass361_error.log CustomLog /var/log/apache2/osclass361_access.log combined </VirtualHost> |
4. Restart apache
|
1 |
sudo service apache2 restart |
5. changes on config.php. Modify from
|
1 |
define('WEB_PATH', 'http://www.osclass361.dev/'); |
to
|
1 2 |
//define('WEB_PATH', 'http://'.$_SERVER['HTTP_HOST'].'.osclass361.dev/');-->WRONG!!! define('WEB_PATH', 'http://'.$_SERVER['HTTP_HOST'].'/'); |
6. Add cookies configuration on config.php
|
1 |
define('COOKIE_DOMAIN', '.osclass361.dev'); |
7. Modify .htaccess to be like this
|
1 2 3 4 5 6 7 8 |
<IfModule mod_rewrite.c> RewriteEngine On RewriteBase / RewriteRule ^index\.php$ - [L] RewriteCond %{REQUEST_FILENAME} !-f RewriteCond %{REQUEST_FILENAME} !-d RewriteRule . /index.php [L] </IfModule> |
8. Test!
|
1 2 |
http://www.osclass361.dev/ --> OK http://www.osclass361.dev/oc-admin/ --> OK |
9. Open the site with the subdomain (city) like: http://abbeville.osclass361.dev/
AND IT WORKS!!! IT CAN OPEN THE OTHERS PAGES WITH THE SUBDOMAIN BUT I THINK IT NEED TO BE LIMITED WHICH PAGE CAN BE OPENED BY THE SUBDOMAIN FOR EXAMPLE ONLY FOR ITEMS PAGE AND SHOW THE ITEMS FROM THE CITY!
A FEW ERRORS ENCOUNTER:
|
1 2 3 4 5 6 7 |
Internal Server Error The server encountered an internal error or misconfiguration and was unable to complete your request. Please contact the server administrator at [no address given] to inform them of the time this error occurred, and the actions you performed just before this error. More information about this error may be available in the server error log. |
WHEN TRYING TO ACCESS ANOTHER LINK LIKE http://www.osclass361.dev/user/login. SO IT ONLY CAN OPEN THE HOMEPAGE!
SOLUTION: It happened because I didn’t modify .htaccess file, Modify it like #7 above!
IT’S WORKS NOW BUT SLOW TO OPEN ANYPAGE (WHEN COOKIES IS ALREADY DELETED)!!!