Laravel Quiz

source: https://github.com/SAIBA0011/laravel-quiz

Description:

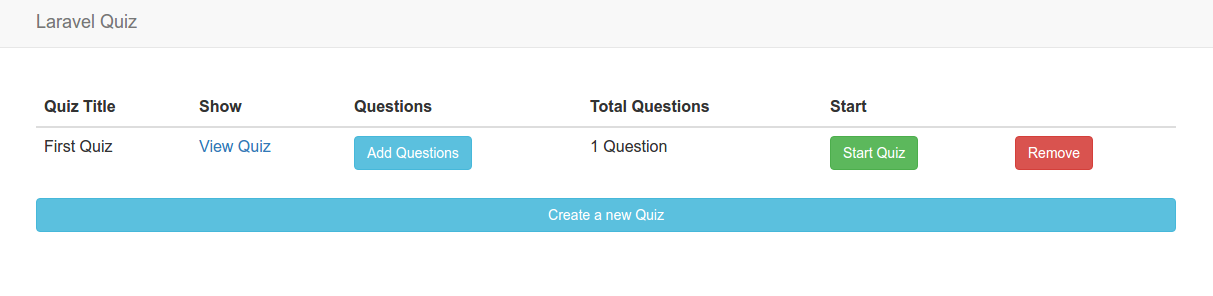
Laravel-Quiz functionality

Create a new quiz
Create quiz questions — single & multi Select
show quiz questions
Create quiz question options — Pending..
To be implemented

Finish quiz question options.
Change question position.
Change question option position.
Randomize question order on display page.
Track user attempts per quiz.
Allow user to take quiz.
allow user to complete quiz.
show quiz results on complete.

Installation:

  1. Create a new laravel project:

     
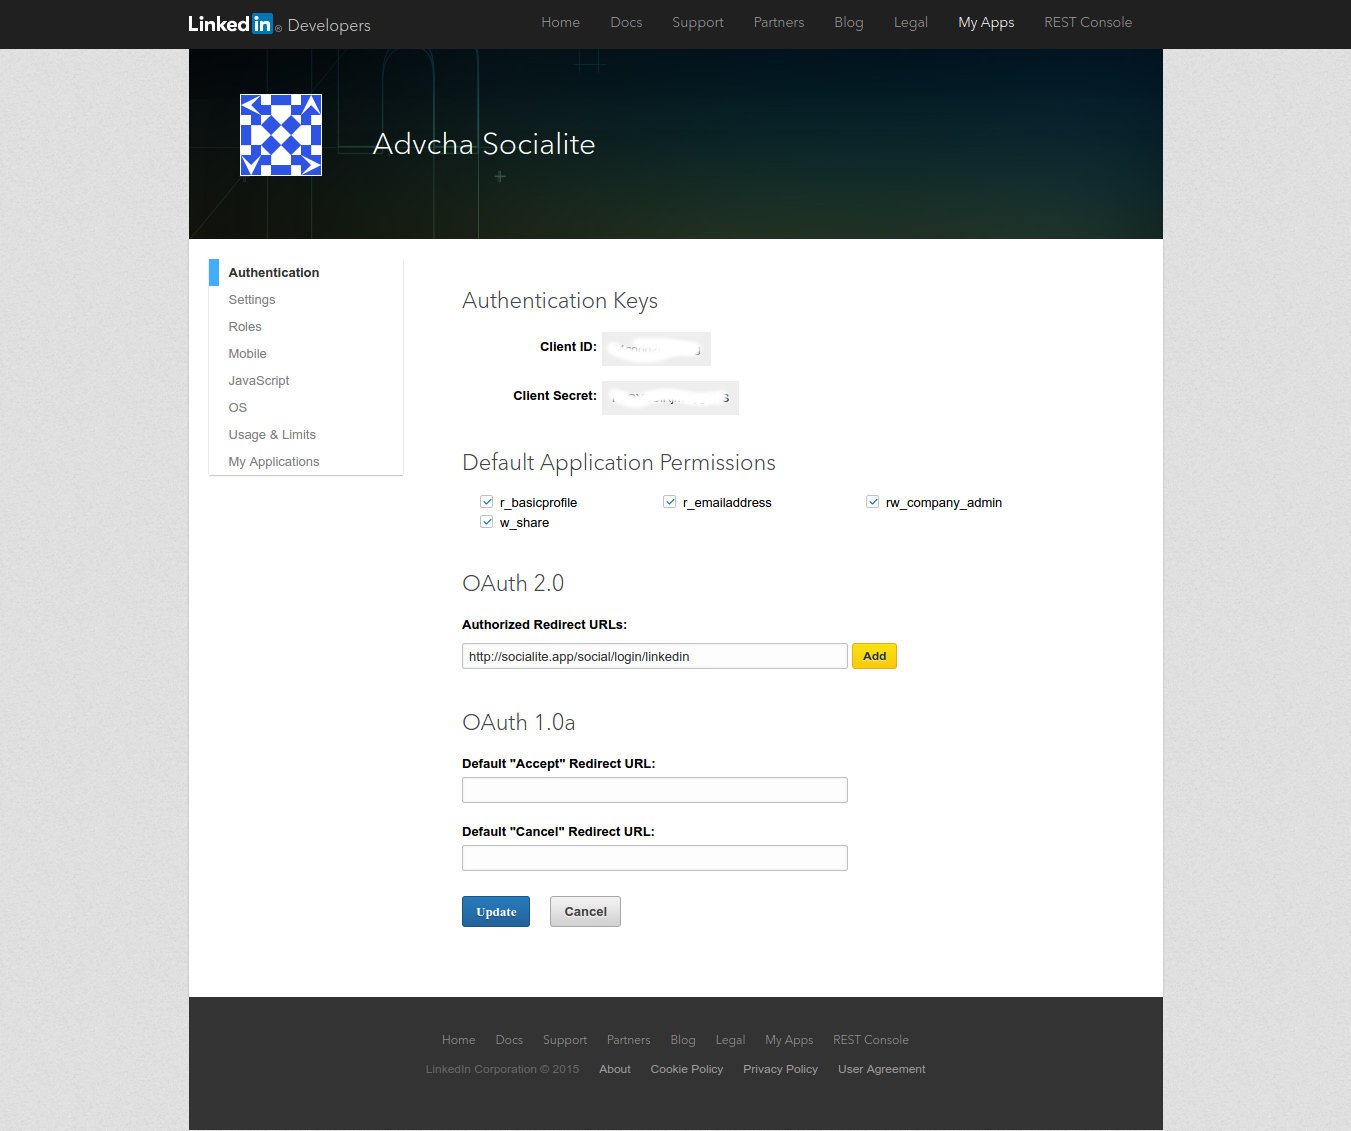
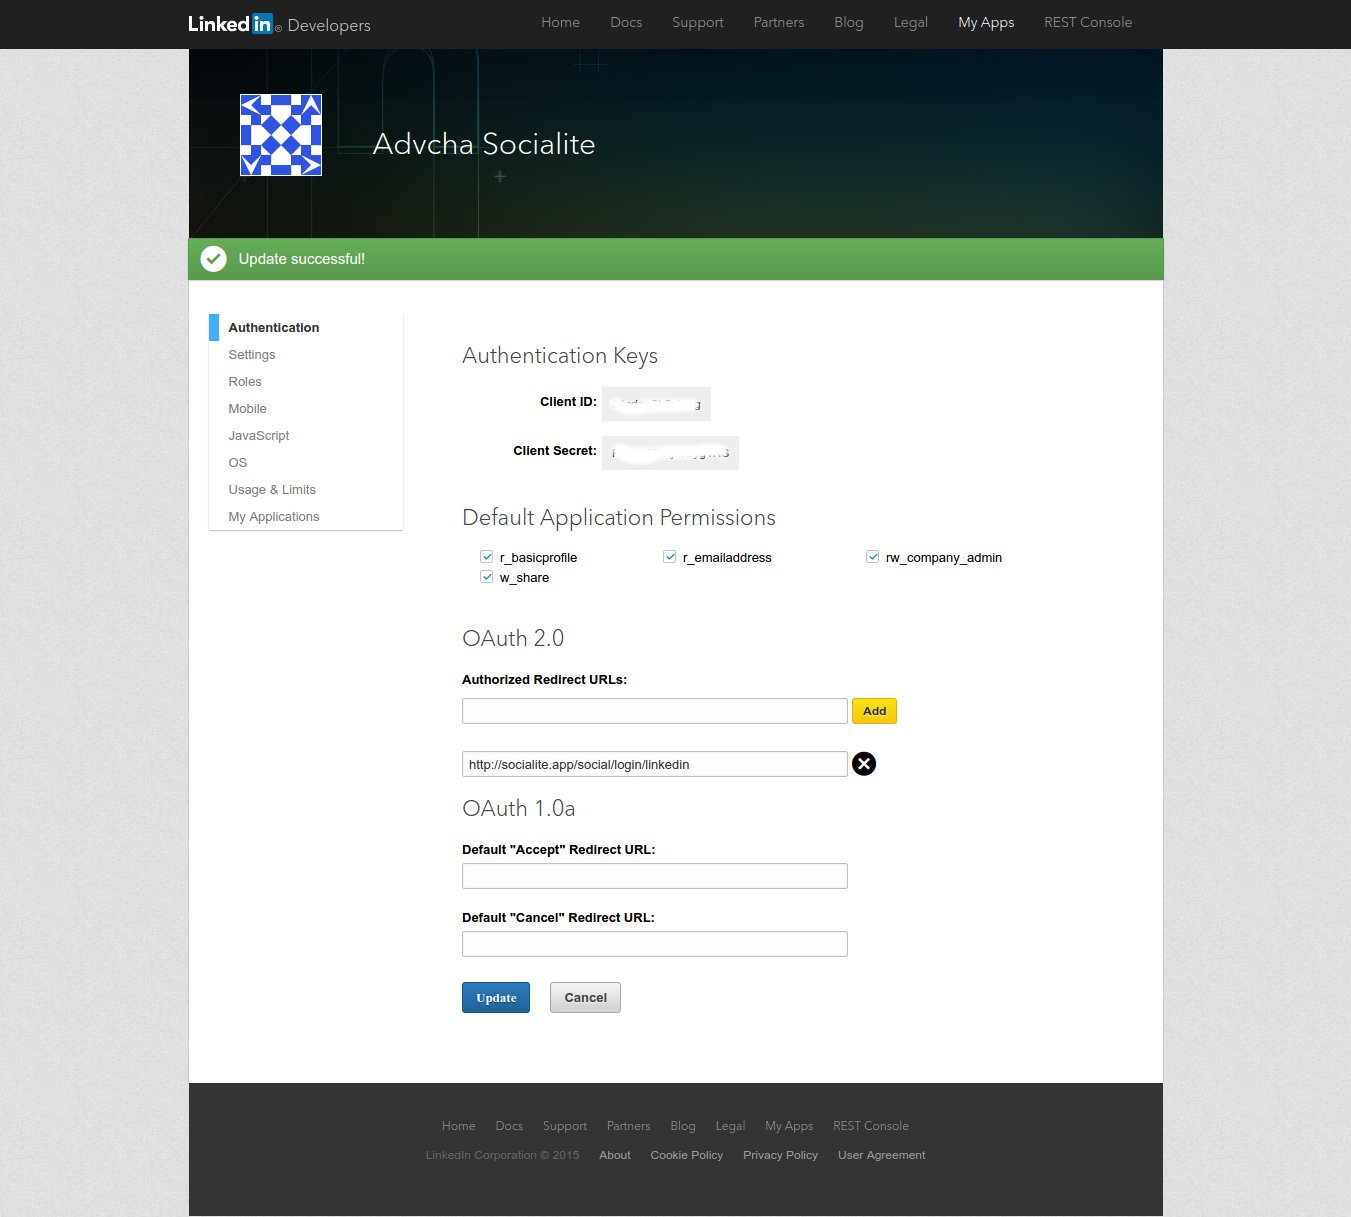
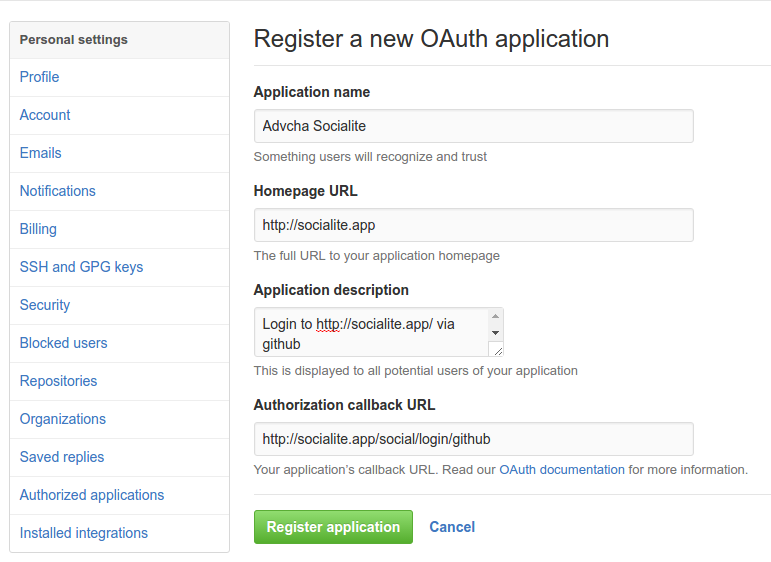
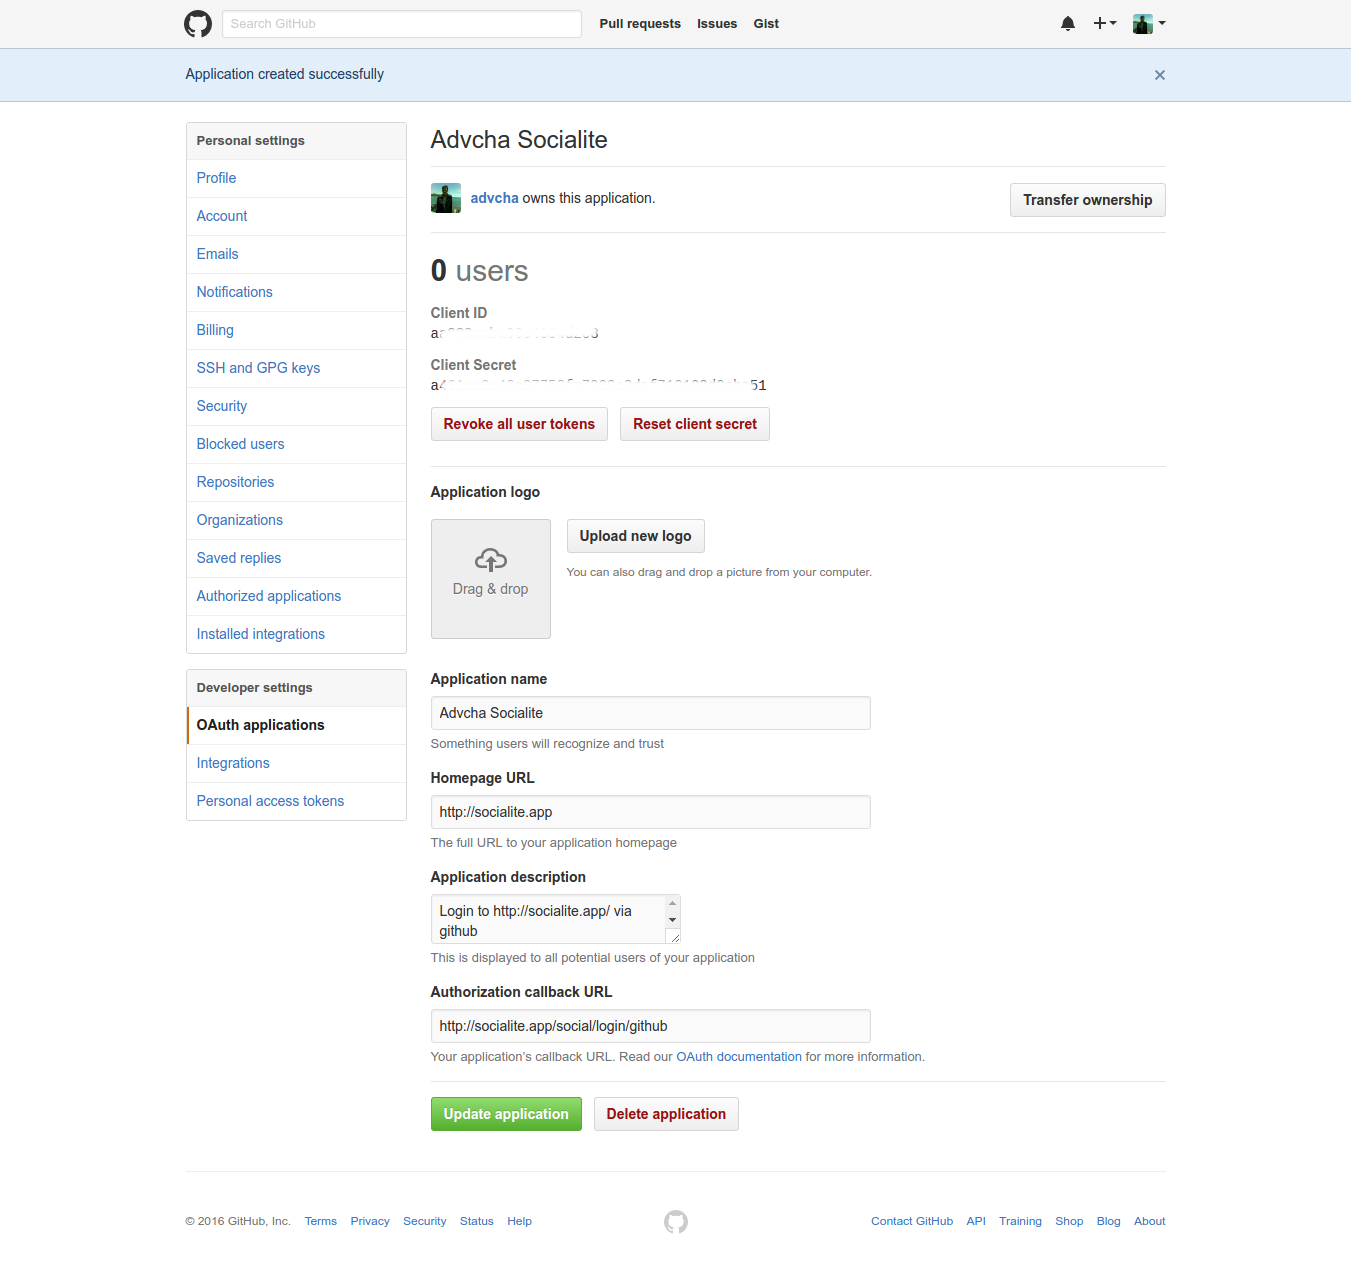
  2. Download the app from https://github.com/SAIBA0011/laravel-quiz. It’s better to donwload in zip file then extract the content in /works/laravel/quiz/ directory. Overwrite the existing files and directories.
  3. Install the laravel component required:

     
  4. Create a new database ‘laravel_quiz’ by phpmyadmin
  5. Use ‘php artisan migrate’ to create the tables.
    NOTE: I got this error when trying to do ‘migrate’
    “teddy@teddy-K43SJ:~/Documents/works/laravel/laravel-quiz$ php artisan migrate
    Migration table created successfully.[Illuminate\Database\QueryException]
    SQLSTATE[42000]: Syntax error or access violation: 1064 You have an error i
    n your SQL syntax; check the manual that corresponds to your MySQL server v
    ersion for the right syntax to use near ‘) on delete cascade’ at line 1 (SQ
    L: alter table quiz_results add constraint quiz_results_user_id_foreign
    foreign key (user_id) references users () on delete cascade)
    [PDOException]
    SQLSTATE[42000]: Syntax error or access violation: 1064 You have an error i
    n your SQL syntax; check the manual that corresponds to your MySQL server v
    ersion for the right syntax to use near ‘) on delete cascade’ at line 1 ”
    SOLUTION: At first, I did like in the articles http://stackoverflow.com/questions/26820788/add-on-delete-cascade-to-existing-column-in-laravel and http://stackoverflow.com/questions/28167329/laravel-migration-remove-ondeletecascade-from-existing-foreign-key on ‘2016_10_24_101046_create_quiz_results_table.php’ in /database/migrations/ directory BUT SOMEHOW IT DIDN’T WORK

    SO I JUST COMMENT THE ‘onDelete’ COMMAND

    THEN THE MIGRATIONS RUN WELL.
  6. generate the new key
  7. Install npm modules and gulp

    BUT SOMEHOW I GOT THIS ERROR ON ‘gulp’

    NO SOLUTION YET:
    I’VE TRIED FROM https://laracasts.com/discuss/channels/elixir/laravel-53-error-on-gulp-execution?page=1

    BUT FAILED AND GOT THIS ERROR

    I ALSO TRIED (DONT DO THIS BECAUSE I BROKE THE ENVIRONMENT BINDING!)

    BECAUSE OF THIS I GOT A HARDTIME AND SPENT MANY ERRORS TO FIX IT (http://stackoverflow.com/questions/37324519/node-sass-does-not-yet-support-your-current-environment-linux-64-bit-with-false) THROUGH THIS:

    BUT THE ERROR STILL PERSIST (ON GULP)! DONT KNOW HOW TO FIX IT!!!
    I READ gulpfile.js IN ‘laravel-quiz’ PROJECT DIFFERENT WITH IN ‘quiz’ PROJECT. THEREFORE ‘laravel-quiz’ PROJECT USE VUE!!!
  8. Test it live (http://localhost:8000)laravel-quiz-homeIT RUN WELL
  9. Errors & Solutions:
    When I want to see the quiz result by submitting the answer (http://localhost:8000/second-quiz/submit), I got this error:
    “ErrorException in QuizResultsController.php line 25:
    Trying to get property of non-object”
    SOLUTION: This is because I didn’t login first. Use http://localhost:8000/home to login/register (I’ve registered with email: ‘advcha@yahoo.com’ and password: ‘satria’) then take the quiz again and answer the above question. Then the result would be showed up like this:laravel-quiz-result
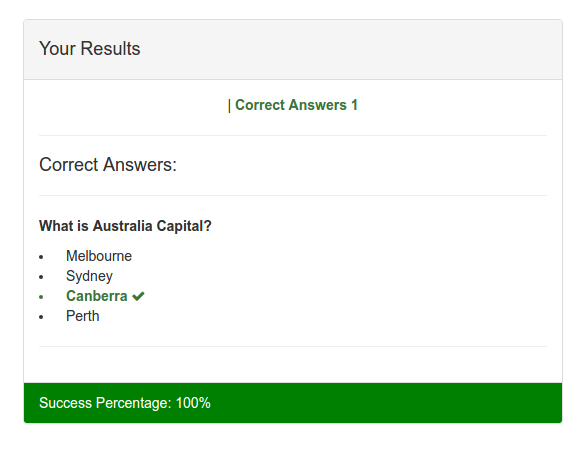
  10. Others samples for online quiz:
    http://practice.cappassessments.com/Nrt/NrtPage.html (Shows time to answer question, can drag up or down the answer options, not only can pick the answer, but also can type the answer). There is a job application in upwork for this kind of online quiz: https://www.upwork.com/jobs/_~01d2316bc1f3c2cb84/.

Quiz

source: https://github.com/sms516/quiz
online: http://dojang.nz/

Installation:

  1. Create a new laravel project:

     
  2. Download the app from https://github.com/sms516/quiz. It’s better to donwload in zip file then extract the content in /works/laravel/quiz/ directory. Overwrite the existing files and directories.
  3. Install the laravel component required:

     
  4. Import the database file (DB_SETUP.sql) along with the github.
    NOTE: ‘quiz_details’ table can’t be created because the field type ‘datetime CURRENT_TIMESTAMP ON UPDATE CURRENT_TIMESTAMP’ for ‘updated_at’ can’t be used. So replace ‘datetime’ with ‘timestamp’
  5. Set the file/folder permission for ‘storage’
  6. Test it live (http://localhost:8000/admin)

    WORKING!!!quiz-frontCAN’T SHOW http://localhost:8000/admin BUT CAN SHOW http://localhost:8000/admin/quiz/questionsquiz-admin-questionNOTE: Check the routes in /app/Http/routes.php. The routes are very limited! NO ROUTE FOR ADMIN???
  7. I found gulpfile.js in the root of the website, so I think I need to use npm and gulp to compile the saas:
    Use ‘npm install’ to install required modules

    Use ‘gulp’ to compile saas

    I DONT KNOW HOW TO DO NEXT OR HOW THE NPM AND GULP AFFECT THE WEBSITE! NEED TO LEARN ABOUT THESE!!!
  8. On the homepage ‘http://localhost:8000’, I clicked ‘Start Quiz’ button but I got NOT FOUND error (ajax error) at the chrome console. I found it is triggered by ‘onclick=”startQuiz()”‘ in /resources/views/quiz/view.blade.php and the javascript command in /public/js/functions.js. I NEED TO MODIFY A FEW SETTING IN functions.js file! First replace the ‘base_dir’ variable like below:

    FROM NOW ON, I HAVE TO USE ‘http://localhost/works/laravel/quiz/public/’ INSTEAD OF ‘http://localhost:8000’! FOR HOMEPAGE AND ‘http://localhost/works/laravel/quiz/public/admin/quiz/questions’ FOR ADMIN PAGE!
    NOW THE AJAX IS WORKING!! ‘Start Quiz’ button IS WORKING!
    Another errors detected:

    Sometimes I got unknow error when trying to edit the question (http://localhost/works/laravel/quiz/public/admin/quiz/question/376).
    Solution: I need to put ‘ini_set(‘display_errors’,1);’ in /app/Http/routes.php to enable to debug the errors. It seems the ‘storage’ directory HAS NOT BEEN SET THE PERMISSION. So make sure the step #5 is executed first!
  9. Improvements:
    Many links in the admin page can’t be opened or don’t have the correct routes. Here I want to fix or develop the links.
    Club Admin (http://localhost/works/laravel/quiz/public/admin/club)
    Add a new route in /app/Http/routes.php

    Create a new controller ‘ClubController.php’ in /app/Http/Controllers/

    The ‘Club’ model is already exist in /app/models/ directory! Here we want to show all the club in our database!
    The data would be showed up by /resources/views/club/view.blade.php like this:quiz-view-clubsAdd/Save New Club (http://localhost/works/laravel/quiz/public/admin/club/add)
    Add two new routes in /app/Http/routes.php

    Modify a controller ‘ClubController.php’ in /app/Http/Controllers/

    Add/modify a model ‘Club.php’ in /app/models/ directory:

    Add new model ‘MartialArt.php’ in /app/models/ directory:

    Add a new blade template ‘add.blade.php’ in /resources/views/club/ directory

    OK. then make a test at http://localhost/works/laravel/quiz/public/admin/club/add.quiz-add-clubI got this club sample from Kumgang Tae Kwon Do website. Then save the data by clicking ‘Add Club’. Here is the working result:quiz-club-savedEdit/Save Club (http://localhost/works/laravel/quiz/public/admin/club/edit/4)
    First I need to put ‘Edit’ link on the club admin page (http://localhost/works/laravel/quiz/public/admin/club). Modify ‘view.blade.php’ in /resources/views/club/ directory. Modify the header table to show/hide the needed field (add class ‘all’ to show and ‘none’ to hide)

    Then arrange the field width by defining the columns (‘columnDefs’) like this:

    So here is the new looksquiz-club-view-editTo make the ‘Edit’ links work, add two new routes in /app/Http/routes.php

    Then Modify ‘ClubController.php’ in /app/Http/Controllers/ dir:

    Add/Modify ‘edit.blade.php’ in /resources/views/club/ directory:

    OK. Now the Club admin can be used properly.
    NOTES: When I save the new club or the edited club, I don’t find the flash status to show the data is saved/updated successfully!
    HOW TO DELETE CLUB???

Sistem Informasi Sekolah (SIS)

Source: https://github.com/balitax/SI-Sekolah-L5

Installation: (the most steps is pretty same with Laravel Blog)

  1. Create a new laravel project:

     
  2. Download the app from https://github.com/balitax/SI-Sekolah-L5. It’s better to donwload in zip file then extract the content in /works/laravel/sis/ directory. Overwrite the existing files and directories.
  3. Install the laravel component required:

     
  4. edit .env file and fill the database account (DB name is sis)
  5. Import the database file (database_sekolah.sql) along with the github.
    Note: authentication scaffolding NOT RUN HERE! ERROR BUT NO PROBLEM
  6. Use ‘migration’ to add some new tables into the new database

     
  7. Dont forget to set the file permission in /public/ directory if we want to upload an image into it

     
  8. I found some errors when tried it for the first time. http://localhost:8000/login IS WORKING but CAN’T LOGIN. THE USER TABLE IN ‘tbl_kepegawaian’. BECAUSE I DONT KNOW THE ‘admin’ PASSWORD, I NEED TO UPDATE ‘password’ FIELD WITH ‘$2y$10$eWW.aZOeruiS1VEO0ghKHu7A7UoQcj2tVmLIcnw6JnrcsiljuOmYK’ –> ‘satria’. SO the ‘admin’ password is ‘satria’. NOW I CAN GO INTO THE ADMIN PAGE (dashboard, data sekolah, data siswa, galeri foto, absensi siswa, data pegawai, etc).
    THERE ARE SO MANY ERRORS (I CAN’T GO INTO THE WEBSITE ROOT OR http://localhost:8000/ BUT ONLY CAN GO TO http://localhost:8000/admin). ANYWAY IT’S GOOD AND I CAN SEE THE SCREEN!
    NOTES: pls study the routes in /app/Http/routes.php !

SOMETHING IS NEEDED TO FIX SOME ERRORS:

  1. Error when I want to acces the root http://localhost:8000/
    “FatalErrorException in Handler.php line 25:
    Uncaught TypeError: Argument 1 passed to App\Exceptions\Handler::report() must be an instance of Exception, instance of Error given, called in /home/teddy/Documents/works/laravel/sis/vendor/laravel/framework/src/Illuminate/Foundation/Bootstrap/HandleExceptions.php on line 73 and defined in /home/teddy/Documents/works/laravel/sis/app/Exceptions/Handler.php:25
    Stack trace:
    #0 /home/teddy/Documents/works/laravel/sis/vendor/laravel/framework/src/Illuminate/Foundation/Bootstrap/HandleExceptions.php(73): App\Exceptions\Handler->report(Object(Error))
    #1 [internal function]: Illuminate\Foundation\Bootstrap\HandleExceptions->handleException(Object(Error))
    #2 {main}
    thrown”
    SOLUTION: The error because I use PHP 7 (CLI) when I started the server (‘php artisan serve’). ref: http://stackoverflow.com/questions/36983734/laravel-fatalerrorexception-in-handler-php-line-25. So use php 5.6 instead when starting the server like this:
  2. Another error when accessing the root website:
    “FatalErrorException in FrontController.php line 42:
    Class ‘App\Models\Banner’ not found”
    SOLUTION: In /app/Http/Controllers/FrontController.php, comment a few lines:

    Because there is models available for them.
    Also in ‘index’ function, replace ‘bappeda’ with ‘web’

     
  3. Now, the root/front website can be displayed but the website can’t be loaded. User need to upload the logo manually from the admin page -> Setting (http://localhost:8000/admin/setting). But when I saved the input, This error is appeared:
    “QueryException in Connection.php line 624:
    SQLSTATE[42S22]: Column not found: 1054 Unknown column ‘peta_latitude’ in ‘field list’ (SQL: update tbl_setting set title_web = Sekolah Ku, desc_web = Sekolah Ku, key_web = sekolah, logo = lapVa94436orMdu892YPf3uSj931XM.png, facebook = , twitter = , gplus = , peta_latitude = , peta_longitude = , alamat = , no_telp = , no_fax = , email = where id_setting = 1)”
    SOLUTION: Modify tbl_setting in the database, then add these new fields: peta_latitude varchar(25), peta_longitude varchar(25), alamat text, no_telp varchar(25), no_fax varchar(25) and email varchar(25).
    Now the website logo can be displayedsis
  4. When I clicked one of the news (berita) like http://localhost:8000/baca/berita/2011-lembaga-pemerintah-sudah-harus-cicipi-open-source, I got this error:
    “InvalidArgumentException in FileViewFinder.php line 140:
    View [bappeda.berita_detail] not found.”
    SOLUTION: in /app/Http/Controllers/FrontController.php, Modify ‘berita’ function and replace ‘bappeda’ with ‘web’ and ‘berita_detail’ with ‘beritadetail’

     
  5. When I clicked one of the ‘Profil Sekolah’ links like http://localhost:8000/page/profil-sekolah, I got this error:
    “InvalidArgumentException in FileViewFinder.php line 140:
    View [bappeda.halaman] not found.”
    SOLUTION: SAME WITH ABOVE, Modify ‘halaman’ function in FrontController.php and replace ‘bappeda’ with ‘web’:
  6. Some links still shows error like for ‘pengumuman’ (http://localhost:8000/baca/pengumuman/pembagian-raport-semester-ganjil-tahun-ajaran-2010-2011) –> check the route and make sure the model is exist
    SOLUTION: There is no ‘pengumuman’ route, so add them (also for pengumuman index and detail) in /app/Http/routes.php like this:

    Then in FrontController.php, like above replace ‘bappeda’ with ‘web’ for ‘pengumumanlist’ and ‘pengumuman’ functions:

     
  7. For Galleri menu, do this:

     
  8. Some pages in the admin (http://localhost:8000/admin) still can’t be showed up properly (some weirds characters appeared!)

Laravel Blog

  1. Create a new laravel project:


  2. Download the ready made laravel blog app from https://github.com/jacurtis/laravel-blog-tutorial. It’s better to donwload in zip file then extract the content in /works/laravel/laravel-blog-tutorial/ directory. Overwrite the existing files and directories.
  3. Install the laravel component required:


  4. edit .env file and fill the database account (DB name is laravel_blog)
  5. Create authentication scaffolding (login, register, forgot password, etc)
  6. Use ‘migration’ to add some new tables into the new database

    It should be ready to test the website.
  7. Dont forget to set the file permission in /public/ directory if we want to upload an image into it
  8. Test the website: http://localhost:8000/

    If i found an error like:

    Just stop the server then generate the new key:

    It’d create a new key in .env like

    ref: http://laravel.io/forum/08-25-2016-no-supported-encrypter-found-the-cipher-and-or-key-length-are-invalid-when-i-run-keygenerate.
    Then start the server back. If everything is okay, here is the screen look like:blog-tutorialSometimes you got an error about the file permission writeable or not like this

    Then you need to set the file permission in /public/ directory to 777

    Explore the Laravel Blog!!! (Add/edit users, add/edit posts, categories, tags, comments, send contact, login, register)
    If you have enough time to learn the nitty-gritty about laravel and how to create this blog step by step, then please watch this 47 youtube videos in How to Build a Blog with Laravel.
  9. NOTES about this app:
    The route file DONT lay in /routes/web.app BUT in /app/Http/routes.php. It used Route::group.

    The route for the root website (/) is pointing to ‘PagesController.php’ in /app/Http/Controllers/

    The ‘Post’ data is retrieved with a help from ‘Post’ model in /app/Post.php. The data then would be rendered by welcome.blade.php in /resources/views/pages/

PHP Tools

Install some PHP tools:

  1. PHP Coding Standards Fixer (http://cs.sensiolabs.org/)
    Installation: (Globally (Composer))

    Then make sure you have ~/.composer/vendor/bin in your PATH and you’re good to go:

    To find out the location of php-cs-fixer

    I can use the location for the netbeans plugins needed.
    Another reference: https://mattstauffer.co/blog/using-php-cs-fixer-to-fix-up-your-php-code
  2. PHP CodeSniffer
    Ref: http://purencool.com/install-and-test-phpcodesniffer-on-ubuntu
    http://askubuntu.com/questions/572956/adding-a-standard-to-php-codesniffer
    Installation:

    To find out the location

    To verify PHP_CodeSniffer is already installed, check like this:

    Ref: https://wisdmlabs.com/blog/how-to-format-php-code-to-wordpress-coding-standards-in-netbeans/
    To use it in netbeans, click: Source > Inspect…
  3. PHP Mess Detector & PDepend
    Ref: https://phpmd.org/download/index.html
    http://stackoverflow.com/questions/27958289/what-is-phpmd-and-how-to-use-it
    Installation: (Same way with php cs fixer to use composer globally)

    To find out the location for PHPMD and PDepend:


  4. PHP Copy/Paste Detector (PHPCPD)
    Ref: https://github.com/sebastianbergmann/phpcpd
    NOTE: DONT INSTALL FROM PEAR!
    Installation: (Use composer globally)

    To find out the location:

    Please read this: Installation of PHP Code Review Tools
    For integrating all the above tools in Netbeans!

JQuery Promise Cascase To Array Reduce

I have a question about JQuery Promise problem. Actually I have a more difficult problem about the JQuery and Ajax that I need to loop a result from Ajax call then nest it to call another Ajax. But I dont know how to set a delay/timeout between the Ajax calls so I can avoid to put much burden on the server. I want to simplify the problem so I can comprehend the promise better. I have a working function to write some console outputs but the output has to be written after delaying for 2 seconds. Here is the code

And here is the output

The above code actually I borrowed from http://jsfiddle.net/1njL4w1t/. NOTE: Learn carefully also about the promise error handling Problems inherent to jQuery $.Deferred (jQuery 1.x/2.x).
Now I want to replicate the same behavior but I want to use array reduce here. I have tried many things to achieve that by searching through internet but can’t wrap them up in my brain. Then I asked the problem on stackoverflow. Here is my initial code

BUT it didn’t work like I want. Then I got the working solution from one of the stackoverflow user. Here is the answers (yeah I got two working answers)

And it’s work like I want. I made a test file (promise-timeout.php) and try it locally http://localhost/works/jquery/promise-timeout.php.

Now I want to make it more difficult by using ajax. I made two functions (‘getCarQueryMake’ and ‘getCarQueryModel’) to call the ajaxs like this:

Here is the url value

I created a new file ‘ajax-json.php’ to call the carquery API.

Finally after learning more from the previous sample how to setup the promise and the time out, I can manage how to setup the promise to ajax calls and the timeout to delay every ajax calls. Here is the code:

I made a local test file (promise-timeout2.php) and url: http://localhost/works/jquery/promise-timeout2.php. Here is the console output:

Here is the API url to get Car Models from Car Make: http://www.carqueryapi.com/api/0.3/?callback=1481095214&cmd=getModels&make=abarth
The API response look like:

Okay. Then I expand and add more nest to get Car Serie from Car Model. Also add a delay 5 second between the ajax call to get the Car Serie/Trim. I added a new function ‘getCarQuerySerie’. The function consist of some return function and the delay/timeout. Here is the code

I need to call this function like this

Modify ajax-json.php file to handle the ajax call

I made a test file (promise-timeout3.php) and the url: http://localhost/works/jquery/promise-timeout3.php. Here is the console output (Here I only use one Make. It’s ‘AC’ because the others Makes has many models and series. ‘AC’ only has 8 models):

Here is the API url to get Car Series/Trims from Car Models: http://www.carqueryapi.com/api/0.3/?callback=1481095214&cmd=getTrims&make=abarth&year=-1&model=1000&full_results=0
Then one of the Car Series/Trims output:

NEXT. I need to update the local database also from the APIs but I think it’d need more time to make the local database as complete as CarQuery database. Like I said previously, I dont want to burden the CarQuery server from the API requests! May be I need to increase the delay from 5 seconds to 10 seconds each API request??? Also need to add progress bar and how to handle/catch any error???

Elance API on WordPress Without WP Plugin

Elance has gone now and merged with Odesk to establish a new company Upwork. Once I successfully used Elance API on my wordpress website without using wordpress plugin. I know it’s a bad practice but it’s work anyway. Here is how to do it:

  1. Make sure you already registered on elance (https://elance.com) and have any elance key. If not go to https://developers.elance.com and get the keys (API Key, API secret, redirect URL, etc). Here is the keys:
    SORRY, ONLY ADMIN CAN SHOW THIS!
  2. I created a new wordpress template page with name ‘My Elance Jobs’ in a new file ‘my_elance_page.php’ in the active wordpress theme (currently the active theme is Sorbet). Based on some PHP example to use Elance API, Here is the complete content:

    Just read the code. Try to comprehend it by yourself :). I also need to add a new file ‘elance-auth-lib.php’ for the elance API PHP wrapper in the same directory. The class ‘ElanceAuthentication’ in the file would authenticate the access to the API.

     
  3. On the wordpress admin, create a new page (not post) with title ‘Elance’ then use template ‘My Elance Jobs’ then Save! It would create a new url: http://www.advchaweb.com/elance/. The url is must be same with our redirect url above!elance-api
  4. OK. Now we can use the API from our wordpress page.wp-elanceJust click the link ‘Elance’ or http://www.advchaweb.com/elance
  5. First, It’d redirect us to elance page and please log in!elance-loginSORRY, ONLY ADMIN CAN SHOW THIS!
  6. After successful login, I supposed to get the authorization page but because it is already closed, I got this page instead 🙁elance-closedSOMEHOW when I click the ‘Continue to Elance’ button, I still get the authorization page!!!
    SORRY, ONLY ADMIN CAN SHOW THIS!elance-authOK. Click ‘Allow’ button
  7. It would be redirected back to my wordpress page. Because there is no job anymore on elance, I got no data!elance-redirectSORRY, ONLY ADMIN CAN SHOW THIS!


WordPress Plugin to Connect to Upwork API

Ref: APIS, WORDPRESS TIPS AND TRICKS, USING OAUTH IN WORDPRESS PLUGINS, PART 1: THE BASICS
       How to write a WordPress plugin

  1. Make sure you already registered on Upwork (https://upwork.com) and have any Upwork key. If not go to https://developers.upwork.com and get the keys (API Key, API secret, redirect URL, etc). Apply for the API on https://www.upwork.com/services/api/apply
  2. Go into the plugin directory (/wp-content/plugins/) then create a new directory ‘upwork’. then in the new directory, create a new file ‘upwork.php’
  3. Here is our first content in upwork.php file

    From here, we can see the plugin ‘Upwork’ in the wordpress admin -> plugin Then please ‘Activate’ it.wp-plugin-upwork
  4. Create a class ‘WP_Upwork’ and instantiate it in upwork.php file
  5. Add the setting page
    To add the setting page, we need to add actions and callback in constructor of WP_Upwork class.

    First we set and register the Upwork setting (API Key and Secret) in WP_Upwork class:

    Then we add the menu ‘WP Upwork Setting’ in the Settings menu. Let’s add some code in WP_Upwork class:

    Okay. Here is the menuwp-plugin-upwork-menuAnd here is the ‘Upwork API Settings’ page (http://localhost/works/wordpress_local/wp-admin/options-general.php?page=wp_upwork)wp-plugin-upwork-admin-page
  6. Save the settings
    Fill the API Key and API Secret data above given by upwork then click ‘Save Changes’wp-plugin-upwork-settingsThe above values would be saved in the database at ‘wp_options’ table. You can see them in the table like this:wp-plugin-upwork-settings-dbHere is my Upwork API Settings:SORRY, ONLY ADMIN CAN SHOW THIS!
  7. Add Setting link next to activate/deactivate link in the plugin management list.
    In the WP_Upwork class constructor, add filter ‘plugin_action_links’ like this line:

    Then define the function ‘add_settings_link’ in the WP_Upwork class:

    Here is the result looks like:wp-plugin-upwork-settings-link
  8. Refactor our plugin structure a bit. Create a new directory ‘includes’ and add a new file in it ‘settings.php’. I want to move the settings in to the file to make the plugin structure better (Please learn WordPress plugin boilerplate and read How to Build a WordPress Plugin (part 1)).
    Here is the content of /includes/settings.php:

    And here is our main plugin file ‘upwork.php’ content:

    Somehow I can’t put the filter ‘plugin_action_links_’ . plugin_basename(__FILE__)’ in ‘WP_Upwork_Settings’ class! The setting link can’t be displayed in the plugin main list!
  9. Now I want to connect to Upwork API with My API key and API Secret provided by Upwork. When the connection is success, I would get the access token! I need to store the token to get more access from Upwork like searching the jobs and many more.
    NOTE: I MADE A WRONG THING HERE! WHAT I THOUGHT AS ACCESS TOKEN ACTUALLY IS A REQUEST TOKEN! AND FINALLY IT’S NOT WORKING FROM HERE #9 UNTIL #13
    Modify /includes/settings.php to show the token below the API Key and Secret (The token must be from Upwork so I dont have to type it manually). The screnario is every ‘Save’ button is pressed, beside the keys, the token would be updated as well. So in ‘WP_Upwork_Settings’ class constructor, add this:

    Then show the label for the access token in ‘admin_init’ and ‘settings_field_label’ function:

    Modify ‘plugin_settings_page’ function to add a new hidden value ‘wp_nonce_field’ and change the button title to ‘Save and Get Access Token’.

    The hidden value would be submitted and be caught to inspect the keys and get the access token in ‘get_access_token’ function.

    There is an important setting to pass the configuration beside ‘consumer key’ and ‘consumer secret’, it’s ‘authType’. I tried ‘OAuth1’ but it didn’t work. the work is ‘OAuthPHPLib’.
  10. Use composer to download the Upwork API for PHP (https://github.com/upwork/php-upwork). Create a new composer.json file in our main plugin directory. Here is the content:

    Now use terminal and download the API PHP library

    This would create a new directory ‘vendor’ in the main our plugin directory. The API would be there!
    Read how to use autoload and composer for developing wordpress plugin: Improving WordPress Development Workflow with Composer, Managing Your WordPress Site with Git and Composer Part 2 – Using Composer to Manage Themes and Plugins and How To Use Autoloading And A Plugin Container In WordPress Plugins.
  11. We need to add the autoload in upwork.php file so we can use the API library:

    With this only single line, we dont need to include/require the API library manually like this (/includes/settings.php at ‘admin_post’ function):
  12. Here is how it lookswp-plugin-upwork-tokenWhen the button is pressed,  if nothing wrong the access token and the access token secret would be revealed like this:SORRY, ONLY ADMIN CAN SHOW THIS!
  13. Now I want to store the tokens values in database so later we can get the values and use its for Upwork API functions.
    Modify ‘get_access_token’ function in /includes/settings.php file to get the tokens and save its. I use ‘update_option’ function to do its (https://codex.wordpress.org/Function_Reference/update_option)

    If everything right, here is how it would looks likewp-plugin-upwork-get-token2<OLD>
    You can also check the tokens values. Not only the value for access token (‘wp_upwork_access_token’) but also for access token secret’s value (‘wp_upwork_access_token_secret’). No reason to display the secret’s value here.
    </OLD>
    <NEW>
    Actually I GOT THE REQUEST TOKEN ABOVE NOT THE ACCESS TOKEN!! SO UPWORK GAVE REQUEST TOKEN FIRST THEN GIVE BACK THE ACCESS TOKEN IF SUCCESS!
    READ THIS FOR THE WORKFLOW: https://developers.upwork.com/?lang=php#authentication_oauth-10
    </NEW>
  14. I tried to get the access token (actually I just realized I got the request token not the access token)
    I MODIFY ‘get_access_token’ function

    LIKE I SAID ABOVE, IT DIDN’T WORK

    wp-plugin-upwork-authwp-plugin-upwork-auth-accesswp-plugin-upwork-auth-no-pagehttps://www.upwork.com/services/api/www.advchaweb.com/upwork?oauth_token=708638d60eee72f4c7c133a2617b15ef&oauth_verifier=b57428447a10ef831db125a1c9f6e648
    IT SHOULD BE LIKE:
    http://localhost/works/wordpress_local/wp-admin/options-general.php?page=wp_upwork&oauth_token=63c1ab57d81ef2a120dc122255f252fd&oauth_verifier=4601823dab3c049d2d71be0f76a48a7cUNTIL HERE, IT’S NOT WORKING AS EXPECTED. I NEED TO TRY THIS SAMPLE https://github.com/upwork/php-upwork/blob/master/example/web.php
    I MAKE THE SAMPLE LOCALLY: http://localhost/works/upwork_api/ AND IT’S WORKING FOR THE FIRST TIME (NOT WORKING AFTER THAT. MEANS NO DATA CAN I GET FROM UPWORK!!!)
    SORRY, ONLY ADMIN CAN SHOW THIS!
    After a few hours I tried again to call the Upwork API via http://localhost/works/upwork_api AND it’s working again. Actually to get the access token and call a function (like User), it takes four web call.
    SORRY, ONLY ADMIN CAN SHOW THIS!

  15. Because I failed to get the access token from ‘get_access_token’ function, I tried to use Custom Page Template (Please read Add Page Templates to WordPress with a Plugin) like I used to use it for Elance API. But it different here. I dont have to inject the php file in the active theme. I can use it from my plugin!
    Okay. I need to clean my code and remove the previous changes above (from #9 and #14) about the tokens field and the ‘get_access_token’ function.
    SORRY, ONLY ADMIN CAN SHOW THIS!
    SO I BACK TO THE PREVIOUS CODE WHERE THE WP_Upwork plugin in the admin page only to store API Key and API Secret!
    Back to our custom page template, create a new file ‘template.php’ in /includes/ directory. this file would consist of a class ‘WP_Upwork_Template’. This class would get the template file, show it on the page/post page dropdown template and render/view it.

    The template name is in a file ‘upwork-template.php’ in the same directory (/includes/). this file is the main page to connect to Upwork API (authenticate, authorize/get access token and call the Upwork API functions). This content looks like same with https://github.com/upwork/php-upwork/blob/master/example/web.php. Only API key and API secret I got from database. For a test only and to prove it can work as expected, here is the file content:

    The template name is ‘Upwork Template’
  16. Then create a new page ‘Upwork’ and select the template ‘Upwork Template’wp-plugin-upwork-templateOkay. One more thing. It’s better to change the permalink of our page url to http://localhost/works/wordpress_local/upwork/ instead of http://localhost/works/wordpress_local/?p=123. To do this, please go to Settings -> Permalinks -> Select ‘Post name’ Then Click ‘Save Changes’. It’d change the page url like above. BUT if you open the link and show 404 error, it means something wrong on your .htaccess or the permission or the apache2 setting. I tried many thing from

    or

    BUT NOTHING IS WORKING. IT’S FINALLY WORKING IS FROM http://askubuntu.com/questions/48362/how-to-enable-mod-rewrite-in-apache. I need to put ‘AllowOverride All’ in the default apache2 configuration file:

    Then add these lines:

    Then restart apache2 server.
    Okay. It’s working now. It can open http://localhost/works/wordpress_local/upwork correctly. ALSO DON’T FORGET TO CHANGE AND SAVE Callback URL IN UPWORK API PAGE (https://www.upwork.com/services/api/keys).
    SORRY, ONLY ADMIN CAN SHOW THIS!
  17. Modify ‘upwork-template.php’ so we can save the access token and no need to get new token each API call. I tried like this:

    THE RESULT CAN’T BE EXPECTED BECAUSE UPWORK SERVER IS NOT RELIABLE ENOUGH!!!!. THIS SUPPOSED TO WORK BUT I GOT THIS ERROR

    IT’S REALLY EMBARRASSING. I NEED TO WAIT A FEW HOURS TO TRY IT AGAIN!
    OKAY. IT’S WORKING NOW. I MODIFIED ‘upwork-template.php’ file like this:

    With this changes, I can store the access token in database when it haven’t it yet and use the tokens from repeat Upwork API call without having to get the new token. From https://developers.upwork.com/?lang=php#authentication_get-access-token, IT SAID “Once created, the Access token never expires.”.
    NOTE: the ‘config’ parameters is different when we already have the tokens. it no need the ‘request token’ anymore (see above code at if($access_token && $access_token_secret){) .
    NOTE: I also need to clear the sessions if there is any error related with the Upwork API occured. I think it’d be better to put a new button ‘Reset Access Token’ on the WP Upwork admin settings. The button would empty the tokens values in the database. This would give a chance to get the new token and fix the errors. The button would also be responsible to clear the sessions!
    This is a screenshots of the Upwork API to display job listing by some criteria. wp-plugin-upwork-jobsNOTE: SOMEHOW I CAN’T MANAGE HOW TO GET THE RESULT MORE THAN 10 DATA
    NEXT: HOW TO CATCH ANY ERROR FROM THE UPWORK API???
    CREATE a new button ‘Reset Access Token’ on the WP Upwork admin settings.
  18. SOME ERROR HAS HAPPENED. HERE THEY ARE AND THE SOLUTIONS:

    SOLUTIONS: Clear the sessions and empty the tokens values in the database then refresh the page again!
  19. Now, I already put the source code in my github repository: https://github.com/advcha/upwork.

Linkedin Oauth2 App

Ref: Authenticating with OAuth 2.0

  1. Create a linkedin app by opening https://www.linkedin.com/secure/developer?newapp= OR if you already have an app, open https://www.linkedin.com/secure/developer. Here I want to create a new app. Here is the screenlinkedin-appThen click ‘Create Application’
  2. Fill out the formlinkedin-create-app2Then click ‘Submit’
  3. Here is the app settinglinkedin-socialite-app2Check the permission needed and fill the redirect URL (DONT FORGET TO CLICK ‘ADD’). Then click ‘Update’. Here is the final settinglinkedin-socialite-app22SORRY, ONLY ADMIN CAN SHOW THIS!
    NOTE: SOMETIMES I HAVE TO INSERT THE REDIRECT URL REPEATEDLY BECAUSE SOMETIMES THE REDIRECT URL IS MISSING ALTHOUGH I JUST FILL IT!!! SO I HAVE TO CHECK IT AGAIN. On ‘socialite’ app (http://myprojects.advchaweb.com/index.php/2016/11/25/laravel-socialite/), I got this error when I tried it the first timesocialite-linkedin-errorAnd keep asking about ‘The redirect_uri does not match the registered value’. When I checked the linkedin app, the redirect url is missing! So i have to input it again!

Github App

ref: Register a new Social Login Application on Github

  1. Now go to your profile options at top right corner and select Settings from the menu or open your github profile setting https://github.com/settings/profile.github-app
  2. Then on ‘Developer settings’, click ‘OAuth applications’ or https://github.com/settings/developers. Then click ‘Register new application’ or https://github.com/settings/applications/new. Fill the form github-create-appThen click ‘Register application’
  3. Here is My appgithub-socialite-app2SORRY, ONLY ADMIN CAN SHOW THIS!