teddy@teddy-K43SJ:~/Documents/node/test-project$ npm install
npm WARN deprecated swig@1.4.2: This package is no longer maintained
npm WARN deprecated minimatch@2.0.10: Please update to minimatch 3.0.2 or higher to avoid a RegExp DoS issue
npm WARN deprecated minimatch@0.2.14: Please update to minimatch 3.0.2 or higher to avoid a RegExp DoS issue
npm WARN deprecated graceful-fs@1.2.3: graceful-fs v3.0.0 and before will fail on node releases >= v7.0. Please update to graceful-fs@^4.0.0 as soon as possible. Use 'npm ls graceful-fs' to find it in the tree.
npm WARN deprecated graceful-fs@2.0.3: graceful-fs v3.0.0 and before will fail on node releases >= v7.0. Please update to graceful-fs@^4.0.0 as soon as possible. Use 'npm ls graceful-fs' to find it in the tree.
npm WARN prefer global coffee-script@1.10.0 should be installed with -g
npm WARN prefer global node-gyp@3.5.0 should be installed with -g
> phantomjs-prebuilt@2.1.14 install /home/teddy/Documents/node/test-project/node_modules/phantomjs-prebuilt
> node install.js
PhantomJS not found on PATH
Download already available at /tmp/phantomjs/phantomjs-2.1.1-linux-x86_64.tar.bz2
Verified checksum of previously downloaded file
Extracting tar contents (via spawned process)
Removing /home/teddy/Documents/node/test-project/node_modules/phantomjs-prebuilt/lib/phantom
Copying extracted folder /tmp/phantomjs/phantomjs-2.1.1-linux-x86_64.tar.bz2-extract-1487232993569/phantomjs-2.1.1-linux-x86_64 -> /home/teddy/Documents/node/test-project/node_modules/phantomjs-prebuilt/lib/phantom
Writing location.js file
Done. Phantomjs binary available at /home/teddy/Documents/node/test-project/node_modules/phantomjs-prebuilt/lib/phantom/bin/phantomjs
> node-sass@4.5.0 install /home/teddy/Documents/node/test-project/node_modules/node-sass
> node scripts/install.js
Downloading binary from https://github.com/sass/node-sass/releases/download/v4.5.0/linux-x64-48_binding.node
Download complete ] - :
Binary saved to /home/teddy/Documents/node/test-project/node_modules/node-sass/vendor/linux-x64-48/binding.node
Caching binary to /home/teddy/.npm/node-sass/4.5.0/linux-x64-48_binding.node
> meanio@0.9.4 postinstall /home/teddy/Documents/node/test-project/node_modules/meanio
> cd ./lib/core_modules/server && npm install && cd ../../..
npm WARN deprecated mongodb@1.4.40: Please upgrade to 2.2.19 or higher
> bson@0.2.22 install /home/teddy/Documents/node/test-project/node_modules/meanio/lib/core_modules/server/node_modules/bson
> (node-gyp rebuild 2> builderror.log) || (exit 0)
make: Entering directory `/home/teddy/Documents/node/test-project/node_modules/meanio/lib/core_modules/server/node_modules/bson/build'
CXX(target) Release/obj.target/bson/ext/bson.o
make: Leaving directory `/home/teddy/Documents/node/test-project/node_modules/meanio/lib/core_modules/server/node_modules/bson/build'
> kerberos@0.0.11 install /home/teddy/Documents/node/test-project/node_modules/meanio/lib/core_modules/server/node_modules/kerberos
> (node-gyp rebuild 2> builderror.log) || (exit 0)
make: Entering directory `/home/teddy/Documents/node/test-project/node_modules/meanio/lib/core_modules/server/node_modules/kerberos/build'
CXX(target) Release/obj.target/kerberos/lib/kerberos.o
make: Leaving directory `/home/teddy/Documents/node/test-project/node_modules/meanio/lib/core_modules/server/node_modules/kerberos/build'
server@ /home/teddy/Documents/node/test-project/node_modules/meanio/lib/core_modules/server
├─┬ connect-mongo@0.4.2
│ └─┬ mongodb@1.4.40
│ ├─┬ bson@0.2.22
│ │ └── nan@1.8.4
│ ├── kerberos@0.0.11
│ └─┬ readable-stream@2.2.2
│ ├── buffer-shims@1.0.0
│ ├── core-util-is@1.0.2
│ ├── inherits@2.0.3
│ ├── isarray@1.0.0
│ ├── process-nextick-args@1.0.7
│ ├── string_decoder@0.10.31
│ └── util-deprecate@1.0.2
├─┬ cookie-parser@1.4.3
│ ├── cookie@0.3.1
│ └── cookie-signature@1.0.6
├─┬ express@4.14.1
│ ├─┬ accepts@1.3.3
│ │ ├─┬ mime-types@2.1.14
│ │ │ └── mime-db@1.26.0
│ │ └── negotiator@0.6.1
│ ├── array-flatten@1.1.1
│ ├── content-disposition@0.5.2
│ ├── content-type@1.0.2
│ ├─┬ debug@2.2.0
│ │ └── ms@0.7.1
│ ├── depd@1.1.0
│ ├── encodeurl@1.0.1
│ ├── escape-html@1.0.3
│ ├── etag@1.7.0
│ ├─┬ finalhandler@0.5.1
│ │ ├── statuses@1.3.1
│ │ └── unpipe@1.0.0
│ ├── fresh@0.3.0
│ ├── merge-descriptors@1.0.1
│ ├── methods@1.1.2
│ ├─┬ on-finished@2.3.0
│ │ └── ee-first@1.1.1
│ ├── parseurl@1.3.1
│ ├── path-to-regexp@0.1.7
│ ├─┬ proxy-addr@1.1.3
│ │ ├── forwarded@0.1.0
│ │ └── ipaddr.js@1.2.0
│ ├── qs@6.2.0
│ ├── range-parser@1.2.0
│ ├─┬ send@0.14.2
│ │ ├── destroy@1.0.4
│ │ ├─┬ http-errors@1.5.1
│ │ │ └── setprototypeof@1.0.2
│ │ ├── mime@1.3.4
│ │ └── ms@0.7.2
│ ├── serve-static@1.11.2
│ ├─┬ type-is@1.6.14
│ │ └── media-typer@0.3.0
│ ├── utils-merge@1.0.0
│ └── vary@1.1.0
├─┬ express-session@1.15.1
│ ├── crc@3.4.4
│ ├─┬ debug@2.6.1
│ │ └── ms@0.7.2
│ ├── on-headers@1.0.1
│ └─┬ uid-safe@2.1.3
│ ├── base64-url@1.3.3
│ └── random-bytes@1.0.0
├─┬ express-validator@2.21.0
│ ├── bluebird@3.4.7
│ ├── lodash@4.16.6
│ └── validator@5.7.0
├─┬ gridfs-stream@1.1.1
│ └── flushwritable@1.0.0
├─┬ method-override@1.0.2
│ └── methods@1.0.0
└─┬ passport@0.2.2
├── passport-strategy@1.0.0
└── pause@0.0.1
npm WARN server@ No description
npm WARN server@ No repository field.
npm WARN server@ No license field.
> node-sass@4.5.0 postinstall /home/teddy/Documents/node/test-project/node_modules/node-sass
> node scripts/build.js
Binary found at /home/teddy/Documents/node/test-project/node_modules/node-sass/vendor/linux-x64-48/binding.node
Testing binary
Binary is fine
> mean@0.9.1 postinstall /home/teddy/Documents/node/test-project
> node tools/scripts/postinstall.js
Auto installing package dependencies
mean@0.9.1 /home/teddy/Documents/node/test-project
├── UNMET PEER DEPENDENCY angular@1.6.2
├── UNMET PEER DEPENDENCY angular-animate@1.6.2
├── UNMET PEER DEPENDENCY angular-aria@1.6.2
├─┬ meanio@0.9.4
│ └─┬ express-jwt@5.1.0
│ └── jsonwebtoken@6.2.0
├─┬ meanio-admin@0.1.10
│ ├─┬ gridfs-stream@1.1.1
│ │ └── flushwritable@1.0.0
│ ├─┬ meanio-users@0.1.8
│ │ ├── angular-jwt@0.1.9
│ │ ├─┬ nodemailer@2.7.2
│ │ │ ├─┬ libmime@3.0.0
│ │ │ │ ├── libbase64@0.1.0
│ │ │ │ └── libqp@1.1.0
│ │ │ ├─┬ mailcomposer@4.0.1
│ │ │ │ └─┬ buildmail@4.0.1
│ │ │ │ └── addressparser@1.0.1
│ │ │ ├─┬ nodemailer-direct-transport@3.3.2
│ │ │ │ └─┬ smtp-connection@2.12.0
│ │ │ │ └─┬ httpntlm@1.6.1
│ │ │ │ ├── httpreq@0.4.22
│ │ │ │ └── underscore@1.7.0
│ │ │ ├─┬ nodemailer-shared@1.1.0
│ │ │ │ └── nodemailer-fetch@1.6.0
│ │ │ ├─┬ nodemailer-smtp-pool@2.8.2
│ │ │ │ └── nodemailer-wellknown@0.1.10
│ │ │ ├── nodemailer-smtp-transport@2.7.2
│ │ │ └─┬ socks@1.1.9
│ │ │ ├── ip@1.1.4
│ │ │ └── smart-buffer@1.1.15
│ │ ├─┬ passport-facebook@2.1.1
│ │ │ └─┬ passport-oauth2@1.4.0
│ │ │ ├── oauth@0.9.15
│ │ │ └── uid2@0.0.3
│ │ ├── passport-github@1.1.0
│ │ ├─┬ passport-google-oauth@1.0.0
│ │ │ ├── passport-google-oauth1@1.0.0
│ │ │ └── passport-google-oauth20@1.0.0
│ │ ├─┬ passport-linkedin@1.0.0
│ │ │ └── passport-oauth1@1.1.0
│ │ ├─┬ passport-local@1.0.0
│ │ │ └── passport-strategy@1.0.0
│ │ └─┬ passport-twitter@1.0.4
│ │ └── xtraverse@0.1.0
│ ├── ng-clip@0.2.6
│ └── zeroclipboard@2.3.0
└─┬ meanio-system@0.1.4
├── meanio-circles@0.1.7
└── serve-favicon@2.3.2
Dependencies installed for package meanStarter
> mean@0.9.1 prepublish /home/teddy/Documents/node/test-project
> npm run snyk-protect
> mean@0.9.1 snyk-protect /home/teddy/Documents/node/test-project
> snyk protect
Successfully applied Snyk patches
mean@0.9.1 /home/teddy/Documents/node/test-project
├── UNMET PEER DEPENDENCY angular@1.6.2
├── UNMET PEER DEPENDENCY angular-animate@1.6.2
├── UNMET PEER DEPENDENCY angular-aria@1.6.2
├── angular-bootstrap@0.12.2
├── angular-cookies@1.6.2
├── angular-jwt@0.1.9
├── angular-material@1.1.3
├── angular-mocks@1.6.2
├── angular-resource@1.6.2
├── angular-route@1.6.2
├── angular-sanitize@1.6.2
├── angular-ui-router@0.4.2
├── angular-ui-select@0.12.100
├─┬ babel-core@6.23.1
│ ├─┬ babel-code-frame@6.22.0
│ │ ├── esutils@2.0.2
│ │ └── js-tokens@3.0.1
│ ├─┬ babel-generator@6.23.0
│ │ ├─┬ detect-indent@4.0.0
│ │ │ └── repeating@2.0.1
│ │ ├── jsesc@1.3.0
│ │ └── trim-right@1.0.1
│ ├── babel-helpers@6.23.0
│ ├── babel-messages@6.23.0
│ ├─┬ babel-register@6.23.0
│ │ └── home-or-tmp@2.0.0
│ ├─┬ babel-runtime@6.23.0
│ │ └── regenerator-runtime@0.10.1
│ ├── babel-template@6.23.0
│ ├─┬ babel-traverse@6.23.1
│ │ ├── globals@9.15.0
│ │ └─┬ invariant@2.2.2
│ │ └── loose-envify@1.3.1
│ ├─┬ babel-types@6.23.0
│ │ └── to-fast-properties@1.0.2
│ ├── babylon@6.15.0
│ ├── convert-source-map@1.4.0
│ ├── json5@0.5.1
│ ├─┬ minimatch@3.0.3
│ │ └─┬ brace-expansion@1.1.6
│ │ ├── balanced-match@0.4.2
│ │ └── concat-map@0.0.1
│ ├── path-is-absolute@1.0.1
│ ├── private@0.1.7
│ ├── slash@1.0.0
│ └── source-map@0.5.6
├─┬ babel-loader@6.3.1
│ ├─┬ find-cache-dir@0.1.1
│ │ ├── commondir@1.0.1
│ │ └─┬ pkg-dir@1.0.0
│ │ └─┬ find-up@1.1.2
│ │ └── path-exists@2.1.0
│ ├─┬ loader-utils@0.2.16
│ │ ├── big.js@3.1.3
│ │ ├── emojis-list@2.1.0
│ │ └── json5@0.5.1
│ ├─┬ mkdirp@0.5.1
│ │ └── minimist@0.0.8
│ └── object-assign@4.1.1
├─┬ babel-preset-es2015@6.22.0
│ ├── babel-plugin-check-es2015-constants@6.22.0
│ ├── babel-plugin-transform-es2015-arrow-functions@6.22.0
│ ├── babel-plugin-transform-es2015-block-scoped-functions@6.22.0
│ ├── babel-plugin-transform-es2015-block-scoping@6.23.0
│ ├─┬ babel-plugin-transform-es2015-classes@6.23.0
│ │ ├── babel-helper-define-map@6.23.0
│ │ ├── babel-helper-function-name@6.23.0
│ │ ├── babel-helper-optimise-call-expression@6.23.0
│ │ └── babel-helper-replace-supers@6.23.0
│ ├── babel-plugin-transform-es2015-computed-properties@6.22.0
│ ├── babel-plugin-transform-es2015-destructuring@6.23.0
│ ├── babel-plugin-transform-es2015-duplicate-keys@6.22.0
│ ├── babel-plugin-transform-es2015-for-of@6.23.0
│ ├── babel-plugin-transform-es2015-function-name@6.22.0
│ ├── babel-plugin-transform-es2015-literals@6.22.0
│ ├── babel-plugin-transform-es2015-modules-amd@6.22.0
│ ├─┬ babel-plugin-transform-es2015-modules-commonjs@6.23.0
│ │ └── babel-plugin-transform-strict-mode@6.22.0
│ ├─┬ babel-plugin-transform-es2015-modules-systemjs@6.23.0
│ │ └── babel-helper-hoist-variables@6.22.0
│ ├── babel-plugin-transform-es2015-modules-umd@6.23.0
│ ├── babel-plugin-transform-es2015-object-super@6.22.0
│ ├─┬ babel-plugin-transform-es2015-parameters@6.23.0
│ │ ├── babel-helper-call-delegate@6.22.0
│ │ └── babel-helper-get-function-arity@6.22.0
│ ├── babel-plugin-transform-es2015-shorthand-properties@6.22.0
│ ├── babel-plugin-transform-es2015-spread@6.22.0
│ ├─┬ babel-plugin-transform-es2015-sticky-regex@6.22.0
│ │ └── babel-helper-regex@6.22.0
│ ├── babel-plugin-transform-es2015-template-literals@6.22.0
│ ├── babel-plugin-transform-es2015-typeof-symbol@6.23.0
│ ├─┬ babel-plugin-transform-es2015-unicode-regex@6.22.0
│ │ └─┬ regexpu-core@2.0.0
│ │ ├── regenerate@1.3.2
│ │ ├── regjsgen@0.2.0
│ │ └─┬ regjsparser@0.1.5
│ │ └── jsesc@0.5.0
│ └─┬ babel-plugin-transform-regenerator@6.22.0
│ └── regenerator-transform@0.9.8
├─┬ babel-preset-stage-1@6.22.0
│ ├─┬ babel-plugin-transform-class-constructor-call@6.22.0
│ │ └── babel-plugin-syntax-class-constructor-call@6.18.0
│ ├─┬ babel-plugin-transform-export-extensions@6.22.0
│ │ └── babel-plugin-syntax-export-extensions@6.13.0
│ └─┬ babel-preset-stage-2@6.22.0
│ ├── babel-plugin-syntax-dynamic-import@6.18.0
│ ├─┬ babel-plugin-transform-class-properties@6.23.0
│ │ └── babel-plugin-syntax-class-properties@6.13.0
│ ├─┬ babel-plugin-transform-decorators@6.22.0
│ │ ├─┬ babel-helper-explode-class@6.22.0
│ │ │ └── babel-helper-bindify-decorators@6.22.0
│ │ └── babel-plugin-syntax-decorators@6.13.0
│ └─┬ babel-preset-stage-3@6.22.0
│ ├── babel-plugin-syntax-trailing-function-commas@6.22.0
│ ├─┬ babel-plugin-transform-async-generator-functions@6.22.0
│ │ ├── babel-helper-remap-async-to-generator@6.22.0
│ │ └── babel-plugin-syntax-async-generators@6.13.0
│ ├─┬ babel-plugin-transform-async-to-generator@6.22.0
│ │ └── babel-plugin-syntax-async-functions@6.13.0
│ ├─┬ babel-plugin-transform-exponentiation-operator@6.22.0
│ │ ├─┬ babel-helper-builder-binary-assignment-operator-visitor@6.22.0
│ │ │ └── babel-helper-explode-assignable-expression@6.22.0
│ │ └── babel-plugin-syntax-exponentiation-operator@6.13.0
│ └─┬ babel-plugin-transform-object-rest-spread@6.23.0
│ └── babel-plugin-syntax-object-rest-spread@6.13.0
├─┬ body-parser@1.16.1
│ ├── bytes@2.4.0
│ ├── content-type@1.0.2
│ ├── depd@1.1.0
│ ├─┬ http-errors@1.5.1
│ │ ├── inherits@2.0.3
│ │ ├── setprototypeof@1.0.2
│ │ └── statuses@1.3.1
│ ├── iconv-lite@0.4.15
│ ├─┬ on-finished@2.3.0
│ │ └── ee-first@1.1.1
│ ├── qs@6.2.1
│ ├─┬ raw-body@2.2.0
│ │ └── unpipe@1.0.0
│ └─┬ type-is@1.6.14
│ └── media-typer@0.3.0
├── bootstrap@3.3.7
├─┬ compression@1.6.2
│ ├─┬ accepts@1.3.3
│ │ └── negotiator@0.6.1
│ ├── bytes@2.3.0
│ ├─┬ compressible@2.0.9
│ │ └── mime-db@1.26.0
│ ├─┬ debug@2.2.0
│ │ └── ms@0.7.1
│ ├── on-headers@1.0.1
│ └── vary@1.1.0
├── connect-flash@0.1.1
├─┬ connect-modrewrite@0.9.0
│ └── qs@1.2.2
├─┬ consolidate@0.14.5
│ └── bluebird@3.4.7
├─┬ cross-env@3.1.4
│ └─┬ cross-spawn@3.0.1
│ └─┬ lru-cache@4.0.2
│ ├── pseudomap@1.0.2
│ └── yallist@2.0.0
├─┬ css-loader@0.26.1
│ ├─┬ css-selector-tokenizer@0.7.0
│ │ ├── cssesc@0.1.0
│ │ ├── fastparse@1.1.1
│ │ └── regexpu-core@1.0.0
│ ├─┬ cssnano@3.10.0
│ │ ├─┬ autoprefixer@6.7.3
│ │ │ ├─┬ browserslist@1.7.3
│ │ │ │ └── electron-to-chromium@1.2.2
│ │ │ ├── caniuse-db@1.0.30000623
│ │ │ ├── normalize-range@0.1.2
│ │ │ └── num2fraction@1.2.2
│ │ ├── decamelize@1.2.0
│ │ ├── defined@1.0.0
│ │ ├─┬ has@1.0.1
│ │ │ └── function-bind@1.1.0
│ │ ├─┬ postcss-calc@5.3.1
│ │ │ ├── postcss-message-helpers@2.0.0
│ │ │ └─┬ reduce-css-calc@1.3.0
│ │ │ ├── math-expression-evaluator@1.2.16
│ │ │ └── reduce-function-call@1.0.2
│ │ ├─┬ postcss-colormin@2.2.2
│ │ │ └─┬ colormin@1.1.2
│ │ │ ├─┬ color@0.11.4
│ │ │ │ ├─┬ color-convert@1.9.0
│ │ │ │ │ └── color-name@1.1.1
│ │ │ │ └── color-string@0.3.0
│ │ │ └── css-color-names@0.0.4
│ │ ├── postcss-convert-values@2.6.1
│ │ ├── postcss-discard-comments@2.0.4
│ │ ├── postcss-discard-duplicates@2.0.2
│ │ ├── postcss-discard-empty@2.1.0
│ │ ├── postcss-discard-overridden@0.1.1
│ │ ├─┬ postcss-discard-unused@2.2.3
│ │ │ └── uniqs@2.0.0
│ │ ├─┬ postcss-filter-plugins@2.0.2
│ │ │ └─┬ uniqid@4.1.1
│ │ │ └── macaddress@0.2.8
│ │ ├── postcss-merge-idents@2.1.7
│ │ ├── postcss-merge-longhand@2.0.2
│ │ ├─┬ postcss-merge-rules@2.1.1
│ │ │ ├─┬ caniuse-api@1.5.3
│ │ │ │ ├── lodash.memoize@4.1.2
│ │ │ │ └── lodash.uniq@4.5.0
│ │ │ ├─┬ postcss-selector-parser@2.2.2
│ │ │ │ ├── flatten@1.0.2
│ │ │ │ ├── indexes-of@1.0.1
│ │ │ │ └── uniq@1.0.1
│ │ │ └── vendors@1.0.1
│ │ ├── postcss-minify-font-values@1.0.5
│ │ ├── postcss-minify-gradients@1.0.5
│ │ ├─┬ postcss-minify-params@1.2.2
│ │ │ └── alphanum-sort@1.0.2
│ │ ├── postcss-minify-selectors@2.1.1
│ │ ├── postcss-normalize-charset@1.1.1
│ │ ├─┬ postcss-normalize-url@3.0.8
│ │ │ ├── is-absolute-url@2.1.0
│ │ │ └─┬ normalize-url@1.9.0
│ │ │ ├── prepend-http@1.0.4
│ │ │ ├─┬ query-string@4.3.2
│ │ │ │ └── strict-uri-encode@1.1.0
│ │ │ └─┬ sort-keys@1.1.2
│ │ │ └── is-plain-obj@1.1.0
│ │ ├── postcss-ordered-values@2.2.3
│ │ ├── postcss-reduce-idents@2.4.0
│ │ ├── postcss-reduce-initial@1.0.1
│ │ ├── postcss-reduce-transforms@1.0.4
│ │ ├─┬ postcss-svgo@2.1.6
│ │ │ ├─┬ is-svg@2.1.0
│ │ │ │ └── html-comment-regex@1.1.1
│ │ │ └─┬ svgo@0.7.2
│ │ │ ├── coa@1.0.1
│ │ │ ├─┬ csso@2.3.1
│ │ │ │ └── clap@1.1.2
│ │ │ ├── js-yaml@3.7.0
│ │ │ └── whet.extend@0.9.9
│ │ ├── postcss-unique-selectors@2.0.2
│ │ ├── postcss-value-parser@3.3.0
│ │ └── postcss-zindex@2.2.0
│ ├── lodash.camelcase@4.3.0
│ ├─┬ postcss@5.2.13
│ │ ├── js-base64@2.1.9
│ │ └── supports-color@3.2.3
│ ├── postcss-modules-extract-imports@1.0.1
│ ├─┬ postcss-modules-local-by-default@1.1.1
│ │ └─┬ css-selector-tokenizer@0.6.0
│ │ └── regexpu-core@1.0.0
│ ├─┬ postcss-modules-scope@1.0.2
│ │ └─┬ css-selector-tokenizer@0.6.0
│ │ └── regexpu-core@1.0.0
│ ├─┬ postcss-modules-values@1.2.2
│ │ └── icss-replace-symbols@1.0.2
│ └── source-list-map@0.1.8
├─┬ debug@2.6.1
│ └── ms@0.7.2
├─┬ del@2.2.2
│ ├─┬ globby@5.0.0
│ │ ├── array-union@1.0.2
│ │ └── arrify@1.0.1
│ ├── is-path-cwd@1.0.0
│ ├─┬ is-path-in-cwd@1.0.0
│ │ └─┬ is-path-inside@1.0.0
│ │ └── path-is-inside@1.0.2
│ ├── pify@2.3.0
│ ├─┬ pinkie-promise@2.0.1
│ │ └── pinkie@2.0.4
│ └── rimraf@2.2.8
├── expect.js@0.3.1
├─┬ express@4.14.1
│ ├── array-flatten@1.1.1
│ ├── content-disposition@0.5.2
│ ├── cookie@0.3.1
│ ├── cookie-signature@1.0.6
│ ├─┬ debug@2.2.0
│ │ └── ms@0.7.1
│ ├── encodeurl@1.0.1
│ ├── escape-html@1.0.3
│ ├── etag@1.7.0
│ ├─┬ finalhandler@0.5.1
│ │ └─┬ debug@2.2.0
│ │ └── ms@0.7.1
│ ├── fresh@0.3.0
│ ├── merge-descriptors@1.0.1
│ ├── methods@1.1.2
│ ├── parseurl@1.3.1
│ ├── path-to-regexp@0.1.7
│ ├─┬ proxy-addr@1.1.3
│ │ ├── forwarded@0.1.0
│ │ └── ipaddr.js@1.2.0
│ ├── qs@6.2.0
│ ├── range-parser@1.2.0
│ ├─┬ send@0.14.2
│ │ ├─┬ debug@2.2.0
│ │ │ └── ms@0.7.1
│ │ └── destroy@1.0.4
│ ├── serve-static@1.11.2
│ └── utils-merge@1.0.0
├── file-loader@0.10.0
├─┬ gulp@3.9.1
│ ├── archy@1.0.0
│ ├─┬ chalk@1.1.3
│ │ ├── ansi-styles@2.2.1
│ │ ├── has-ansi@2.0.0
│ │ └── supports-color@2.0.0
│ ├── deprecated@0.0.1
│ ├── interpret@1.0.1
│ ├─┬ liftoff@2.3.0
│ │ ├── findup-sync@0.4.3
│ │ ├─┬ fined@1.0.2
│ │ │ ├── expand-tilde@1.2.2
│ │ │ ├── lodash.assignwith@4.2.0
│ │ │ ├── lodash.isempty@4.4.0
│ │ │ ├── lodash.pick@4.4.0
│ │ │ └─┬ parse-filepath@1.0.1
│ │ │ ├─┬ is-absolute@0.2.6
│ │ │ │ └─┬ is-relative@0.2.1
│ │ │ │ └─┬ is-unc-path@0.1.2
│ │ │ │ └── unc-path-regex@0.1.2
│ │ │ ├── map-cache@0.2.2
│ │ │ └─┬ path-root@0.1.1
│ │ │ └── path-root-regex@0.1.2
│ │ ├── flagged-respawn@0.3.2
│ │ ├── lodash.isplainobject@4.0.6
│ │ ├── lodash.isstring@4.0.1
│ │ └── lodash.mapvalues@4.6.0
│ ├── minimist@1.2.0
│ ├─┬ orchestrator@0.3.8
│ │ ├─┬ end-of-stream@0.1.5
│ │ │ └── once@1.3.3
│ │ ├── sequencify@0.0.7
│ │ └── stream-consume@0.1.0
│ ├── pretty-hrtime@1.0.3
│ ├── semver@4.3.6
│ ├─┬ tildify@1.2.0
│ │ └── os-homedir@1.0.2
│ ├─┬ v8flags@2.0.11
│ │ └── user-home@1.1.1
│ └─┬ vinyl-fs@0.3.14
│ ├── defaults@1.0.3
│ ├─┬ glob-stream@3.1.18
│ │ ├── glob@4.5.3
│ │ ├─┬ glob2base@0.0.12
│ │ │ └── find-index@0.1.1
│ │ ├── minimatch@2.0.10
│ │ ├── ordered-read-streams@0.1.0
│ │ ├─┬ through2@0.6.5
│ │ │ └─┬ readable-stream@1.0.34
│ │ │ └── isarray@0.0.1
│ │ └── unique-stream@1.0.0
│ ├─┬ glob-watcher@0.0.6
│ │ └─┬ gaze@0.5.2
│ │ └─┬ globule@0.1.0
│ │ ├─┬ glob@3.1.21
│ │ │ ├── graceful-fs@1.2.3
│ │ │ └── inherits@1.0.2
│ │ ├── lodash@1.0.2
│ │ └─┬ minimatch@0.2.14
│ │ ├── lru-cache@2.7.3
│ │ └── sigmund@1.0.1
│ ├─┬ graceful-fs@3.0.11
│ │ └── natives@1.1.0
│ ├─┬ strip-bom@1.0.0
│ │ ├── first-chunk-stream@1.0.0
│ │ └── is-utf8@0.2.1
│ ├─┬ through2@0.6.5
│ │ └─┬ readable-stream@1.0.34
│ │ └── isarray@0.0.1
│ └─┬ vinyl@0.4.6
│ └── clone@0.2.0
├─┬ gulp-concat@2.6.1
│ ├── concat-with-sourcemaps@1.0.4
│ ├─┬ through2@2.0.3
│ │ └─┬ readable-stream@2.1.5
│ │ ├── buffer-shims@1.0.0
│ │ ├── isarray@1.0.0
│ │ └── util-deprecate@1.0.2
│ └─┬ vinyl@2.0.1
│ ├── clone@1.0.2
│ ├── clone-buffer@1.0.0
│ ├── clone-stats@1.0.0
│ ├─┬ cloneable-readable@1.0.0
│ │ └── process-nextick-args@1.0.7
│ ├── is-stream@1.1.0
│ ├── remove-trailing-separator@1.0.1
│ └── replace-ext@1.0.0
├─┬ gulp-csslint@1.0.0
│ ├─┬ csslint@1.0.5
│ │ ├── clone@2.1.0
│ │ └── parserlib@1.1.1
│ └─┬ rcloader@0.2.2
│ ├── lodash.isobject@3.0.2
│ ├── lodash.merge@4.6.0
│ └── rcfinder@0.1.9
├─┬ gulp-cssmin@0.1.7
│ ├─┬ clean-css@3.4.24
│ │ ├── commander@2.8.1
│ │ └── source-map@0.4.4
│ ├── filesize@2.0.4
│ ├── graceful-fs@2.0.3
│ ├── gulp-rename@1.1.0
│ ├─┬ gulp-util@2.2.20
│ │ ├─┬ chalk@0.5.1
│ │ │ ├── ansi-styles@1.1.0
│ │ │ ├─┬ has-ansi@0.1.0
│ │ │ │ └── ansi-regex@0.2.1
│ │ │ ├── strip-ansi@0.3.0
│ │ │ └── supports-color@0.2.0
│ │ ├── lodash._reinterpolate@2.4.1
│ │ ├─┬ lodash.template@2.4.1
│ │ │ ├── lodash._escapestringchar@2.4.1
│ │ │ ├─┬ lodash.defaults@2.4.1
│ │ │ │ └── lodash._objecttypes@2.4.1
│ │ │ ├─┬ lodash.escape@2.4.1
│ │ │ │ ├─┬ lodash._escapehtmlchar@2.4.1
│ │ │ │ │ └── lodash._htmlescapes@2.4.1
│ │ │ │ └─┬ lodash._reunescapedhtml@2.4.1
│ │ │ │ └─┬ lodash.keys@2.4.1
│ │ │ │ └── lodash.isobject@2.4.1
│ │ │ ├─┬ lodash.keys@2.4.1
│ │ │ │ ├── lodash._isnative@2.4.1
│ │ │ │ ├── lodash._shimkeys@2.4.1
│ │ │ │ └── lodash.isobject@2.4.1
│ │ │ ├── lodash.templatesettings@2.4.1
│ │ │ └─┬ lodash.values@2.4.1
│ │ │ └─┬ lodash.keys@2.4.1
│ │ │ └── lodash.isobject@2.4.1
│ │ ├── minimist@0.2.0
│ │ ├─┬ through2@0.5.1
│ │ │ ├─┬ readable-stream@1.0.34
│ │ │ │ └── isarray@0.0.1
│ │ │ └── xtend@3.0.0
│ │ └── vinyl@0.2.3
│ ├── map-stream@0.0.4
│ └─┬ temp-write@0.1.1
│ ├── graceful-fs@2.0.3
│ └─┬ tempfile@0.1.3
│ └── uuid@1.4.2
├── gulp-jshint@2.0.4
├─┬ gulp-livereload@3.8.1
│ ├─┬ chalk@0.5.1
│ │ ├── ansi-styles@1.1.0
│ │ ├─┬ has-ansi@0.1.0
│ │ │ └── ansi-regex@0.2.1
│ │ ├── strip-ansi@0.3.0
│ │ └── supports-color@0.2.0
│ ├─┬ event-stream@3.3.4
│ │ ├── duplexer@0.1.1
│ │ ├── from@0.1.3
│ │ ├── map-stream@0.1.0
│ │ ├── pause-stream@0.0.11
│ │ ├── split@0.3.3
│ │ └── stream-combiner@0.0.4
│ ├─┬ lodash.assign@3.2.0
│ │ ├── lodash._baseassign@3.2.0
│ │ ├─┬ lodash._createassigner@3.1.1
│ │ │ └── lodash._bindcallback@3.0.1
│ │ └─┬ lodash.keys@3.1.2
│ │ ├── lodash._getnative@3.9.1
│ │ ├── lodash.isarguments@3.1.0
│ │ └── lodash.isarray@3.0.4
│ └─┬ mini-lr@0.1.9
│ ├─┬ body-parser@1.14.2
│ │ ├── bytes@2.2.0
│ │ ├─┬ debug@2.2.0
│ │ │ └── ms@0.7.1
│ │ ├── http-errors@1.3.1
│ │ ├── iconv-lite@0.4.13
│ │ ├── qs@5.2.0
│ │ └─┬ raw-body@2.1.7
│ │ └── bytes@2.4.0
│ ├─┬ faye-websocket@0.7.3
│ │ └─┬ websocket-driver@0.6.5
│ │ └── websocket-extensions@0.1.1
│ ├── livereload-js@2.2.2
│ └── qs@2.2.5
├─┬ gulp-load-plugins@1.5.0
│ ├── array-unique@0.2.1
│ ├─┬ fancy-log@1.3.0
│ │ └── time-stamp@1.0.1
│ ├─┬ findup-sync@0.4.3
│ │ ├─┬ detect-file@0.1.0
│ │ │ └── fs-exists-sync@0.1.0
│ │ ├── is-glob@2.0.1
│ │ └─┬ resolve-dir@0.1.1
│ │ └─┬ global-modules@0.2.3
│ │ ├─┬ global-prefix@0.1.5
│ │ │ └─┬ homedir-polyfill@1.0.1
│ │ │ └── parse-passwd@1.0.0
│ │ └── is-windows@0.2.0
│ ├─┬ gulplog@1.0.0
│ │ └── glogg@1.0.0
│ ├─┬ has-gulplog@0.1.0
│ │ └── sparkles@1.0.0
│ ├─┬ micromatch@2.3.11
│ │ ├─┬ arr-diff@2.0.0
│ │ │ └── arr-flatten@1.0.1
│ │ ├─┬ braces@1.8.5
│ │ │ ├─┬ expand-range@1.8.2
│ │ │ │ └─┬ fill-range@2.2.3
│ │ │ │ ├── is-number@2.1.0
│ │ │ │ ├── isobject@2.1.0
│ │ │ │ ├── randomatic@1.1.6
│ │ │ │ └── repeat-string@1.6.1
│ │ │ ├── preserve@0.2.0
│ │ │ └── repeat-element@1.1.2
│ │ ├─┬ expand-brackets@0.1.5
│ │ │ └── is-posix-bracket@0.1.1
│ │ ├── extglob@0.3.2
│ │ ├── filename-regex@2.0.0
│ │ ├── is-extglob@1.0.0
│ │ ├── kind-of@3.1.0
│ │ ├── normalize-path@2.0.1
│ │ ├─┬ object.omit@2.0.1
│ │ │ ├─┬ for-own@0.1.4
│ │ │ │ └── for-in@0.1.6
│ │ │ └── is-extendable@0.1.1
│ │ ├─┬ parse-glob@3.0.4
│ │ │ ├── glob-base@0.3.0
│ │ │ └── is-dotfile@1.0.2
│ │ └─┬ regex-cache@0.4.3
│ │ ├── is-equal-shallow@0.1.3
│ │ └── is-primitive@2.0.0
│ └── resolve@1.1.7
├─┬ gulp-mocha@3.0.1
│ ├─┬ plur@2.1.2
│ │ └── irregular-plurals@1.2.0
│ ├─┬ req-cwd@1.0.1
│ │ └─┬ req-from@1.0.1
│ │ └── resolve-from@2.0.0
│ └─┬ temp@0.8.3
│ └── os-tmpdir@1.0.2
├─┬ gulp-nodemon@2.2.1
│ ├── colors@1.1.2
│ └─┬ nodemon@1.11.0
│ ├── ignore-by-default@1.0.1
│ ├─┬ lodash.defaults@3.1.2
│ │ └── lodash.assign@3.2.0
│ ├── ps-tree@1.1.0
│ └─┬ touch@1.0.0
│ └── nopt@1.0.10
├── gulp-plumber@1.1.0
├─┬ gulp-uglify@2.0.1
│ ├─┬ make-error-cause@1.2.2
│ │ └── make-error@1.2.1
│ ├─┬ uglify-js@2.7.5
│ │ ├── async@0.2.10
│ │ ├── uglify-to-browserify@1.0.2
│ │ └─┬ yargs@3.10.0
│ │ ├── camelcase@1.2.1
│ │ ├─┬ cliui@2.1.0
│ │ │ ├─┬ center-align@0.1.3
│ │ │ │ ├─┬ align-text@0.1.4
│ │ │ │ │ └── longest@1.0.1
│ │ │ │ └── lazy-cache@1.0.4
│ │ │ └── right-align@0.1.3
│ │ └── window-size@0.1.0
│ ├── uglify-save-license@0.4.1
│ └── vinyl-sourcemaps-apply@0.2.1
├─┬ gulp-util@3.0.8
│ ├── array-differ@1.0.0
│ ├── array-uniq@1.0.3
│ ├── beeper@1.1.1
│ ├── dateformat@2.0.0
│ ├── lodash._reescape@3.0.0
│ ├── lodash._reevaluate@3.0.0
│ ├── lodash._reinterpolate@3.0.0
│ ├─┬ lodash.template@3.6.2
│ │ ├── lodash._basecopy@3.0.1
│ │ ├── lodash._basetostring@3.0.1
│ │ ├── lodash._basevalues@3.0.0
│ │ ├── lodash._isiterateecall@3.0.9
│ │ ├─┬ lodash.escape@3.2.0
│ │ │ └── lodash._root@3.0.1
│ │ ├── lodash.restparam@3.6.1
│ │ └── lodash.templatesettings@3.1.1
│ ├─┬ multipipe@0.1.2
│ │ └─┬ duplexer2@0.0.2
│ │ └─┬ readable-stream@1.1.14
│ │ └── isarray@0.0.1
│ ├── object-assign@3.0.0
│ ├── replace-ext@0.0.1
│ └─┬ vinyl@0.5.3
│ └── clone-stats@0.0.1
├─┬ helmet@2.3.0
│ ├─┬ connect@3.4.1
│ │ ├─┬ debug@2.2.0
│ │ │ └── ms@0.7.1
│ │ └── finalhandler@0.4.1
│ ├── dns-prefetch-control@0.1.0
│ ├── dont-sniff-mimetype@1.0.0
│ ├── frameguard@2.0.0
│ ├─┬ helmet-csp@1.2.2
│ │ ├── camelize@1.0.0
│ │ ├─┬ content-security-policy-builder@1.0.0
│ │ │ └── dashify@0.2.2
│ │ ├── lodash.reduce@4.5.0
│ │ └── platform@1.3.1
│ ├── hide-powered-by@1.0.0
│ ├── hpkp@1.2.0
│ ├─┬ hsts@1.0.0
│ │ └── core-util-is@1.0.2
│ ├── ienoopen@1.0.0
│ ├── nocache@1.0.1
│ ├── referrer-policy@1.0.0
│ └── x-xss-protection@1.0.0
├─┬ jasmine@2.5.3 invalid
│ ├── exit@0.1.2
│ ├─┬ glob@7.1.1
│ │ ├── fs.realpath@1.0.0
│ │ ├─┬ inflight@1.0.6
│ │ │ └── wrappy@1.0.2
│ │ └── once@1.4.0
│ └── jasmine-core@2.5.2
├─┬ jasmine-reporters@2.2.0
│ └── xmldom@0.1.27
├── jquery@3.1.1
├─┬ jshint@2.9.4
│ ├── cli@1.0.1
│ ├─┬ console-browserify@1.1.0
│ │ └── date-now@0.1.4
│ ├─┬ htmlparser2@3.8.3
│ │ ├── domelementtype@1.3.0
│ │ ├── domhandler@2.3.0
│ │ ├─┬ domutils@1.5.1
│ │ │ └─┬ dom-serializer@0.1.0
│ │ │ ├── domelementtype@1.1.3
│ │ │ └── entities@1.1.1
│ │ ├── entities@1.0.0
│ │ └─┬ readable-stream@1.1.14
│ │ └── isarray@0.0.1
│ ├── lodash@3.7.0
│ ├── shelljs@0.3.0
│ └── strip-json-comments@1.0.4
├─┬ jshint-stylish@2.2.1
│ ├── log-symbols@1.0.2
│ ├── string-length@1.0.1
│ └── text-table@0.2.0
├─┬ jsonwebtoken@7.3.0
│ ├─┬ joi@6.10.1
│ │ ├── hoek@2.16.3
│ │ ├── isemail@1.2.0
│ │ ├── moment@2.17.1
│ │ └── topo@1.1.0
│ ├─┬ jws@3.1.4
│ │ ├── base64url@2.0.0
│ │ └─┬ jwa@1.1.5
│ │ ├── buffer-equal-constant-time@1.0.1
│ │ └── ecdsa-sig-formatter@1.0.9
│ ├── lodash.once@4.1.1
│ └── xtend@4.0.1
├─┬ karma@1.4.1
│ ├─┬ chokidar@1.6.1
│ │ ├── anymatch@1.3.0
│ │ ├── async-each@1.0.1
│ │ ├── glob-parent@2.0.0
│ │ ├─┬ is-binary-path@1.0.1
│ │ │ └── binary-extensions@1.8.0
│ │ └─┬ readdirp@2.1.0
│ │ └── set-immediate-shim@1.0.1
│ ├── combine-lists@1.0.1
│ ├── core-js@2.4.1
│ ├── di@0.0.1
│ ├─┬ dom-serialize@2.2.1
│ │ ├── custom-event@1.0.1
│ │ ├── ent@2.2.0
│ │ └── void-elements@2.0.1
│ ├─┬ expand-braces@0.1.2
│ │ ├── array-slice@0.2.3
│ │ └─┬ braces@0.1.5
│ │ └─┬ expand-range@0.1.1
│ │ ├── is-number@0.1.1
│ │ └── repeat-string@0.2.2
│ ├── graceful-fs@4.1.11
│ ├─┬ http-proxy@1.16.2
│ │ ├── eventemitter3@1.2.0
│ │ └── requires-port@1.0.0
│ ├── isbinaryfile@3.0.2
│ ├── lodash@3.10.1
│ ├─┬ log4js@0.6.38
│ │ ├─┬ readable-stream@1.0.34
│ │ │ └── isarray@0.0.1
│ │ └── semver@4.3.6
│ ├── mime@1.3.4
│ ├─┬ optimist@0.6.1
│ │ ├── minimist@0.0.10
│ │ └── wordwrap@0.0.2
│ ├── qjobs@1.1.5
│ ├── rimraf@2.5.4
│ ├── safe-buffer@5.0.1
│ ├─┬ socket.io@1.7.2
│ │ ├── debug@2.3.3
│ │ ├─┬ engine.io@1.8.2
│ │ │ ├── base64id@1.0.0
│ │ │ ├── debug@2.3.3
│ │ │ ├─┬ engine.io-parser@1.3.2
│ │ │ │ ├── after@0.8.2
│ │ │ │ ├── arraybuffer.slice@0.0.6
│ │ │ │ ├── base64-arraybuffer@0.1.5
│ │ │ │ ├── blob@0.0.4
│ │ │ │ └── wtf-8@1.0.0
│ │ │ └─┬ ws@1.1.1
│ │ │ ├── options@0.0.6
│ │ │ └── ultron@1.0.2
│ │ ├─┬ has-binary@0.1.7
│ │ │ └── isarray@0.0.1
│ │ ├── object-assign@4.1.0
│ │ ├─┬ socket.io-adapter@0.5.0
│ │ │ └── debug@2.3.3
│ │ ├─┬ socket.io-client@1.7.2
│ │ │ ├── backo2@1.0.2
│ │ │ ├── component-bind@1.0.0
│ │ │ ├── component-emitter@1.2.1
│ │ │ ├── debug@2.3.3
│ │ │ ├─┬ engine.io-client@1.8.2
│ │ │ │ ├── component-emitter@1.2.1
│ │ │ │ ├── component-inherit@0.0.3
│ │ │ │ ├── debug@2.3.3
│ │ │ │ ├── has-cors@1.1.0
│ │ │ │ ├── parsejson@0.0.3
│ │ │ │ ├── parseqs@0.0.5
│ │ │ │ ├── ws@1.1.1
│ │ │ │ ├── xmlhttprequest-ssl@1.5.3
│ │ │ │ └── yeast@0.1.2
│ │ │ ├── indexof@0.0.1
│ │ │ ├── object-component@0.0.3
│ │ │ ├─┬ parseuri@0.0.5
│ │ │ │ └─┬ better-assert@1.0.2
│ │ │ │ └── callsite@1.0.0
│ │ │ └── to-array@0.1.4
│ │ └─┬ socket.io-parser@2.3.1
│ │ ├── component-emitter@1.1.2
│ │ ├─┬ debug@2.2.0
│ │ │ └── ms@0.7.1
│ │ └── isarray@0.0.1
│ ├── tmp@0.0.28
│ └─┬ useragent@2.1.12
│ ├── lru-cache@2.2.4
│ └── tmp@0.0.30
├─┬ karma-chrome-launcher@2.0.0
│ ├─┬ fs-access@1.0.1
│ │ └── null-check@1.0.0
│ └─┬ which@1.2.12
│ └── isexe@1.1.2
├─┬ karma-coffee-preprocessor@1.0.1
│ └── coffee-script@1.10.0
├─┬ karma-coverage@1.1.1
│ ├── dateformat@1.0.12
│ ├─┬ istanbul@0.4.5
│ │ ├── abbrev@1.0.9
│ │ ├── async@1.5.2
│ │ ├─┬ escodegen@1.8.1
│ │ │ ├── estraverse@1.9.3
│ │ │ ├─┬ optionator@0.8.2
│ │ │ │ ├── deep-is@0.1.3
│ │ │ │ ├── fast-levenshtein@2.0.6
│ │ │ │ ├── levn@0.3.0
│ │ │ │ ├── prelude-ls@1.1.2
│ │ │ │ ├── type-check@0.3.2
│ │ │ │ └── wordwrap@1.0.0
│ │ │ └── source-map@0.2.0
│ │ ├── esprima@2.7.3
│ │ ├── glob@5.0.15
│ │ ├─┬ handlebars@4.0.6
│ │ │ └── source-map@0.4.4
│ │ ├─┬ js-yaml@3.5.5
│ │ │ └─┬ argparse@1.0.9
│ │ │ └── sprintf-js@1.0.3
│ │ ├── nopt@3.0.6
│ │ ├── supports-color@3.2.3
│ │ └── wordwrap@1.0.0
│ └── lodash@3.10.1
├── karma-firefox-launcher@1.0.0
├── karma-html2js-preprocessor@1.1.0
├── karma-jasmine@1.1.0
├─┬ karma-junit-reporter@1.2.0
│ └── xmlbuilder@8.2.2
├── karma-ng-html2js-preprocessor@1.0.0
├── karma-phantomjs-launcher@1.0.2
├── karma-phantomjs-shim@1.4.0
├── karma-requirejs@1.1.0
├── karma-script-launcher@1.0.0
├─┬ karma-webpack@2.0.2
│ ├── async@0.9.2
│ ├── lodash@3.10.1
│ └─┬ source-map@0.1.43
│ └── amdefine@1.0.1
├─┬ less@2.7.2
│ ├─┬ errno@0.1.4
│ │ └── prr@0.0.0
│ ├── image-size@0.5.1
│ └─┬ promise@7.1.1
│ └── asap@2.0.5
├── less-loader@2.2.3
├── lodash@4.17.4
├─┬ meanio@0.9.4
│ ├─┬ assetmanager@1.2.3
│ │ └─┬ grunt@1.0.1
│ │ ├── eventemitter2@0.4.14
│ │ ├─┬ findup-sync@0.3.0
│ │ │ └── glob@5.0.15
│ │ ├── glob@7.0.6
│ │ ├── grunt-cli@1.2.0
│ │ ├── grunt-known-options@1.1.0
│ │ ├─┬ grunt-legacy-log@1.0.0
│ │ │ ├─┬ grunt-legacy-log-utils@1.0.0
│ │ │ │ └── lodash@4.3.0
│ │ │ ├── hooker@0.2.3
│ │ │ ├── lodash@3.10.1
│ │ │ └── underscore.string@3.2.3
│ │ └─┬ grunt-legacy-util@1.0.0
│ │ ├── getobject@0.1.0
│ │ └── lodash@4.3.0
│ ├── complex-list@0.1.4
│ ├─┬ config@1.25.1
│ │ └── json5@0.4.0
│ ├── dependable-list@0.1.1
│ ├── errorhandler@1.5.0
│ ├── eventemitter2@1.0.0
│ ├─┬ express-jwt@5.1.0
│ │ ├── express-unless@0.3.0
│ │ └── lodash.set@4.3.2
│ ├── glob@5.0.15
│ ├── lazy-dependable@0.2.0
│ ├── lodash@4.17.4
│ ├─┬ md5@2.2.1
│ │ ├── charenc@0.0.2
│ │ ├── crypt@0.0.2
│ │ └── is-buffer@1.1.4
│ ├─┬ mongoose@4.8.3
│ │ ├── async@2.1.4
│ │ ├── bson@1.0.4
│ │ ├── hooks-fixed@1.2.0
│ │ ├── kareem@1.2.1
│ │ ├─┬ mongodb@2.2.24
│ │ │ └─┬ mongodb-core@2.1.8
│ │ │ └── require_optional@1.0.0
│ │ ├── mpath@0.2.1
│ │ ├── mpromise@0.5.5
│ │ ├─┬ mquery@2.2.3
│ │ │ ├── bluebird@2.10.2
│ │ │ ├─┬ debug@2.2.0
│ │ │ │ └── ms@0.7.1
│ │ │ └── sliced@0.0.5
│ │ ├── muri@1.2.1
│ │ ├── regexp-clone@0.0.1
│ │ └── sliced@1.0.1
│ ├─┬ morgan@1.5.3
│ │ ├── basic-auth@1.0.4
│ │ ├─┬ debug@2.2.0
│ │ │ └── ms@0.7.1
│ │ ├── depd@1.0.1
│ │ └─┬ on-finished@2.2.1
│ │ └── ee-first@1.1.0
│ ├── querystring@0.2.0
│ ├─┬ rtlcss@2.1.2
│ │ ├─┬ findup@0.1.5
│ │ │ ├── colors@0.6.2
│ │ │ └── commander@2.1.0
│ │ └── strip-json-comments@2.0.1
│ ├── socketio-sticky-session@0.4.2
│ └─┬ swig@1.4.2
│ └─┬ uglify-js@2.4.24
│ ├── async@0.2.10
│ ├── source-map@0.1.34
│ └─┬ yargs@3.5.4
│ ├── camelcase@1.2.1
│ └── window-size@0.1.0
├─┬ mocha@3.2.0
│ ├── browser-stdout@1.3.0
│ ├─┬ commander@2.9.0
│ │ └── graceful-readlink@1.0.1
│ ├─┬ debug@2.2.0
│ │ └── ms@0.7.1
│ ├── diff@1.4.0
│ ├── escape-string-regexp@1.0.5
│ ├── glob@7.0.5
│ ├── growl@1.9.2
│ ├── json3@3.3.2
│ ├─┬ lodash.create@3.1.1
│ │ └── lodash._basecreate@3.0.3
│ └─┬ supports-color@3.1.2
│ └── has-flag@1.0.0
├─┬ morgan@1.8.1
│ └── basic-auth@1.1.0
├─┬ node-sass@4.5.0
│ ├── async-foreach@0.1.3
│ ├─┬ gaze@1.1.2
│ │ └─┬ globule@1.1.0
│ │ └── lodash@4.16.6
│ ├── get-stdin@4.0.1
│ ├── in-publish@2.0.0
│ ├── lodash.assign@4.2.0
│ ├── lodash.clonedeep@4.5.0
│ ├── lodash.mergewith@4.6.0
│ ├─┬ meow@3.7.0
│ │ ├─┬ camelcase-keys@2.1.0
│ │ │ └── camelcase@2.1.1
│ │ ├─┬ loud-rejection@1.6.0
│ │ │ ├─┬ currently-unhandled@0.4.1
│ │ │ │ └── array-find-index@1.0.2
│ │ │ └── signal-exit@3.0.2
│ │ ├── map-obj@1.0.1
│ │ ├─┬ normalize-package-data@2.3.5
│ │ │ ├─┬ is-builtin-module@1.0.0
│ │ │ │ └── builtin-modules@1.1.1
│ │ │ └─┬ validate-npm-package-license@3.0.1
│ │ │ ├─┬ spdx-correct@1.0.2
│ │ │ │ └── spdx-license-ids@1.2.2
│ │ │ └── spdx-expression-parse@1.0.4
│ │ ├─┬ read-pkg-up@1.0.1
│ │ │ └─┬ read-pkg@1.1.0
│ │ │ ├─┬ load-json-file@1.1.0
│ │ │ │ ├─┬ parse-json@2.2.0
│ │ │ │ │ └─┬ error-ex@1.3.0
│ │ │ │ │ └── is-arrayish@0.2.1
│ │ │ │ └── strip-bom@2.0.0
│ │ │ └── path-type@1.1.0
│ │ ├─┬ redent@1.0.0
│ │ │ ├── indent-string@2.1.0
│ │ │ └── strip-indent@1.0.1
│ │ └── trim-newlines@1.0.0
│ ├── nan@2.5.1
│ ├─┬ node-gyp@3.5.0
│ │ ├── fstream@1.0.10
│ │ ├── osenv@0.1.4
│ │ └─┬ tar@2.2.1
│ │ └── block-stream@0.0.9
│ ├─┬ npmlog@4.0.2
│ │ ├─┬ are-we-there-yet@1.1.2
│ │ │ └── delegates@1.0.0
│ │ ├── console-control-strings@1.1.0
│ │ ├─┬ gauge@2.7.3
│ │ │ ├── aproba@1.1.1
│ │ │ ├── has-unicode@2.0.1
│ │ │ └── wide-align@1.1.0
│ │ └── set-blocking@2.0.0
│ ├─┬ sass-graph@2.1.2
│ │ └─┬ yargs@4.8.1
│ │ ├── cliui@3.2.0
│ │ ├── window-size@0.2.0
│ │ └─┬ yargs-parser@2.4.1
│ │ └── camelcase@3.0.0
│ └── stdout-stream@1.4.0
├─┬ npm@3.10.10
│ ├── abbrev@1.0.9
│ ├── ansi-regex@2.0.0
│ ├── ansicolors@0.3.2
│ ├── ansistyles@0.1.3
│ ├── aproba@1.0.4
│ ├── archy@1.0.0
│ ├── asap@2.0.5
│ ├── chownr@1.0.1
│ ├── cmd-shim@2.0.2
│ ├─┬ columnify@1.5.4
│ │ └─┬ wcwidth@1.0.0
│ │ └─┬ defaults@1.0.3
│ │ └── clone@1.0.2
│ ├─┬ config-chain@1.1.11
│ │ └── proto-list@1.2.4
│ ├── debuglog@1.0.1
│ ├── dezalgo@1.0.3
│ ├── editor@1.0.0
│ ├── fs-vacuum@1.2.9
│ ├── fs-write-stream-atomic@1.0.8
│ ├── fstream@1.0.10
│ ├─┬ fstream-npm@1.2.0
│ │ └─┬ fstream-ignore@1.0.5
│ │ └─┬ minimatch@3.0.3
│ │ └─┬ brace-expansion@1.1.6
│ │ ├── balanced-match@0.4.2
│ │ └── concat-map@0.0.1
│ ├─┬ glob@7.1.0
│ │ ├── fs.realpath@1.0.0
│ │ ├─┬ minimatch@3.0.3
│ │ │ └─┬ brace-expansion@1.1.6
│ │ │ ├── balanced-match@0.4.2
│ │ │ └── concat-map@0.0.1
│ │ └── path-is-absolute@1.0.1
│ ├── graceful-fs@4.1.9
│ ├── has-unicode@2.0.1
│ ├── hosted-git-info@2.1.5
│ ├── iferr@0.1.5
│ ├── imurmurhash@0.1.4
│ ├── inflight@1.0.5
│ ├── inherits@2.0.3
│ ├── ini@1.3.4
│ ├─┬ init-package-json@1.9.4
│ │ ├─┬ glob@6.0.4
│ │ │ ├─┬ minimatch@3.0.3
│ │ │ │ └─┬ brace-expansion@1.1.6
│ │ │ │ ├── balanced-match@0.4.2
│ │ │ │ └── concat-map@0.0.1
│ │ │ └── path-is-absolute@1.0.0
│ │ └── promzard@0.3.0
│ ├── lockfile@1.0.2
│ ├── lodash._baseindexof@3.1.0
│ ├─┬ lodash._baseuniq@4.6.0
│ │ ├── lodash._createset@4.0.3
│ │ └── lodash._root@3.0.1
│ ├── lodash._bindcallback@3.0.1
│ ├── lodash._cacheindexof@3.0.2
│ ├── lodash._createcache@3.1.2
│ ├── lodash._getnative@3.9.1
│ ├── lodash.clonedeep@4.5.0
│ ├── lodash.restparam@3.6.1
│ ├── lodash.union@4.6.0
│ ├── lodash.uniq@4.5.0
│ ├── lodash.without@4.4.0
│ ├─┬ mkdirp@0.5.1
│ │ └── minimist@0.0.8
│ ├─┬ node-gyp@3.4.0
│ │ ├─┬ minimatch@3.0.3
│ │ │ └─┬ brace-expansion@1.1.6
│ │ │ ├── balanced-match@0.4.2
│ │ │ └── concat-map@0.0.1
│ │ ├─┬ npmlog@3.1.2
│ │ │ ├─┬ are-we-there-yet@1.1.2
│ │ │ │ └── delegates@1.0.0
│ │ │ ├── console-control-strings@1.1.0
│ │ │ ├─┬ gauge@2.6.0
│ │ │ │ ├── has-color@0.1.7
│ │ │ │ ├── object-assign@4.1.0
│ │ │ │ ├── signal-exit@3.0.0
│ │ │ │ ├─┬ string-width@1.0.2
│ │ │ │ │ ├─┬ code-point-at@1.0.0
│ │ │ │ │ │ └── number-is-nan@1.0.0
│ │ │ │ │ └─┬ is-fullwidth-code-point@1.0.0
│ │ │ │ │ └── number-is-nan@1.0.0
│ │ │ │ └── wide-align@1.1.0
│ │ │ └── set-blocking@2.0.0
│ │ └─┬ path-array@1.0.1
│ │ └─┬ array-index@1.0.0
│ │ ├─┬ debug@2.2.0
│ │ │ └── ms@0.7.1
│ │ └─┬ es6-symbol@3.1.0
│ │ ├── d@0.1.1
│ │ └─┬ es5-ext@0.10.12
│ │ └── es6-iterator@2.0.0
│ ├── nopt@3.0.6
│ ├── normalize-git-url@3.0.2
│ ├─┬ normalize-package-data@2.3.5
│ │ └─┬ is-builtin-module@1.0.0
│ │ └── builtin-modules@1.1.1
│ ├── npm-cache-filename@1.0.2
│ ├── npm-install-checks@3.0.0
│ ├── npm-package-arg@4.2.0
│ ├─┬ npm-registry-client@7.2.1
│ │ ├─┬ concat-stream@1.5.2
│ │ │ ├─┬ readable-stream@2.0.6
│ │ │ │ ├── core-util-is@1.0.2
│ │ │ │ ├── isarray@1.0.0
│ │ │ │ ├── process-nextick-args@1.0.7
│ │ │ │ ├── string_decoder@0.10.31
│ │ │ │ └── util-deprecate@1.0.2
│ │ │ └── typedarray@0.0.6
│ │ ├─┬ npmlog@3.1.2
│ │ │ ├─┬ are-we-there-yet@1.1.2
│ │ │ │ └── delegates@1.0.0
│ │ │ ├── console-control-strings@1.1.0
│ │ │ ├─┬ gauge@2.6.0
│ │ │ │ ├── has-color@0.1.7
│ │ │ │ ├── object-assign@4.1.0
│ │ │ │ ├── signal-exit@3.0.0
│ │ │ │ ├─┬ string-width@1.0.2
│ │ │ │ │ ├─┬ code-point-at@1.0.0
│ │ │ │ │ │ └── number-is-nan@1.0.0
│ │ │ │ │ └─┬ is-fullwidth-code-point@1.0.0
│ │ │ │ │ └── number-is-nan@1.0.0
│ │ │ │ └── wide-align@1.1.0
│ │ │ └── set-blocking@2.0.0
│ │ └── retry@0.10.0
│ ├── npm-user-validate@0.1.5
│ ├─┬ npmlog@4.0.0
│ │ ├─┬ are-we-there-yet@1.1.2
│ │ │ └── delegates@1.0.0
│ │ ├── console-control-strings@1.1.0
│ │ ├─┬ gauge@2.6.0
│ │ │ ├── has-color@0.1.7
│ │ │ ├── object-assign@4.1.0
│ │ │ ├── signal-exit@3.0.0
│ │ │ ├─┬ string-width@1.0.2
│ │ │ │ ├─┬ code-point-at@1.0.0
│ │ │ │ │ └── number-is-nan@1.0.0
│ │ │ │ └─┬ is-fullwidth-code-point@1.0.0
│ │ │ │ └── number-is-nan@1.0.0
│ │ │ └── wide-align@1.1.0
│ │ └── set-blocking@2.0.0
│ ├── once@1.4.0
│ ├── opener@1.4.2
│ ├─┬ osenv@0.1.3
│ │ ├── os-homedir@1.0.1
│ │ └── os-tmpdir@1.0.1
│ ├── path-is-inside@1.0.2
│ ├─┬ read@1.0.7
│ │ └── mute-stream@0.0.5
│ ├── read-cmd-shim@1.0.1
│ ├─┬ read-installed@4.0.3
│ │ └── util-extend@1.0.3
│ ├─┬ read-package-json@2.0.4
│ │ ├─┬ glob@6.0.4
│ │ │ ├─┬ minimatch@3.0.3
│ │ │ │ └─┬ brace-expansion@1.1.6
│ │ │ │ ├── balanced-match@0.4.2
│ │ │ │ └── concat-map@0.0.1
│ │ │ └── path-is-absolute@1.0.0
│ │ └─┬ json-parse-helpfulerror@1.0.3
│ │ └── jju@1.3.0
│ ├── read-package-tree@5.1.5
│ ├─┬ readable-stream@2.1.5
│ │ ├── buffer-shims@1.0.0
│ │ ├── core-util-is@1.0.2
│ │ ├── isarray@1.0.0
│ │ ├── process-nextick-args@1.0.7
│ │ ├── string_decoder@0.10.31
│ │ └── util-deprecate@1.0.2
│ ├── readdir-scoped-modules@1.0.2
│ ├── realize-package-specifier@3.0.3
│ ├─┬ request@2.75.0
│ │ ├── aws-sign2@0.6.0
│ │ ├── aws4@1.4.1
│ │ ├─┬ bl@1.1.2
│ │ │ └─┬ readable-stream@2.0.6
│ │ │ ├── core-util-is@1.0.2
│ │ │ ├── isarray@1.0.0
│ │ │ ├── process-nextick-args@1.0.7
│ │ │ ├── string_decoder@0.10.31
│ │ │ └── util-deprecate@1.0.2
│ │ ├── caseless@0.11.0
│ │ ├─┬ combined-stream@1.0.5
│ │ │ └── delayed-stream@1.0.0
│ │ ├── extend@3.0.0
│ │ ├── forever-agent@0.6.1
│ │ ├─┬ form-data@2.0.0
│ │ │ └── asynckit@0.4.0
│ │ ├─┬ har-validator@2.0.6
│ │ │ ├─┬ chalk@1.1.3
│ │ │ │ ├── ansi-styles@2.2.1
│ │ │ │ ├── escape-string-regexp@1.0.5
│ │ │ │ ├── has-ansi@2.0.0
│ │ │ │ └── supports-color@2.0.0
│ │ │ ├─┬ commander@2.9.0
│ │ │ │ └── graceful-readlink@1.0.1
│ │ │ ├─┬ is-my-json-valid@2.15.0
│ │ │ │ ├── generate-function@2.0.0
│ │ │ │ ├─┬ generate-object-property@1.2.0
│ │ │ │ │ └── is-property@1.0.2
│ │ │ │ ├── jsonpointer@4.0.0
│ │ │ │ └── xtend@4.0.1
│ │ │ └─┬ pinkie-promise@2.0.1
│ │ │ └── pinkie@2.0.4
│ │ ├─┬ hawk@3.1.3
│ │ │ ├── boom@2.10.1
│ │ │ ├── cryptiles@2.0.5
│ │ │ ├── hoek@2.16.3
│ │ │ └── sntp@1.0.9
│ │ ├─┬ http-signature@1.1.1
│ │ │ ├── assert-plus@0.2.0
│ │ │ ├─┬ jsprim@1.3.1
│ │ │ │ ├── extsprintf@1.0.2
│ │ │ │ ├── json-schema@0.2.3
│ │ │ │ └── verror@1.3.6
│ │ │ └─┬ sshpk@1.10.1
│ │ │ ├── asn1@0.2.3
│ │ │ ├── assert-plus@1.0.0
│ │ │ ├── bcrypt-pbkdf@1.0.0
│ │ │ ├── dashdash@1.14.0
│ │ │ ├── ecc-jsbn@0.1.1
│ │ │ ├── getpass@0.1.6
│ │ │ ├── jodid25519@1.0.2
│ │ │ ├── jsbn@0.1.0
│ │ │ └── tweetnacl@0.14.3
│ │ ├── is-typedarray@1.0.0
│ │ ├── isstream@0.1.2
│ │ ├── json-stringify-safe@5.0.1
│ │ ├─┬ mime-types@2.1.12
│ │ │ └── mime-db@1.24.0
│ │ ├── node-uuid@1.4.7
│ │ ├── oauth-sign@0.8.2
│ │ ├── qs@6.2.1
│ │ ├── stringstream@0.0.5
│ │ ├── tough-cookie@2.3.1
│ │ └── tunnel-agent@0.4.3
│ ├── retry@0.10.0
│ ├── rimraf@2.5.4
│ ├── semver@5.3.0
│ ├── sha@2.0.1
│ ├── slide@1.1.6
│ ├── sorted-object@2.0.1
│ ├── strip-ansi@3.0.1
│ ├─┬ tar@2.2.1
│ │ └── block-stream@0.0.8
│ ├── text-table@0.2.0
│ ├── uid-number@0.0.6
│ ├── umask@1.1.0
│ ├─┬ unique-filename@1.1.0
│ │ └── unique-slug@2.0.0
│ ├── unpipe@1.0.0
│ ├─┬ validate-npm-package-license@3.0.1
│ │ ├─┬ spdx-correct@1.0.2
│ │ │ └── spdx-license-ids@1.2.0
│ │ └─┬ spdx-expression-parse@1.0.2
│ │ ├── spdx-exceptions@1.0.4
│ │ └── spdx-license-ids@1.2.0
│ ├─┬ validate-npm-package-name@2.2.2
│ │ └── builtins@0.0.7
│ ├─┬ which@1.2.11
│ │ └── isexe@1.1.2
│ ├── wrappy@1.0.2
│ └── write-file-atomic@1.2.0
├─┬ phantomjs-prebuilt@2.1.14
│ ├── es6-promise@4.0.5
│ ├─┬ extract-zip@1.5.0
│ │ ├─┬ concat-stream@1.5.0
│ │ │ ├── readable-stream@2.0.6
│ │ │ └── typedarray@0.0.6
│ │ ├── debug@0.7.4
│ │ ├─┬ mkdirp@0.5.0
│ │ │ └── minimist@0.0.8
│ │ └─┬ yauzl@2.4.1
│ │ └─┬ fd-slicer@1.0.1
│ │ └── pend@1.2.0
│ ├─┬ fs-extra@1.0.0
│ │ ├── jsonfile@2.4.0
│ │ └── klaw@1.3.1
│ ├── hasha@2.2.0
│ ├── kew@0.7.0
│ ├── progress@1.1.8
│ └─┬ request-progress@2.0.1
│ └── throttleit@1.0.0
├─┬ protractor@5.1.1 invalid
│ ├── @types/node@6.0.63
│ ├── @types/q@0.0.32
│ ├── @types/selenium-webdriver@2.53.39
│ ├── blocking-proxy@0.0.5
│ ├── jasminewd2@2.0.0
│ ├─┬ saucelabs@1.3.0
│ │ └─┬ https-proxy-agent@1.0.0
│ │ └─┬ agent-base@2.0.1
│ │ └── semver@5.0.3
│ ├─┬ selenium-webdriver@3.0.1
│ │ └── rimraf@2.5.4
│ ├── source-map-support@0.4.11
│ ├─┬ webdriver-js-extender@1.0.0
│ │ └─┬ selenium-webdriver@2.53.3
│ │ ├── adm-zip@0.4.4
│ │ ├── tmp@0.0.24
│ │ ├── ws@1.1.2
│ │ └─┬ xml2js@0.4.4
│ │ └── sax@0.6.1
│ └─┬ webdriver-manager@12.0.2
│ ├── adm-zip@0.4.7
│ ├── ini@1.3.4
│ ├── rimraf@2.5.4
│ └─┬ xml2js@0.4.17
│ ├── sax@1.2.2
│ └── xmlbuilder@4.2.1
├── q@1.4.1
├─┬ request@2.79.0
│ ├── aws-sign2@0.6.0
│ ├── aws4@1.6.0
│ ├── caseless@0.11.0
│ ├─┬ combined-stream@1.0.5
│ │ └── delayed-stream@1.0.0
│ ├── extend@3.0.0
│ ├── forever-agent@0.6.1
│ ├─┬ form-data@2.1.2
│ │ └── asynckit@0.4.0
│ ├─┬ har-validator@2.0.6
│ │ └─┬ is-my-json-valid@2.15.0
│ │ ├── generate-function@2.0.0
│ │ ├─┬ generate-object-property@1.2.0
│ │ │ └── is-property@1.0.2
│ │ └── jsonpointer@4.0.1
│ ├─┬ hawk@3.1.3
│ │ ├── boom@2.10.1
│ │ ├── cryptiles@2.0.5
│ │ └── sntp@1.0.9
│ ├─┬ http-signature@1.1.1
│ │ ├── assert-plus@0.2.0
│ │ ├─┬ jsprim@1.3.1
│ │ │ ├── extsprintf@1.0.2
│ │ │ ├── json-schema@0.2.3
│ │ │ └── verror@1.3.6
│ │ └─┬ sshpk@1.10.2
│ │ ├── asn1@0.2.3
│ │ ├── assert-plus@1.0.0
│ │ ├── bcrypt-pbkdf@1.0.1
│ │ ├─┬ dashdash@1.14.1
│ │ │ └── assert-plus@1.0.0
│ │ ├── ecc-jsbn@0.1.1
│ │ ├─┬ getpass@0.1.6
│ │ │ └── assert-plus@1.0.0
│ │ ├── jodid25519@1.0.2
│ │ ├── jsbn@0.1.1
│ │ └── tweetnacl@0.14.5
│ ├── is-typedarray@1.0.0
│ ├── isstream@0.1.2
│ ├── json-stringify-safe@5.0.1
│ ├── mime-types@2.1.14
│ ├── oauth-sign@0.8.2
│ ├── qs@6.3.1
│ ├── stringstream@0.0.5
│ ├─┬ tough-cookie@2.3.2
│ │ └── punycode@1.4.1
│ ├── tunnel-agent@0.4.3
│ └── uuid@3.0.1
├── require-dir@0.3.1
├── requirejs@2.3.2
├─┬ sass-loader@6.0.0
│ ├── async@2.1.4
│ └── lodash.tail@4.1.1
├─┬ shelljs@0.7.6
│ └── rechoir@0.6.2
├─┬ snyk@1.25.0
│ ├── abbrev@1.1.0
│ ├── ansi-escapes@1.4.0
│ ├─┬ configstore@1.4.0
│ │ ├── uuid@2.0.3
│ │ ├─┬ write-file-atomic@1.3.1
│ │ │ ├── imurmurhash@0.1.4
│ │ │ └── slide@1.1.6
│ │ └── xdg-basedir@2.0.0
│ ├── es6-promise@3.2.1
│ ├── hasbin@1.2.3
│ ├─┬ inquirer@1.0.3
│ │ ├─┬ cli-cursor@1.0.2
│ │ │ └─┬ restore-cursor@1.0.1
│ │ │ ├── exit-hook@1.1.1
│ │ │ └── onetime@1.1.0
│ │ ├── cli-width@2.1.0
│ │ ├── figures@1.7.0
│ │ ├── mute-stream@0.0.6
│ │ ├─┬ run-async@2.3.0
│ │ │ └── is-promise@2.1.0
│ │ ├── rx@4.1.0
│ │ └─┬ string-width@1.0.2
│ │ ├── code-point-at@1.1.0
│ │ └─┬ is-fullwidth-code-point@1.0.0
│ │ └── number-is-nan@1.0.1
│ ├── open@0.0.5
│ ├─┬ os-name@1.0.3
│ │ ├── osx-release@1.1.0
│ │ └── win-release@1.1.1
│ ├── semver@5.3.0
│ ├─┬ snyk-config@1.0.1
│ │ └─┬ nconf@0.7.2
│ │ ├── async@0.9.2
│ │ └─┬ yargs@3.15.0
│ │ ├── camelcase@1.2.1
│ │ └── window-size@0.1.4
│ ├─┬ snyk-module@1.7.0
│ │ ├── hosted-git-info@2.2.0
│ │ └─┬ validate-npm-package-name@2.2.2
│ │ └── builtins@0.0.7
│ ├── snyk-policy@1.7.0
│ ├─┬ snyk-recursive-readdir@2.0.0
│ │ └── minimatch@3.0.2
│ ├── snyk-resolve@1.0.0
│ ├─┬ snyk-resolve-deps@1.7.0
│ │ ├── ansicolors@0.3.2
│ │ └─┬ clite@0.3.0
│ │ ├── lodash.defaults@4.2.0
│ │ ├── lodash.defaultsdeep@4.6.0
│ │ ├─┬ update-notifier@0.6.3
│ │ │ ├─┬ boxen@0.3.1
│ │ │ │ ├── filled-array@1.1.0
│ │ │ │ └── widest-line@1.0.0
│ │ │ ├─┬ configstore@2.1.0
│ │ │ │ ├─┬ dot-prop@3.0.0
│ │ │ │ │ └── is-obj@1.0.1
│ │ │ │ └── uuid@2.0.3
│ │ │ └─┬ latest-version@2.0.0
│ │ │ └─┬ package-json@2.4.0
│ │ │ ├─┬ got@5.7.1
│ │ │ │ ├─┬ create-error-class@3.0.2
│ │ │ │ │ └── capture-stack-trace@1.0.0
│ │ │ │ ├── duplexer2@0.1.4
│ │ │ │ ├── is-retry-allowed@1.1.0
│ │ │ │ ├── node-status-codes@1.0.0
│ │ │ │ ├── timed-out@3.1.3
│ │ │ │ ├── unzip-response@1.0.2
│ │ │ │ └── url-parse-lax@1.0.0
│ │ │ └── registry-auth-token@3.1.0
│ │ └─┬ yargs@4.8.1
│ │ ├── cliui@3.2.0
│ │ └── window-size@0.2.0
│ ├── snyk-tree@1.0.0
│ ├── snyk-try-require@1.2.0
│ ├─┬ tempfile@1.1.1
│ │ └── uuid@2.0.3
│ ├── then-fs@2.0.0
│ ├── undefsafe@0.0.3
│ ├─┬ update-notifier@0.5.0
│ │ ├── is-npm@1.0.0
│ │ ├─┬ latest-version@1.0.1
│ │ │ └─┬ package-json@1.2.0
│ │ │ ├─┬ got@3.3.1
│ │ │ │ ├─┬ duplexify@3.5.0
│ │ │ │ │ ├─┬ end-of-stream@1.0.0
│ │ │ │ │ │ └── once@1.3.3
│ │ │ │ │ └── stream-shift@1.0.0
│ │ │ │ ├── infinity-agent@2.0.3
│ │ │ │ ├── is-redirect@1.0.0
│ │ │ │ ├── lowercase-keys@1.0.0
│ │ │ │ ├── nested-error-stacks@1.0.2
│ │ │ │ ├── object-assign@3.0.0
│ │ │ │ ├── read-all-stream@3.1.0
│ │ │ │ └── timed-out@2.0.0
│ │ │ └─┬ registry-url@3.1.0
│ │ │ └─┬ rc@1.1.6
│ │ │ ├── deep-extend@0.4.1
│ │ │ └── strip-json-comments@1.0.4
│ │ ├─┬ repeating@1.1.3
│ │ │ └── is-finite@1.0.2
│ │ └── semver-diff@2.1.0
│ └─┬ url@0.11.0
│ └── punycode@1.3.2
├── style-loader@0.13.1
├─┬ supertest@3.0.0
│ └─┬ superagent@3.4.3
│ ├── component-emitter@1.2.1
│ ├── cookiejar@2.1.0
│ └── formidable@1.1.1
├── through@2.3.8
├─┬ url-loader@0.5.7
│ └── mime@1.2.11
├── view-helpers@0.1.5
├─┬ webpack@2.2.1
│ ├── acorn@4.0.11
│ ├── acorn-dynamic-import@2.0.1
│ ├─┬ ajv@4.11.3
│ │ ├── co@4.6.0
│ │ └─┬ json-stable-stringify@1.0.1
│ │ └── jsonify@0.0.0
│ ├── ajv-keywords@1.5.1
│ ├── async@2.1.4
│ ├── enhanced-resolve@3.1.0
│ ├── json-loader@0.5.4
│ ├── loader-runner@2.3.0
│ ├── memory-fs@0.4.1
│ ├─┬ node-libs-browser@2.0.0
│ │ ├── assert@1.4.1
│ │ ├─┬ browserify-zlib@0.1.4
│ │ │ └── pako@0.2.9
│ │ ├─┬ buffer@4.9.1
│ │ │ ├── base64-js@1.2.0
│ │ │ └── ieee754@1.1.8
│ │ ├── constants-browserify@1.0.0
│ │ ├─┬ crypto-browserify@3.11.0
│ │ │ ├─┬ browserify-cipher@1.0.0
│ │ │ │ ├─┬ browserify-aes@1.0.6
│ │ │ │ │ └── buffer-xor@1.0.3
│ │ │ │ ├─┬ browserify-des@1.0.0
│ │ │ │ │ └── des.js@1.0.0
│ │ │ │ └── evp_bytestokey@1.0.0
│ │ │ ├─┬ browserify-sign@4.0.0
│ │ │ │ ├── bn.js@4.11.6
│ │ │ │ ├── browserify-rsa@4.0.1
│ │ │ │ ├─┬ elliptic@6.3.3
│ │ │ │ │ ├── brorand@1.0.7
│ │ │ │ │ └── hash.js@1.0.3
│ │ │ │ └─┬ parse-asn1@5.0.0
│ │ │ │ └── asn1.js@4.9.1
│ │ │ ├── create-ecdh@4.0.0
│ │ │ ├─┬ create-hash@1.1.2
│ │ │ │ ├── cipher-base@1.0.3
│ │ │ │ ├── ripemd160@1.0.1
│ │ │ │ └── sha.js@2.4.8
│ │ │ ├── create-hmac@1.1.4
│ │ │ ├─┬ diffie-hellman@5.0.2
│ │ │ │ └── miller-rabin@4.0.0
│ │ │ ├── pbkdf2@3.0.9
│ │ │ ├── public-encrypt@4.0.0
│ │ │ └── randombytes@2.0.3
│ │ ├── domain-browser@1.1.7
│ │ ├── events@1.1.1
│ │ ├── https-browserify@0.0.1
│ │ ├── os-browserify@0.2.1
│ │ ├── path-browserify@0.0.0
│ │ ├── process@0.11.9
│ │ ├── querystring-es3@0.2.1
│ │ ├── stream-browserify@2.0.1
│ │ ├─┬ stream-http@2.6.3
│ │ │ ├── builtin-status-codes@3.0.0
│ │ │ └── to-arraybuffer@1.0.1
│ │ ├── string_decoder@0.10.31
│ │ ├─┬ timers-browserify@2.0.2
│ │ │ └── setimmediate@1.0.5
│ │ ├── tty-browserify@0.0.0
│ │ ├─┬ util@0.10.3
│ │ │ └── inherits@2.0.1
│ │ └── vm-browserify@0.0.4
│ ├── supports-color@3.2.3
│ ├── tapable@0.2.6
│ ├─┬ watchpack@1.2.1
│ │ └── async@2.1.4
│ ├── webpack-sources@0.1.4
│ └─┬ yargs@6.6.0
│ ├── camelcase@3.0.0
│ ├─┬ cliui@3.2.0
│ │ └── wrap-ansi@2.1.0
│ ├── get-caller-file@1.0.2
│ ├─┬ os-locale@1.4.0
│ │ └─┬ lcid@1.0.0
│ │ └── invert-kv@1.0.0
│ ├── require-directory@2.1.1
│ ├── require-main-filename@1.0.1
│ ├── which-module@1.0.0
│ ├── y18n@3.2.1
│ └── yargs-parser@4.2.1
├── webpack-dev-middleware@1.10.0
├─┬ webpack-dev-server@2.3.0
│ ├── ansi-html@0.0.7
│ ├── connect-history-api-fallback@1.3.0
│ ├── html-entities@1.2.0
│ ├─┬ http-proxy-middleware@0.17.3
│ │ └─┬ is-glob@3.1.0
│ │ └── is-extglob@2.1.1
│ ├── opn@4.0.2
│ ├── portfinder@1.0.13
│ ├─┬ serve-index@1.8.0
│ │ ├── batch@0.5.3
│ │ └─┬ debug@2.2.0
│ │ └── ms@0.7.1
│ ├─┬ sockjs@0.3.18
│ │ ├── faye-websocket@0.10.0
│ │ └── uuid@2.0.3
│ ├─┬ sockjs-client@1.1.1
│ │ ├─┬ eventsource@0.1.6
│ │ │ └─┬ original@1.0.0
│ │ │ └── url-parse@1.0.5
│ │ ├── faye-websocket@0.11.1
│ │ └─┬ url-parse@1.1.7
│ │ └── querystringify@0.0.4
│ ├─┬ spdy@3.4.4
│ │ ├── handle-thing@1.2.5
│ │ ├── http-deceiver@1.2.7
│ │ ├── select-hose@2.0.0
│ │ └─┬ spdy-transport@2.0.18
│ │ ├── hpack.js@2.1.6
│ │ ├── obuf@1.1.1
│ │ └─┬ wbuf@1.7.2
│ │ └── minimalistic-assert@1.0.0
│ ├─┬ strip-ansi@3.0.1
│ │ └── ansi-regex@2.1.1
│ ├── supports-color@3.2.3
│ └─┬ yargs@6.6.0
│ ├── camelcase@3.0.0
│ ├── cliui@3.2.0
│ └── yargs-parser@4.2.1
├─┬ webpack-hot-middleware@2.17.0
│ └── ansi-html@0.0.6
└─┬ webpack-stream@3.2.0
├── lodash.clone@4.5.0
├── lodash.some@4.6.0
├── memory-fs@0.3.0
├── vinyl@1.2.0
└─┬ webpack@1.14.0
├── acorn@3.3.0
├─┬ enhanced-resolve@0.9.1
│ └── memory-fs@0.2.0
├── interpret@0.6.6
├─┬ node-libs-browser@0.7.0
│ └─┬ crypto-browserify@3.3.0
│ ├── browserify-aes@0.4.0
│ ├── pbkdf2-compat@2.0.1
│ ├── ripemd160@0.2.0
│ └── sha.js@2.2.6
├── supports-color@3.2.3
├── tapable@0.1.10
├─┬ watchpack@0.2.9
│ └── async@0.9.2
└─┬ webpack-core@0.6.9
└── source-map@0.4.4
npm WARN optional SKIPPING OPTIONAL DEPENDENCY: fsevents@^1.0.0 (node_modules/chokidar/node_modules/fsevents):
npm WARN notsup SKIPPING OPTIONAL DEPENDENCY: Unsupported platform for fsevents@1.0.17: wanted {"os":"darwin","arch":"any"} (current: {"os":"linux","arch":"x64"})
npm WARN angular-material@1.1.3 requires a peer of angular@>=1.3 <1.6 but none was installed.
npm WARN angular-material@1.1.3 requires a peer of angular-animate@>=1.3 <1.6 but none was installed.
npm WARN angular-material@1.1.3 requires a peer of angular-aria@>=1.3 <1.6 but none was installed.
 NOTE: The last error ‘NoneType’ not related with keras. TAKE CARE OF IT LATER (SOLUTION READ: http://www.pyimagesearch.com/2016/12/26/opencv-resolving-nonetype-errors/)
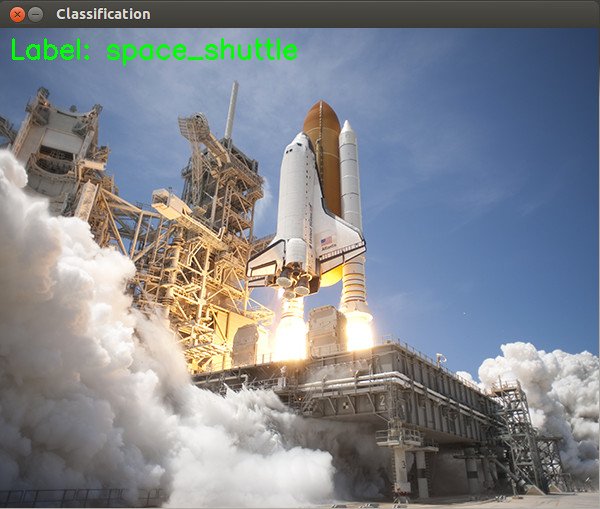 NOTE: The downloaded dataset would be stored in /.keras/models/ directory. the dataset filename is ‘vgg16_weights_tf_dim_ordering_tf_kernels.h5’ and the labeled index filename is ‘imagenet_class_index.json’.
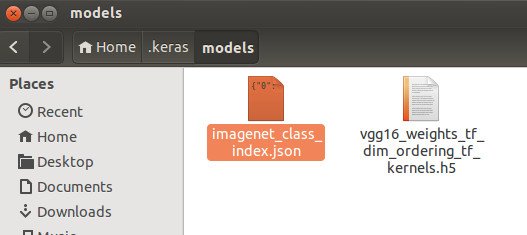


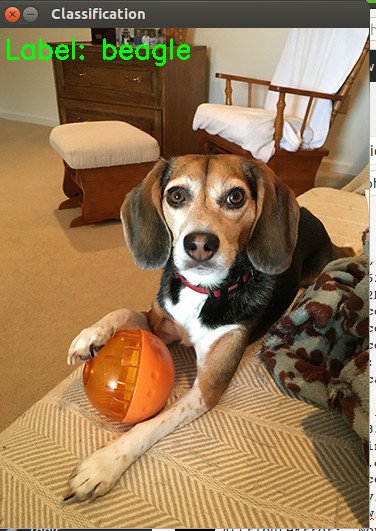
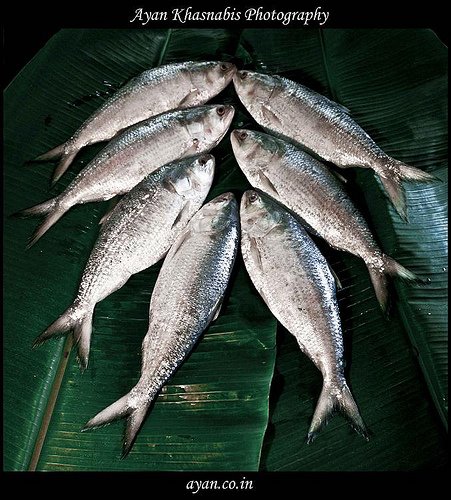 BUT NONE OF THEM SHOW THE CORRECT RESULT. HERE ARE THE RESULT
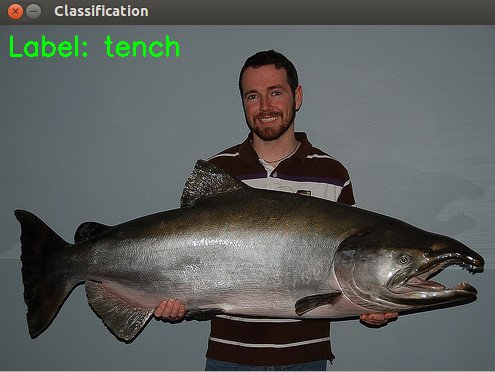 RECOGNIZED AS ‘tench’ ???
 RECOGNIZED AS ‘electric_ray’ ???
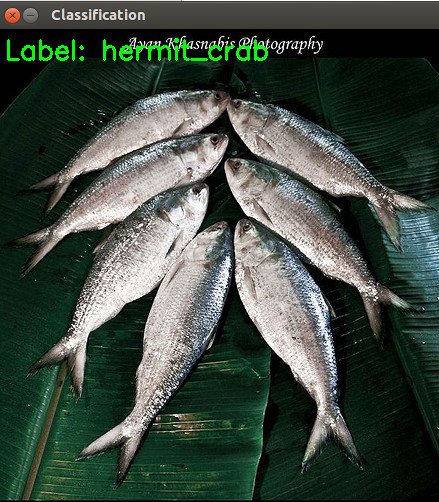 RECOGNIZED AS ‘hermit_crab’ ???