teddy@teddy-K43SJ:~$ sudo npm install -g cordova ionic
[sudo] password for teddy:
npm WARN deprecated node-uuid@1.4.7: use uuid module instead
npm WARN deprecated minimatch@0.2.14: Please update to minimatch 3.0.2 or higher to avoid a RegExp DoS issue
npm WARN deprecated minimatch@0.3.0: Please update to minimatch 3.0.2 or higher to avoid a RegExp DoS issue
npm WARN deprecated minimatch@2.0.10: Please update to minimatch 3.0.2 or higher to avoid a RegExp DoS issue
npm WARN deprecated node-uuid@1.3.3: use uuid module instead
/usr/local/bin/cordova -> /usr/local/lib/node_modules/cordova/bin/cordova
/usr/local/bin/ionic -> /usr/local/lib/node_modules/ionic/bin/ionic
/usr/local/lib
├─┬ cordova@6.5.0
│ ├─┬ cordova-common@2.0.0
│ │ ├── ansi@0.3.1
│ │ ├─┬ bplist-parser@0.1.1
│ │ │ └── big-integer@1.6.17
│ │ ├── cordova-registry-mapper@1.1.15
│ │ ├─┬ elementtree@0.1.7
│ │ │ └── sax@1.1.4
│ │ ├─┬ glob@5.0.15
│ │ │ ├─┬ inflight@1.0.6
│ │ │ │ └── wrappy@1.0.2
│ │ │ ├── inherits@2.0.3
│ │ │ ├── once@1.4.0
│ │ │ └── path-is-absolute@1.0.1
│ │ ├─┬ minimatch@3.0.3
│ │ │ └─┬ brace-expansion@1.1.6
│ │ │ ├── balanced-match@0.4.2
│ │ │ └── concat-map@0.0.1
│ │ ├─┬ osenv@0.1.4
│ │ │ ├── os-homedir@1.0.2
│ │ │ └── os-tmpdir@1.0.2
│ │ ├─┬ plist@1.2.0
│ │ │ ├── base64-js@0.0.8
│ │ │ ├── util-deprecate@1.0.2
│ │ │ ├── xmlbuilder@4.0.0
│ │ │ └── xmldom@0.1.27
│ │ ├── q@1.4.1
│ │ ├── semver@5.3.0
│ │ ├── shelljs@0.5.3
│ │ ├── underscore@1.8.3
│ │ └── unorm@1.4.1
│ ├─┬ cordova-lib@6.5.0
│ │ ├─┬ aliasify@1.9.0
│ │ │ └─┬ browserify-transform-tools@1.5.3
│ │ │ └─┬ falafel@1.2.0
│ │ │ ├── acorn@1.2.2
│ │ │ ├── foreach@2.0.5
│ │ │ ├── isarray@0.0.1
│ │ │ └── object-keys@1.0.11
│ │ ├─┬ cordova-create@1.0.2
│ │ │ ├── cordova-app-hello-world@3.11.0
│ │ │ └── shelljs@0.3.0
│ │ ├─┬ cordova-fetch@1.0.2
│ │ │ ├─┬ dependency-ls@1.0.0
│ │ │ │ └── q@1.4.1
│ │ │ ├── is-url@1.2.2
│ │ │ ├── q@1.4.1
│ │ │ └─┬ shelljs@0.7.7
│ │ │ ├── glob@7.1.1
│ │ │ ├── interpret@1.0.1
│ │ │ └── rechoir@0.6.2
│ │ ├─┬ cordova-js@4.2.1
│ │ │ └─┬ browserify@13.3.0
│ │ │ ├── assert@1.4.1
│ │ │ ├─┬ browser-pack@6.0.2
│ │ │ │ ├─┬ combine-source-map@0.7.2
│ │ │ │ │ ├── convert-source-map@1.1.3
│ │ │ │ │ ├── inline-source-map@0.6.2
│ │ │ │ │ ├── lodash.memoize@3.0.4
│ │ │ │ │ └── source-map@0.5.6
│ │ │ │ └── umd@3.0.1
│ │ │ ├─┬ browser-resolve@1.11.2
│ │ │ │ └── resolve@1.1.7
│ │ │ ├─┬ browserify-zlib@0.1.4
│ │ │ │ └── pako@0.2.9
│ │ │ ├─┬ buffer@4.9.1
│ │ │ │ ├── base64-js@1.2.0
│ │ │ │ ├── ieee754@1.1.8
│ │ │ │ └── isarray@1.0.0
│ │ │ ├── cached-path-relative@1.0.1
│ │ │ ├─┬ concat-stream@1.5.2
│ │ │ │ ├─┬ readable-stream@2.0.6
│ │ │ │ │ └── isarray@1.0.0
│ │ │ │ └── typedarray@0.0.6
│ │ │ ├─┬ console-browserify@1.1.0
│ │ │ │ └── date-now@0.1.4
│ │ │ ├── constants-browserify@1.0.0
│ │ │ ├─┬ crypto-browserify@3.11.0
│ │ │ │ ├─┬ browserify-cipher@1.0.0
│ │ │ │ │ ├─┬ browserify-aes@1.0.6
│ │ │ │ │ │ └── buffer-xor@1.0.3
│ │ │ │ │ ├─┬ browserify-des@1.0.0
│ │ │ │ │ │ └── des.js@1.0.0
│ │ │ │ │ └── evp_bytestokey@1.0.0
│ │ │ │ ├─┬ browserify-sign@4.0.0
│ │ │ │ │ ├── bn.js@4.11.6
│ │ │ │ │ ├── browserify-rsa@4.0.1
│ │ │ │ │ ├─┬ elliptic@6.4.0
│ │ │ │ │ │ ├── brorand@1.1.0
│ │ │ │ │ │ ├── hash.js@1.0.3
│ │ │ │ │ │ ├── hmac-drbg@1.0.0
│ │ │ │ │ │ ├── minimalistic-assert@1.0.0
│ │ │ │ │ │ └── minimalistic-crypto-utils@1.0.1
│ │ │ │ │ └─┬ parse-asn1@5.1.0
│ │ │ │ │ └── asn1.js@4.9.1
│ │ │ │ ├── create-ecdh@4.0.0
│ │ │ │ ├─┬ create-hash@1.1.2
│ │ │ │ │ ├── cipher-base@1.0.3
│ │ │ │ │ └── ripemd160@1.0.1
│ │ │ │ ├── create-hmac@1.1.4
│ │ │ │ ├─┬ diffie-hellman@5.0.2
│ │ │ │ │ └── miller-rabin@4.0.0
│ │ │ │ ├── pbkdf2@3.0.9
│ │ │ │ ├── public-encrypt@4.0.0
│ │ │ │ └── randombytes@2.0.3
│ │ │ ├── defined@1.0.0
│ │ │ ├── deps-sort@2.0.0
│ │ │ ├── domain-browser@1.1.7
│ │ │ ├── duplexer2@0.1.4
│ │ │ ├── events@1.1.1
│ │ │ ├── glob@7.1.1
│ │ │ ├─┬ has@1.0.1
│ │ │ │ └── function-bind@1.1.0
│ │ │ ├── htmlescape@1.1.1
│ │ │ ├── https-browserify@0.0.1
│ │ │ ├─┬ insert-module-globals@7.0.1
│ │ │ │ ├── is-buffer@1.1.5
│ │ │ │ └─┬ lexical-scope@1.2.0
│ │ │ │ └─┬ astw@2.2.0
│ │ │ │ └── acorn@4.0.11
│ │ │ ├─┬ JSONStream@1.3.1
│ │ │ │ └── jsonparse@1.3.0
│ │ │ ├─┬ labeled-stream-splicer@2.0.0
│ │ │ │ └── stream-splicer@2.0.0
│ │ │ ├─┬ module-deps@4.1.1
│ │ │ │ ├─┬ detective@4.5.0
│ │ │ │ │ └── acorn@4.0.11
│ │ │ │ └── stream-combiner2@1.1.1
│ │ │ ├── os-browserify@0.1.2
│ │ │ ├─┬ parents@1.0.1
│ │ │ │ └── path-platform@0.11.15
│ │ │ ├── path-browserify@0.0.0
│ │ │ ├── process@0.11.9
│ │ │ ├── querystring-es3@0.2.1
│ │ │ ├── read-only-stream@2.0.0
│ │ │ ├─┬ readable-stream@2.2.6
│ │ │ │ ├── buffer-shims@1.0.0
│ │ │ │ ├── core-util-is@1.0.2
│ │ │ │ ├── isarray@1.0.0
│ │ │ │ └── process-nextick-args@1.0.7
│ │ │ ├─┬ resolve@1.3.2
│ │ │ │ └── path-parse@1.0.5
│ │ │ ├─┬ shasum@1.0.2
│ │ │ │ ├── json-stable-stringify@0.0.1
│ │ │ │ └── sha.js@2.4.8
│ │ │ ├─┬ shell-quote@1.6.1
│ │ │ │ ├── array-filter@0.0.1
│ │ │ │ ├── array-map@0.0.0
│ │ │ │ ├── array-reduce@0.0.0
│ │ │ │ └── jsonify@0.0.0
│ │ │ ├── stream-browserify@2.0.1
│ │ │ ├─┬ stream-http@2.6.3
│ │ │ │ ├── builtin-status-codes@3.0.0
│ │ │ │ └── to-arraybuffer@1.0.1
│ │ │ ├── string_decoder@0.10.31
│ │ │ ├── subarg@1.0.0
│ │ │ ├─┬ syntax-error@1.3.0
│ │ │ │ └── acorn@4.0.11
│ │ │ ├── through2@2.0.3
│ │ │ ├── timers-browserify@1.4.2
│ │ │ ├── tty-browserify@0.0.0
│ │ │ ├─┬ url@0.11.0
│ │ │ │ ├── punycode@1.3.2
│ │ │ │ └── querystring@0.2.0
│ │ │ ├─┬ util@0.10.3
│ │ │ │ └── inherits@2.0.1
│ │ │ ├─┬ vm-browserify@0.0.4
│ │ │ │ └── indexof@0.0.1
│ │ │ └── xtend@4.0.1
│ │ ├─┬ cordova-serve@1.0.1
│ │ │ ├─┬ compression@1.6.2
│ │ │ │ ├─┬ accepts@1.3.3
│ │ │ │ │ └── negotiator@0.6.1
│ │ │ │ ├── bytes@2.3.0
│ │ │ │ ├── compressible@2.0.9
│ │ │ │ ├─┬ debug@2.2.0
│ │ │ │ │ └── ms@0.7.1
│ │ │ │ ├── on-headers@1.0.1
│ │ │ │ └── vary@1.1.0
│ │ │ ├─┬ express@4.15.2
│ │ │ │ ├── array-flatten@1.1.1
│ │ │ │ ├── content-disposition@0.5.2
│ │ │ │ ├── content-type@1.0.2
│ │ │ │ ├── cookie@0.3.1
│ │ │ │ ├── cookie-signature@1.0.6
│ │ │ │ ├─┬ debug@2.6.1
│ │ │ │ │ └── ms@0.7.2
│ │ │ │ ├── depd@1.1.0
│ │ │ │ ├── encodeurl@1.0.1
│ │ │ │ ├── escape-html@1.0.3
│ │ │ │ ├── etag@1.8.0
│ │ │ │ ├─┬ finalhandler@1.0.0
│ │ │ │ │ ├─┬ debug@2.6.1
│ │ │ │ │ │ └── ms@0.7.2
│ │ │ │ │ └── unpipe@1.0.0
│ │ │ │ ├── fresh@0.5.0
│ │ │ │ ├── merge-descriptors@1.0.1
│ │ │ │ ├── methods@1.1.2
│ │ │ │ ├─┬ on-finished@2.3.0
│ │ │ │ │ └── ee-first@1.1.1
│ │ │ │ ├── parseurl@1.3.1
│ │ │ │ ├── path-to-regexp@0.1.7
│ │ │ │ ├─┬ proxy-addr@1.1.3
│ │ │ │ │ ├── forwarded@0.1.0
│ │ │ │ │ └── ipaddr.js@1.2.0
│ │ │ │ ├── range-parser@1.2.0
│ │ │ │ ├─┬ send@0.15.1
│ │ │ │ │ ├── debug@2.6.1
│ │ │ │ │ ├── destroy@1.0.4
│ │ │ │ │ ├── http-errors@1.6.1
│ │ │ │ │ ├── mime@1.3.4
│ │ │ │ │ └── ms@0.7.2
│ │ │ │ ├── serve-static@1.12.1
│ │ │ │ ├── setprototypeof@1.0.3
│ │ │ │ ├── statuses@1.3.1
│ │ │ │ ├─┬ type-is@1.6.14
│ │ │ │ │ └── media-typer@0.3.0
│ │ │ │ └── utils-merge@1.0.0
│ │ │ └── q@1.4.1
│ │ ├─┬ dep-graph@1.1.0
│ │ │ └── underscore@1.2.1
│ │ ├─┬ elementtree@0.1.6
│ │ │ └── sax@0.3.5
│ │ ├─┬ init-package-json@1.9.5
│ │ │ ├─┬ glob@7.1.1
│ │ │ │ └── fs.realpath@1.0.0
│ │ │ ├─┬ npm-package-arg@4.2.1
│ │ │ │ └── hosted-git-info@2.3.1
│ │ │ ├── promzard@0.3.0
│ │ │ ├─┬ read@1.0.7
│ │ │ │ └── mute-stream@0.0.7
│ │ │ ├─┬ read-package-json@2.0.5
│ │ │ │ ├── glob@7.1.1
│ │ │ │ ├─┬ json-parse-helpfulerror@1.0.3
│ │ │ │ │ └── jju@1.3.0
│ │ │ │ └─┬ normalize-package-data@2.3.6
│ │ │ │ └─┬ is-builtin-module@1.0.0
│ │ │ │ └── builtin-modules@1.1.1
│ │ │ ├─┬ validate-npm-package-license@3.0.1
│ │ │ │ ├─┬ spdx-correct@1.0.2
│ │ │ │ │ └── spdx-license-ids@1.2.2
│ │ │ │ └── spdx-expression-parse@1.0.4
│ │ │ └─┬ validate-npm-package-name@3.0.0
│ │ │ └── builtins@1.0.3
│ │ ├── nopt@3.0.6
│ │ ├─┬ npm@2.15.11
│ │ │ ├── abbrev@1.0.9
│ │ │ ├── ansi@0.3.1
│ │ │ ├── ansi-regex@2.0.0
│ │ │ ├── ansicolors@0.3.2
│ │ │ ├── ansistyles@0.1.3
│ │ │ ├── archy@1.0.0
│ │ │ ├── async-some@1.0.2
│ │ │ ├── block-stream@0.0.9
│ │ │ ├── char-spinner@1.0.1
│ │ │ ├── chmodr@1.0.2
│ │ │ ├── chownr@1.0.1
│ │ │ ├── cmd-shim@2.0.2
│ │ │ ├─┬ columnify@1.5.4
│ │ │ │ └─┬ wcwidth@1.0.0
│ │ │ │ └─┬ defaults@1.0.3
│ │ │ │ └── clone@1.0.2
│ │ │ ├─┬ config-chain@1.1.10
│ │ │ │ └── proto-list@1.2.4
│ │ │ ├─┬ dezalgo@1.0.3
│ │ │ │ └── asap@2.0.3
│ │ │ ├── editor@1.0.0
│ │ │ ├── fs-vacuum@1.2.9
│ │ │ ├─┬ fs-write-stream-atomic@1.0.8
│ │ │ │ └── iferr@0.1.5
│ │ │ ├── fstream@1.0.10
│ │ │ ├─┬ fstream-npm@1.1.1
│ │ │ │ └── fstream-ignore@1.0.5
│ │ │ ├── github-url-from-git@1.4.0
│ │ │ ├── github-url-from-username-repo@1.0.2
│ │ │ ├─┬ glob@7.0.6
│ │ │ │ ├── fs.realpath@1.0.0
│ │ │ │ └── path-is-absolute@1.0.0
│ │ │ ├── graceful-fs@4.1.6
│ │ │ ├── hosted-git-info@2.1.5
│ │ │ ├── imurmurhash@0.1.4
│ │ │ ├── inflight@1.0.5
│ │ │ ├── inherits@2.0.3
│ │ │ ├── ini@1.3.4
│ │ │ ├─┬ init-package-json@1.9.4
│ │ │ │ ├─┬ glob@6.0.4
│ │ │ │ │ └── path-is-absolute@1.0.0
│ │ │ │ └── promzard@0.3.0
│ │ │ ├── lockfile@1.0.1
│ │ │ ├─┬ lru-cache@4.0.1
│ │ │ │ ├── pseudomap@1.0.2
│ │ │ │ └── yallist@2.0.0
│ │ │ ├─┬ minimatch@3.0.3
│ │ │ │ └─┬ brace-expansion@1.1.6
│ │ │ │ ├── balanced-match@0.4.2
│ │ │ │ └── concat-map@0.0.1
│ │ │ ├─┬ mkdirp@0.5.1
│ │ │ │ └── minimist@0.0.8
│ │ │ ├─┬ node-gyp@3.4.0
│ │ │ │ └─┬ path-array@1.0.1
│ │ │ │ └─┬ array-index@1.0.0
│ │ │ │ ├─┬ debug@2.2.0
│ │ │ │ │ └── ms@0.7.1
│ │ │ │ └─┬ es6-symbol@3.1.0
│ │ │ │ ├── d@0.1.1
│ │ │ │ └─┬ es5-ext@0.10.12
│ │ │ │ └── es6-iterator@2.0.0
│ │ │ ├── nopt@3.0.6
│ │ │ ├── normalize-git-url@3.0.2
│ │ │ ├─┬ normalize-package-data@2.3.5
│ │ │ │ └─┬ is-builtin-module@1.0.0
│ │ │ │ └── builtin-modules@1.1.0
│ │ │ ├── npm-cache-filename@1.0.2
│ │ │ ├── npm-install-checks@1.0.7
│ │ │ ├── npm-package-arg@4.1.0
│ │ │ ├─┬ npm-registry-client@7.2.1
│ │ │ │ ├─┬ concat-stream@1.5.2
│ │ │ │ │ ├─┬ readable-stream@2.0.6
│ │ │ │ │ │ ├── core-util-is@1.0.2
│ │ │ │ │ │ ├── isarray@1.0.0
│ │ │ │ │ │ ├── process-nextick-args@1.0.7
│ │ │ │ │ │ ├── string_decoder@0.10.31
│ │ │ │ │ │ └── util-deprecate@1.0.2
│ │ │ │ │ └── typedarray@0.0.6
│ │ │ │ └── retry@0.10.0
│ │ │ ├── npm-user-validate@0.1.5
│ │ │ ├─┬ npmlog@2.0.4
│ │ │ │ ├─┬ are-we-there-yet@1.1.2
│ │ │ │ │ └── delegates@1.0.0
│ │ │ │ └─┬ gauge@1.2.7
│ │ │ │ ├── has-unicode@2.0.0
│ │ │ │ ├─┬ lodash.pad@4.4.0
│ │ │ │ │ ├── lodash._baseslice@4.0.0
│ │ │ │ │ ├── lodash._basetostring@4.12.0
│ │ │ │ │ └── lodash.tostring@4.1.4
│ │ │ │ ├── lodash.padend@4.5.0
│ │ │ │ └── lodash.padstart@4.5.0
│ │ │ ├── once@1.4.0
│ │ │ ├── opener@1.4.1
│ │ │ ├─┬ osenv@0.1.3
│ │ │ │ ├── os-homedir@1.0.0
│ │ │ │ └── os-tmpdir@1.0.1
│ │ │ ├── path-is-inside@1.0.1
│ │ │ ├─┬ read@1.0.7
│ │ │ │ └── mute-stream@0.0.5
│ │ │ ├─┬ read-installed@4.0.3
│ │ │ │ ├── debuglog@1.0.1
│ │ │ │ ├── readdir-scoped-modules@1.0.2
│ │ │ │ └── util-extend@1.0.1
│ │ │ ├─┬ read-package-json@2.0.4
│ │ │ │ ├─┬ glob@6.0.4
│ │ │ │ │ └── path-is-absolute@1.0.0
│ │ │ │ └─┬ json-parse-helpfulerror@1.0.3
│ │ │ │ └── jju@1.3.0
│ │ │ ├─┬ readable-stream@2.1.5
│ │ │ │ ├── buffer-shims@1.0.0
│ │ │ │ ├── core-util-is@1.0.2
│ │ │ │ ├── isarray@1.0.0
│ │ │ │ ├── process-nextick-args@1.0.7
│ │ │ │ ├── string_decoder@0.10.31
│ │ │ │ └── util-deprecate@1.0.2
│ │ │ ├── realize-package-specifier@3.0.1
│ │ │ ├─┬ request@2.74.0
│ │ │ │ ├── aws-sign2@0.6.0
│ │ │ │ ├── aws4@1.4.1
│ │ │ │ ├─┬ bl@1.1.2
│ │ │ │ │ └─┬ readable-stream@2.0.6
│ │ │ │ │ ├── core-util-is@1.0.2
│ │ │ │ │ ├── isarray@1.0.0
│ │ │ │ │ ├── process-nextick-args@1.0.7
│ │ │ │ │ ├── string_decoder@0.10.31
│ │ │ │ │ └── util-deprecate@1.0.2
│ │ │ │ ├── caseless@0.11.0
│ │ │ │ ├─┬ combined-stream@1.0.5
│ │ │ │ │ └── delayed-stream@1.0.0
│ │ │ │ ├── extend@3.0.0
│ │ │ │ ├── forever-agent@0.6.1
│ │ │ │ ├─┬ form-data@1.0.0-rc4
│ │ │ │ │ └── async@1.5.2
│ │ │ │ ├─┬ har-validator@2.0.6
│ │ │ │ │ ├─┬ chalk@1.1.3
│ │ │ │ │ │ ├── ansi-styles@2.2.1
│ │ │ │ │ │ ├── escape-string-regexp@1.0.5
│ │ │ │ │ │ ├── has-ansi@2.0.0
│ │ │ │ │ │ └── supports-color@2.0.0
│ │ │ │ │ ├─┬ commander@2.9.0
│ │ │ │ │ │ └── graceful-readlink@1.0.1
│ │ │ │ │ ├─┬ is-my-json-valid@2.13.1
│ │ │ │ │ │ ├── generate-function@2.0.0
│ │ │ │ │ │ ├─┬ generate-object-property@1.2.0
│ │ │ │ │ │ │ └── is-property@1.0.2
│ │ │ │ │ │ ├── jsonpointer@2.0.0
│ │ │ │ │ │ └── xtend@4.0.1
│ │ │ │ │ └─┬ pinkie-promise@2.0.1
│ │ │ │ │ └── pinkie@2.0.4
│ │ │ │ ├─┬ hawk@3.1.3
│ │ │ │ │ ├── boom@2.10.1
│ │ │ │ │ ├── cryptiles@2.0.5
│ │ │ │ │ ├── hoek@2.16.3
│ │ │ │ │ └── sntp@1.0.9
│ │ │ │ ├─┬ http-signature@1.1.1
│ │ │ │ │ ├── assert-plus@0.2.0
│ │ │ │ │ ├─┬ jsprim@1.3.0
│ │ │ │ │ │ ├── extsprintf@1.0.2
│ │ │ │ │ │ ├── json-schema@0.2.2
│ │ │ │ │ │ └── verror@1.3.6
│ │ │ │ │ └─┬ sshpk@1.9.2
│ │ │ │ │ ├── asn1@0.2.3
│ │ │ │ │ ├── assert-plus@1.0.0
│ │ │ │ │ ├── dashdash@1.14.0
│ │ │ │ │ ├── ecc-jsbn@0.1.1
│ │ │ │ │ ├── getpass@0.1.6
│ │ │ │ │ ├── jodid25519@1.0.2
│ │ │ │ │ ├── jsbn@0.1.0
│ │ │ │ │ └── tweetnacl@0.13.3
│ │ │ │ ├── is-typedarray@1.0.0
│ │ │ │ ├── isstream@0.1.2
│ │ │ │ ├── json-stringify-safe@5.0.1
│ │ │ │ ├─┬ mime-types@2.1.11
│ │ │ │ │ └── mime-db@1.23.0
│ │ │ │ ├── node-uuid@1.4.7
│ │ │ │ ├── oauth-sign@0.8.2
│ │ │ │ ├── qs@6.2.1
│ │ │ │ ├── stringstream@0.0.5
│ │ │ │ ├── tough-cookie@2.3.1
│ │ │ │ └── tunnel-agent@0.4.3
│ │ │ ├── retry@0.10.0
│ │ │ ├── rimraf@2.5.4
│ │ │ ├── semver@5.1.0
│ │ │ ├─┬ sha@2.0.1
│ │ │ │ └─┬ readable-stream@2.0.2
│ │ │ │ ├── core-util-is@1.0.1
│ │ │ │ ├── isarray@0.0.1
│ │ │ │ ├── process-nextick-args@1.0.3
│ │ │ │ ├── string_decoder@0.10.31
│ │ │ │ └── util-deprecate@1.0.1
│ │ │ ├── slide@1.1.6
│ │ │ ├── sorted-object@2.0.0
│ │ │ ├── spdx-license-ids@1.2.2
│ │ │ ├── strip-ansi@3.0.1
│ │ │ ├── tar@2.2.1
│ │ │ ├── text-table@0.2.0
│ │ │ ├── uid-number@0.0.6
│ │ │ ├── umask@1.1.0
│ │ │ ├─┬ validate-npm-package-license@3.0.1
│ │ │ │ ├── spdx-correct@1.0.2
│ │ │ │ └─┬ spdx-expression-parse@1.0.2
│ │ │ │ └── spdx-exceptions@1.0.4
│ │ │ ├─┬ validate-npm-package-name@2.2.2
│ │ │ │ └── builtins@0.0.7
│ │ │ ├─┬ which@1.2.11
│ │ │ │ └── isexe@1.1.2
│ │ │ ├── wrappy@1.0.2
│ │ │ └── write-file-atomic@1.1.4
│ │ ├── opener@1.4.1
│ │ ├── properties-parser@0.2.3
│ │ ├─┬ request@2.47.0
│ │ │ ├── aws-sign2@0.5.0
│ │ │ ├─┬ bl@0.9.5
│ │ │ │ └── readable-stream@1.0.34
│ │ │ ├── caseless@0.6.0
│ │ │ ├─┬ combined-stream@0.0.7
│ │ │ │ └── delayed-stream@0.0.5
│ │ │ ├── forever-agent@0.5.2
│ │ │ ├─┬ form-data@0.1.4
│ │ │ │ ├── async@0.9.2
│ │ │ │ └── mime@1.2.11
│ │ │ ├─┬ hawk@1.1.1
│ │ │ │ ├── boom@0.4.2
│ │ │ │ ├── cryptiles@0.2.2
│ │ │ │ ├── hoek@0.9.1
│ │ │ │ └── sntp@0.2.4
│ │ │ ├─┬ http-signature@0.10.1
│ │ │ │ ├── asn1@0.1.11
│ │ │ │ ├── assert-plus@0.1.5
│ │ │ │ └── ctype@0.5.3
│ │ │ ├── json-stringify-safe@5.0.1
│ │ │ ├── mime-types@1.0.2
│ │ │ ├── node-uuid@1.4.7
│ │ │ ├── oauth-sign@0.4.0
│ │ │ ├── qs@2.3.3
│ │ │ ├── stringstream@0.0.5
│ │ │ └── tunnel-agent@0.4.3
│ │ ├── semver@4.3.6
│ │ ├── shelljs@0.3.0
│ │ ├─┬ tar@1.0.2
│ │ │ ├── block-stream@0.0.9
│ │ │ └─┬ fstream@1.0.11
│ │ │ └─┬ rimraf@2.6.1
│ │ │ └── glob@7.1.1
│ │ ├── unorm@1.3.3
│ │ ├── valid-identifier@0.0.1
│ │ └─┬ xcode@0.9.1
│ │ ├── pegjs@0.9.0
│ │ └─┬ simple-plist@0.1.4
│ │ ├─┬ bplist-creator@0.0.4
│ │ │ └── stream-buffers@0.2.6
│ │ └── bplist-parser@0.0.6
│ ├─┬ insight@0.8.4
│ │ ├── async@1.5.2
│ │ ├─┬ chalk@1.1.3
│ │ │ ├── ansi-styles@2.2.1
│ │ │ ├── escape-string-regexp@1.0.5
│ │ │ ├── has-ansi@2.0.0
│ │ │ ├── strip-ansi@3.0.1
│ │ │ └── supports-color@2.0.0
│ │ ├─┬ configstore@1.4.0
│ │ │ ├── graceful-fs@4.1.11
│ │ │ ├─┬ mkdirp@0.5.1
│ │ │ │ └── minimist@0.0.8
│ │ │ ├── uuid@2.0.3
│ │ │ ├─┬ write-file-atomic@1.3.1
│ │ │ │ ├── imurmurhash@0.1.4
│ │ │ │ └── slide@1.1.6
│ │ │ └── xdg-basedir@2.0.0
│ │ ├─┬ inquirer@0.10.1
│ │ │ ├── ansi-escapes@1.4.0
│ │ │ ├── ansi-regex@2.1.1
│ │ │ ├─┬ cli-cursor@1.0.2
│ │ │ │ └─┬ restore-cursor@1.0.1
│ │ │ │ ├── exit-hook@1.1.1
│ │ │ │ └── onetime@1.1.0
│ │ │ ├── cli-width@1.1.1
│ │ │ ├── figures@1.7.0
│ │ │ ├── lodash@3.10.1
│ │ │ ├─┬ readline2@1.0.1
│ │ │ │ ├── code-point-at@1.1.0
│ │ │ │ ├── is-fullwidth-code-point@1.0.0
│ │ │ │ └── mute-stream@0.0.5
│ │ │ ├── run-async@0.1.0
│ │ │ ├── rx-lite@3.1.2
│ │ │ └── through@2.3.8
│ │ ├─┬ lodash.debounce@3.1.1
│ │ │ └── lodash._getnative@3.9.1
│ │ ├── object-assign@4.1.1
│ │ ├─┬ os-name@1.0.3
│ │ │ ├─┬ osx-release@1.1.0
│ │ │ │ └── minimist@1.2.0
│ │ │ └── win-release@1.1.1
│ │ ├─┬ request@2.81.0
│ │ │ ├── aws-sign2@0.6.0
│ │ │ ├── aws4@1.6.0
│ │ │ ├── caseless@0.12.0
│ │ │ ├─┬ combined-stream@1.0.5
│ │ │ │ └── delayed-stream@1.0.0
│ │ │ ├── extend@3.0.0
│ │ │ ├── forever-agent@0.6.1
│ │ │ ├─┬ form-data@2.1.2
│ │ │ │ └── asynckit@0.4.0
│ │ │ ├─┬ har-validator@4.2.1
│ │ │ │ ├─┬ ajv@4.11.5
│ │ │ │ │ ├── co@4.6.0
│ │ │ │ │ └── json-stable-stringify@1.0.1
│ │ │ │ └── har-schema@1.0.5
│ │ │ ├─┬ hawk@3.1.3
│ │ │ │ ├── boom@2.10.1
│ │ │ │ ├── cryptiles@2.0.5
│ │ │ │ ├── hoek@2.16.3
│ │ │ │ └── sntp@1.0.9
│ │ │ ├─┬ http-signature@1.1.1
│ │ │ │ ├── assert-plus@0.2.0
│ │ │ │ ├─┬ jsprim@1.4.0
│ │ │ │ │ ├── assert-plus@1.0.0
│ │ │ │ │ ├── extsprintf@1.0.2
│ │ │ │ │ ├── json-schema@0.2.3
│ │ │ │ │ └── verror@1.3.6
│ │ │ │ └─┬ sshpk@1.11.0
│ │ │ │ ├── asn1@0.2.3
│ │ │ │ ├── assert-plus@1.0.0
│ │ │ │ ├── bcrypt-pbkdf@1.0.1
│ │ │ │ ├─┬ dashdash@1.14.1
│ │ │ │ │ └── assert-plus@1.0.0
│ │ │ │ ├── ecc-jsbn@0.1.1
│ │ │ │ ├─┬ getpass@0.1.6
│ │ │ │ │ └── assert-plus@1.0.0
│ │ │ │ ├── jodid25519@1.0.2
│ │ │ │ ├── jsbn@0.1.1
│ │ │ │ └── tweetnacl@0.14.5
│ │ │ ├── is-typedarray@1.0.0
│ │ │ ├── isstream@0.1.2
│ │ │ ├─┬ mime-types@2.1.14
│ │ │ │ └── mime-db@1.26.0
│ │ │ ├── oauth-sign@0.8.2
│ │ │ ├── performance-now@0.2.0
│ │ │ ├── qs@6.4.0
│ │ │ ├── safe-buffer@5.0.1
│ │ │ └── tunnel-agent@0.6.0
│ │ ├─┬ tough-cookie@2.3.2
│ │ │ └── punycode@1.4.1
│ │ └── uuid@3.0.1
│ ├─┬ nopt@3.0.1
│ │ └── abbrev@1.1.0
│ ├── q@1.0.1
│ ├── underscore@1.7.0
│ └─┬ update-notifier@0.5.0
│ ├── is-npm@1.0.0
│ ├─┬ latest-version@1.0.1
│ │ └─┬ package-json@1.2.0
│ │ ├─┬ got@3.3.1
│ │ │ ├─┬ duplexify@3.5.0
│ │ │ │ ├─┬ end-of-stream@1.0.0
│ │ │ │ │ └── once@1.3.3
│ │ │ │ └── stream-shift@1.0.0
│ │ │ ├── infinity-agent@2.0.3
│ │ │ ├── is-redirect@1.0.0
│ │ │ ├── is-stream@1.1.0
│ │ │ ├── lowercase-keys@1.0.0
│ │ │ ├── nested-error-stacks@1.0.2
│ │ │ ├── object-assign@3.0.0
│ │ │ ├── prepend-http@1.0.4
│ │ │ ├─┬ read-all-stream@3.1.0
│ │ │ │ └─┬ pinkie-promise@2.0.1
│ │ │ │ └── pinkie@2.0.4
│ │ │ └── timed-out@2.0.0
│ │ └─┬ registry-url@3.1.0
│ │ └─┬ rc@1.1.7
│ │ ├── deep-extend@0.4.1
│ │ ├── ini@1.3.4
│ │ └── strip-json-comments@2.0.1
│ ├─┬ repeating@1.1.3
│ │ └─┬ is-finite@1.0.2
│ │ └── number-is-nan@1.0.1
│ ├── semver-diff@2.1.0
│ └── string-length@1.0.1
└─┬ ionic@2.2.1
├── @ionic/app-generators@0.0.3
├─┬ chalk@1.1.3
│ ├── ansi-styles@2.2.1
│ ├── escape-string-regexp@1.0.5
│ ├─┬ has-ansi@2.0.0
│ │ └── ansi-regex@2.0.0
│ ├─┬ strip-ansi@3.0.1
│ │ └── ansi-regex@2.0.0
│ └── supports-color@2.0.0
├─┬ cli-table@0.3.1
│ └── colors@1.0.3
├─┬ cross-spawn@5.0.1
│ ├─┬ lru-cache@4.0.2
│ │ ├── pseudomap@1.0.2
│ │ └── yallist@2.0.0
│ ├─┬ shebang-command@1.2.0
│ │ └── shebang-regex@1.0.0
│ └─┬ which@1.2.12
│ └── isexe@1.1.2
├─┬ expand-tilde@1.2.0
│ └── user-home@1.1.1
├─┬ form-data@0.1.4
│ ├── async@0.9.2
│ ├─┬ combined-stream@0.0.7
│ │ └── delayed-stream@0.0.5
│ └── mime@1.2.11
├─┬ gulp@3.8.8
│ ├── archy@0.0.2
│ ├─┬ chalk@0.5.1
│ │ ├── ansi-styles@1.1.0
│ │ ├── escape-string-regexp@1.0.5
│ │ ├─┬ has-ansi@0.1.0
│ │ │ └── ansi-regex@0.2.1
│ │ ├─┬ strip-ansi@0.3.0
│ │ │ └── ansi-regex@0.2.1
│ │ └── supports-color@0.2.0
│ ├── deprecated@0.0.1
│ ├── interpret@0.3.10
│ ├─┬ liftoff@0.12.1
│ │ ├── extend@1.3.0
│ │ ├─┬ findup-sync@0.1.3
│ │ │ ├─┬ glob@3.2.11
│ │ │ │ ├── inherits@2.0.3
│ │ │ │ └─┬ minimatch@0.3.0
│ │ │ │ ├── lru-cache@2.7.3
│ │ │ │ └── sigmund@1.0.1
│ │ │ └── lodash@2.4.2
│ │ ├── minimist@0.2.0
│ │ └── resolve@0.7.4
│ ├── minimist@1.2.0
│ ├─┬ orchestrator@0.3.8
│ │ ├─┬ end-of-stream@0.1.5
│ │ │ └─┬ once@1.3.3
│ │ │ └── wrappy@1.0.2
│ │ ├── sequencify@0.0.7
│ │ └── stream-consume@0.1.0
│ ├── pretty-hrtime@0.2.2
│ ├── semver@3.0.1
│ ├─┬ tildify@1.2.0
│ │ └── os-homedir@1.0.2
│ └─┬ vinyl-fs@0.3.14
│ ├─┬ defaults@1.0.3
│ │ └── clone@1.0.2
│ ├─┬ glob-stream@3.1.18
│ │ ├─┬ glob@4.5.3
│ │ │ ├─┬ inflight@1.0.6
│ │ │ │ └── wrappy@1.0.2
│ │ │ ├── inherits@2.0.3
│ │ │ └─┬ once@1.4.0
│ │ │ └── wrappy@1.0.2
│ │ ├─┬ glob2base@0.0.12
│ │ │ └── find-index@0.1.1
│ │ ├─┬ minimatch@2.0.10
│ │ │ └─┬ brace-expansion@1.1.6
│ │ │ ├── balanced-match@0.4.2
│ │ │ └── concat-map@0.0.1
│ │ ├── ordered-read-streams@0.1.0
│ │ └── unique-stream@1.0.0
│ ├─┬ glob-watcher@0.0.6
│ │ └─┬ gaze@0.5.2
│ │ └─┬ globule@0.1.0
│ │ ├─┬ glob@3.1.21
│ │ │ ├── graceful-fs@1.2.3
│ │ │ └── inherits@1.0.2
│ │ ├── lodash@1.0.2
│ │ └─┬ minimatch@0.2.14
│ │ ├── lru-cache@2.7.3
│ │ └── sigmund@1.0.1
│ ├─┬ graceful-fs@3.0.11
│ │ └── natives@1.1.0
│ ├─┬ mkdirp@0.5.1
│ │ └── minimist@0.0.8
│ ├─┬ strip-bom@1.0.0
│ │ ├── first-chunk-stream@1.0.0
│ │ └── is-utf8@0.2.1
│ ├─┬ through2@0.6.5
│ │ ├─┬ readable-stream@1.0.34
│ │ │ ├── core-util-is@1.0.2
│ │ │ ├── inherits@2.0.3
│ │ │ ├── isarray@0.0.1
│ │ │ └── string_decoder@0.10.31
│ │ └── xtend@4.0.1
│ └─┬ vinyl@0.4.6
│ ├── clone@0.2.0
│ └── clone-stats@0.0.1
├─┬ gulp-util@3.0.7
│ ├── array-differ@1.0.0
│ ├── array-uniq@1.0.3
│ ├── beeper@1.1.1
│ ├─┬ dateformat@1.0.12
│ │ ├── get-stdin@4.0.1
│ │ └─┬ meow@3.7.0
│ │ ├─┬ camelcase-keys@2.1.0
│ │ │ └── camelcase@2.1.1
│ │ ├── decamelize@1.2.0
│ │ ├─┬ loud-rejection@1.6.0
│ │ │ ├─┬ currently-unhandled@0.4.1
│ │ │ │ └── array-find-index@1.0.2
│ │ │ └── signal-exit@3.0.2
│ │ ├── map-obj@1.0.1
│ │ ├─┬ normalize-package-data@2.3.5
│ │ │ ├── hosted-git-info@2.1.5
│ │ │ ├─┬ is-builtin-module@1.0.0
│ │ │ │ └── builtin-modules@1.1.1
│ │ │ └─┬ validate-npm-package-license@3.0.1
│ │ │ ├─┬ spdx-correct@1.0.2
│ │ │ │ └── spdx-license-ids@1.2.2
│ │ │ └── spdx-expression-parse@1.0.4
│ │ ├── object-assign@4.1.0
│ │ ├─┬ read-pkg-up@1.0.1
│ │ │ ├─┬ find-up@1.1.2
│ │ │ │ ├── path-exists@2.1.0
│ │ │ │ └─┬ pinkie-promise@2.0.1
│ │ │ │ └── pinkie@2.0.4
│ │ │ └─┬ read-pkg@1.1.0
│ │ │ ├─┬ load-json-file@1.1.0
│ │ │ │ ├── graceful-fs@4.1.11
│ │ │ │ ├─┬ parse-json@2.2.0
│ │ │ │ │ └─┬ error-ex@1.3.0
│ │ │ │ │ └── is-arrayish@0.2.1
│ │ │ │ ├── pify@2.3.0
│ │ │ │ ├─┬ pinkie-promise@2.0.1
│ │ │ │ │ └── pinkie@2.0.4
│ │ │ │ └─┬ strip-bom@2.0.0
│ │ │ │ └── is-utf8@0.2.1
│ │ │ └─┬ path-type@1.1.0
│ │ │ ├── graceful-fs@4.1.11
│ │ │ ├── pify@2.3.0
│ │ │ └─┬ pinkie-promise@2.0.1
│ │ │ └── pinkie@2.0.4
│ │ ├─┬ redent@1.0.0
│ │ │ ├─┬ indent-string@2.1.0
│ │ │ │ └─┬ repeating@2.0.1
│ │ │ │ └─┬ is-finite@1.0.2
│ │ │ │ └── number-is-nan@1.0.1
│ │ │ └── strip-indent@1.0.1
│ │ └── trim-newlines@1.0.0
│ ├─┬ fancy-log@1.2.0
│ │ └── time-stamp@1.0.1
│ ├─┬ gulplog@1.0.0
│ │ └─┬ glogg@1.0.0
│ │ └── sparkles@1.0.0
│ ├─┬ has-gulplog@0.1.0
│ │ └── sparkles@1.0.0
│ ├── lodash._reescape@3.0.0
│ ├── lodash._reevaluate@3.0.0
│ ├── lodash._reinterpolate@3.0.0
│ ├─┬ lodash.template@3.6.2
│ │ ├── lodash._basecopy@3.0.1
│ │ ├── lodash._basetostring@3.0.1
│ │ ├── lodash._basevalues@3.0.0
│ │ ├── lodash._isiterateecall@3.0.9
│ │ ├─┬ lodash.escape@3.2.0
│ │ │ └── lodash._root@3.0.1
│ │ ├─┬ lodash.keys@3.1.2
│ │ │ ├── lodash._getnative@3.9.1
│ │ │ ├── lodash.isarguments@3.1.0
│ │ │ └── lodash.isarray@3.0.4
│ │ ├── lodash.restparam@3.6.1
│ │ └── lodash.templatesettings@3.1.1
│ ├── minimist@1.2.0
│ ├─┬ multipipe@0.1.2
│ │ └─┬ duplexer2@0.0.2
│ │ └─┬ readable-stream@1.1.14
│ │ ├── core-util-is@1.0.2
│ │ ├── inherits@2.0.3
│ │ ├── isarray@0.0.1
│ │ └── string_decoder@0.10.31
│ ├── object-assign@3.0.0
│ ├── replace-ext@0.0.1
│ ├─┬ through2@2.0.3
│ │ ├─┬ readable-stream@2.2.2
│ │ │ ├── buffer-shims@1.0.0
│ │ │ ├── core-util-is@1.0.2
│ │ │ ├── inherits@2.0.3
│ │ │ ├── isarray@1.0.0
│ │ │ ├── process-nextick-args@1.0.7
│ │ │ ├── string_decoder@0.10.31
│ │ │ └── util-deprecate@1.0.2
│ │ └── xtend@4.0.1
│ └─┬ vinyl@0.5.3
│ ├── clone@1.0.2
│ └── clone-stats@0.0.1
├─┬ inquirer@0.11.2
│ ├── ansi-escapes@1.4.0
│ ├── ansi-regex@2.0.0
│ ├─┬ cli-cursor@1.0.2
│ │ └─┬ restore-cursor@1.0.1
│ │ ├── exit-hook@1.1.1
│ │ └── onetime@1.1.0
│ ├── cli-width@1.1.1
│ ├─┬ figures@1.7.0
│ │ ├── escape-string-regexp@1.0.5
│ │ └── object-assign@4.1.0
│ ├── lodash@3.10.1
│ ├─┬ readline2@1.0.1
│ │ ├── code-point-at@1.1.0
│ │ ├─┬ is-fullwidth-code-point@1.0.0
│ │ │ └── number-is-nan@1.0.1
│ │ └── mute-stream@0.0.5
│ ├─┬ run-async@0.1.0
│ │ └─┬ once@1.4.0
│ │ └── wrappy@1.0.2
│ ├── rx-lite@3.1.2
│ ├── strip-ansi@3.0.1
│ └── through@2.3.8
├─┬ ionic-app-lib@2.2.0
│ ├── adm-zip@0.4.7
│ ├─┬ archiver@0.5.2
│ │ ├─┬ file-utils@0.1.5
│ │ │ ├── findup-sync@0.1.3
│ │ │ ├─┬ glob@3.2.11
│ │ │ │ └── minimatch@0.3.0
│ │ │ ├── iconv-lite@0.2.11
│ │ │ ├── isbinaryfile@0.1.9
│ │ │ ├── lodash@2.1.0
│ │ │ ├─┬ minimatch@0.2.14
│ │ │ │ ├── lru-cache@2.7.3
│ │ │ │ └── sigmund@1.0.1
│ │ │ └── rimraf@2.2.8
│ │ ├── lazystream@0.1.0
│ │ ├── lodash@2.4.2
│ │ ├─┬ readable-stream@1.0.34
│ │ │ ├── core-util-is@1.0.2
│ │ │ ├── inherits@2.0.3
│ │ │ ├── isarray@0.0.1
│ │ │ └── string_decoder@0.10.31
│ │ └─┬ zip-stream@0.1.4
│ │ └─┬ lodash.defaults@2.4.1
│ │ ├── lodash._objecttypes@2.4.1
│ │ └─┬ lodash.keys@2.4.1
│ │ ├── lodash._isnative@2.4.1
│ │ ├── lodash._shimkeys@2.4.1
│ │ └── lodash.isobject@2.4.1
│ ├─┬ cheerio@0.19.0
│ │ ├─┬ css-select@1.0.0
│ │ │ ├── boolbase@1.0.0
│ │ │ ├── css-what@1.0.0
│ │ │ ├── domutils@1.4.3
│ │ │ └── nth-check@1.0.1
│ │ ├─┬ dom-serializer@0.1.0
│ │ │ └── domelementtype@1.1.3
│ │ ├── entities@1.1.1
│ │ ├─┬ htmlparser2@3.8.3
│ │ │ ├── domelementtype@1.3.0
│ │ │ ├── domhandler@2.3.0
│ │ │ ├── domutils@1.5.1
│ │ │ ├── entities@1.0.0
│ │ │ └── readable-stream@1.1.14
│ │ └── lodash@3.10.1
│ ├─┬ connect@3.1.1
│ │ ├─┬ debug@1.0.4
│ │ │ └── ms@0.6.2
│ │ ├── finalhandler@0.1.0
│ │ ├── parseurl@1.3.1
│ │ └── utils-merge@1.0.0
│ ├── connect-livereload@0.5.2
│ ├─┬ cordova-lib@6.1.0
│ │ ├─┬ aliasify@1.9.0
│ │ │ └─┬ browserify-transform-tools@1.5.3
│ │ │ ├─┬ falafel@1.2.0
│ │ │ │ ├── acorn@1.2.2
│ │ │ │ ├── foreach@2.0.5
│ │ │ │ └── object-keys@1.0.11
│ │ │ └── through@2.3.8
│ │ ├── cordova-app-hello-world@3.10.0
│ │ ├─┬ cordova-common@1.1.1
│ │ │ ├── ansi@0.3.1
│ │ │ ├─┬ bplist-parser@0.1.1
│ │ │ │ └── big-integer@1.6.12
│ │ │ ├─┬ osenv@0.1.3
│ │ │ │ ├── os-homedir@1.0.1
│ │ │ │ └── os-tmpdir@1.0.1
│ │ │ ├── q@1.4.1
│ │ │ ├── semver@5.1.0
│ │ │ ├── shelljs@0.5.3
│ │ │ └── underscore@1.8.3
│ │ ├─┬ cordova-js@4.1.4
│ │ │ └─┬ browserify@10.1.3
│ │ │ ├── assert@1.3.0
│ │ │ ├─┬ browser-pack@4.0.4
│ │ │ │ ├─┬ combine-source-map@0.3.0
│ │ │ │ │ ├── convert-source-map@0.3.5
│ │ │ │ │ ├─┬ inline-source-map@0.3.1
│ │ │ │ │ │ └── source-map@0.3.0
│ │ │ │ │ └─┬ source-map@0.1.43
│ │ │ │ │ └── amdefine@1.0.1
│ │ │ │ ├─┬ through2@0.5.1
│ │ │ │ │ └── xtend@3.0.0
│ │ │ │ └── umd@3.0.1
│ │ │ ├─┬ browser-resolve@1.11.2
│ │ │ │ └── resolve@1.1.7
│ │ │ ├─┬ browserify-zlib@0.1.4
│ │ │ │ └── pako@0.2.9
│ │ │ ├─┬ buffer@3.6.0
│ │ │ │ ├── base64-js@0.0.8
│ │ │ │ ├── ieee754@1.1.8
│ │ │ │ └── isarray@1.0.0
│ │ │ ├── builtins@0.0.7
│ │ │ ├── commondir@0.0.1
│ │ │ ├─┬ concat-stream@1.4.10
│ │ │ │ ├── readable-stream@1.1.14
│ │ │ │ └── typedarray@0.0.6
│ │ │ ├─┬ console-browserify@1.1.0
│ │ │ │ └── date-now@0.1.4
│ │ │ ├── constants-browserify@0.0.1
│ │ │ ├─┬ crypto-browserify@3.11.0
│ │ │ │ ├─┬ browserify-cipher@1.0.0
│ │ │ │ │ ├─┬ browserify-aes@1.0.6
│ │ │ │ │ │ └── buffer-xor@1.0.3
│ │ │ │ │ ├─┬ browserify-des@1.0.0
│ │ │ │ │ │ └── des.js@1.0.0
│ │ │ │ │ └── evp_bytestokey@1.0.0
│ │ │ │ ├─┬ browserify-sign@4.0.0
│ │ │ │ │ ├── bn.js@4.11.6
│ │ │ │ │ ├── browserify-rsa@4.0.1
│ │ │ │ │ ├─┬ elliptic@6.4.0
│ │ │ │ │ │ ├── brorand@1.1.0
│ │ │ │ │ │ ├── hash.js@1.0.3
│ │ │ │ │ │ ├── hmac-drbg@1.0.0
│ │ │ │ │ │ ├── minimalistic-assert@1.0.0
│ │ │ │ │ │ └── minimalistic-crypto-utils@1.0.1
│ │ │ │ │ └─┬ parse-asn1@5.1.0
│ │ │ │ │ └── asn1.js@4.9.1
│ │ │ │ ├── create-ecdh@4.0.0
│ │ │ │ ├─┬ create-hash@1.1.2
│ │ │ │ │ ├── cipher-base@1.0.3
│ │ │ │ │ └── ripemd160@1.0.1
│ │ │ │ ├── create-hmac@1.1.4
│ │ │ │ ├─┬ diffie-hellman@5.0.2
│ │ │ │ │ └── miller-rabin@4.0.0
│ │ │ │ ├── pbkdf2@3.0.9
│ │ │ │ ├── public-encrypt@4.0.0
│ │ │ │ └── randombytes@2.0.3
│ │ │ ├── deep-equal@1.0.1
│ │ │ ├── defined@1.0.0
│ │ │ ├── deps-sort@1.3.9
│ │ │ ├── domain-browser@1.1.7
│ │ │ ├─┬ duplexer2@0.0.2
│ │ │ │ └── readable-stream@1.1.14
│ │ │ ├── events@1.0.2
│ │ │ ├─┬ glob@4.5.3
│ │ │ │ └── minimatch@2.0.10
│ │ │ ├─┬ has@1.0.1
│ │ │ │ └── function-bind@1.1.0
│ │ │ ├── htmlescape@1.1.1
│ │ │ ├─┬ http-browserify@1.7.0
│ │ │ │ └── Base64@0.2.1
│ │ │ ├── https-browserify@0.0.1
│ │ │ ├─┬ insert-module-globals@6.6.3
│ │ │ │ ├─┬ combine-source-map@0.6.1
│ │ │ │ │ ├── convert-source-map@1.1.3
│ │ │ │ │ ├── inline-source-map@0.5.0
│ │ │ │ │ ├── lodash.memoize@3.0.4
│ │ │ │ │ └── source-map@0.4.4
│ │ │ │ ├── is-buffer@1.1.5
│ │ │ │ └─┬ lexical-scope@1.2.0
│ │ │ │ └─┬ astw@2.2.0
│ │ │ │ └── acorn@4.0.11
│ │ │ ├─┬ JSONStream@1.3.1
│ │ │ │ └── jsonparse@1.3.0
│ │ │ ├─┬ labeled-stream-splicer@1.0.2
│ │ │ │ └─┬ stream-splicer@1.3.2
│ │ │ │ └── readable-stream@1.1.14
│ │ │ ├─┬ module-deps@3.9.1
│ │ │ │ ├─┬ detective@4.5.0
│ │ │ │ │ └── acorn@4.0.11
│ │ │ │ ├── readable-stream@1.1.14
│ │ │ │ └─┬ stream-combiner2@1.0.2
│ │ │ │ └─┬ through2@0.5.1
│ │ │ │ └── xtend@3.0.0
│ │ │ ├── os-browserify@0.1.2
│ │ │ ├─┬ parents@1.0.1
│ │ │ │ └── path-platform@0.11.15
│ │ │ ├── path-browserify@0.0.0
│ │ │ ├── process@0.11.9
│ │ │ ├── querystring-es3@0.2.1
│ │ │ ├─┬ read-only-stream@1.1.1
│ │ │ │ └─┬ readable-wrap@1.0.0
│ │ │ │ └── readable-stream@1.1.14
│ │ │ ├── readable-stream@1.1.14
│ │ │ ├─┬ resolve@1.3.2
│ │ │ │ └── path-parse@1.0.5
│ │ │ ├── shallow-copy@0.0.1
│ │ │ ├─┬ shasum@1.0.2
│ │ │ │ ├─┬ json-stable-stringify@0.0.1
│ │ │ │ │ └── jsonify@0.0.0
│ │ │ │ └── sha.js@2.4.8
│ │ │ ├── shell-quote@0.0.1
│ │ │ ├── stream-browserify@1.0.0
│ │ │ ├─┬ subarg@1.0.0
│ │ │ │ └── minimist@1.2.0
│ │ │ ├─┬ syntax-error@1.3.0
│ │ │ │ └── acorn@4.0.11
│ │ │ ├─┬ through2@1.1.1
│ │ │ │ └── readable-stream@1.1.14
│ │ │ ├── timers-browserify@1.4.2
│ │ │ ├── tty-browserify@0.0.0
│ │ │ ├─┬ url@0.10.3
│ │ │ │ ├── punycode@1.3.2
│ │ │ │ └── querystring@0.2.0
│ │ │ ├─┬ util@0.10.3
│ │ │ │ └── inherits@2.0.1
│ │ │ ├─┬ vm-browserify@0.0.4
│ │ │ │ └── indexof@0.0.1
│ │ │ └── xtend@4.0.1
│ │ ├── cordova-registry-mapper@1.1.15
│ │ ├─┬ cordova-serve@1.0.1
│ │ │ ├─┬ compression@1.6.2
│ │ │ │ ├─┬ accepts@1.3.3
│ │ │ │ │ ├── mime-types@2.1.14
│ │ │ │ │ └── negotiator@0.6.1
│ │ │ │ ├── bytes@2.3.0
│ │ │ │ ├─┬ compressible@2.0.9
│ │ │ │ │ └── mime-db@1.26.0
│ │ │ │ ├─┬ debug@2.2.0
│ │ │ │ │ └── ms@0.7.1
│ │ │ │ ├── on-headers@1.0.1
│ │ │ │ └── vary@1.1.0
│ │ │ ├─┬ express@4.15.2
│ │ │ │ ├── array-flatten@1.1.1
│ │ │ │ ├── content-disposition@0.5.2
│ │ │ │ ├── content-type@1.0.2
│ │ │ │ ├── cookie@0.3.1
│ │ │ │ ├── cookie-signature@1.0.6
│ │ │ │ ├─┬ debug@2.6.1
│ │ │ │ │ └── ms@0.7.2
│ │ │ │ ├── depd@1.1.0
│ │ │ │ ├── encodeurl@1.0.1
│ │ │ │ ├── escape-html@1.0.3
│ │ │ │ ├── etag@1.8.0
│ │ │ │ ├─┬ finalhandler@1.0.0
│ │ │ │ │ └── unpipe@1.0.0
│ │ │ │ ├── fresh@0.5.0
│ │ │ │ ├── merge-descriptors@1.0.1
│ │ │ │ ├── methods@1.1.2
│ │ │ │ ├─┬ on-finished@2.3.0
│ │ │ │ │ └── ee-first@1.1.1
│ │ │ │ ├── path-to-regexp@0.1.7
│ │ │ │ ├─┬ proxy-addr@1.1.3
│ │ │ │ │ ├── forwarded@0.1.0
│ │ │ │ │ └── ipaddr.js@1.2.0
│ │ │ │ ├── qs@6.4.0
│ │ │ │ ├── range-parser@1.2.0
│ │ │ │ ├─┬ send@0.15.1
│ │ │ │ │ ├── debug@2.6.1
│ │ │ │ │ ├── destroy@1.0.4
│ │ │ │ │ ├── escape-html@1.0.3
│ │ │ │ │ ├── http-errors@1.6.1
│ │ │ │ │ ├── mime@1.3.4
│ │ │ │ │ └── ms@0.7.2
│ │ │ │ ├── serve-static@1.12.1
│ │ │ │ ├── setprototypeof@1.0.3
│ │ │ │ ├── statuses@1.3.1
│ │ │ │ └─┬ type-is@1.6.14
│ │ │ │ └── media-typer@0.3.0
│ │ │ └── q@1.4.1
│ │ ├─┬ dep-graph@1.1.0
│ │ │ └── underscore@1.2.1
│ │ ├─┬ elementtree@0.1.6
│ │ │ └── sax@0.3.5
│ │ ├─┬ glob@5.0.15
│ │ │ ├─┬ inflight@1.0.4
│ │ │ │ └── wrappy@1.0.1
│ │ │ ├── inherits@2.0.1
│ │ │ ├─┬ minimatch@3.0.0
│ │ │ │ └─┬ brace-expansion@1.1.3
│ │ │ │ ├── balanced-match@0.3.0
│ │ │ │ └── concat-map@0.0.1
│ │ │ ├── once@1.3.3
│ │ │ └── path-is-absolute@1.0.0
│ │ ├─┬ init-package-json@1.9.5
│ │ │ ├─┬ glob@7.1.1
│ │ │ │ ├── fs.realpath@1.0.0
│ │ │ │ ├── inflight@1.0.6
│ │ │ │ └─┬ minimatch@3.0.3
│ │ │ │ └─┬ brace-expansion@1.1.6
│ │ │ │ ├── balanced-match@0.4.2
│ │ │ │ └── concat-map@0.0.1
│ │ │ ├─┬ npm-package-arg@4.2.1
│ │ │ │ ├── hosted-git-info@2.3.1
│ │ │ │ └── semver@5.3.0
│ │ │ ├── promzard@0.3.0
│ │ │ ├─┬ read@1.0.7
│ │ │ │ └── mute-stream@0.0.7
│ │ │ ├─┬ read-package-json@2.0.5
│ │ │ │ ├─┬ glob@7.1.1
│ │ │ │ │ └── minimatch@3.0.3
│ │ │ │ ├── graceful-fs@4.1.11
│ │ │ │ ├─┬ json-parse-helpfulerror@1.0.3
│ │ │ │ │ └── jju@1.3.0
│ │ │ │ └─┬ normalize-package-data@2.3.6
│ │ │ │ └─┬ is-builtin-module@1.0.0
│ │ │ │ └── builtin-modules@1.1.1
│ │ │ ├─┬ validate-npm-package-license@3.0.1
│ │ │ │ ├─┬ spdx-correct@1.0.2
│ │ │ │ │ └── spdx-license-ids@1.2.2
│ │ │ │ └── spdx-expression-parse@1.0.4
│ │ │ └─┬ validate-npm-package-name@3.0.0
│ │ │ └── builtins@1.0.3
│ │ ├─┬ nopt@3.0.6
│ │ │ └── abbrev@1.1.0
│ │ ├─┬ npm@2.15.11
│ │ │ ├── abbrev@1.0.9
│ │ │ ├── ansi@0.3.1
│ │ │ ├── ansi-regex@2.0.0
│ │ │ ├── ansicolors@0.3.2
│ │ │ ├── ansistyles@0.1.3
│ │ │ ├── archy@1.0.0
│ │ │ ├── async-some@1.0.2
│ │ │ ├── block-stream@0.0.9
│ │ │ ├── char-spinner@1.0.1
│ │ │ ├── chmodr@1.0.2
│ │ │ ├── chownr@1.0.1
│ │ │ ├── cmd-shim@2.0.2
│ │ │ ├─┬ columnify@1.5.4
│ │ │ │ └─┬ wcwidth@1.0.0
│ │ │ │ └─┬ defaults@1.0.3
│ │ │ │ └── clone@1.0.2
│ │ │ ├─┬ config-chain@1.1.10
│ │ │ │ └── proto-list@1.2.4
│ │ │ ├─┬ dezalgo@1.0.3
│ │ │ │ └── asap@2.0.3
│ │ │ ├── editor@1.0.0
│ │ │ ├── fs-vacuum@1.2.9
│ │ │ ├─┬ fs-write-stream-atomic@1.0.8
│ │ │ │ └── iferr@0.1.5
│ │ │ ├── fstream@1.0.10
│ │ │ ├─┬ fstream-npm@1.1.1
│ │ │ │ └── fstream-ignore@1.0.5
│ │ │ ├── github-url-from-git@1.4.0
│ │ │ ├── github-url-from-username-repo@1.0.2
│ │ │ ├─┬ glob@7.0.6
│ │ │ │ ├── fs.realpath@1.0.0
│ │ │ │ └── path-is-absolute@1.0.0
│ │ │ ├── graceful-fs@4.1.6
│ │ │ ├── hosted-git-info@2.1.5
│ │ │ ├── imurmurhash@0.1.4
│ │ │ ├── inflight@1.0.5
│ │ │ ├── inherits@2.0.3
│ │ │ ├── ini@1.3.4
│ │ │ ├─┬ init-package-json@1.9.4
│ │ │ │ ├─┬ glob@6.0.4
│ │ │ │ │ └── path-is-absolute@1.0.0
│ │ │ │ └── promzard@0.3.0
│ │ │ ├── lockfile@1.0.1
│ │ │ ├─┬ lru-cache@4.0.1
│ │ │ │ ├── pseudomap@1.0.2
│ │ │ │ └── yallist@2.0.0
│ │ │ ├─┬ minimatch@3.0.3
│ │ │ │ └─┬ brace-expansion@1.1.6
│ │ │ │ ├── balanced-match@0.4.2
│ │ │ │ └── concat-map@0.0.1
│ │ │ ├─┬ mkdirp@0.5.1
│ │ │ │ └── minimist@0.0.8
│ │ │ ├─┬ node-gyp@3.4.0
│ │ │ │ └─┬ path-array@1.0.1
│ │ │ │ └─┬ array-index@1.0.0
│ │ │ │ ├─┬ debug@2.2.0
│ │ │ │ │ └── ms@0.7.1
│ │ │ │ └─┬ es6-symbol@3.1.0
│ │ │ │ ├── d@0.1.1
│ │ │ │ └─┬ es5-ext@0.10.12
│ │ │ │ └── es6-iterator@2.0.0
│ │ │ ├── nopt@3.0.6
│ │ │ ├── normalize-git-url@3.0.2
│ │ │ ├─┬ normalize-package-data@2.3.5
│ │ │ │ └─┬ is-builtin-module@1.0.0
│ │ │ │ └── builtin-modules@1.1.0
│ │ │ ├── npm-cache-filename@1.0.2
│ │ │ ├── npm-install-checks@1.0.7
│ │ │ ├── npm-package-arg@4.1.0
│ │ │ ├─┬ npm-registry-client@7.2.1
│ │ │ │ ├─┬ concat-stream@1.5.2
│ │ │ │ │ ├─┬ readable-stream@2.0.6
│ │ │ │ │ │ ├── core-util-is@1.0.2
│ │ │ │ │ │ ├── isarray@1.0.0
│ │ │ │ │ │ ├── process-nextick-args@1.0.7
│ │ │ │ │ │ ├── string_decoder@0.10.31
│ │ │ │ │ │ └── util-deprecate@1.0.2
│ │ │ │ │ └── typedarray@0.0.6
│ │ │ │ └── retry@0.10.0
│ │ │ ├── npm-user-validate@0.1.5
│ │ │ ├─┬ npmlog@2.0.4
│ │ │ │ ├─┬ are-we-there-yet@1.1.2
│ │ │ │ │ └── delegates@1.0.0
│ │ │ │ └─┬ gauge@1.2.7
│ │ │ │ ├── has-unicode@2.0.0
│ │ │ │ ├─┬ lodash.pad@4.4.0
│ │ │ │ │ ├── lodash._baseslice@4.0.0
│ │ │ │ │ ├── lodash._basetostring@4.12.0
│ │ │ │ │ └── lodash.tostring@4.1.4
│ │ │ │ ├── lodash.padend@4.5.0
│ │ │ │ └── lodash.padstart@4.5.0
│ │ │ ├── once@1.4.0
│ │ │ ├── opener@1.4.1
│ │ │ ├─┬ osenv@0.1.3
│ │ │ │ ├── os-homedir@1.0.0
│ │ │ │ └── os-tmpdir@1.0.1
│ │ │ ├── path-is-inside@1.0.1
│ │ │ ├─┬ read@1.0.7
│ │ │ │ └── mute-stream@0.0.5
│ │ │ ├─┬ read-installed@4.0.3
│ │ │ │ ├── debuglog@1.0.1
│ │ │ │ ├── readdir-scoped-modules@1.0.2
│ │ │ │ └── util-extend@1.0.1
│ │ │ ├─┬ read-package-json@2.0.4
│ │ │ │ ├─┬ glob@6.0.4
│ │ │ │ │ └── path-is-absolute@1.0.0
│ │ │ │ └─┬ json-parse-helpfulerror@1.0.3
│ │ │ │ └── jju@1.3.0
│ │ │ ├─┬ readable-stream@2.1.5
│ │ │ │ ├── buffer-shims@1.0.0
│ │ │ │ ├── core-util-is@1.0.2
│ │ │ │ ├── isarray@1.0.0
│ │ │ │ ├── process-nextick-args@1.0.7
│ │ │ │ ├── string_decoder@0.10.31
│ │ │ │ └── util-deprecate@1.0.2
│ │ │ ├── realize-package-specifier@3.0.1
│ │ │ ├─┬ request@2.74.0
│ │ │ │ ├── aws-sign2@0.6.0
│ │ │ │ ├── aws4@1.4.1
│ │ │ │ ├─┬ bl@1.1.2
│ │ │ │ │ └─┬ readable-stream@2.0.6
│ │ │ │ │ ├── core-util-is@1.0.2
│ │ │ │ │ ├── isarray@1.0.0
│ │ │ │ │ ├── process-nextick-args@1.0.7
│ │ │ │ │ ├── string_decoder@0.10.31
│ │ │ │ │ └── util-deprecate@1.0.2
│ │ │ │ ├── caseless@0.11.0
│ │ │ │ ├─┬ combined-stream@1.0.5
│ │ │ │ │ └── delayed-stream@1.0.0
│ │ │ │ ├── extend@3.0.0
│ │ │ │ ├── forever-agent@0.6.1
│ │ │ │ ├─┬ form-data@1.0.0-rc4
│ │ │ │ │ └── async@1.5.2
│ │ │ │ ├─┬ har-validator@2.0.6
│ │ │ │ │ ├─┬ chalk@1.1.3
│ │ │ │ │ │ ├── ansi-styles@2.2.1
│ │ │ │ │ │ ├── escape-string-regexp@1.0.5
│ │ │ │ │ │ ├── has-ansi@2.0.0
│ │ │ │ │ │ └── supports-color@2.0.0
│ │ │ │ │ ├─┬ commander@2.9.0
│ │ │ │ │ │ └── graceful-readlink@1.0.1
│ │ │ │ │ ├─┬ is-my-json-valid@2.13.1
│ │ │ │ │ │ ├── generate-function@2.0.0
│ │ │ │ │ │ ├─┬ generate-object-property@1.2.0
│ │ │ │ │ │ │ └── is-property@1.0.2
│ │ │ │ │ │ ├── jsonpointer@2.0.0
│ │ │ │ │ │ └── xtend@4.0.1
│ │ │ │ │ └─┬ pinkie-promise@2.0.1
│ │ │ │ │ └── pinkie@2.0.4
│ │ │ │ ├─┬ hawk@3.1.3
│ │ │ │ │ ├── boom@2.10.1
│ │ │ │ │ ├── cryptiles@2.0.5
│ │ │ │ │ ├── hoek@2.16.3
│ │ │ │ │ └── sntp@1.0.9
│ │ │ │ ├─┬ http-signature@1.1.1
│ │ │ │ │ ├── assert-plus@0.2.0
│ │ │ │ │ ├─┬ jsprim@1.3.0
│ │ │ │ │ │ ├── extsprintf@1.0.2
│ │ │ │ │ │ ├── json-schema@0.2.2
│ │ │ │ │ │ └── verror@1.3.6
│ │ │ │ │ └─┬ sshpk@1.9.2
│ │ │ │ │ ├── asn1@0.2.3
│ │ │ │ │ ├── assert-plus@1.0.0
│ │ │ │ │ ├── dashdash@1.14.0
│ │ │ │ │ ├── ecc-jsbn@0.1.1
│ │ │ │ │ ├── getpass@0.1.6
│ │ │ │ │ ├── jodid25519@1.0.2
│ │ │ │ │ ├── jsbn@0.1.0
│ │ │ │ │ └── tweetnacl@0.13.3
│ │ │ │ ├── is-typedarray@1.0.0
│ │ │ │ ├── isstream@0.1.2
│ │ │ │ ├── json-stringify-safe@5.0.1
│ │ │ │ ├─┬ mime-types@2.1.11
│ │ │ │ │ └── mime-db@1.23.0
│ │ │ │ ├── node-uuid@1.4.7
│ │ │ │ ├── oauth-sign@0.8.2
│ │ │ │ ├── qs@6.2.1
│ │ │ │ ├── stringstream@0.0.5
│ │ │ │ ├── tough-cookie@2.3.1
│ │ │ │ └── tunnel-agent@0.4.3
│ │ │ ├── retry@0.10.0
│ │ │ ├── rimraf@2.5.4
│ │ │ ├── semver@5.1.0
│ │ │ ├─┬ sha@2.0.1
│ │ │ │ └─┬ readable-stream@2.0.2
│ │ │ │ ├── core-util-is@1.0.1
│ │ │ │ ├── isarray@0.0.1
│ │ │ │ ├── process-nextick-args@1.0.3
│ │ │ │ ├── string_decoder@0.10.31
│ │ │ │ └── util-deprecate@1.0.1
│ │ │ ├── slide@1.1.6
│ │ │ ├── sorted-object@2.0.0
│ │ │ ├── spdx-license-ids@1.2.2
│ │ │ ├── strip-ansi@3.0.1
│ │ │ ├── tar@2.2.1
│ │ │ ├── text-table@0.2.0
│ │ │ ├── uid-number@0.0.6
│ │ │ ├── umask@1.1.0
│ │ │ ├─┬ validate-npm-package-license@3.0.1
│ │ │ │ ├── spdx-correct@1.0.2
│ │ │ │ └─┬ spdx-expression-parse@1.0.2
│ │ │ │ └── spdx-exceptions@1.0.4
│ │ │ ├─┬ validate-npm-package-name@2.2.2
│ │ │ │ └── builtins@0.0.7
│ │ │ ├─┬ which@1.2.11
│ │ │ │ └── isexe@1.1.2
│ │ │ ├── wrappy@1.0.2
│ │ │ └── write-file-atomic@1.1.4
│ │ ├── opener@1.4.1
│ │ ├─┬ plist@1.2.0
│ │ │ ├── base64-js@0.0.8
│ │ │ ├── util-deprecate@1.0.2
│ │ │ ├─┬ xmlbuilder@4.0.0
│ │ │ │ └── lodash@3.10.1
│ │ │ └── xmldom@0.1.22
│ │ ├── properties-parser@0.2.3
│ │ ├─┬ request@2.47.0
│ │ │ ├── caseless@0.6.0
│ │ │ ├── mime-types@1.0.2
│ │ │ ├── oauth-sign@0.4.0
│ │ │ └── qs@2.3.3
│ │ ├── shelljs@0.3.0
│ │ ├─┬ tar@1.0.2
│ │ │ ├── block-stream@0.0.9
│ │ │ └─┬ fstream@1.0.11
│ │ │ └─┬ mkdirp@0.5.1
│ │ │ └── minimist@0.0.8
│ │ ├── unorm@1.3.3
│ │ ├── valid-identifier@0.0.1
│ │ └─┬ xcode@0.8.0
│ │ ├── node-uuid@1.3.3
│ │ └── pegjs@0.6.2
│ ├── crc@3.2.1
│ ├─┬ cross-spawn@4.0.2
│ │ ├─┬ lru-cache@4.0.2
│ │ │ ├── pseudomap@1.0.2
│ │ │ └── yallist@2.1.2
│ │ └─┬ which@1.2.12
│ │ └── isexe@1.1.2
│ ├─┬ finalhandler@0.2.0
│ │ ├── debug@2.0.0
│ │ └── escape-html@1.0.1
│ ├─┬ glob-watcher@3.0.0
│ │ ├─┬ async-done@1.2.2
│ │ │ ├── end-of-stream@1.4.0
│ │ │ ├── next-tick@1.0.0
│ │ │ ├─┬ once@1.4.0
│ │ │ │ └── wrappy@1.0.2
│ │ │ └── stream-exhaust@1.0.1
│ │ ├─┬ chokidar@1.6.1
│ │ │ ├─┬ anymatch@1.3.0
│ │ │ │ ├── arrify@1.0.1
│ │ │ │ └─┬ micromatch@2.3.11
│ │ │ │ ├─┬ arr-diff@2.0.0
│ │ │ │ │ └── arr-flatten@1.0.1
│ │ │ │ ├── array-unique@0.2.1
│ │ │ │ ├─┬ braces@1.8.5
│ │ │ │ │ ├─┬ expand-range@1.8.2
│ │ │ │ │ │ └─┬ fill-range@2.2.3
│ │ │ │ │ │ ├── is-number@2.1.0
│ │ │ │ │ │ ├─┬ isobject@2.1.0
│ │ │ │ │ │ │ └── isarray@1.0.0
│ │ │ │ │ │ ├── randomatic@1.1.6
│ │ │ │ │ │ └── repeat-string@1.6.1
│ │ │ │ │ ├── preserve@0.2.0
│ │ │ │ │ └── repeat-element@1.1.2
│ │ │ │ ├─┬ expand-brackets@0.1.5
│ │ │ │ │ └── is-posix-bracket@0.1.1
│ │ │ │ ├── extglob@0.3.2
│ │ │ │ ├── filename-regex@2.0.0
│ │ │ │ ├── kind-of@3.1.0
│ │ │ │ ├── normalize-path@2.0.1
│ │ │ │ ├─┬ object.omit@2.0.1
│ │ │ │ │ ├─┬ for-own@0.1.5
│ │ │ │ │ │ └── for-in@1.0.2
│ │ │ │ │ └── is-extendable@0.1.1
│ │ │ │ ├─┬ parse-glob@3.0.4
│ │ │ │ │ ├── glob-base@0.3.0
│ │ │ │ │ └── is-dotfile@1.0.2
│ │ │ │ └─┬ regex-cache@0.4.3
│ │ │ │ ├── is-equal-shallow@0.1.3
│ │ │ │ └── is-primitive@2.0.0
│ │ │ ├── async-each@1.0.1
│ │ │ ├── glob-parent@2.0.0
│ │ │ ├─┬ is-binary-path@1.0.1
│ │ │ │ └── binary-extensions@1.8.0
│ │ │ ├─┬ is-glob@2.0.1
│ │ │ │ └── is-extglob@1.0.0
│ │ │ ├── path-is-absolute@1.0.1
│ │ │ └─┬ readdirp@2.1.0
│ │ │ ├── minimatch@3.0.3
│ │ │ ├─┬ readable-stream@2.2.6
│ │ │ │ ├── buffer-shims@1.0.0
│ │ │ │ ├── isarray@1.0.0
│ │ │ │ ├── process-nextick-args@1.0.7
│ │ │ │ └── util-deprecate@1.0.2
│ │ │ └── set-immediate-shim@1.0.1
│ │ ├── lodash.assignwith@4.2.0
│ │ └── lodash.debounce@4.0.8
│ ├─┬ os-name@2.0.1
│ │ ├── macos-release@1.0.0
│ │ └─┬ win-release@1.1.1
│ │ └── semver@5.3.0
│ ├── proxy-middleware@0.7.0
│ ├─┬ request@2.51.0
│ │ ├── aws-sign2@0.5.0
│ │ ├── bl@0.9.5
│ │ ├── caseless@0.8.0
│ │ ├─┬ combined-stream@0.0.7
│ │ │ └── delayed-stream@0.0.5
│ │ ├── forever-agent@0.5.2
│ │ ├─┬ form-data@0.2.0
│ │ │ ├── async@0.9.2
│ │ │ └─┬ mime-types@2.0.14
│ │ │ └── mime-db@1.12.0
│ │ ├─┬ hawk@1.1.1
│ │ │ ├── boom@0.4.2
│ │ │ ├── cryptiles@0.2.2
│ │ │ ├── hoek@0.9.1
│ │ │ └── sntp@0.2.4
│ │ ├─┬ http-signature@0.10.1
│ │ │ ├── asn1@0.1.11
│ │ │ ├── assert-plus@0.1.5
│ │ │ └── ctype@0.5.3
│ │ ├── json-stringify-safe@5.0.1
│ │ ├── mime-types@1.0.2
│ │ ├── node-uuid@1.4.7
│ │ ├── oauth-sign@0.5.0
│ │ ├── qs@2.3.3
│ │ ├── stringstream@0.0.5
│ │ ├─┬ tough-cookie@2.3.2
│ │ │ └── punycode@1.4.1
│ │ └── tunnel-agent@0.4.3
│ ├─┬ request-progress@0.3.1
│ │ └── throttleit@0.0.2
│ ├── semver@4.2.0
│ ├─┬ tiny-lr-fork@0.0.5
│ │ ├── debug@0.7.4
│ │ ├── faye-websocket@0.4.4
│ │ ├─┬ noptify@0.0.3
│ │ │ └── nopt@2.0.0
│ │ └── qs@0.5.6
│ ├─┬ winston@1.1.2
│ │ ├── async@1.0.0
│ │ ├── colors@1.0.3
│ │ ├── cycle@1.0.3
│ │ ├── eyes@0.1.8
│ │ ├── isstream@0.1.2
│ │ ├── pkginfo@0.3.1
│ │ └── stack-trace@0.0.9
│ └─┬ xml2js@0.4.16
│ ├── sax@1.2.2
│ └─┬ xmlbuilder@4.2.1
│ └── lodash@4.17.4
├── moment@2.11.1
├── open@0.0.5
├─┬ optimist@0.6.0
│ ├── minimist@0.0.10
│ └── wordwrap@0.0.3
├── pretty-hrtime@1.0.2
├── progress@1.1.7
├─┬ prompt@0.2.12
│ ├── pkginfo@0.4.0
│ ├─┬ read@1.0.7
│ │ └── mute-stream@0.0.6
│ ├── revalidator@0.1.8
│ ├─┬ utile@0.2.1
│ │ ├── async@0.2.10
│ │ ├── deep-equal@1.0.1
│ │ ├── i@0.3.5
│ │ ├─┬ mkdirp@0.5.1
│ │ │ └── minimist@0.0.8
│ │ ├── ncp@0.4.2
│ │ └─┬ rimraf@2.5.4
│ │ └─┬ glob@7.1.1
│ │ ├── fs.realpath@1.0.0
│ │ ├─┬ inflight@1.0.6
│ │ │ └── wrappy@1.0.2
│ │ ├── inherits@2.0.3
│ │ ├─┬ minimatch@3.0.3
│ │ │ └─┬ brace-expansion@1.1.6
│ │ │ ├── balanced-match@0.4.2
│ │ │ └── concat-map@0.0.1
│ │ ├─┬ once@1.4.0
│ │ │ └── wrappy@1.0.2
│ │ └── path-is-absolute@1.0.1
│ └─┬ winston@0.6.2
│ ├── async@0.1.22
│ ├── colors@0.6.2
│ ├── cycle@1.0.3
│ ├── eyes@0.1.8
│ ├── pkginfo@0.2.3
│ ├── request@2.9.203
│ └── stack-trace@0.0.9
├── q@1.0.1
├─┬ request@2.74.0
│ ├── aws-sign2@0.6.0
│ ├── aws4@1.5.0
│ ├─┬ bl@1.1.2
│ │ └─┬ readable-stream@2.0.6
│ │ ├── core-util-is@1.0.2
│ │ ├── inherits@2.0.3
│ │ ├── isarray@1.0.0
│ │ ├── process-nextick-args@1.0.7
│ │ ├── string_decoder@0.10.31
│ │ └── util-deprecate@1.0.2
│ ├── caseless@0.11.0
│ ├─┬ combined-stream@1.0.5
│ │ └── delayed-stream@1.0.0
│ ├── extend@3.0.0
│ ├── forever-agent@0.6.1
│ ├─┬ form-data@1.0.1
│ │ └─┬ async@2.1.4
│ │ └── lodash@4.17.2
│ ├─┬ har-validator@2.0.6
│ │ ├─┬ commander@2.9.0
│ │ │ └── graceful-readlink@1.0.1
│ │ ├─┬ is-my-json-valid@2.15.0
│ │ │ ├── generate-function@2.0.0
│ │ │ ├─┬ generate-object-property@1.2.0
│ │ │ │ └── is-property@1.0.2
│ │ │ ├── jsonpointer@4.0.0
│ │ │ └── xtend@4.0.1
│ │ └─┬ pinkie-promise@2.0.1
│ │ └── pinkie@2.0.4
│ ├─┬ hawk@3.1.3
│ │ ├── boom@2.10.1
│ │ ├── cryptiles@2.0.5
│ │ ├── hoek@2.16.3
│ │ └── sntp@1.0.9
│ ├─┬ http-signature@1.1.1
│ │ ├── assert-plus@0.2.0
│ │ ├─┬ jsprim@1.3.1
│ │ │ ├── extsprintf@1.0.2
│ │ │ ├── json-schema@0.2.3
│ │ │ └── verror@1.3.6
│ │ └─┬ sshpk@1.10.1
│ │ ├── asn1@0.2.3
│ │ ├── assert-plus@1.0.0
│ │ ├── bcrypt-pbkdf@1.0.0
│ │ ├── dashdash@1.14.1
│ │ ├── ecc-jsbn@0.1.1
│ │ ├── getpass@0.1.6
│ │ ├── jodid25519@1.0.2
│ │ ├── jsbn@0.1.0
│ │ └── tweetnacl@0.14.4
│ ├── is-typedarray@1.0.0
│ ├── isstream@0.1.2
│ ├── json-stringify-safe@5.0.1
│ ├─┬ mime-types@2.1.13
│ │ └── mime-db@1.25.0
│ ├── node-uuid@1.4.7
│ ├── oauth-sign@0.8.2
│ ├── qs@6.2.1
│ ├── stringstream@0.0.5
│ ├─┬ tough-cookie@2.3.2
│ │ └── punycode@1.4.1
│ └── tunnel-agent@0.4.3
├── semver@4.3.6
├─┬ serve-static@1.7.1
│ ├── escape-html@1.0.1
│ ├── parseurl@1.3.1
│ ├─┬ send@0.10.1
│ │ ├─┬ debug@2.1.3
│ │ │ └── ms@0.7.0
│ │ ├── depd@1.0.1
│ │ ├── destroy@1.0.3
│ │ ├─┬ etag@1.5.1
│ │ │ └── crc@3.2.1
│ │ ├── fresh@0.2.4
│ │ ├── mime@1.2.11
│ │ ├── ms@0.6.2
│ │ ├─┬ on-finished@2.1.1
│ │ │ └── ee-first@1.1.0
│ │ └── range-parser@1.0.3
│ └── utils-merge@1.0.0
├── shelljs@0.2.6
├── underscore@1.7.0
└─┬ unzip@0.1.9
├─┬ binary@0.3.0
│ ├── buffers@0.1.1
│ └─┬ chainsaw@0.1.0
│ └── traverse@0.3.9
├─┬ fstream@0.1.31
│ ├─┬ graceful-fs@3.0.11
│ │ └── natives@1.1.0
│ ├── inherits@2.0.3
│ ├─┬ mkdirp@0.5.1
│ │ └── minimist@0.0.8
│ └─┬ rimraf@2.5.4
│ └─┬ glob@7.1.1
│ ├── fs.realpath@1.0.0
│ ├─┬ inflight@1.0.6
│ │ └── wrappy@1.0.2
│ ├─┬ minimatch@3.0.3
│ │ └─┬ brace-expansion@1.1.6
│ │ ├── balanced-match@0.4.2
│ │ └── concat-map@0.0.1
│ ├─┬ once@1.4.0
│ │ └── wrappy@1.0.2
│ └── path-is-absolute@1.0.1
├─┬ match-stream@0.0.2
│ └── buffers@0.1.1
├─┬ pullstream@0.4.1
│ ├── over@0.0.5
│ └── slice-stream@1.0.0
├─┬ readable-stream@1.0.34
│ ├── core-util-is@1.0.2
│ ├── inherits@2.0.3
│ ├── isarray@0.0.1
│ └── string_decoder@0.10.31
└── setimmediate@1.0.5
npm WARN optional SKIPPING OPTIONAL DEPENDENCY: fsevents@^1.0.0 (node_modules/ionic/node_modules/chokidar/node_modules/fsevents):
npm WARN notsup SKIPPING OPTIONAL DEPENDENCY: Unsupported platform for fsevents@1.1.1: wanted {"os":"darwin","arch":"any"} (current: {"os":"linux","arch":"x64"})
npm WARN In ionic@2.2.1 replacing bundled version of cross-spawn with cross-spawn@4.0.2
npm WARN In ionic@2.2.1 replacing bundled version of mime-types with mime-types@2.0.14
npm WARN In ionic@2.2.1 replacing bundled version of semver with semver@4.2.0
npm WARN In ionic@2.2.1 replacing bundled version of form-data with form-data@0.2.0
npm WARN In ionic@2.2.1 replacing bundled version of request with request@2.51.0
npm WARN In ionic@2.2.1 replacing bundled version of ionic-app-lib with ionic-app-lib@2.2.0

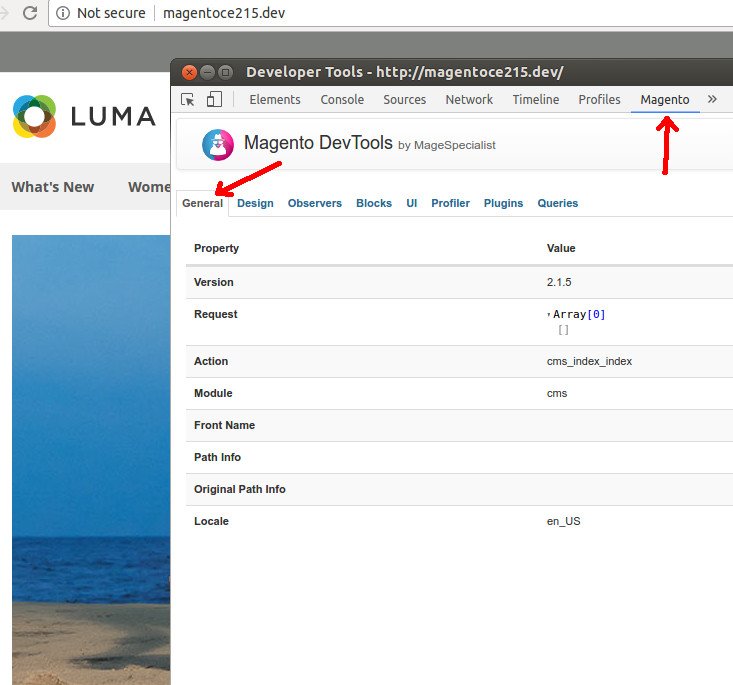 Design tab
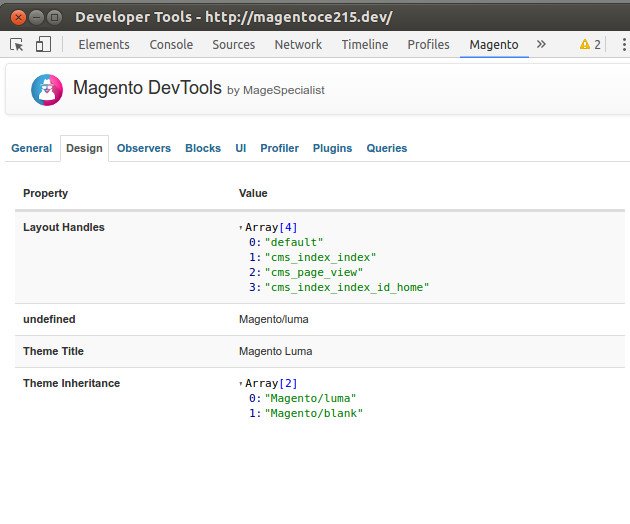 Observers tab
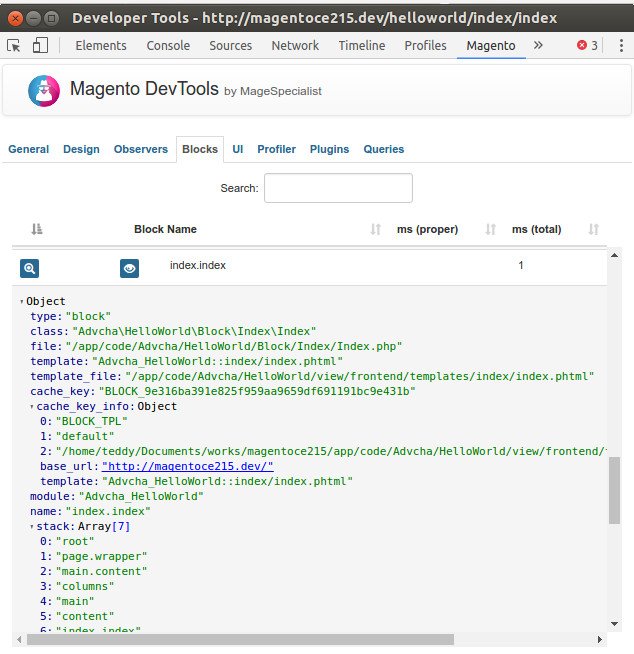
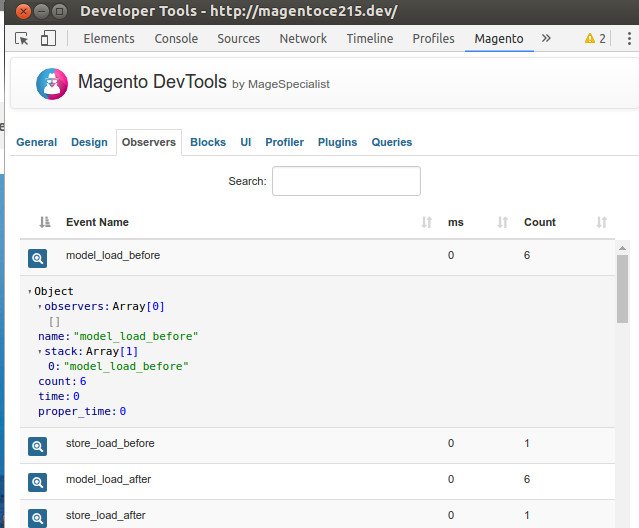 Blocks tab
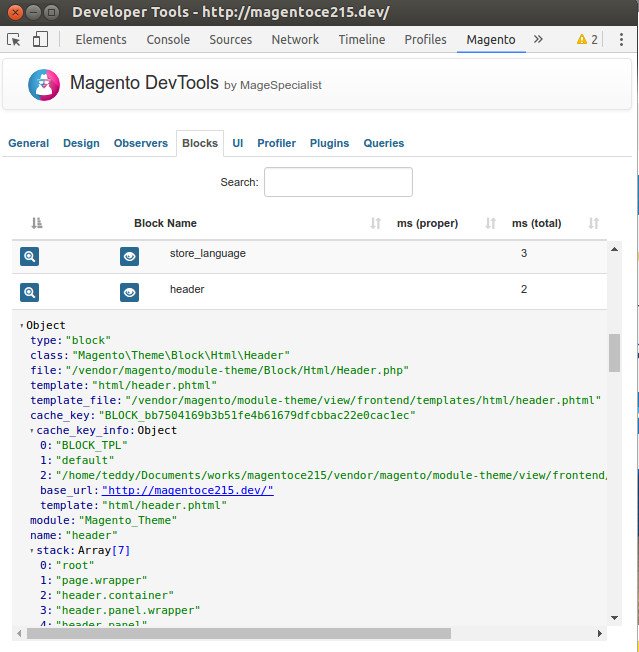 UI tab
 Profiler tab
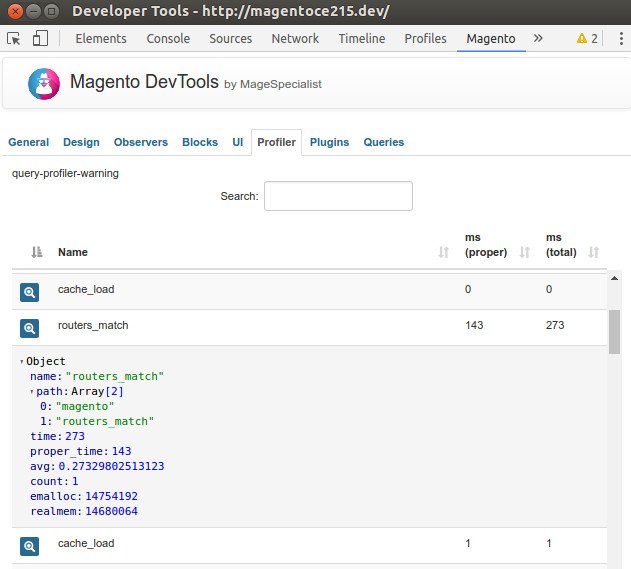 Plugins tab
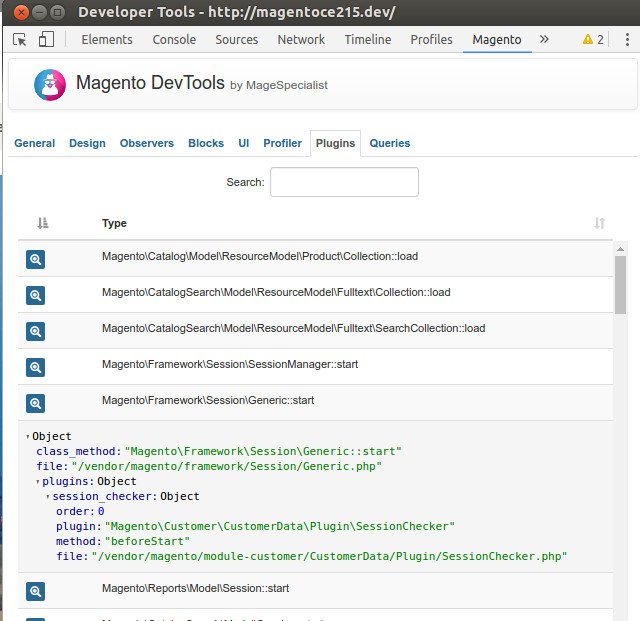 Queries tab
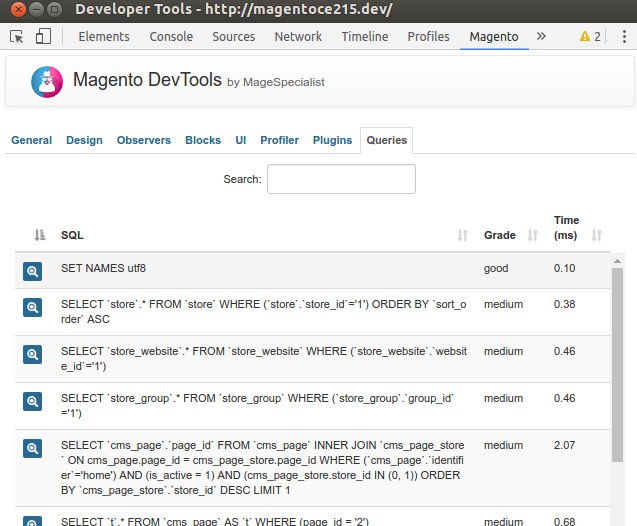 Inspect element and the magento element


 If you find an error like this (put “