Read: https://docs.frappe.io/framework/user/en/installation#debian-ubuntu
Update your system’s package index
|
1 2 |
sudo apt update |
if not exist, Install/update git, python, and redis
|
1 2 |
sudo apt install git python-is-python3 python3-dev python3-pip redis-server libmariadb-dev mariadb-server mariadb-client pkg-config |
Check:
|
1 2 3 4 5 6 7 8 9 |
satria@teddy:~$ git --version git version 2.34.1 satria@teddy:~$ python3 --version Python 3.10.13 satria@teddy:~$ redis-server --version Redis server v=6.0.16 sha=00000000:0 malloc=jemalloc-5.2.1 bits=64 build=a3fdef44459b3ad6 satria@teddy:~$ mariadb --version mariadb Ver 15.1 Distrib 10.6.21-MariaDB, for debian-linux-gnu (x86_64) using EditLine wrapper |
Now, edit the MariaDB configuration file (this step is not required for Frappe v15.21.0 or above).
|
1 2 |
sudo gedit /etc/mysql/my.cnf |
And add this configuration
|
1 2 3 4 5 6 7 8 |
[mysqld] <span class="hljs-type">character</span><span class="hljs-operator">-</span><span class="hljs-keyword">set</span><span class="hljs-operator">-</span>client<span class="hljs-operator">-</span>handshake <span class="hljs-operator">=</span> <span class="hljs-literal">FALSE</span> <span class="hljs-type">character</span><span class="hljs-operator">-</span><span class="hljs-keyword">set</span><span class="hljs-operator">-</span>server <span class="hljs-operator">=</span> utf8mb4 <span class="hljs-keyword">collation</span><span class="hljs-operator">-</span>server <span class="hljs-operator">=</span> utf8mb4_unicode_ci [mysql] <span class="hljs-keyword">default</span><span class="hljs-operator">-</span><span class="hljs-type">character</span><span class="hljs-operator">-</span><span class="hljs-keyword">set</span> <span class="hljs-operator">=</span> utf8mb4 |
Now, just restart the MariaDB service and you are good to go.
|
1 2 |
<span class="hljs-attribute">sudo</span> systemctl restart mariadb |
Check Node or Install Node if not exist
Use node > 18. use the stable version (v20..) instead
Check:
|
1 2 3 4 5 6 7 8 9 10 11 12 13 |
satria@teddy:~$ node -v v16.15.1 satria@teddy:~$ nvm list -> v16.15.1 ... node -> stable (-> v20.15.1) (default) stable -> 20.15 (-> v20.15.1) (default) ... satria@teddy:~$ nvm use stable Now using node v20.15.1 (npm v10.7.0) satria@teddy:~$ node -v v20.15.1 |
Finally, check/install yarn using npm
|
1 2 3 4 5 |
<span class="hljs-attribute">npm</span> install -g yarn Check: satria@teddy:~$ yarn --version 1.22.19 |
Install the libraries for wkhtmltopdf
|
1 2 |
<span class="hljs-attribute">sudo</span> apt install xvfb libfontconfig |
Download and install wkhtmltopdf package from https://wkhtmltopdf.org/downloads.html, then run this command to install the package. As an example for Ubuntu 22.04 amd64 in Download directory
|
1 2 |
sudo dpkg -i wkhtmltox_0.12.6.1-2.jammy_amd64.deb |
if you found this error: Package xfonts-75dpi is not installed. then run this to install the dependencies
|
1 |
sudo apt-get -f install |
Install Bench CLI
Install bench via pip (or pip3)
[codesyntax lang=”bash”]
|
1 2 3 4 5 6 7 8 9 10 11 12 13 14 15 16 17 18 19 20 21 22 23 24 25 26 27 28 29 30 31 32 33 34 35 36 37 |
satria@teddy:~$ pip3 install frappe-bench Defaulting to user installation because normal site-packages is not writeable Collecting frappe-bench Downloading frappe_bench-5.25.1-py3-none-any.whl (152 kB) ━━━━━━━━━━━━━━━━━━━━━━━━━━━━━━━━━━━━━ 152.6/152.6 KB 758.7 kB/s eta 0:00:00 Collecting semantic-version~=2.10.0 Downloading semantic_version-2.10.0-py2.py3-none-any.whl (15 kB) Collecting click~=8.2.0 Downloading click-8.2.0-py3-none-any.whl (102 kB) ━━━━━━━━━━━━━━━━━━━━━━━━━━━━━━━━━━━━━━━ 102.2/102.2 KB 3.5 MB/s eta 0:00:00 Collecting setuptools>=71.0.0 Downloading setuptools-80.4.0-py3-none-any.whl (1.2 MB) ━━━━━━━━━━━━━━━━━━━━━━━━━━━━━━━━━━━━━━━━ 1.2/1.2 MB 2.0 MB/s eta 0:00:00 Requirement already satisfied: gitpython~=3.1.30 in ./.local/lib/python3.10/site-packages (from frappe-bench) (3.1.44) Collecting tomli Downloading tomli-2.2.1-py3-none-any.whl (14 kB) Requirement already satisfied: requests~=2.32.3 in ./.local/lib/python3.10/site-packages (from frappe-bench) (2.32.3) Requirement already satisfied: jinja2~=3.1.3 in ./.local/lib/python3.10/site-packages (from frappe-bench) (3.1.5) Collecting honcho Downloading honcho-2.0.0-py3-none-any.whl (22 kB) Collecting python-crontab~=2.6.0 Downloading python_crontab-2.6.0-py3-none-any.whl (25 kB) Requirement already satisfied: gitdb<5,>=4.0.1 in ./.local/lib/python3.10/site-packages (from gitpython~=3.1.30->frappe-bench) (4.0.12) Requirement already satisfied: MarkupSafe>=2.0 in /usr/lib/python3/dist-packages (from jinja2~=3.1.3->frappe-bench) (2.0.1) Requirement already satisfied: python-dateutil in ./.local/lib/python3.10/site-packages (from python-crontab~=2.6.0->frappe-bench) (2.9.0.post0) Requirement already satisfied: urllib3<3,>=1.21.1 in /usr/lib/python3/dist-packages (from requests~=2.32.3->frappe-bench) (1.26.5) Requirement already satisfied: charset-normalizer<4,>=2 in ./.local/lib/python3.10/site-packages (from requests~=2.32.3->frappe-bench) (3.4.1) Requirement already satisfied: idna<4,>=2.5 in /usr/lib/python3/dist-packages (from requests~=2.32.3->frappe-bench) (3.3) Requirement already satisfied: certifi>=2017.4.17 in /usr/lib/python3/dist-packages (from requests~=2.32.3->frappe-bench) (2020.6.20) Requirement already satisfied: smmap<6,>=3.0.1 in ./.local/lib/python3.10/site-packages (from gitdb<5,>=4.0.1->gitpython~=3.1.30->frappe-bench) (5.0.2) Requirement already satisfied: six>=1.5 in /usr/lib/python3/dist-packages (from python-dateutil->python-crontab~=2.6.0->frappe-bench) (1.16.0) Installing collected packages: honcho, tomli, setuptools, semantic-version, click, python-crontab, frappe-bench WARNING: The script honcho is installed in '/home/satria/.local/bin' which is not on PATH. Consider adding this directory to PATH or, if you prefer to suppress this warning, use --no-warn-script-location. WARNING: The script bench is installed in '/home/satria/.local/bin' which is not on PATH. Consider adding this directory to PATH or, if you prefer to suppress this warning, use --no-warn-script-location. Successfully installed click-8.2.0 frappe-bench-5.25.1 honcho-2.0.0 python-crontab-2.6.0 semantic-version-2.10.0 setuptools-80.4.0 tomli-2.2.1 |
[/codesyntax]
Note: WARNING: The script bench is installed in ‘/home/satria/.local/bin’ which is not on PATH.
So run –> THIS IS NOT SAVED BECAUSE WHEN I TRIED TO LOGIN AGAIN, THE PATH IS MISSING
[codesyntax lang=”bash”]
|
1 2 |
echo "export PATH=$PATH:$HOME/.local/bin" >> ~/.bashrc source ~/.bashrc |
[/codesyntax]
Check ‘Bench’ version
[codesyntax lang=”bash”]
|
1 2 |
satria@teddy:~$ bench --version 5.25.1 |
[/codesyntax]
Read: https://docs.frappe.io/framework/user/en/tutorial/install-and-setup-bench
Create frappe-bench directory
Let’s create our project folder which will contain our apps and sites. Run the following command: bench init frappe-bench in my projects directory
[codesyntax lang=”bash”]
|
1 2 3 4 5 6 7 8 9 10 11 12 13 14 15 16 17 18 19 20 21 22 23 24 25 26 27 28 29 30 31 32 33 34 35 36 37 38 39 40 41 42 43 44 45 46 47 48 49 50 51 52 53 54 55 56 57 58 59 60 61 62 63 64 65 66 67 68 69 70 71 72 73 74 75 76 77 78 79 80 81 82 83 84 85 86 87 88 89 90 91 92 93 94 95 96 97 98 99 100 101 102 103 104 105 106 107 108 109 110 111 112 113 114 115 116 117 118 119 120 121 122 123 124 125 |
satria@teddy:~/Documents/projects$ bench init frappe-bench Setting Up Environment $ python3 -m venv env $ /home/satria/Documents/projects/frappe-bench/env/bin/python -m pip install --quiet --upgrade pip $ /home/satria/Documents/projects/frappe-bench/env/bin/python -m pip install --quiet wheel Getting frappe $ git clone https://github.com/frappe/frappe.git --depth 1 --origin upstream Cloning into 'frappe'... remote: Enumerating objects: 3322, done. remote: Counting objects: 100% (3322/3322), done. remote: Compressing objects: 100% (2815/2815), done. remote: Total 3322 (delta 461), reused 2861 (delta 412), pack-reused 0 (from 0) Receiving objects: 100% (3322/3322), 15.27 MiB | 8.35 MiB/s, done. Resolving deltas: 100% (461/461), done. Installing frappe $ /home/satria/Documents/projects/frappe-bench/env/bin/python -m pip install --quiet --upgrade -e /home/satria/Documents/projects/frappe-bench/apps/frappe $ yarn install --check-files yarn install v1.22.19 [1/5] Validating package.json... [2/5] Resolving packages... [3/5] Fetching packages... [4/5] Linking dependencies... warning " > @frappe/esbuild-plugin-postcss2@0.1.3" has unmet peer dependency "less@^4.x". warning " > @frappe/esbuild-plugin-postcss2@0.1.3" has unmet peer dependency "stylus@^0.x". warning " > @vue/component-compiler@4.2.4" has unmet peer dependency "vue-template-compiler@*". [5/5] Building fresh packages... Done in 14.94s. Found existing apps updating states... $ bench build Assets for Commit dc3ab2ee149d0a359b1f058c54bc7d1d2b6e39fa don't exist Linking /home/satria/Documents/projects/frappe-bench/apps/frappe/frappe/public to ./assets/frappe Linking /home/satria/Documents/projects/frappe-bench/apps/frappe/node_modules to ./assets/frappe/node_modules ✔ Application Assets Linked yarn run v1.22.19 $ node esbuild --production --run-build-command Browserslist: caniuse-lite is outdated. Please run: npx update-browserslist-db@latest Why you should do it regularly: https://github.com/browserslist/update-db#readme File Size frappe/dist/js/ ├─ billing.bundle.TQHLK7UT.js 4.44 Kb ├─ bootstrap-4-web.bundle.FOZOVELL.js 1.73 Kb ├─ calendar.bundle.4A4YITIU.js 264.60 Kb ├─ controls.bundle.VNX7UDSZ.js 879.39 Kb ├─ data_import_tools.bundle.DJ5WZEDY.js 127.49 Kb ├─ desk.bundle.FQ3M5L42.js 1104.44 Kb ├─ dialog.bundle.3F5VODSL.js 58.38 Kb ├─ form.bundle.3RCYIKGB.js 168.94 Kb ├─ frappe-web.bundle.VFID6Y35.js 832.90 Kb ├─ libs.bundle.TIV7ZGVY.js 556.25 Kb ├─ list.bundle.QDED3XSG.js 203.41 Kb ├─ logtypes.bundle.5KO3ZOOI.js 0.72 Kb ├─ onboarding_tours.bundle.RAUR6X4Z.js 7.60 Kb ├─ photoswipe.bundle.YSXZQA64.js 60.50 Kb ├─ report.bundle.BVTA3F76.js 203.84 Kb ├─ sentry.bundle.AX44GVWW.js 74.42 Kb ├─ telemetry.bundle.LKEZCADB.js 2.59 Kb ├─ video_player.bundle.DUYYLSFO.js 120.67 Kb ├─ web_form.bundle.KDU5JJTN.js 1072.49 Kb ├─ form_builder.bundle.IGL7RUSL.js 799.99 Kb ├─ form_builder.bundle.25A5BOO2.css 23.22 Kb ├─ print_format_builder.bundle.OSQWFKYA.js 685.26 Kb ├─ print_format_builder.bundle.XNVQC47Z.css 5.60 Kb ├─ workflow_builder.bundle.RRL2HLV5.js 352.45 Kb ├─ workflow_builder.bundle.ICGZLXKF.css 11.02 Kb ├─ build_events.bundle.3EJOGX4C.js 105.71 Kb ├─ build_events.bundle.XSSFVMGJ.css 1.29 Kb ├─ file_uploader.bundle.2BZNSVJG.js 203.64 Kb ├─ file_uploader.bundle.OTXSYDJR.css 6.58 Kb └─ kanban_board.bundle.F6FPXXED.js 578.30 Kb frappe/dist/css/ ├─ desk.bundle.3EZB3Y5X.css 600.57 Kb ├─ email.bundle.77WPFLMN.css 5.97 Kb ├─ login.bundle.MN3RJEPE.css 32.64 Kb ├─ print.bundle.MYH35JO2.css 207.29 Kb ├─ print_format.bundle.BL5UAFLR.css 186.46 Kb ├─ report.bundle.IGZEN7PM.css 5.51 Kb ├─ web_form.bundle.6P2ERMYP.css 14.86 Kb └─ website.bundle.VMXALGIE.css 454.66 Kb frappe/dist/css-rtl/ ├─ desk.bundle.XZFJMN5D.css 601.07 Kb ├─ email.bundle.IDXJO4AL.css 5.98 Kb ├─ login.bundle.TU4NQTUU.css 32.64 Kb ├─ print.bundle.PJUPZQQM.css 207.44 Kb ├─ print_format.bundle.KNX2ZRMQ.css 186.58 Kb ├─ report.bundle.GDASZB7L.css 5.50 Kb ├─ web_form.bundle.PPZQ7CSA.css 14.85 Kb └─ website.bundle.7FJWJAIG.css 454.83 Kb DONE Total Build Time: 11.853s WARN Cannot connect to redis_cache to update assets_json WARN Cannot connect to redis_cache to update assets_json WARN Cannot connect to redis_cache to update assets_json Done in 12.51s. Compiling translations for frappe MO file created at /home/satria/Documents/projects/frappe-bench/sites/assets/locale/th/LC_MESSAGES/frappe.mo MO file created at /home/satria/Documents/projects/frappe-bench/sites/assets/locale/af/LC_MESSAGES/frappe.mo MO file created at /home/satria/Documents/projects/frappe-bench/sites/assets/locale/es/LC_MESSAGES/frappe.mo MO file created at /home/satria/Documents/projects/frappe-bench/sites/assets/locale/de/LC_MESSAGES/frappe.mo MO file created at /home/satria/Documents/projects/frappe-bench/sites/assets/locale/zh/LC_MESSAGES/frappe.mo MO file created at /home/satria/Documents/projects/frappe-bench/sites/assets/locale/ru/LC_MESSAGES/frappe.mo MO file created at /home/satria/Documents/projects/frappe-bench/sites/assets/locale/pt_BR/LC_MESSAGES/frappe.mo MO file created at /home/satria/Documents/projects/frappe-bench/sites/assets/locale/ar/LC_MESSAGES/frappe.mo MO file created at /home/satria/Documents/projects/frappe-bench/sites/assets/locale/sv/LC_MESSAGES/frappe.mo MO file created at /home/satria/Documents/projects/frappe-bench/sites/assets/locale/fa/LC_MESSAGES/frappe.mo MO file created at /home/satria/Documents/projects/frappe-bench/sites/assets/locale/eo/LC_MESSAGES/frappe.mo MO file created at /home/satria/Documents/projects/frappe-bench/sites/assets/locale/hr/LC_MESSAGES/frappe.mo MO file created at /home/satria/Documents/projects/frappe-bench/sites/assets/locale/id/LC_MESSAGES/frappe.mo MO file created at /home/satria/Documents/projects/frappe-bench/sites/assets/locale/bs/LC_MESSAGES/frappe.mo MO file created at /home/satria/Documents/projects/frappe-bench/sites/assets/locale/hu/LC_MESSAGES/frappe.mo MO file created at /home/satria/Documents/projects/frappe-bench/sites/assets/locale/tr/LC_MESSAGES/frappe.mo MO file created at /home/satria/Documents/projects/frappe-bench/sites/assets/locale/vi/LC_MESSAGES/frappe.mo MO file created at /home/satria/Documents/projects/frappe-bench/sites/assets/locale/fi/LC_MESSAGES/frappe.mo MO file created at /home/satria/Documents/projects/frappe-bench/sites/assets/locale/fr/LC_MESSAGES/frappe.mo MO file created at /home/satria/Documents/projects/frappe-bench/sites/assets/locale/pl/LC_MESSAGES/frappe.mo MO file created at /home/satria/Documents/projects/frappe-bench/sites/assets/locale/zh_TW/LC_MESSAGES/frappe.mo MO file created at /home/satria/Documents/projects/frappe-bench/sites/assets/locale/pt/LC_MESSAGES/frappe.mo MO file created at /home/satria/Documents/projects/frappe-bench/sites/assets/locale/sr_CS/LC_MESSAGES/frappe.mo MO file created at /home/satria/Documents/projects/frappe-bench/sites/assets/locale/nl/LC_MESSAGES/frappe.mo MO file created at /home/satria/Documents/projects/frappe-bench/sites/assets/locale/it/LC_MESSAGES/frappe.mo SUCCESS: Bench frappe-bench initialized |
[/codesyntax]
Note: make sure to use node > = v18…
Let’s fix the installation problem:
1. [codesyntax lang=”bash”]
|
1 2 3 4 |
yarn run v1.22.19 $ node esbuild --production --run-build-command Browserslist: caniuse-lite is outdated. Please run: npx update-browserslist-db@latest |
[/codesyntax]
pls go to ‘apps/frappe’ directory (here is the complete path: /home/satria/Documents/projects/frappe-bench/apps/frappe) then run ‘npx update-browserslist-db@latest’
[codesyntax lang=”bash”]
|
1 |
satria@teddy:~/Documents/projects/frappe-bench/apps/frappe$ npx update-browserslist-db@latest |
[/codesyntax]
2. WARN Cannot connect to redis_cache to update assets_json
the redis service is running:
sudo systemctl status redis
[sudo] password for satria:
● redis-server.service – Advanced key-value store
Loaded: loaded (/lib/systemd/system/redis-server.service; enabled; vendor >
Active: active (running) since Wed 2025-05-14 13:49:23 WIB; 16min ago
Docs: http://redis.io/documentation,
man:redis-server(1)
Main PID: 1390 (redis-server)
Status: “Ready to accept connections”
Tasks: 5 (limit: 57560)
Memory: 5.2M
CPU: 1.714s
CGroup: /system.slice/redis-server.service
└─1390 “/usr/bin/redis-server 127.0.0.1:6379” “” “” “” “” “” “” “”>
Mei 14 13:49:23 teddy systemd[1]: Starting Advanced key-value store…
Mei 14 13:49:23 teddy systemd[1]: Started Advanced key-value store.
here is the content of sites/common_site_config.json:
{
“background_workers”: 1,
“file_watcher_port”: 6787,
“frappe_user”: “satria”,
“gunicorn_workers”: 17,
“live_reload”: true,
“rebase_on_pull”: false,
“redis_cache”: “redis://127.0.0.1:13000”,
“redis_queue”: “redis://127.0.0.1:11000”,
“redis_socketio”: “redis://127.0.0.1:13000”,
“restart_supervisor_on_update”: false,
“restart_systemd_on_update”: false,
“serve_default_site”: true,
“shallow_clone”: true,
“socketio_port”: 9000,
“use_redis_auth”: false,
“webserver_port”: 8000
}
SO the redis server used PORT 13000 instead of PORT 6379. CHANGED THE PORT FOR redis_cache, redis_queue and redis_socketio to port 6379 in sites/common_site_config.json. So now the content is:
[codesyntax lang=”text”]
|
1 2 3 4 5 6 7 8 9 10 11 12 13 14 15 16 17 18 |
{ "background_workers": 1, "file_watcher_port": 6787, "frappe_user": "satria", "gunicorn_workers": 17, "live_reload": true, "rebase_on_pull": false, "redis_cache": "redis://127.0.0.1:6379", "redis_queue": "redis://127.0.0.1:6379", "redis_socketio": "redis://127.0.0.1:6379", "restart_supervisor_on_update": false, "restart_systemd_on_update": false, "serve_default_site": true, "shallow_clone": true, "socketio_port": 9000, "use_redis_auth": false, "webserver_port": 8000 } |
[/codesyntax]
Test the redis server for 6379 port
[codesyntax lang=”bash”]
|
1 2 |
satria@teddy:~/Documents/projects/frappe-bench/apps/frappe$ redis-cli -p 6379 ping PONG |
[/codesyntax]
Start the Bench Server
Now that we have created our frappe-bench directory, we can start the Frappe web server by running the following command: bench start
[codesyntax lang=”bash”]
|
1 2 3 4 5 6 7 8 9 10 11 12 13 14 15 16 17 18 19 20 21 22 23 24 25 26 27 28 29 30 31 32 33 34 35 36 37 |
satria@teddy:~/Documents/projects/frappe-bench$ bench start 14:31:33 system | redis_cache.1 started (pid=206513) 14:31:33 system | redis_queue.1 started (pid=206515) 14:31:33 system | watch.1 started (pid=206528) 14:31:33 system | web.1 started (pid=206520) 14:31:33 system | socketio.1 started (pid=206525) 14:31:33 system | schedule.1 started (pid=206533) 14:31:33 system | worker.1 started (pid=206535) 14:31:33 redis_cache.1 | 206517:C 14 May 2025 14:31:33.746 # oO0OoO0OoO0Oo Redis is starting oO0OoO0OoO0Oo 14:31:33 redis_cache.1 | 206517:C 14 May 2025 14:31:33.746 # Redis version=6.0.16, bits=64, commit=00000000, modified=0, pid=206517, just started 14:31:33 redis_cache.1 | 206517:C 14 May 2025 14:31:33.747 # Configuration loaded 14:31:33 redis_queue.1 | 206519:C 14 May 2025 14:31:33.745 # oO0OoO0OoO0Oo Redis is starting oO0OoO0OoO0Oo 14:31:33 redis_cache.1 | 206517:M 14 May 2025 14:31:33.747 * Increased maximum number of open files to 10032 (it was originally set to 1024). 14:31:33 redis_queue.1 | 206519:C 14 May 2025 14:31:33.745 # Redis version=6.0.16, bits=64, commit=00000000, modified=0, pid=206519, just started 14:31:33 redis_queue.1 | 206519:C 14 May 2025 14:31:33.745 # Configuration loaded 14:31:33 redis_cache.1 | 206517:M 14 May 2025 14:31:33.748 * Running mode=standalone, port=13000. 14:31:33 redis_queue.1 | 206519:M 14 May 2025 14:31:33.746 * Increased maximum number of open files to 10032 (it was originally set to 1024). 14:31:33 redis_cache.1 | 206517:M 14 May 2025 14:31:33.748 # Server initialized 14:31:33 redis_queue.1 | 206519:M 14 May 2025 14:31:33.747 * Running mode=standalone, port=11000. 14:31:33 redis_queue.1 | 206519:M 14 May 2025 14:31:33.747 # Server initialized 14:31:33 redis_cache.1 | 206517:M 14 May 2025 14:31:33.748 # WARNING overcommit_memory is set to 0! Background save may fail under low memory condition. To fix this issue add 'vm.overcommit_memory = 1' to /etc/sysctl.conf and then reboot or run the command 'sysctl vm.overcommit_memory=1' for this to take effect. 14:31:33 redis_queue.1 | 206519:M 14 May 2025 14:31:33.747 # WARNING overcommit_memory is set to 0! Background save may fail under low memory condition. To fix this issue add 'vm.overcommit_memory = 1' to /etc/sysctl.conf and then reboot or run the command 'sysctl vm.overcommit_memory=1' for this to take effect. 14:31:33 redis_cache.1 | 206517:M 14 May 2025 14:31:33.749 * Ready to accept connections 14:31:33 redis_queue.1 | 206519:M 14 May 2025 14:31:33.747 * Ready to accept connections 14:31:34 socketio.1 | Realtime service listening on: 9000 14:31:34 watch.1 | 14:31:34 watch.1 | yarn run v1.22.19 14:31:34 watch.1 | $ node esbuild --watch --live-reload 14:31:34 web.1 | WARNING: This is a development server. Do not use it in a production deployment. Use a production WSGI server instead. 14:31:34 web.1 | * Running on all addresses (0.0.0.0) 14:31:34 web.1 | * Running on http://127.0.0.1:8000 14:31:34 web.1 | * Running on http://192.168.1.23:8000 14:31:34 web.1 | Press CTRL+C to quit 14:31:34 web.1 | * Restarting with stat 14:31:35 web.1 | * Debugger is active! 14:31:35 web.1 | * Debugger PIN: 548-397-486 14:31:48 watch.1 | Watching for changes... |
[/codesyntax]
Note: Type CTRL+C to stop the bench engine
It can be opened on http://127.0.0.1:8000/ or http://192.168.1.23:8000
but the app still empty!
So Create an App
Read: https://docs.frappe.io/framework/user/en/tutorial/create-an-app
Case study: Library Management System
To create our Library Management app, run the new-app command:
|
1 2 |
bench <span class="hljs-keyword">new</span>-app library_management |
You should get some prompts, and output like the following. You can enter information manually, or press enter to select the defaults
[codesyntax lang=”bash”]
|
1 2 3 4 5 6 7 8 9 10 11 12 13 14 15 16 17 18 19 20 21 22 23 |
satria@teddy:~/Documents/projects/frappe-bench$ bench new-app library_management App Title [Library Management]: App Description: Library Management System App Publisher: Satria Faestha App Email: advcha@yahoo.com App License (agpl-3.0, apache-2.0, bsd-2-clause, bsd-3-clause, bsl-1.0, cc0-1.0, epl-2.0, gpl-2.0, gpl-3.0, lgpl-2.1, mit, mpl-2.0, unlicense) [mit]: Create GitHub Workflow action for unittests [y/N]: y Branch Name [develop]: 'library_management' created at /home/satria/Documents/projects/frappe-bench/apps/library_management Installing library_management $ /home/satria/Documents/projects/frappe-bench/env/bin/python -m pip install --quiet --upgrade -e /home/satria/Documents/projects/frappe-bench/apps/library_management $ bench build --app library_management Linking /home/satria/Documents/projects/frappe-bench/apps/frappe/frappe/public to ./assets/frappe Linking /home/satria/Documents/projects/frappe-bench/apps/frappe/node_modules to ./assets/frappe/node_modules Linking /home/satria/Documents/projects/frappe-bench/apps/library_management/library_management/public to ./assets/library_management ✔ Application Assets Linked yarn run v1.22.19 $ node esbuild --production --apps library_management --run-build-command File Size DONE Total Build Time: 111.785ms Done in 0.74s. Compiling translations for library_management |
[/codesyntax]
You will be prompted with details of your app, fill them up and an app named library_management will be created in the apps folder.
Create A Site
Read: https://docs.frappe.io/framework/user/en/tutorial/create-a-site
Run : bench new-site library.localhost
[codesyntax lang=”bash”]
|
1 2 3 4 5 6 7 8 9 10 |
satria@teddy:~/Documents/projects/frappe-bench$ bench new-site library.localhost Enter mysql super user [root]: MySQL root password: Installing frappe... Updating DocTypes for frappe : [====================] 100% Set Administrator password: Updating Dashboard for frappe library.localhost: SystemSettings.enable_scheduler is UNSET *** Scheduler is disabled *** |
[/codesyntax]
the admin password is Teddy@123
This command will create a new database, so you need to enter your MariaDB root password. It will also ask to set the password for the Administrator user, just set a password that you won’t forget. This will be useful later.
Now, you will have a new folder named library.localhost in the sites directory.
If site creation fails for any reason, you’ll be prompted to roll back the changes. This will delete the library.localhost or equivalent in your sites directory, and delete the database/user that was created. This will allow you to easily retry without having to manually cleanup the unusable site.
the new database (_5b0e23f4238e31a0), user and password can be seen in sites/library.localhost/site_config.json
Now you can open the site http://library.localhost:8000/ on your browser
Note: make sure to run ‘bench start’ first in the frappe-bench directory
The login page will be displayed:
username: Administrator
password: Teddy@123
This user also can be found in the database (tabUser table)
Then install app on site
[codesyntax lang=”bash”]
|
1 2 3 4 |
satria@teddy:~/Documents/projects/frappe-bench$ bench --site library.localhost install-app library_management Installing library_management... Updating Dashboard for library_management |
[/codesyntax]
To confirm if the app was installed, run the following command:
[codesyntax lang=”bash”]
|
1 2 3 4 |
satria@teddy:~/Documents/projects/frappe-bench$ bench --site library.localhost list-apps frappe library_management |
[/codesyntax]
then run ‘bench start’ again!
I found some glitch on the frontend.
for example on http://library.localhost:8000/login, i found these errors related to css on the console:
Failed to load resource: the server responded with a status of 404 (NOT FOUND) -> http://library.localhost:8000/assets/frappe/dist/css/login.bundle.O2AXXQ4F.css
I can’t find the file but I found this file:
sites/assets/frappe/dist/css/login.bundle.M242FIII.css
–> NEED TO RESTART bench server (stop bench then run again bench start). then refresh the browser
but after the login, i found another frontend glitch:
GET http://library.localhost:8000/assets/frappe/dist/css/desk.bundle.5EPJH5Z3.css net::ERR_ABORTED 404 (NOT FOUND) -> http://library.localhost:8000/assets/frappe/dist/css/desk.bundle.5EPJH5Z3.css
GET http://library.localhost:8000/assets/frappe/dist/css/report.bundle.7F2GVCHL.css net::ERR_ABORTED 404 (NOT FOUND) -> http://library.localhost:8000/assets/frappe/dist/css/report.bundle.7F2GVCHL.css
–> READ THE WARNING MESSAGE:
WARNING overcommit_memory is set to 0! Background save may fail under low memory condition. To fix this issue add ‘vm.overcommit_memory = 1’ to /etc/sysctl.conf and then reboot or run the command ‘sysctl vm.overcommit_memory=1’ for this to take effect. –> So fix it as requested! then restart bench (bench start)
Open http://library.localhost:8000/app/ -> should be working and run the app install wizard
email: advcha@yahoo.com
pass: Teddy@123
Create a DocType
Read: https://docs.frappe.io/framework/user/en/tutorial/create-a-doctype
DocType is analogous to a Model in other frameworks. Apart from defining properties, it also defines the behavior of the Model.
Enable Developer Mode
Before we can create DocTypes, we need to enable developer mode on our bench. This will enable boilerplate creation when we create doctypes and we can track them into version control with our app.
Go to your terminal and quit the bench server if it’s already running then from the frappe-bench directory, run the following command:
Creating a DocType
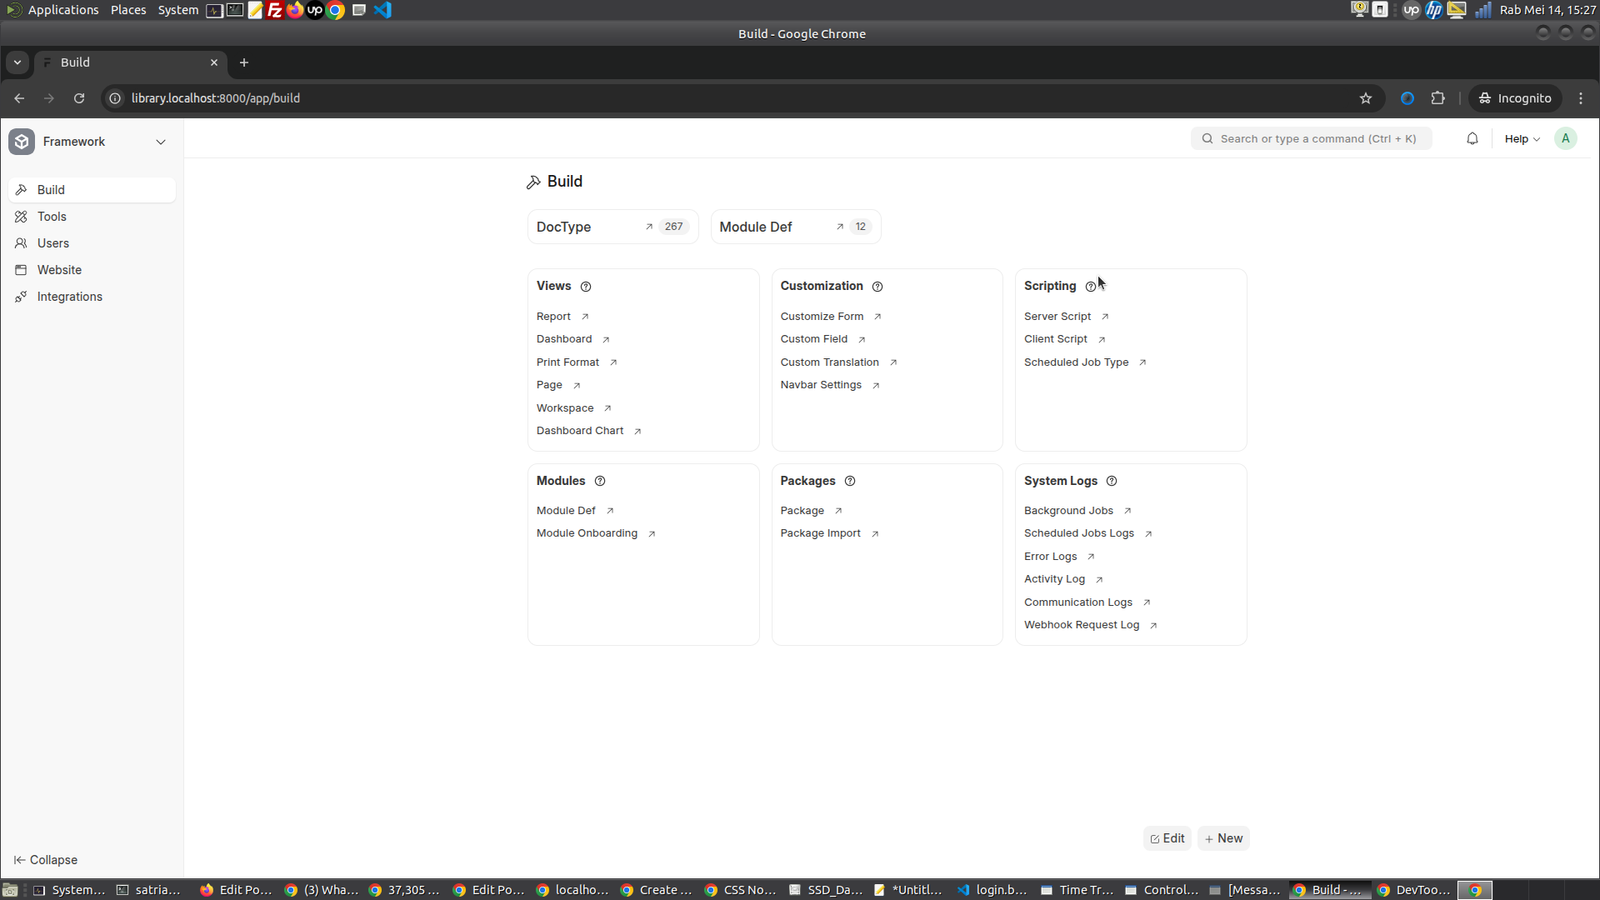
While in Desk, navigate to the DocType List using the Awesomebar. This list will include DocTypes bundled with the framework, those that are a part of the installed Frappe apps and custom ones, which you can create specific to each site.
The first doctype we will create is Article. To create it, click on New.
-> http://library.localhost:8000/app/doctype/view/list then click ‘+Add DocType’ button on the top right
- Enter Name as Article
- Select Library Management in Module
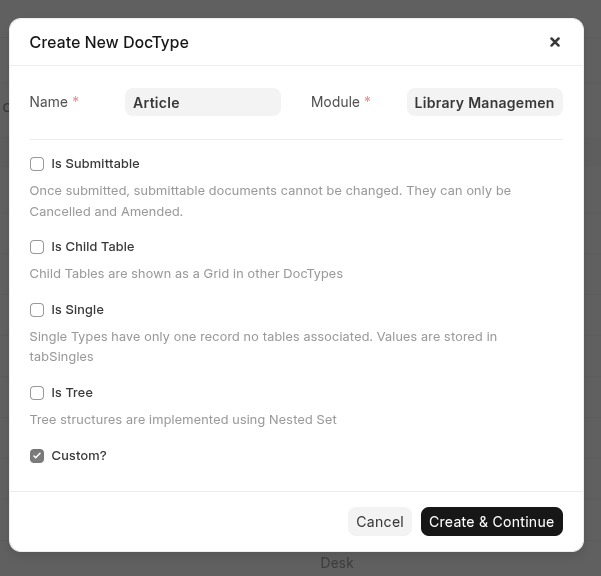
Then click ‘Create & Continue’ button
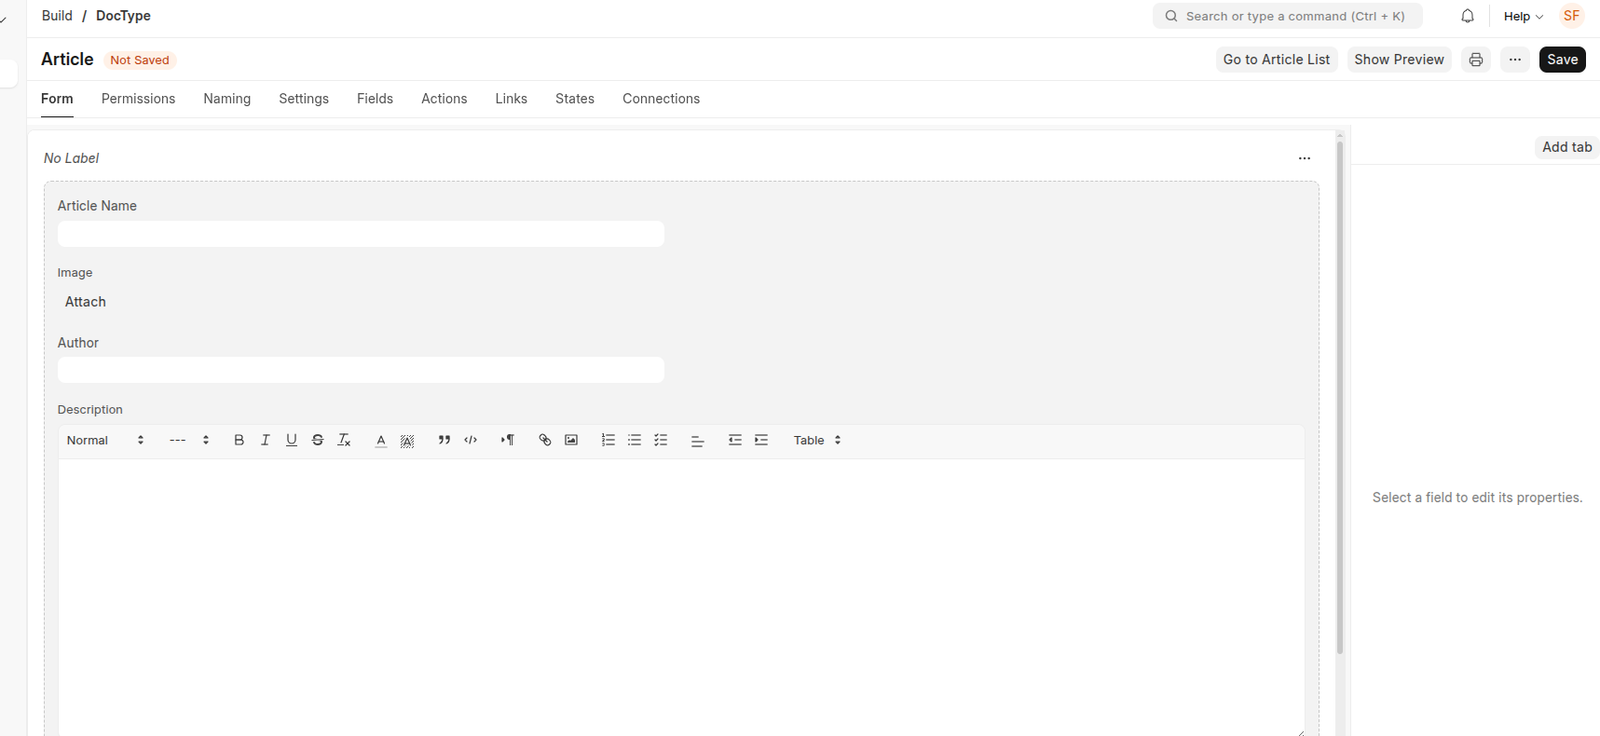
then Go to http://library.localhost:8000/app/doctype
then select ‘Article’
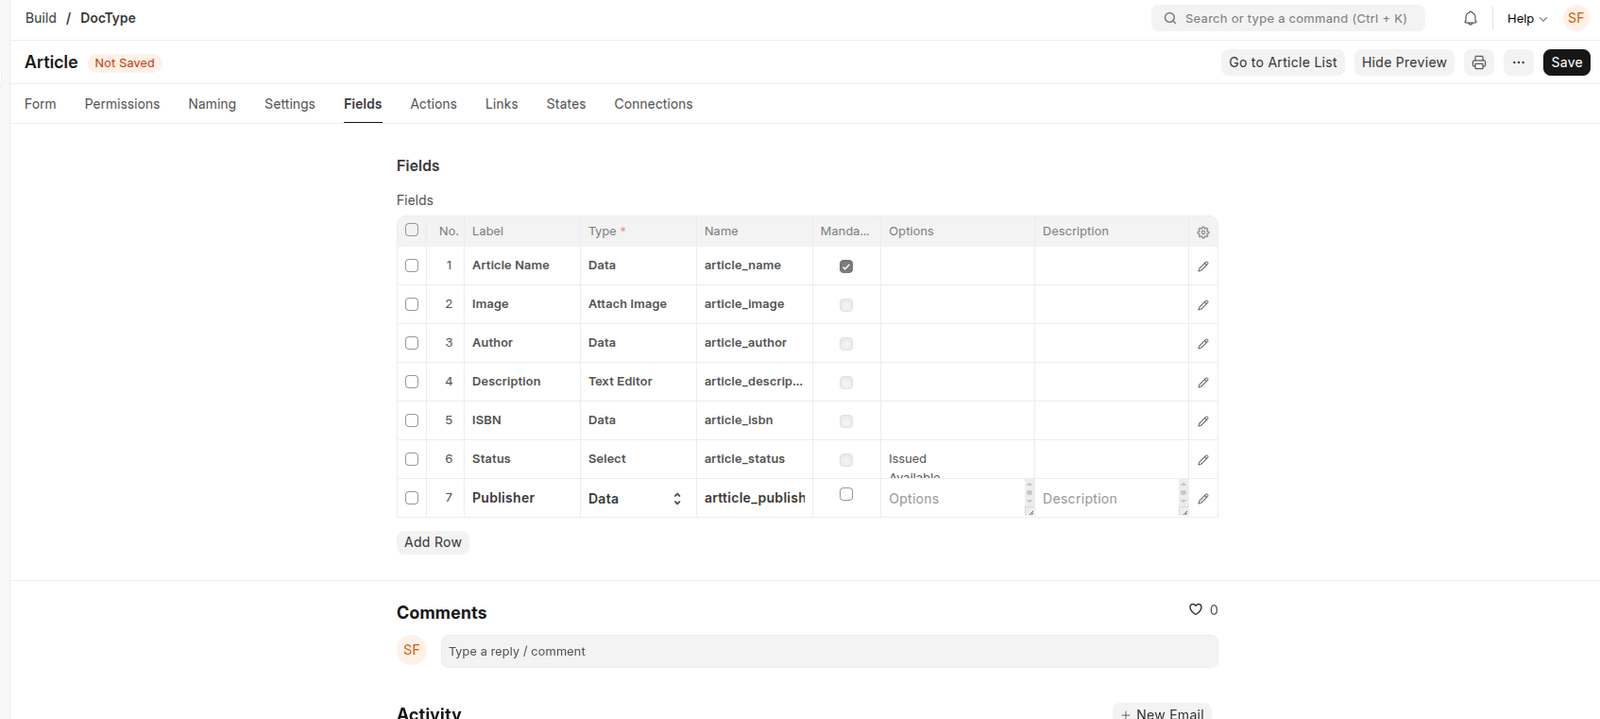
- Add the following fields in the Fields table: (Better use ‘Form’ tab)
- Article Name (Data, Mandatory)
- Image (Attach Image)
- Author (Data)
- Description (Text Editor)
- ISBN (Data)
- Status (Select) – Enter two options: Issued and Available (Type Issued, hit enter, then type Available)
- Publisher (Data)
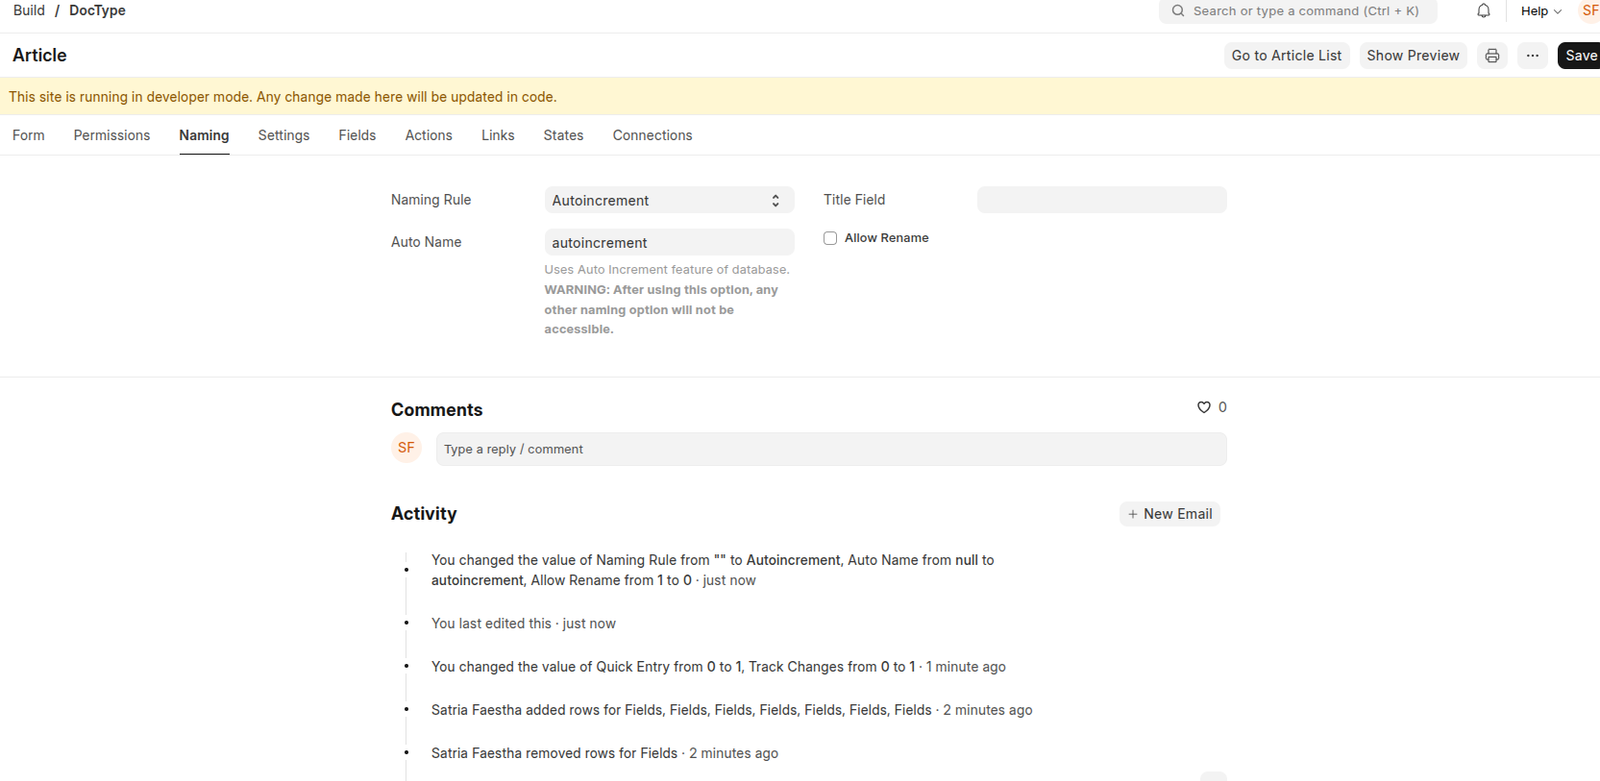
Refer the following images to check how it should be done:
Form tab
Naming tab
Setting tab
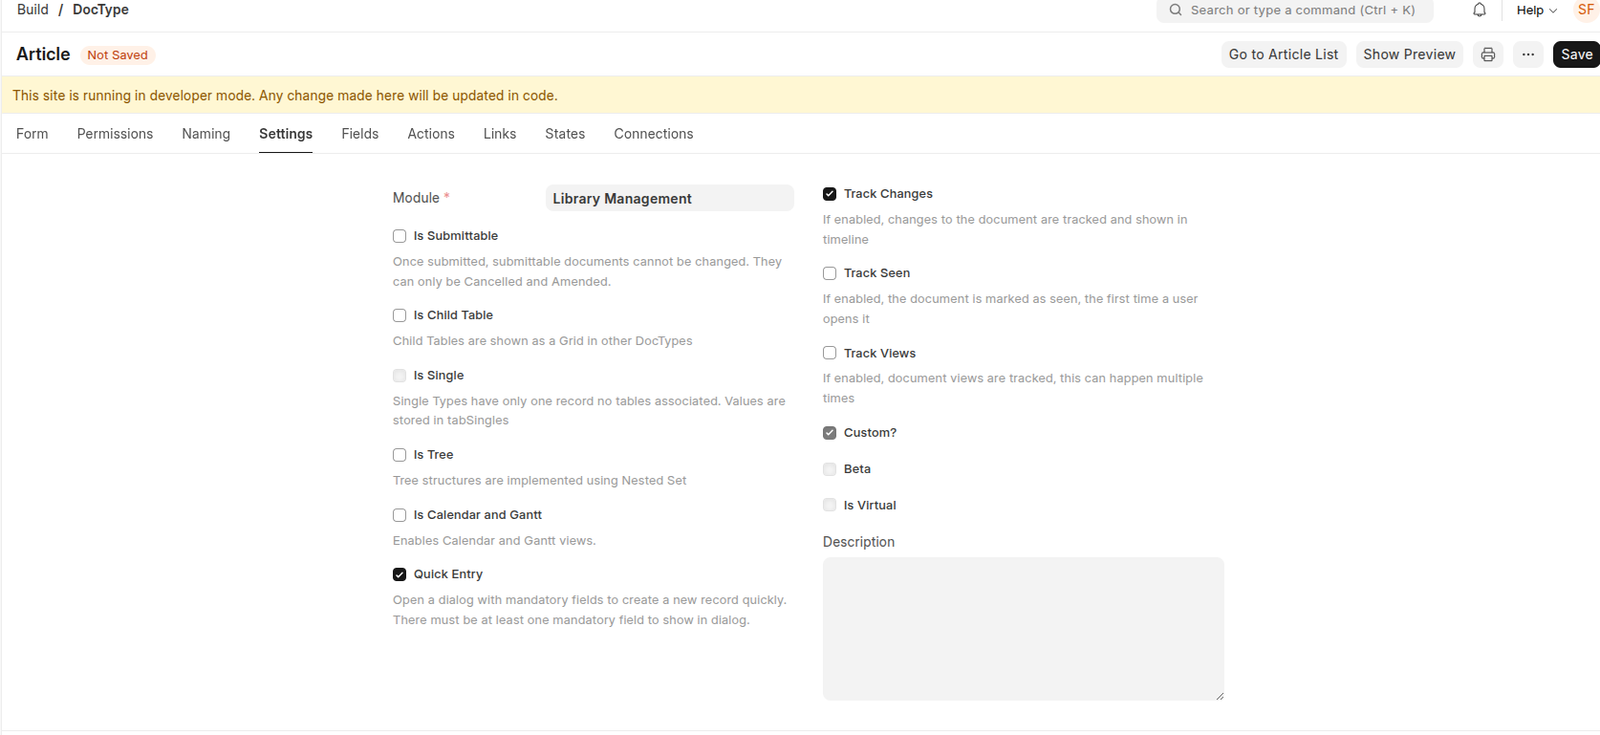
Field tab (usually populated from the Form tab entries)
After adding the fields, click on Save.
You will see a Go to Article List button at the top right of the form. Click on it to go to the Article List. Here you will see a blank list with no records because the table has no records.
Let’s create some records. But before that, we need to clear the Desk cache. Click on the Settings dropdown on the right side of the navbar and click on Reload.
Click ‘Go to Article List’ button (http://library.localhost:8000/app/article)
then click ‘Add Article’ button

The github gave me much headeache
[codesyntax lang=”bash”]
|
1 2 3 4 5 6 7 8 9 10 11 12 13 14 15 16 17 18 19 20 21 22 23 24 25 26 27 |
(env) satria@teddy:~/Documents/projects/frappe-bench/apps/library_management$ git remote set-url origin https://github.com/advcha/library-management-system.git (env) satria@teddy:~/Documents/projects/frappe-bench/apps/library_management$ git push origin main error: src refspec main does not match any error: failed to push some refs to 'https://github.com/advcha/library-management-system.git' (env) satria@teddy:~/Documents/projects/frappe-bench/apps/library_management$ git remote add origin https://github.com/your-username/library-management-system.git error: remote origin already exists. (env) satria@teddy:~/Documents/projects/frappe-bench/apps/library_management$ git push origin main error: src refspec main does not match any error: failed to push some refs to 'https://github.com/advcha/library-management-system.git' (env) satria@teddy:~/Documents/projects/frappe-bench/apps/library_management$ ^C (env) satria@teddy:~/Documents/projects/frappe-bench/apps/library_management$ git branch develop * library-management-system (env) satria@teddy:~/Documents/projects/frappe-bench/apps/library_management$ git push origin library-management-system Enumerating objects: 52, done. Counting objects: 100% (52/52), done. Delta compression using up to 8 threads Compressing objects: 100% (44/44), done. Writing objects: 100% (50/50), 13.02 KiB | 3.25 MiB/s, done. Total 50 (delta 16), reused 0 (delta 0), pack-reused 0 remote: Resolving deltas: 100% (16/16), done. remote: remote: Create a pull request for 'library-management-system' on GitHub by visiting: remote: https://github.com/advcha/library-management-system/pull/new/library-management-system remote: To https://github.com/advcha/library-management-system.git * [new branch] library-management-system -> library-management-system |
[/codesyntax]