Ref: http://tutorials.mustangx.org/tutorials/create-advanced-blog-symfony-4-p1-2/
Getting Started with Symfony 4.x
There has been a lot of changes made for Symfony 4, seems to be ok though. I was quite confused, mainly the file structure of Symfony 3 is what I was used to. Then I discovered a nice and quick tutorial with the title Beginners Symfony 4 Tutorial.
The file structure has change if you are developing a web application. There are many, many changes that I may not catch as we move through this.
Step 1 – Symfony Website Skeleton
I am not going to detail this part, if you need that go to the link above.
|
1 2 3 4 5 6 7 8 9 10 11 12 13 14 15 16 17 18 19 20 21 22 23 24 25 26 27 28 29 30 31 32 33 34 35 36 37 38 39 40 41 42 43 44 45 46 47 48 49 50 51 52 53 54 55 56 57 58 59 60 61 62 63 64 65 66 67 68 69 70 71 72 73 74 75 76 77 78 79 80 81 82 83 84 85 86 87 88 89 90 91 92 93 94 95 96 97 98 99 100 101 102 103 104 105 106 107 108 109 110 111 112 113 114 115 116 117 118 119 120 121 122 123 124 125 126 127 128 129 130 131 132 133 134 135 136 137 138 139 140 141 142 143 144 145 146 147 148 149 150 151 152 153 154 155 156 157 158 159 160 161 162 163 164 165 166 167 168 169 |
teddy@teddy:~/Documents/works/symfony4$ composer create-project symfony/website-skeleton symfony4-blog Installing symfony/website-skeleton (v4.2.3.1) - Installing symfony/website-skeleton (v4.2.3.1): Downloading (100%) Created project in symfony4-blog Loading composer repositories with package information Installing dependencies (including require-dev) from lock file Package operations: 99 installs, 0 updates, 0 removals - Installing ocramius/package-versions (1.3.0): Downloading (100%) - Installing symfony/flex (v1.1.8): Downloading (100%) Cannot create cache directory /home/teddy/.composer/cache/repo/https---flex.symfony.com/, or directory is not writable. Proceeding without cache Prefetching 74 packages 🎶 - Downloading (100%) - Installing symfony/polyfill-mbstring (v1.10.0): Loading from cache - Installing symfony/contracts (v1.0.2): Loading from cache - Installing doctrine/lexer (v1.0.1): Loading from cache - Installing doctrine/annotations (v1.6.0): Loading from cache - Installing doctrine/reflection (v1.0.0): Loading from cache - Installing doctrine/event-manager (v1.0.0): Loading from cache - Installing doctrine/collections (v1.5.0): Loading from cache - Installing doctrine/cache (v1.8.0): Loading from cache - Installing doctrine/persistence (v1.1.0): Loading from cache - Installing symfony/doctrine-bridge (v4.2.3): Loading from cache - Installing doctrine/inflector (v1.3.0): Loading from cache - Installing doctrine/doctrine-cache-bundle (1.3.5): Loading from cache - Installing doctrine/instantiator (1.1.0): Loading from cache - Installing symfony/stopwatch (v4.2.3): Loading from cache - Installing symfony/console (v4.2.3): Loading from cache - Installing zendframework/zend-eventmanager (3.2.1): Loading from cache - Installing zendframework/zend-code (3.3.1): Loading from cache - Installing ocramius/proxy-manager (2.1.1): Loading from cache - Installing doctrine/dbal (v2.9.2): Loading from cache - Installing doctrine/migrations (v2.0.0): Loading from cache - Installing egulias/email-validator (2.1.7): Loading from cache - Installing jdorn/sql-formatter (v1.2.17): Loading from cache - Installing phpdocumentor/reflection-common (1.0.1): Loading from cache - Installing phpdocumentor/type-resolver (0.4.0): Loading from cache - Installing psr/cache (1.0.1): Loading from cache - Installing psr/container (1.0.0): Loading from cache - Installing psr/simple-cache (1.0.1): Loading from cache - Installing symfony/http-foundation (v4.2.3): Loading from cache - Installing symfony/event-dispatcher (v4.2.3): Loading from cache - Installing psr/log (1.1.0): Loading from cache - Installing symfony/debug (v4.2.3): Loading from cache - Installing symfony/http-kernel (v4.2.3): Loading from cache - Installing symfony/routing (v4.2.3): Loading from cache - Installing symfony/finder (v4.2.3): Loading from cache - Installing symfony/filesystem (v4.2.3): Loading from cache - Installing symfony/dependency-injection (v4.2.3): Loading from cache - Installing symfony/config (v4.2.3): Loading from cache - Installing symfony/var-exporter (v4.2.3): Loading from cache - Installing symfony/cache (v4.2.3): Loading from cache - Installing symfony/framework-bundle (v4.2.3): Loading from cache - Installing doctrine/common (v2.10.0): Loading from cache - Installing sensio/framework-extra-bundle (v5.2.4): Loading from cache - Installing symfony/asset (v4.2.3): Loading from cache - Installing symfony/dotenv (v4.2.3): Loading from cache - Installing symfony/expression-language (v4.2.3): Loading from cache - Installing symfony/inflector (v4.2.3): Loading from cache - Installing symfony/property-access (v4.2.3): Loading from cache - Installing symfony/options-resolver (v4.2.3): Loading from cache - Installing symfony/intl (v4.2.3): Loading from cache - Installing symfony/polyfill-intl-icu (v1.10.0): Loading from cache - Installing symfony/form (v4.2.3): Loading from cache - Installing monolog/monolog (1.24.0): Loading from cache - Installing symfony/monolog-bridge (v4.2.3): Loading from cache - Installing doctrine/orm (v2.6.3): Loading from cache - Installing doctrine/doctrine-bundle (1.10.1): Loading from cache - Installing doctrine/doctrine-migrations-bundle (v2.0.0): Loading from cache - Installing symfony/orm-pack (v1.0.6): Loading from cache - Installing symfony/security-core (v4.2.3): Loading from cache - Installing symfony/security-http (v4.2.3): Loading from cache - Installing symfony/security-guard (v4.2.3): Loading from cache - Installing symfony/security-csrf (v4.2.3): Loading from cache - Installing symfony/security-bundle (v4.2.3): Loading from cache - Installing symfony/serializer (v4.2.3): Loading from cache - Installing symfony/property-info (v4.2.3): Loading from cache - Installing webmozart/assert (1.4.0): Loading from cache - Installing phpdocumentor/reflection-docblock (4.3.0): Loading from cache - Installing symfony/serializer-pack (v1.0.2): Loading from cache - Installing swiftmailer/swiftmailer (v6.1.3): Loading from cache - Installing symfony/swiftmailer-bundle (v3.2.5): Loading from cache - Installing symfony/translation (v4.2.3): Loading from cache - Installing twig/twig (v2.6.2): Loading from cache - Installing symfony/twig-bridge (v4.2.3): Loading from cache - Installing symfony/validator (v4.2.3): Loading from cache - Installing psr/link (1.0.0): Loading from cache - Installing fig/link-util (1.0.0): Loading from cache - Installing symfony/web-link (v4.2.3): Loading from cache - Installing symfony/yaml (v4.2.3): Loading from cache - Installing symfony/process (v4.2.3): Loading from cache - Installing facebook/webdriver (1.6.0): Loading from cache - Installing symfony/polyfill-php72 (v1.10.0): Loading from cache - Installing symfony/var-dumper (v4.2.3): Loading from cache - Installing symfony/twig-bundle (v4.2.3): Loading from cache - Installing symfony/web-profiler-bundle (v4.2.3): Loading from cache - Installing symfony/profiler-pack (v1.0.4): Loading from cache - Installing symfony/monolog-bundle (v3.3.1): Loading from cache - Installing symfony/debug-bundle (v4.2.3): Loading from cache - Installing easycorp/easy-log-handler (v1.0.7): Loading from cache - Installing symfony/debug-pack (v1.0.7): Loading from cache - Installing symfony/dom-crawler (v4.2.3): Loading from cache - Installing nikic/php-parser (v4.2.0): Loading from cache - Installing symfony/maker-bundle (v1.11.3): Loading from cache - Installing symfony/phpunit-bridge (v4.2.3): Loading from cache - Installing symfony/browser-kit (v4.2.3): Loading from cache - Installing symfony/panther (v0.2.0): Loading from cache - Installing symfony/css-selector (v4.2.3): Loading from cache - Installing symfony/test-pack (v1.0.5): Loading from cache - Installing symfony/web-server-bundle (v4.2.3): Loading from cache Generating autoload files ocramius/package-versions: Generating version class... ocramius/package-versions: ...done generating version class Symfony operations: 21 recipes (b3986ed40336733aed65b5bbdded81f4) - Configuring symfony/flex (>=1.0): From github.com/symfony/recipes:master - Configuring symfony/framework-bundle (>=4.2): From github.com/symfony/recipes:master - Configuring doctrine/annotations (>=1.0): From github.com/symfony/recipes:master - Configuring doctrine/doctrine-cache-bundle (>=1.3.5): From auto-generated recipe - Configuring symfony/console (>=3.3): From github.com/symfony/recipes:master - Configuring symfony/routing (>=4.2): From github.com/symfony/recipes:master - Configuring sensio/framework-extra-bundle (>=5.2): From github.com/symfony/recipes:master - Configuring doctrine/doctrine-bundle (>=1.6): From github.com/symfony/recipes:master - Configuring doctrine/doctrine-migrations-bundle (>=1.2): From github.com/symfony/recipes:master - Configuring symfony/security-bundle (>=3.3): From github.com/symfony/recipes:master - Configuring symfony/swiftmailer-bundle (>=2.5): From github.com/symfony/recipes:master - Configuring symfony/translation (>=3.3): From github.com/symfony/recipes:master - Configuring symfony/validator (>=4.1): From github.com/symfony/recipes:master - Configuring symfony/twig-bundle (>=3.3): From github.com/symfony/recipes:master - Configuring symfony/web-profiler-bundle (>=3.3): From github.com/symfony/recipes:master - Configuring symfony/monolog-bundle (>=3.1): From github.com/symfony/recipes:master - Configuring symfony/debug-bundle (>=4.1): From github.com/symfony/recipes:master - Configuring easycorp/easy-log-handler (>=1.0): From github.com/symfony/recipes:master - Configuring symfony/maker-bundle (>=1.0): From github.com/symfony/recipes:master - Configuring symfony/phpunit-bridge (>=4.1): From github.com/symfony/recipes:master - Configuring symfony/web-server-bundle (>=3.3): From github.com/symfony/recipes:master Executing script cache:clear [OK] Executing script assets:install public [OK] Some files may have been created or updated to configure your new packages. Please review, edit and commit them: these files are yours. What's next? * Run your application: 1. Change to the project directory 2. Create your code repository with the git init command 3. Run composer require server --dev to install the development web server, or configure another supported web server https://symfony.com/doc/current/setup/web_server_configuration.html * Read the documentation at https://symfony.com/doc Database Configuration * Modify your DATABASE_URL config in .env * Configure the driver (mysql) and server_version (5.7) in config/packages/doctrine.yaml How to test? * Write test cases in the tests/ folder * Run php bin/phpunit |
Step 2 – Change into your new directory:
|
1 2 |
teddy@teddy:~/Documents/works/symfony4$ cd symfony4-blog/ teddy@teddy:~/Documents/works/symfony4/symfony4-blog$ |
Step 3 – Install the Symfony Web Server Bundle: (NO NEED)
|
1 2 3 4 5 6 7 8 9 10 11 12 13 14 |
teddy@teddy:~/Documents/works/symfony4/symfony4-blog$ composer require server --dev Cannot create cache directory /home/teddy/.composer/cache/repo/https---flex.symfony.com/, or directory is not writable. Proceeding without cache Restricting packages listed in "symfony/symfony" to "4.2.*" ./composer.json has been updated Cannot create cache directory /home/teddy/.composer/cache/repo/https---flex.symfony.com/, or directory is not writable. Proceeding without cache Loading composer repositories with package information Updating dependencies (including require-dev) Restricting packages listed in "symfony/symfony" to "4.2.*" Nothing to install or update Generating autoload files ocramius/package-versions: Generating version class... ocramius/package-versions: ...done generating version class Executing script cache:clear [OK] Executing script assets:install public [OK] |
Step 4 – Now let’s fire up the web server
|
1 2 3 4 |
teddy@teddy:~/Documents/works/symfony4/symfony4-blog$ php bin/console server:start [OK] Server listening on http://127.0.0.1:8000 |
 OR CAN USE PHP SERVER CLI : php bin/console server:run
|
1 2 3 4 5 6 7 8 9 10 11 |
teddy@teddy:~/Documents/works/symfony4/symfony4-blog$ php bin/console server:run [OK] Server listening on http://127.0.0.1:8000 // Quit the server with CONTROL-C. PHP 7.2.14-1+ubuntu16.04.1+deb.sury.org+1 Development Server started at Thu Feb 7 10:00:54 2019 Listening on http://127.0.0.1:8000 Document root is /home/teddy/Documents/works/symfony4/symfony4-blog/public Press Ctrl-C to quit. |
That command will start the server and this one will stop it.
|
1 2 3 4 |
teddy@teddy:~/Documents/works/symfony4/symfony4-blog$ php bin/console server:stop [OK] Stopped the web server. |
Note: You do not need to have any other server running. It may cause problems.
Create an .htaccess file (FOR APACHE WEBSERVER)
Mein is like this. Test it out and see if it works for you.
Now COPY & PASTE the following:
|
1 2 3 4 5 6 7 8 9 10 11 12 13 14 15 16 17 |
# Enable rewrite engine and route requests to framework RewriteEngine On RewriteBase / RewriteCond %{REQUEST_URI} ^/robots.txt RewriteRule ^(.*)$ /public/robots.txt [L] # resources RewriteCond %{REQUEST_URI} ^/images/ [OR] RewriteCond %{REQUEST_URI} ^/js/ [OR] RewriteCond %{REQUEST_URI} ^/fonts/ [OR] RewriteCond %{REQUEST_URI} ^/css/ RewriteRule ^(.*)$ /public/$1 [L] RewriteCond %{REQUEST_URI} !^/public/ RewriteRule ^(.*)$ /public/$1 [QSA,L] |
Setup the DB (MySql)
Inside the .env file (probably hidden) find this line
|
1 |
DATABASE_URL=mysql://db_user:db_password@127.0.0.1:3306/db_name |
replace ‘db_user’, ‘db_password’ and ‘db_name’ according to your database credential.
Once that’s done, we need to do this (make sure you have the correct db info added first):
|
1 2 |
teddy@teddy:~/Documents/works/symfony4/symfony4-blog$ php bin/console doctrine:database:create Created database `sf4_blog` for connection named default |
If you already have the database, it’d show this error:
|
1 2 3 4 5 |
teddy@teddy:~/Documents/works/symfony4/symfony4-blog$ php bin/console doctrine:database:create Could not create database `sf4_blog` for connection named default An exception occurred while executing 'CREATE DATABASE `sf4_blog`': SQLSTATE[HY000]: General error: 1007 Can't create database 'sf4_blog'; database exists |
Auto Versioning setup
Get the auto versioning setup first.
NOTE: This has changed and is easier to install thanks to Flex.
|
1 2 3 4 5 6 7 8 9 10 11 12 13 14 15 16 17 |
teddy@teddy:~/Documents/works/symfony4/symfony4-blog$ composer update Cannot create cache directory /home/teddy/.composer/cache/repo/https---flex.symfony.com/, or directory is not writable. Proceeding without cache Loading composer repositories with package information Updating dependencies (including require-dev) Restricting packages listed in "symfony/symfony" to "4.2.*" Package operations: 0 installs, 1 update, 0 removals - Updating ocramius/proxy-manager (2.1.1 => 2.2.2): Downloading (connecting...Downloading (100%) Writing lock file Generating autoload files ocramius/package-versions: Generating version class... What about running composer global require symfony/thanks && composer thanks now? This will spread some 💖 by sending a ★ to the GitHub repositories of your fellow package maintainers. ocramius/package-versions: ...done generating version class Executing script cache:clear [OK] Executing script assets:install public [OK] |
|
1 2 3 4 5 6 7 8 9 10 11 12 13 14 15 16 17 18 19 20 21 22 23 24 25 26 |
teddy@teddy:~/Documents/works/symfony4/symfony4-blog$ composer require shivas/versioning-bundle Cannot create cache directory /home/teddy/.composer/cache/repo/https---flex.symfony.com/, or directory is not writable. Proceeding without cache Using version ^3.1 for shivas/versioning-bundle ./composer.json has been updated Cannot create cache directory /home/teddy/.composer/cache/repo/https---flex.symfony.com/, or directory is not writable. Proceeding without cache Loading composer repositories with package information Updating dependencies (including require-dev) Restricting packages listed in "symfony/symfony" to "4.2.*" Prefetching 2 packages 🎶 - Downloading (100%) Package operations: 2 installs, 0 updates, 0 removals - Installing nikolaposa/version (2.2.2): Loading from cache - Installing shivas/versioning-bundle (3.1.3): Loading from cache Writing lock file Generating autoload files ocramius/package-versions: Generating version class... ocramius/package-versions: ...done generating version class Symfony operations: 1 recipe (2a272251fc87f1a8e5906923edd9fdc4) - Configuring shivas/versioning-bundle (>=3.1.3): From auto-generated recipe Executing script cache:clear [OK] Executing script assets:install public [OK] Some files may have been created or updated to configure your new packages. Please review, edit and commit them: these files are yours. |
The version is automatically updated with Composer and available in your application.
|
1 2 3 4 5 |
# PHP getenv('SHIVAS_APP_VERSION') # Twig {{ shivas_app_version }} |
Console commands
There are two available console commands. The app:version:bump command is automatically called by Composer on every install and update.
|
1 2 3 4 5 |
# This will display all available version providers bin/console app:version:list-providers # Display a dry run of a version bump bin/console app:version:bump -d |
Go ahead and test those two commands and see what it outputs.
|
1 2 3 4 5 6 7 8 9 10 |
teddy@teddy:~/Documents/works/symfony4/symfony4-blog$ php bin/console app:version:list-providers Registered version providers ========== ========================================================= ========== =========== Alias Class Priority Supported ========== ========================================================= ========== =========== version Shivas\VersioningBundle\Provider\VersionProvider 100 No git Shivas\VersioningBundle\Provider\GitRepositoryProvider -25 No revision Shivas\VersioningBundle\Provider\RevisionProvider -50 No init Shivas\VersioningBundle\Provider\InitialVersionProvider -75 Yes ========== ========================================================= ========== =========== |
|
1 2 3 4 5 6 7 |
teddy@teddy:~/Documents/works/symfony4/symfony4-blog$ php bin/console app:version:bump -d Provider: Shivas\VersioningBundle\Provider\InitialVersionProvider Formatter: Shivas\VersioningBundle\Formatter\GitDescribeFormatter 10:16:34 WARNING [cache] Failed to save key "version" (Version\Version) ["key" => "version","type" => "Version\Version","exception" => Symfony\Component\Cache\Exception\InvalidArgumentException { …}] Current version: 0.1.0 New version: 0.1.1 Dry run, skipping version bump |
Create an Advanced Blog with Symfony 4 – part3 (FrontController)
Last Updated On March 28, 2018
Introduction
This part of the tutorial will concentrate on getting a basic Homepage/Frontpage structure setup. I opted for a typical blog look.
We will remove files and folders as well add new ones. The Controller for the homepage will be created and the basic page should be viewable at the end.
Get Twitter Bootstrap Layout
I want to have a different look this time, so we will be using some premade templates from the Startbootstrap website. The one we want is released with an MIT license.
First create the PageController
It is easy to do with Symfony 4.
|
1 2 3 4 5 6 7 8 9 10 11 12 13 |
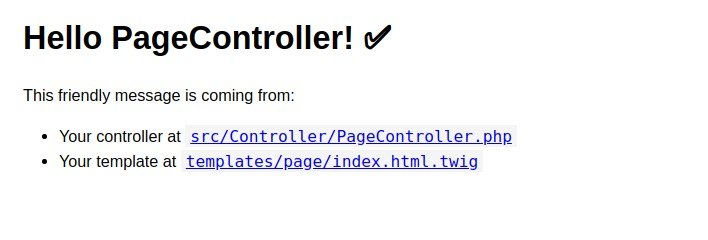
teddy@teddy:~/Documents/works/symfony4/symfony4-blog$ php bin/console make:controller Choose a name for your controller class (e.g. VictoriousPuppyController): > PageController created: src/Controller/PageController.php created: templates/page/index.html.twig Success! Next: Open your new controller class and add some pages! |
Let’s see what got created for us. We have a PageController.php file in our src/Controllers folder and inside of the templates folder we have a new folder and a new file, page/index.html.twig
Now that was all I discovered. Run the server: php bin/console s:r
then open the page on http://localhost:8000/page