Ref: Loopback and AngularJs first tutorial.
Make sure you already installed node/nodejs and npm on your system
|
1 2 3 4 5 6 |
teddy@teddy-K43SJ:~$ npm -v 3.10.8 teddy@teddy-K43SJ:~$ node -v v6.9.1 teddy@teddy-K43SJ:~$ nodejs -v v4.8.0 |
Then start installing Strongloop framework
|
1 |
teddy@teddy-K43SJ:~$ sudo npm install -g strongloop |
Wait until it’s finished. Then I go to my default directory for node project.
|
1 |
teddy@teddy-K43SJ:~$ cd Documents/node/ |
Use ‘slc’ command to create a new project. My first node project name is ‘todo’. Type ‘slc loopback todo’:
|
1 2 3 4 5 6 7 8 9 10 11 12 13 14 15 16 17 18 19 20 21 22 23 24 25 26 27 28 29 30 31 32 33 34 35 36 37 38 39 40 41 42 43 44 45 46 47 48 49 50 51 52 53 54 55 56 57 58 59 60 61 62 63 64 65 66 67 68 69 70 71 72 73 74 75 76 77 78 79 80 81 82 83 84 85 86 87 88 89 90 91 92 93 94 95 96 97 98 99 100 101 102 103 104 105 106 107 108 109 110 111 112 113 114 115 116 117 118 119 120 121 122 123 124 125 126 127 128 129 130 131 132 133 134 135 136 137 138 139 140 141 142 143 144 145 146 147 148 149 150 151 152 153 154 155 156 157 158 159 160 161 162 163 164 165 166 167 168 169 170 171 172 173 174 175 176 177 178 179 180 181 182 183 184 185 186 187 188 189 190 191 192 193 194 195 196 197 198 199 200 201 202 203 204 205 206 207 208 209 210 211 212 213 214 215 216 217 218 219 220 221 222 223 224 225 226 227 228 229 230 231 232 233 234 235 236 237 238 239 240 241 242 243 244 245 246 247 248 249 250 251 252 253 254 255 256 257 258 259 260 261 262 263 264 265 266 267 268 269 270 271 272 273 274 275 276 277 278 279 280 281 282 283 284 285 286 287 288 289 290 291 292 293 294 295 296 297 298 299 300 301 302 303 304 305 306 307 308 309 310 311 312 313 314 315 316 317 318 319 320 321 322 323 324 325 326 327 328 329 330 331 332 333 334 335 336 337 338 339 340 341 342 343 344 345 346 347 348 349 350 351 352 353 354 355 356 357 358 359 360 361 362 363 364 365 366 367 368 369 370 371 372 373 374 375 376 377 378 379 380 381 382 383 384 385 386 387 388 389 390 391 392 393 394 395 396 397 398 399 400 401 402 403 404 405 406 407 408 409 410 411 412 413 414 415 416 417 418 419 420 421 422 423 424 425 426 427 428 429 430 431 432 433 434 435 436 437 438 439 440 441 442 443 444 445 446 447 448 449 450 451 452 453 454 455 456 457 458 459 460 461 462 463 464 465 466 467 468 469 470 471 472 473 474 475 476 477 478 479 480 481 482 483 |
teddy@teddy-K43SJ:~/Documents/node$ slc loopback todo _-----_ | | ╭──────────────────────────╮ |--(o)--| │ Let's create a LoopBack │ `---------´ │ application! │ ( _´U`_ ) ╰──────────────────────────╯ /___A___\ / | ~ | __'.___.'__ ´ ` |° ´ Y ` ? What's the name of your application? todo ? Enter name of the directory to contain the project: todo create todo/ info change the working directory to todo ? Which version of LoopBack would you like to use? 2.x (long term support) ? What kind of application do you have in mind? empty-server (An empty LoopBack API, without any configured models or datasources) Generating .yo-rc.json I'm all done. Running npm install for you to install the required dependencies. If this fails, try running the command yourself. create .editorconfig create .eslintignore create .eslintrc create server/boot/root.js create server/middleware.development.json create server/middleware.json create server/server.js create .gitignore create client/README.md todo@1.0.0 /home/teddy/Documents/node/todo ├─┬ compression@1.6.2 │ ├─┬ accepts@1.3.3 │ │ ├── mime-types@2.1.14 │ │ └── negotiator@0.6.1 │ ├── bytes@2.3.0 │ ├─┬ compressible@2.0.9 │ │ └── mime-db@1.26.0 │ ├─┬ debug@2.2.0 │ │ └── ms@0.7.1 │ ├── on-headers@1.0.1 │ └── vary@1.1.0 ├── cors@2.8.1 ├─┬ eslint@2.13.1 │ ├─┬ chalk@1.1.3 │ │ ├── ansi-styles@2.2.1 │ │ ├── escape-string-regexp@1.0.5 │ │ ├── has-ansi@2.0.0 │ │ ├── strip-ansi@3.0.1 │ │ └── supports-color@2.0.0 │ ├─┬ concat-stream@1.6.0 │ │ ├── inherits@2.0.3 │ │ ├─┬ readable-stream@2.2.5 │ │ │ ├── buffer-shims@1.0.0 │ │ │ ├── process-nextick-args@1.0.7 │ │ │ └── string_decoder@0.10.31 │ │ └── typedarray@0.0.6 │ ├─┬ doctrine@1.5.0 │ │ └── isarray@1.0.0 │ ├─┬ es6-map@0.1.4 │ │ ├── d@0.1.1 │ │ ├── es5-ext@0.10.13 │ │ ├── es6-iterator@2.0.0 │ │ ├── es6-set@0.1.4 │ │ ├── es6-symbol@3.1.0 │ │ └── event-emitter@0.3.4 │ ├─┬ escope@3.6.0 │ │ ├── es6-weak-map@2.0.1 │ │ └─┬ esrecurse@4.1.0 │ │ └── estraverse@4.1.1 │ ├─┬ espree@3.4.0 │ │ ├── acorn@4.0.4 │ │ └─┬ acorn-jsx@3.0.1 │ │ └── acorn@3.3.0 │ ├── estraverse@4.2.0 │ ├── esutils@2.0.2 │ ├─┬ file-entry-cache@1.3.1 │ │ ├─┬ flat-cache@1.2.2 │ │ │ ├── circular-json@0.3.1 │ │ │ ├─┬ del@2.2.2 │ │ │ │ ├─┬ globby@5.0.0 │ │ │ │ │ ├─┬ array-union@1.0.2 │ │ │ │ │ │ └── array-uniq@1.0.3 │ │ │ │ │ └── arrify@1.0.1 │ │ │ │ ├── is-path-cwd@1.0.0 │ │ │ │ ├─┬ is-path-in-cwd@1.0.0 │ │ │ │ │ └── is-path-inside@1.0.0 │ │ │ │ ├── pify@2.3.0 │ │ │ │ └─┬ pinkie-promise@2.0.1 │ │ │ │ └── pinkie@2.0.4 │ │ │ ├── graceful-fs@4.1.11 │ │ │ └── write@0.2.1 │ │ └── object-assign@4.1.1 │ ├─┬ glob@7.1.1 │ │ ├── fs.realpath@1.0.0 │ │ ├─┬ inflight@1.0.6 │ │ │ └── wrappy@1.0.2 │ │ └── once@1.4.0 │ ├── globals@9.16.0 │ ├── ignore@3.2.4 │ ├── imurmurhash@0.1.4 │ ├─┬ inquirer@0.12.0 │ │ ├── ansi-escapes@1.4.0 │ │ ├── ansi-regex@2.1.1 │ │ ├─┬ cli-cursor@1.0.2 │ │ │ └─┬ restore-cursor@1.0.1 │ │ │ ├── exit-hook@1.1.1 │ │ │ └── onetime@1.1.0 │ │ ├── cli-width@2.1.0 │ │ ├── figures@1.7.0 │ │ ├─┬ readline2@1.0.1 │ │ │ ├── code-point-at@1.1.0 │ │ │ ├─┬ is-fullwidth-code-point@1.0.0 │ │ │ │ └── number-is-nan@1.0.1 │ │ │ └── mute-stream@0.0.5 │ │ ├── run-async@0.1.0 │ │ ├── rx-lite@3.1.2 │ │ ├── string-width@1.0.2 │ │ └── through@2.3.8 │ ├─┬ is-my-json-valid@2.16.0 │ │ ├── generate-function@2.0.0 │ │ ├─┬ generate-object-property@1.2.0 │ │ │ └── is-property@1.0.2 │ │ ├── jsonpointer@4.0.1 │ │ └── xtend@4.0.1 │ ├─┬ is-resolvable@1.0.0 │ │ └── tryit@1.0.3 │ ├─┬ js-yaml@3.8.2 │ │ ├── argparse@1.0.9 │ │ └── esprima@3.1.3 │ ├─┬ json-stable-stringify@1.0.1 │ │ └── jsonify@0.0.0 │ ├─┬ levn@0.3.0 │ │ ├── prelude-ls@1.1.2 │ │ └── type-check@0.3.2 │ ├── lodash@4.17.4 │ ├─┬ mkdirp@0.5.1 │ │ └── minimist@0.0.8 │ ├─┬ optionator@0.8.2 │ │ ├── deep-is@0.1.3 │ │ ├── fast-levenshtein@2.0.6 │ │ └── wordwrap@1.0.0 │ ├── path-is-absolute@1.0.1 │ ├── path-is-inside@1.0.2 │ ├── pluralize@1.2.1 │ ├── progress@1.1.8 │ ├─┬ require-uncached@1.0.3 │ │ ├─┬ caller-path@0.1.0 │ │ │ └── callsites@0.2.0 │ │ └── resolve-from@1.0.1 │ ├── shelljs@0.6.1 │ ├── strip-json-comments@1.0.4 │ ├─┬ table@3.8.3 │ │ ├─┬ ajv@4.11.5 │ │ │ └── co@4.6.0 │ │ ├── ajv-keywords@1.5.1 │ │ ├── slice-ansi@0.0.4 │ │ └─┬ string-width@2.0.0 │ │ └── is-fullwidth-code-point@2.0.0 │ ├── text-table@0.2.0 │ └─┬ user-home@2.0.0 │ └── os-homedir@1.0.2 ├── eslint-config-loopback@4.0.0 ├─┬ helmet@1.3.0 │ ├─┬ connect@3.4.1 │ │ ├─┬ finalhandler@0.4.1 │ │ │ └── unpipe@1.0.0 │ │ └── utils-merge@1.0.0 │ ├── dns-prefetch-control@0.1.0 │ ├── dont-sniff-mimetype@1.0.0 │ ├─┬ frameguard@1.1.0 │ │ └── lodash.isstring@4.0.1 │ ├─┬ helmet-csp@1.1.0 │ │ ├── camelize@1.0.0 │ │ ├─┬ content-security-policy-builder@1.0.0 │ │ │ └── dashify@0.2.2 │ │ ├─┬ lodash.assign@4.0.4 │ │ │ ├── lodash.keys@4.2.0 │ │ │ └── lodash.rest@4.0.5 │ │ ├── lodash.isfunction@3.0.8 │ │ ├─┬ lodash.reduce@4.2.0 │ │ │ ├── lodash._baseeach@4.1.3 │ │ │ ├─┬ lodash._baseiteratee@4.7.0 │ │ │ │ └─┬ lodash._stringtopath@4.8.0 │ │ │ │ └── lodash._basetostring@4.12.0 │ │ │ └── lodash._basereduce@3.0.2 │ │ ├── lodash.some@4.2.0 │ │ └── platform@1.3.1 │ ├── hide-powered-by@1.0.0 │ ├── hpkp@1.1.0 │ ├─┬ hsts@1.0.0 │ │ └── core-util-is@1.0.2 │ ├── ienoopen@1.0.0 │ ├── nocache@1.0.0 │ └── x-xss-protection@1.0.0 ├─┬ loopback@2.38.1 │ ├── async@2.1.5 │ ├── bcryptjs@2.4.3 │ ├─┬ body-parser@1.17.1 │ │ ├── bytes@2.4.0 │ │ ├── content-type@1.0.2 │ │ ├─┬ debug@2.6.1 │ │ │ └── ms@0.7.2 │ │ ├── http-errors@1.6.1 │ │ ├── iconv-lite@0.4.15 │ │ ├─┬ on-finished@2.3.0 │ │ │ └── ee-first@1.1.1 │ │ ├── qs@6.4.0 │ │ ├─┬ raw-body@2.2.0 │ │ │ └── bytes@2.4.0 │ │ └─┬ type-is@1.6.14 │ │ └── media-typer@0.3.0 │ ├── canonical-json@0.0.4 │ ├─┬ cookie-parser@1.4.3 │ │ ├── cookie@0.3.1 │ │ └── cookie-signature@1.0.6 │ ├── depd@1.1.0 │ ├── ejs@2.5.6 │ ├─┬ errorhandler@1.5.0 │ │ └── escape-html@1.0.3 │ ├─┬ express@4.15.2 │ │ ├── array-flatten@1.1.1 │ │ ├── content-disposition@0.5.2 │ │ ├─┬ debug@2.6.1 │ │ │ └── ms@0.7.2 │ │ ├── encodeurl@1.0.1 │ │ ├── finalhandler@1.0.0 │ │ ├── merge-descriptors@1.0.1 │ │ ├── methods@1.1.2 │ │ ├── path-to-regexp@0.1.7 │ │ ├─┬ proxy-addr@1.1.3 │ │ │ ├── forwarded@0.1.0 │ │ │ └── ipaddr.js@1.2.0 │ │ ├── range-parser@1.2.0 │ │ ├─┬ send@0.15.1 │ │ │ ├── debug@2.6.1 │ │ │ ├── destroy@1.0.4 │ │ │ ├── mime@1.3.4 │ │ │ └── ms@0.7.2 │ │ ├── serve-static@1.12.1 │ │ ├── setprototypeof@1.0.3 │ │ └── statuses@1.3.1 │ ├── inflection@1.12.0 │ ├── isemail@1.2.0 │ ├── loopback-connector-remote@1.3.3 │ ├─┬ loopback-context@1.0.0 │ │ └─┬ continuation-local-storage@3.2.0 │ │ ├─┬ async-listener@0.6.4 │ │ │ ├── semver@5.3.0 │ │ │ └── shimmer@1.1.0 │ │ └─┬ emitter-listener@1.0.1 │ │ └── shimmer@1.0.0 │ ├─┬ loopback-phase@1.4.1 │ │ └── async@0.9.2 │ ├─┬ nodemailer@2.7.2 │ │ ├─┬ libmime@3.0.0 │ │ │ ├── libbase64@0.1.0 │ │ │ └── libqp@1.1.0 │ │ ├─┬ mailcomposer@4.0.1 │ │ │ └─┬ buildmail@4.0.1 │ │ │ ├── addressparser@1.0.1 │ │ │ └── punycode@1.4.1 │ │ ├─┬ nodemailer-direct-transport@3.3.2 │ │ │ └─┬ smtp-connection@2.12.0 │ │ │ └─┬ httpntlm@1.6.1 │ │ │ ├── httpreq@0.4.23 │ │ │ └── underscore@1.7.0 │ │ ├─┬ nodemailer-shared@1.1.0 │ │ │ └── nodemailer-fetch@1.6.0 │ │ ├─┬ nodemailer-smtp-pool@2.8.2 │ │ │ └── nodemailer-wellknown@0.1.10 │ │ ├── nodemailer-smtp-transport@2.7.2 │ │ └─┬ socks@1.1.9 │ │ ├── ip@1.1.5 │ │ └── smart-buffer@1.1.15 │ ├── nodemailer-stub-transport@1.1.0 │ ├── stable@0.1.5 │ ├─┬ strong-globalize@2.8.2 │ │ ├── async@1.5.2 │ │ ├── esprima@2.7.3 │ │ ├─┬ g11n-pipeline@1.3.0 │ │ │ └─┬ swagger-client@2.1.32 │ │ │ ├── btoa@1.1.2 │ │ │ ├── cookiejar@2.1.0 │ │ │ ├── lodash-compat@3.10.2 │ │ │ ├── q@1.4.1 │ │ │ └─┬ superagent@2.3.0 │ │ │ ├── component-emitter@1.2.1 │ │ │ ├─┬ form-data@1.0.0-rc4 │ │ │ │ └── async@1.5.2 │ │ │ └── formidable@1.1.1 │ │ ├─┬ htmlparser2@3.9.2 │ │ │ ├── domelementtype@1.3.0 │ │ │ ├── domhandler@2.3.0 │ │ │ ├─┬ domutils@1.5.1 │ │ │ │ └─┬ dom-serializer@0.1.0 │ │ │ │ └── domelementtype@1.1.3 │ │ │ └── entities@1.1.1 │ │ ├─┬ md5@2.2.1 │ │ │ ├── charenc@0.0.2 │ │ │ ├── crypt@0.0.2 │ │ │ └── is-buffer@1.1.5 │ │ ├─┬ mktmpdir@0.1.1 │ │ │ └── rimraf@2.2.8 │ │ ├── optional@0.1.3 │ │ ├─┬ os-locale@1.4.0 │ │ │ └─┬ lcid@1.0.0 │ │ │ └── invert-kv@1.0.0 │ │ ├── posix-getopt@1.2.0 │ │ ├── word-count@0.2.2 │ │ └── yamljs@0.2.8 │ ├─┬ strong-remoting@2.33.0 │ │ ├── eventemitter2@2.2.2 │ │ ├─┬ jayson@1.2.2 │ │ │ ├─┬ commander@1.3.2 │ │ │ │ └── keypress@0.1.0 │ │ │ ├── eyes@0.1.8 │ │ │ ├─┬ JSONStream@1.0.3 │ │ │ │ └── jsonparse@1.0.0 │ │ │ └── lodash@3.6.0 │ │ ├── js2xmlparser@1.0.0 │ │ ├─┬ mux-demux@3.7.9 │ │ │ ├── duplex@1.0.0 │ │ │ ├── json-buffer@2.0.11 │ │ │ ├─┬ msgpack-stream@0.0.12 │ │ │ │ ├─┬ bops@0.0.6 │ │ │ │ │ ├── base64-js@0.0.2 │ │ │ │ │ └── to-utf8@0.0.1 │ │ │ │ ├── msgpack-js@0.3.0 │ │ │ │ └── through@2.3.4 │ │ │ ├─┬ stream-combiner@0.0.2 │ │ │ │ └── duplexer@0.0.4 │ │ │ ├── stream-serializer@1.1.2 │ │ │ └── xtend@1.0.3 │ │ ├─┬ request@2.81.0 │ │ │ ├── aws-sign2@0.6.0 │ │ │ ├── aws4@1.6.0 │ │ │ ├── caseless@0.12.0 │ │ │ ├─┬ combined-stream@1.0.5 │ │ │ │ └── delayed-stream@1.0.0 │ │ │ ├── extend@3.0.0 │ │ │ ├── forever-agent@0.6.1 │ │ │ ├─┬ form-data@2.1.2 │ │ │ │ └── asynckit@0.4.0 │ │ │ ├─┬ har-validator@4.2.1 │ │ │ │ └── har-schema@1.0.5 │ │ │ ├─┬ hawk@3.1.3 │ │ │ │ ├── boom@2.10.1 │ │ │ │ ├── cryptiles@2.0.5 │ │ │ │ ├── hoek@2.16.3 │ │ │ │ └── sntp@1.0.9 │ │ │ ├─┬ http-signature@1.1.1 │ │ │ │ ├── assert-plus@0.2.0 │ │ │ │ ├─┬ jsprim@1.4.0 │ │ │ │ │ ├── assert-plus@1.0.0 │ │ │ │ │ ├── extsprintf@1.0.2 │ │ │ │ │ ├── json-schema@0.2.3 │ │ │ │ │ └── verror@1.3.6 │ │ │ │ └─┬ sshpk@1.11.0 │ │ │ │ ├── asn1@0.2.3 │ │ │ │ ├── assert-plus@1.0.0 │ │ │ │ ├── bcrypt-pbkdf@1.0.1 │ │ │ │ ├─┬ dashdash@1.14.1 │ │ │ │ │ └── assert-plus@1.0.0 │ │ │ │ ├── ecc-jsbn@0.1.1 │ │ │ │ ├─┬ getpass@0.1.6 │ │ │ │ │ └── assert-plus@1.0.0 │ │ │ │ ├── jodid25519@1.0.2 │ │ │ │ ├── jsbn@0.1.1 │ │ │ │ └── tweetnacl@0.14.5 │ │ │ ├── is-typedarray@1.0.0 │ │ │ ├── isstream@0.1.2 │ │ │ ├── json-stringify-safe@5.0.1 │ │ │ ├── oauth-sign@0.8.2 │ │ │ ├── performance-now@0.2.0 │ │ │ ├── safe-buffer@5.0.1 │ │ │ ├── stringstream@0.0.5 │ │ │ ├── tough-cookie@2.3.2 │ │ │ └── tunnel-agent@0.6.0 │ │ ├─┬ sse@0.0.6 │ │ │ └── options@0.0.6 │ │ └─┬ xml2js@0.4.17 │ │ ├── sax@1.2.2 │ │ └── xmlbuilder@4.2.1 │ ├── uid2@0.0.3 │ └─┬ underscore.string@3.3.4 │ ├── sprintf-js@1.0.3 │ └── util-deprecate@1.0.2 ├─┬ loopback-boot@2.23.0 │ ├── async@0.9.2 │ ├── commondir@0.0.1 │ ├── lodash@3.10.1 │ ├── semver@4.3.6 │ └── toposort@0.2.12 ├─┬ loopback-component-explorer@2.7.0 │ ├── lodash@3.10.1 │ ├─┬ loopback-swagger@2.9.0 │ │ ├── async@1.5.2 │ │ ├── lodash@3.10.1 │ │ └── underscore.string@2.3.3 │ └── strong-swagger-ui@21.0.2 ├─┬ loopback-datasource-juggler@2.54.1 │ ├── async@1.0.0 │ ├─┬ loopback-connector@2.7.1 │ │ ├── async@1.5.2 │ │ ├── bluebird@3.5.0 │ │ └─┬ msgpack5@3.4.1 │ │ └── bl@1.2.0 │ ├─┬ minimatch@3.0.3 │ │ └─┬ brace-expansion@1.1.6 │ │ ├── balanced-match@0.4.2 │ │ └── concat-map@0.0.1 │ ├── qs@3.1.0 │ ├── shortid@2.2.8 │ ├── traverse@0.6.6 │ └── uuid@3.0.1 ├─┬ nsp@2.6.3 │ ├─┬ chalk@1.1.3 │ │ ├── ansi-styles@2.2.1 │ │ ├── escape-string-regexp@1.0.5 │ │ ├─┬ has-ansi@2.0.0 │ │ │ └── ansi-regex@2.0.0 │ │ ├─┬ strip-ansi@3.0.1 │ │ │ └── ansi-regex@2.0.0 │ │ └── supports-color@2.0.0 │ ├─┬ cli-table@0.3.1 │ │ └── colors@1.0.3 │ ├── cvss@1.0.1 │ ├─┬ https-proxy-agent@1.0.0 │ │ ├─┬ agent-base@2.0.1 │ │ │ └── semver@5.0.3 │ │ ├─┬ debug@2.2.0 │ │ │ └── ms@0.7.1 │ │ └── extend@3.0.0 │ ├─┬ joi@6.10.1 │ │ ├── hoek@2.16.3 │ │ ├── isemail@1.2.0 │ │ ├── moment@2.12.0 │ │ └── topo@1.1.0 │ ├── nodesecurity-npm-utils@5.0.0 │ ├── path-is-absolute@1.0.0 │ ├─┬ rc@1.1.6 │ │ ├── deep-extend@0.4.1 │ │ ├── ini@1.3.4 │ │ ├── minimist@1.2.0 │ │ └── strip-json-comments@1.0.4 │ ├── semver@5.1.0 │ ├─┬ subcommand@2.0.3 │ │ ├── cliclopts@1.1.1 │ │ ├─┬ debug@2.2.0 │ │ │ └── ms@0.7.1 │ │ ├── minimist@1.2.0 │ │ └── xtend@4.0.1 │ └─┬ wreck@6.3.0 │ ├── boom@2.10.1 │ └── hoek@2.16.3 ├─┬ serve-favicon@2.4.1 │ ├── etag@1.8.0 │ ├── fresh@0.5.0 │ ├── ms@0.7.2 │ └── parseurl@1.3.1 └─┬ strong-error-handler@1.2.1 ├── http-status@0.2.5 └─┬ js2xmlparser@2.0.2 └── xmlcreate@0.1.1 Next steps: Change directory to your app $ cd todo Create a model in your app $ slc loopback:model Run the app $ node . |
Then, as instructed, go to ‘todo’ directory
|
1 |
teddy@teddy-K43SJ:~/Documents/node$ cd todo/ |
then create a model
|
1 2 3 4 5 6 7 8 9 10 11 12 13 14 15 16 17 18 19 20 21 22 23 24 25 26 27 |
teddy@teddy-K43SJ:~/Documents/node/todo$ slc loopback:model Warning: Found no data sources to attach model. There will be no data-access methods available until datasources are attached. ? Enter the model name: Todo ? Select model's base class PersistedModel ? Expose Todo via the REST API? Yes ? Custom plural form (used to build REST URL): todos ? Common model or server only? common Let's add some Todo properties now. Enter an empty property name when done. ? Property name: title invoke loopback:property ? Property type: string ? Required? Yes ? Default value[leave blank for none]: Let's add another Todo property. Enter an empty property name when done. ? Property name: isDone invoke loopback:property ? Property type: boolean ? Required? No ? Default value[leave blank for none]: Let's add another Todo property. Enter an empty property name when done. ? Property name: |
At the end if there is no more property needed, type ENTER twice!
The last, Run the node server:
|
1 2 3 |
teddy@teddy-K43SJ:~/Documents/node/todo$ node . Web server listening at: http://0.0.0.0:3000 Browse your REST API at http://0.0.0.0:3000/explorer |
Use your browser to see the action:
http://localhost:3000/
|
1 |
{"started":"2017-03-15T03:33:41.941Z","uptime":20.173} |
http://localhost:3000/explorer/: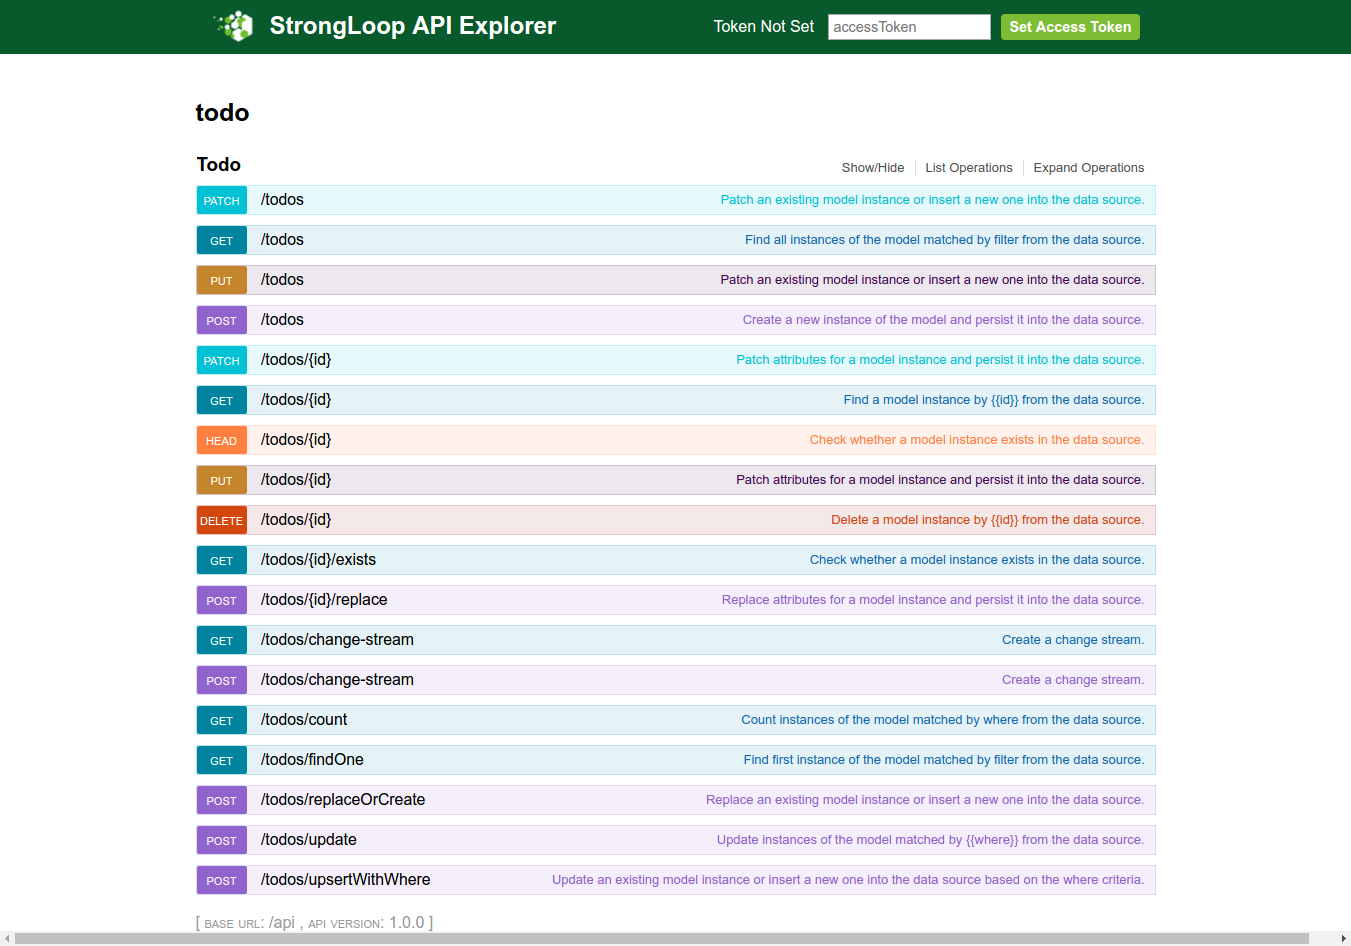 Lest try to create a new post. Click ‘POST’ from the above explorer or http://localhost:3000/explorer/#!/Todo/Todo_create
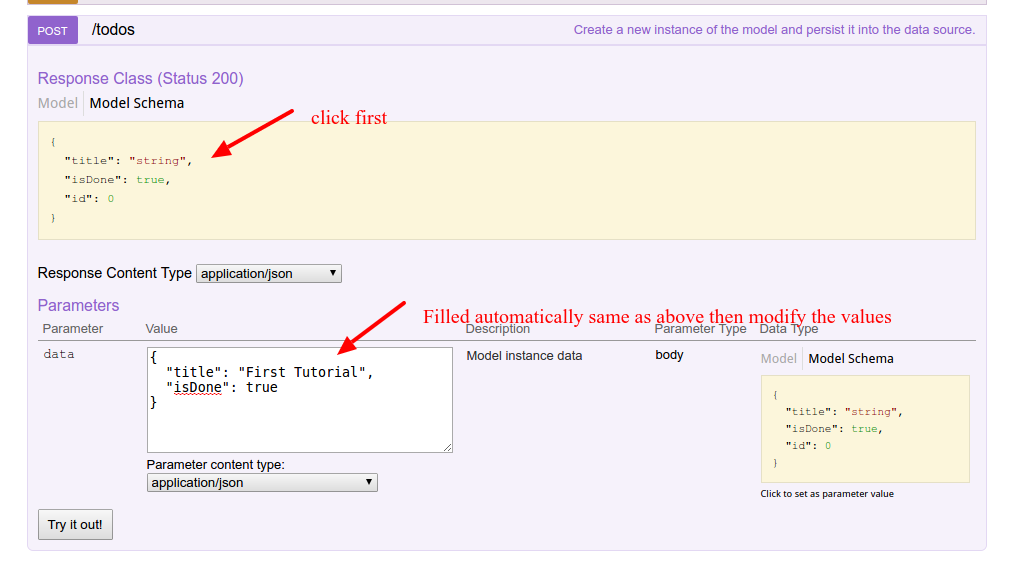 Then click ‘Try out!’ button. Here is the response:
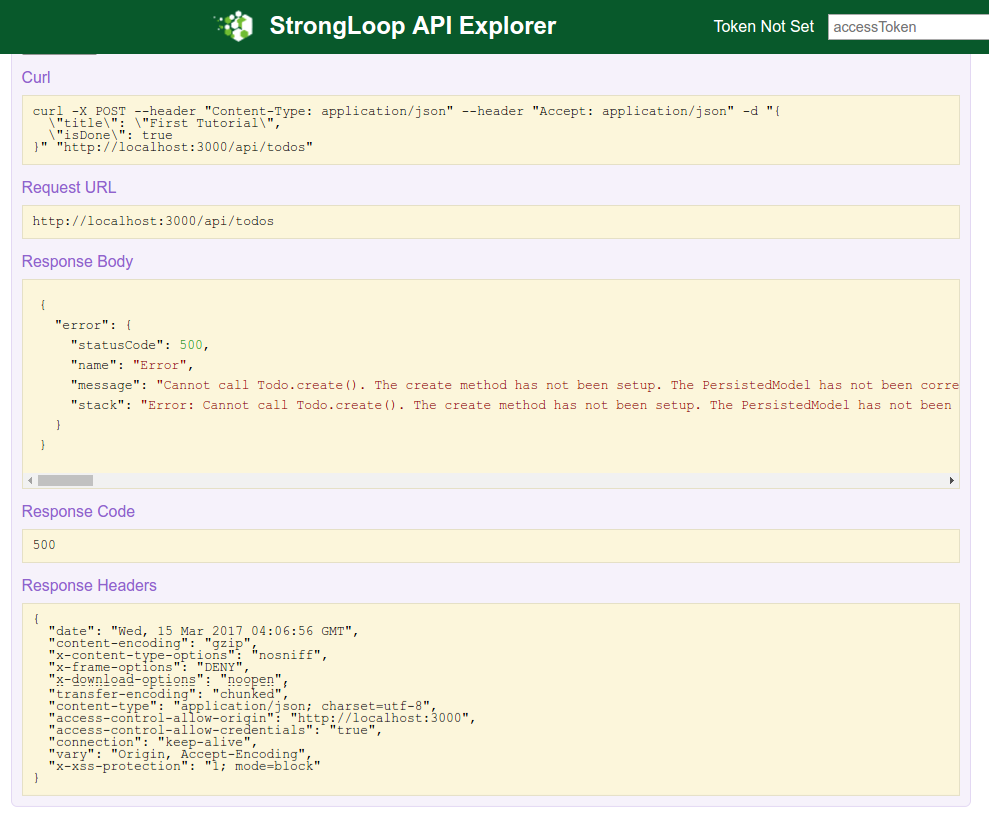 I also got the error in my terminal.
|
1 2 3 4 5 6 7 8 9 10 11 12 13 14 15 16 17 |
Unhandled error for request POST /api/todos: Error: Cannot call Todo.create(). The create method has not been setup. The PersistedModel has not been correctly attached to a DataSource! at throwNotAttached (/home/teddy/Documents/node/todo/node_modules/loopback/lib/persisted-model.js:68:11) at Function.PersistedModel.create (/home/teddy/Documents/node/todo/node_modules/loopback/lib/persisted-model.js:105:5) at SharedMethod.invoke (/home/teddy/Documents/node/todo/node_modules/strong-remoting/lib/shared-method.js:263:25) at HttpContext.invoke (/home/teddy/Documents/node/todo/node_modules/strong-remoting/lib/http-context.js:389:12) at phaseInvoke (/home/teddy/Documents/node/todo/node_modules/strong-remoting/lib/remote-objects.js:654:9) at runHandler (/home/teddy/Documents/node/todo/node_modules/loopback-phase/lib/phase.js:135:5) at iterate (/home/teddy/Documents/node/todo/node_modules/loopback-phase/node_modules/async/lib/async.js:146:13) at Object.async.eachSeries (/home/teddy/Documents/node/todo/node_modules/loopback-phase/node_modules/async/lib/async.js:162:9) at runHandlers (/home/teddy/Documents/node/todo/node_modules/loopback-phase/lib/phase.js:144:13) at iterate (/home/teddy/Documents/node/todo/node_modules/loopback-phase/node_modules/async/lib/async.js:146:13) at /home/teddy/Documents/node/todo/node_modules/loopback-phase/node_modules/async/lib/async.js:157:25 at /home/teddy/Documents/node/todo/node_modules/loopback-phase/node_modules/async/lib/async.js:154:25 at execStack (/home/teddy/Documents/node/todo/node_modules/strong-remoting/lib/remote-objects.js:493:7) at RemoteObjects.execHooks (/home/teddy/Documents/node/todo/node_modules/strong-remoting/lib/remote-objects.js:497:10) at phaseBeforeInvoke (/home/teddy/Documents/node/todo/node_modules/strong-remoting/lib/remote-objects.js:650:10) at runHandler (/home/teddy/Documents/node/todo/node_modules/loopback-phase/lib/phase.js:135:5) |
Let the error from now because we haven’t setup a datasource to store our data yet. We’ll fix this later. UPDATE: READ SETUP OUR DATASOURCE! AT THE END OF THIS ARTICLE.
NOTE: I ALSO CREATED THE OTHER LOOPBACK APP ‘todo1’ WITH Loopback 3 AND app ‘notes’ (A project containing a basic working example, including a memory database)
|
1 2 3 4 5 6 7 8 |
? What's the name of your application? todo1 ? Enter name of the directory to contain the project: todo1 create todo1/ info change the working directory to todo1 ? Which version of LoopBack would you like to use? 3.x (current) ? What kind of application do you have in mind? notes (A project containing a basic working example, including a memory database) Generating .yo-rc.json |
SO THE DATASOURCE ALREADY SETUP AND I’D NOT GET THE ABOVE ERROR ANYMORE. I DID THE SAME THING FOR ‘todo2’ AND Loopback 2.x.
|
1 2 3 4 5 6 7 8 |
? What's the name of your application? todo2 ? Enter name of the directory to contain the project: todo2 create todo2/ info change the working directory to todo2 ? Which version of LoopBack would you like to use? 2.x (long term support) ? What kind of application do you have in mind? notes (A project containing a basic working example, including a memory database) Generating .yo-rc.json |
BUT WHAT I DONT LIKE IS IT’D CREATE ALSO ‘notes’ REST BESIDE ‘todo’ REST. SO I PREFER TO SETUP MY OWN DATASOURCE FROM SCRATCH. PLEASE READ AT THE END OF THIS ARTICLE TO DO THAT!
The REST backend is ready but we need to instruct the ExpressJs backend on how to serve our static content. In the server folder locate the middleware.json file and modify the ‘files’ object in it like show below.
|
1 2 3 4 5 6 7 |
... "files": { "loopback#static": { "params": "$!../client" } }, ... |
From now on all the files in the client folder will be served as static content.
AngularJS
We need install angularjs and the dependencies in /client/lib directory. Create a new file .bowerrc in the todo project root then write this piece of code in it.
|
1 2 3 |
{ "directory": "client/lib" } |
Then use ‘bower’ to install angular and the others.
|
1 2 3 4 5 6 7 8 9 10 11 12 13 14 15 16 17 18 19 20 21 22 23 24 25 26 27 28 29 30 31 32 33 34 35 36 37 38 |
teddy@teddy-K43SJ:~/Documents/node/todo$ bower install angular angular-resource bootstrap bower cached https://github.com/angular/bower-angular-resource.git#1.5.11 bower validate 1.5.11 against https://github.com/angular/bower-angular-resource.git#* bower cached https://github.com/angular/bower-angular.git#1.6.2 bower validate 1.6.2 against https://github.com/angular/bower-angular.git#* bower cached https://github.com/twbs/bootstrap.git#3.3.7 bower validate 3.3.7 against https://github.com/twbs/bootstrap.git#* bower new version for https://github.com/angular/bower-angular.git#* bower resolve https://github.com/angular/bower-angular.git#* bower new version for https://github.com/angular/bower-angular-resource.git#* bower resolve https://github.com/angular/bower-angular-resource.git#* bower download https://github.com/angular/bower-angular/archive/v1.6.3.tar.gz bower download https://github.com/angular/bower-angular-resource/archive/v1.6.3.tar.gz bower cached https://github.com/jquery/jquery-dist.git#3.1.1 bower validate 3.1.1 against https://github.com/jquery/jquery-dist.git#1.9.1 - 3 bower extract angular-resource#* archive.tar.gz bower resolved https://github.com/angular/bower-angular-resource.git#1.6.3 bower not-cached https://github.com/angular/bower-angular.git#1.6.3 bower resolve https://github.com/angular/bower-angular.git#1.6.3 bower download https://github.com/angular/bower-angular/archive/v1.6.3.tar.gz bower extract angular#* archive.tar.gz bower resolved https://github.com/angular/bower-angular.git#1.6.3 bower extract angular#1.6.3 archive.tar.gz bower resolved https://github.com/angular/bower-angular.git#1.6.3 bower install bootstrap#3.3.7 bower install jquery#3.1.1 bower install angular-resource#1.6.3 bower install angular#1.6.3 bootstrap#3.3.7 client/lib/bootstrap └── jquery#3.1.1 jquery#3.1.1 client/lib/jquery angular-resource#1.6.3 client/lib/angular-resource └── angular#1.6.3 angular#1.6.3 client/lib/angular |
NOTE: at the beginning, I failed to execute the above code with this error
|
1 2 3 4 5 6 7 8 9 10 11 12 13 14 15 16 17 18 19 20 21 22 23 |
... bower EACCES EACCES: permission denied, rename '/tmp/teddy/bower/45e372c34ae270c802c414d1d5024500-24410-h2uZXe' -> '/home/teddy/.cache/bower/packages/4d6159b36679e972801e15ff4d8c6b05/1.6.3' Stack trace: Error: EACCES: permission denied, rename '/tmp/teddy/bower/45e372c34ae270c802c414d1d5024500-24410-h2uZXe' -> '/home/teddy/.cache/bower/packages/4d6159b36679e972801e15ff4d8c6b05/1.6.3' at Error (native) Console trace: Error at StandardRenderer.error (/usr/local/lib/node_modules/bower/lib/renderers/StandardRenderer.js:81:37) at Logger.<anonymous> (/usr/local/lib/node_modules/bower/lib/bin/bower.js:110:26) at emitOne (events.js:96:13) at Logger.emit (events.js:188:7) at Logger.emit (/usr/local/lib/node_modules/bower/lib/node_modules/bower-logger/lib/Logger.js:29:39) at /usr/local/lib/node_modules/bower/lib/commands/index.js:48:20 at _rejected (/usr/local/lib/node_modules/bower/lib/node_modules/q/q.js:844:24) at /usr/local/lib/node_modules/bower/lib/node_modules/q/q.js:870:30 at Promise.when (/usr/local/lib/node_modules/bower/lib/node_modules/q/q.js:1122:31) at Promise.promise.promiseDispatch (/usr/local/lib/node_modules/bower/lib/node_modules/q/q.js:788:41) System info: Bower version: 1.8.0 Node version: 6.9.1 OS: Linux 4.4.0-66-generic x64 |
I tried this solution: (ref:https://github.com/bower/bower/issues/2260)
|
1 2 3 |
teddy@teddy-K43SJ:~/Documents/node/todo$ sudo chown -R $USER:$GROUP ~/.npm teddy@teddy-K43SJ:~/Documents/node/todo$ sudo chown -R $USER:$GROUP ~/.config teddy@teddy-K43SJ:~/Documents/node/todo$ sudo chown -R $USER:$GROUP ~/.cache |
Before I tried ‘sudo bower update -a’, ‘sudo bower init –allow-root’, etc but no avail.
Okay. Now the angular, etc already installed in /client/lib/ directory. Please check the directory to make sure.
To test the angularjs in action, create a new html file ‘index.html’ in /client/ directory. Here is the content:
|
1 2 3 4 5 6 7 8 9 10 11 12 13 14 15 16 |
<!DOCTYPE html> <html> <head> <title>Todo Application</title> <link href="lib/bootstrap/dist/css/bootstrap.css" rel="stylesheet"> </head> <body ng-app> {{"AngularJS is working"}} <script src="lib/jquery/dist/jquery.js"></script> <script src="lib/bootstrap/dist/js/bootstrap.js"></script> <script src="lib/angular/angular.js"></script> <script src="lib/angular-resource/angular-resource.js"></script> </body> </html> |
Open it in your browser: http://localhost:3000/index.html
Here is the result:
|
1 |
AngularJS is working |
we will use the Loopback AngularJS client to create a service, compatible with the angular-resource module, to access the backend API.
Create a ‘js’ folder into the client folder and then type the command ‘lb-ng server/server.js client/js/lb-services.js’ in the console.
|
1 2 3 4 |
teddy@teddy-K43SJ:~/Documents/node/todo$ lb-ng server/server.js client/js/lb-services.js Loading LoopBack app "/home/teddy/Documents/node/todo/server/server.js" Generating "lbServices" for the API endpoint "/api" Saving the generated services source to "/home/teddy/Documents/node/todo/client/js/lb-services.js" |
Check ‘lb-services.js’ in /client/js/ dir.
Now create another file called ‘app.js’ into the same ‘js’ folder.
|
1 2 3 4 5 6 7 8 9 10 11 12 13 14 15 16 17 18 19 20 21 22 23 24 25 26 27 28 29 30 31 32 33 34 35 36 |
var app = angular.module('todoApp', ['lbServices']); app.controller('todoController', function($scope, $http, Todo) { $scope.todos = Todo.find(); $scope.todo; $scope.loading=false; $scope.add = function(){ $scope.loading=true; Todo.create({title: $scope.todo.title,isDone:false }).$promise .then(function(todo) { $scope.todos.push(todo); $scope.todo.title=''; $scope.loading=false; });; }; $scope.delete = function($index){ $scope.loading=true; var todo = $scope.todos[$index]; Todo.deleteById({ id: todo.id}).$promise .then(function() { $scope.todos.splice($index,1); $scope.loading=false; }); }; $scope.update = function(todo){ todo.$save(); }; }); |
In the app.js file we injected the ‘lbServices’ and defined three function (add, delete and update) for the basic CRUD operations. As you can see we used all the method exposed by the service created with the ‘lb-ng’ tool to interact with the backend. Most of this methods return a $promise that we used as callback to modify the client model.
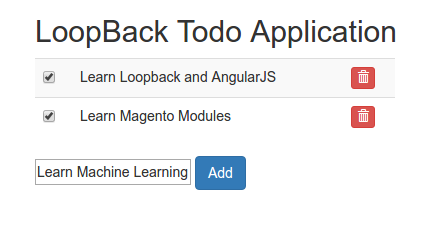
The last thing in order to make this tutorial complete is to rewrite the index.html to suite our application needs. Open the index.html previously created and paste the code below into it.
|
1 2 3 4 5 6 7 8 9 10 11 12 13 14 15 16 17 18 19 20 21 22 23 24 25 26 27 28 29 30 31 32 33 34 35 36 37 |
<!DOCTYPE html> <html> <head> <title>Todo Application</title> <link href="lib/bootstrap/dist/css/bootstrap.css" rel="stylesheet"> <link href="css/style.css" rel="stylesheet"> </head> <body ng-app = "todoApp"> <div class="container" ng-controller="todoController"> <h2>LoopBack Todo Application</h2> <div class="row"> <div class="col-md-4"> <table class="table table-striped"> <tr ng-repeat='todo in todos'> <td><input type="checkbox" ng-true-value="false" ng-false-value="true" ng-model="todo.isDone" ng-change="update(todo)"></td> <td>{{ todo.title}}</td> <td><button class="btn btn-danger btn-xs" ng-click="delete($index)"> <span class="glyphicon glyphicon-trash" ></span></button></td> </tr> </table> </div> </div> <div class="row"> <div class="col-md-4"> <input type='text' ng-model="todo.title"> <button class="btn btn-primary btn-md" ng-click="add()">Add</button> <i ng-show="loading" class="fa fa-spinner fa-spin"></i> </div> </div> </div> <script src="lib/jquery/dist/jquery.js"></script> <script src="lib/bootstrap/dist/js/bootstrap.js"></script> <script src="lib/angular/angular.js"></script> <script src="lib/angular-resource/angular-resource.js"></script> <script src="js/lb-services.js"></script> <script src="js/app.js"></script> </body> </html> |
IT IS NOT FINISHED YET! SETUP OUR DATASOURCE!
Now we want to connect it to a datasource, MySQL!. read: Connect your API to a data source. Here are the steps:
1. Use scaffolding ‘slc’ to define the datasource. datasource name is ‘mysqlID’
|
1 2 3 4 5 6 7 8 9 10 11 12 13 14 15 16 17 18 19 20 |
teddy@teddy-K43SJ:~/Documents/node/todo$ slc loopback:datasource ? Enter the data-source name: mysqlID ? Select the connector for mysqlID: MySQL (supported by StrongLoop) Connector-specific configuration: ? Connection String url to override other settings (eg: mysql://user:pass@host/d b): ? host: localhost ? port: 3306 ? user: root ? password: ***** ? database: loopback ? Install loopback-connector-mysql@^2.2 Yes todo@1.0.0 /home/teddy/Documents/node/todo └─┬ loopback-connector-mysql@2.4.1 ├── async@0.9.2 └─┬ mysql@2.13.0 ├── bignumber.js@3.1.2 ├─┬ readable-stream@1.1.14 │ └── isarray@0.0.1 └── sqlstring@2.2.0 |
2. Check the setting created in /server/datasources.json
3. Create the database ‘loopback’ (utf8-general-ci) and table ‘Todo’ manually (via phpmyadmin). For the table ‘Todo’, Here are the fields:
id int, primary, auto increment,
title varchar(50),
isDone boolean
4. Don’t forget to hook the datasource ‘mysqlID’ in /server/model-config.json like this:
|
1 2 3 4 5 6 7 |
{ ..., "Todo": { "dataSource": "mysqlID", "public": true } } |
NOTE: TO ADD ANOTHER TABLE IN /server/model-config.json, PLS DO LIKE THIS (FOR EXAMPLE WE WANT TO ADD A TABLE ‘User’):
|
1 2 3 4 5 6 7 8 9 10 11 12 13 |
{ ..., "Todo": { "dataSource": "mysqlID", "public": true }, "User": { "dataSource": "mysqlID", "public": true, "$promise": {}, "$resolved": true }, } |
SOMETHING LIKE THIS. PLS LEARN THE OTHERS PARAMS LIKE ‘$promise’ and ‘$resolved’.
5. If the node server still run, stop it then run it again to refresh the changes. Open your browser: http://localhost:3000/index.html. Here is the looks