Source: Tutorial CRUD Sederhana Laravel 5.2 dengan Materializecss Part I
& Tutorial CRUD Sederhana Laravel 5.2 dengan Materializecss Part II
MaterializeCSS source: http://materializecss.com/getting-started.html (I don’t use sass, so download the newest version http://materializecss.com/bin/materialize-v0.97.7.zip)
- Create a new laravel project named ‘crud-materialize’
123456789101112131415161718192021222324252627282930313233343536373839404142434445464748495051525354555657585960616263646566676869707172737475767778798081828384858687888990919293949596979899100101102103104105106107108109110111112113114115116117118119120121122123124125126127128129130131132133134135136137138139140141142143144145146147148149150151152153154155156157158159160161162163164165166167168169170171172173174175176177178179180181182183184185186187188189190191192193194195196197198199200201202203204205206207208209210211212213214215216217218219220221222223224225226227228229230231232233234235236237238239240241242243244245246247248249250251252253254255teddy@teddy-K43SJ:~/Documents/works/laravel$ composer create-project --prefer-dist laravel/laravel crud-materializeInstalling laravel/laravel (v5.3.16)- Installing laravel/laravel (v5.3.16)Loading from cacheCreated project in crud-materialize> php -r "file_exists('.env') || copy('.env.example', '.env');"Loading composer repositories with package informationUpdating dependencies (including require-dev)- Installing vlucas/phpdotenv (v2.4.0)Loading from cache- Installing symfony/polyfill-mbstring (v1.2.0)Loading from cache- Installing symfony/var-dumper (v3.1.6)Downloading: 100%- Installing symfony/translation (v3.1.6)Downloading: 100%- Installing symfony/routing (v3.1.6)Loading from cache- Installing symfony/process (v3.1.6)Loading from cache- Installing psr/log (1.0.2)Loading from cache- Installing symfony/debug (v3.1.6)Loading from cache- Installing symfony/http-foundation (v3.1.6)Downloading: 100%- Installing symfony/event-dispatcher (v3.1.6)Downloading: 100%- Installing symfony/http-kernel (v3.1.6)Downloading: 100%- Installing symfony/finder (v3.1.6)Loading from cache- Installing symfony/console (v3.1.6)Downloading: 100%- Installing swiftmailer/swiftmailer (v5.4.3)Loading from cache- Installing paragonie/random_compat (v2.0.3)Loading from cache- Installing ramsey/uuid (3.5.1)Loading from cache- Installing jakub-onderka/php-console-color (0.1)Loading from cache- Installing jakub-onderka/php-console-highlighter (v0.3.2)Loading from cache- Installing dnoegel/php-xdg-base-dir (0.1)Loading from cache- Installing nikic/php-parser (v2.1.1)Loading from cache- Installing psy/psysh (v0.7.2)Loading from cache- Installing nesbot/carbon (1.21.0)Loading from cache- Installing mtdowling/cron-expression (v1.1.0)Loading from cache- Installing monolog/monolog (1.21.0)Loading from cache- Installing league/flysystem (1.0.32)Loading from cache- Installing symfony/polyfill-util (v1.2.0)Loading from cache- Installing symfony/polyfill-php56 (v1.2.0)Loading from cache- Installing jeremeamia/superclosure (2.2.0)Loading from cache- Installing doctrine/inflector (v1.1.0)Loading from cache- Installing classpreloader/classpreloader (3.0.0)Loading from cache- Installing laravel/framework (v5.3.21)Downloading: 100%- Installing fzaninotto/faker (v1.6.0)Loading from cache- Installing hamcrest/hamcrest-php (v1.2.2)Loading from cache- Installing mockery/mockery (0.9.5)Loading from cache- Installing symfony/yaml (v3.1.6)Downloading: 100%- Installing sebastian/version (2.0.0)Loading from cache- Installing sebastian/resource-operations (1.0.0)Loading from cache- Installing sebastian/recursion-context (1.0.2)Loading from cache- Installing sebastian/object-enumerator (1.0.0)Loading from cache- Installing sebastian/global-state (1.1.1)Loading from cache- Installing sebastian/exporter (1.2.2)Loading from cache- Installing sebastian/environment (1.3.8)Loading from cache- Installing sebastian/diff (1.4.1)Loading from cache- Installing sebastian/comparator (1.2.0)Loading from cache- Installing doctrine/instantiator (1.0.5)Loading from cache- Installing phpunit/php-text-template (1.2.1)Loading from cache- Installing phpunit/phpunit-mock-objects (3.4.0)Loading from cache- Installing phpunit/php-timer (1.0.8)Loading from cache- Installing phpunit/php-file-iterator (1.4.1)Loading from cache- Installing sebastian/code-unit-reverse-lookup (1.0.0)Loading from cache- Installing phpunit/php-token-stream (1.4.8)Loading from cache- Installing phpunit/php-code-coverage (4.0.1)Loading from cache- Installing webmozart/assert (1.1.0)Loading from cache- Installing phpdocumentor/reflection-common (1.0)Loading from cache- Installing phpdocumentor/type-resolver (0.2)Loading from cache- Installing phpdocumentor/reflection-docblock (3.1.1)Loading from cache- Installing phpspec/prophecy (v1.6.1)Loading from cache- Installing myclabs/deep-copy (1.5.4)Loading from cache- Installing phpunit/phpunit (5.6.2)Downloading: 100%- Installing symfony/css-selector (v3.1.6)Loading from cache- Installing symfony/dom-crawler (v3.1.6)Downloading: 100%symfony/var-dumper suggests installing ext-symfony_debug ()symfony/translation suggests installing symfony/config ()symfony/routing suggests installing doctrine/annotations (For using the annotation loader)symfony/routing suggests installing symfony/config (For using the all-in-one router or any loader)symfony/routing suggests installing symfony/dependency-injection (For loading routes from a service)symfony/routing suggests installing symfony/expression-language (For using expression matching)symfony/event-dispatcher suggests installing symfony/dependency-injection ()symfony/http-kernel suggests installing symfony/browser-kit ()symfony/http-kernel suggests installing symfony/class-loader ()symfony/http-kernel suggests installing symfony/config ()symfony/http-kernel suggests installing symfony/dependency-injection ()paragonie/random_compat suggests installing ext-libsodium (Provides a modern crypto API that can be used to generate random bytes.)ramsey/uuid suggests installing ircmaxell/random-lib (Provides RandomLib for use with the RandomLibAdapter)ramsey/uuid suggests installing ext-libsodium (Provides the PECL libsodium extension for use with the SodiumRandomGenerator)ramsey/uuid suggests installing ext-uuid (Provides the PECL UUID extension for use with the PeclUuidTimeGenerator and PeclUuidRandomGenerator)ramsey/uuid suggests installing moontoast/math (Provides support for converting UUID to 128-bit integer (in string form).)ramsey/uuid suggests installing ramsey/uuid-doctrine (Allows the use of Ramsey\Uuid\Uuid as Doctrine field type.)ramsey/uuid suggests installing ramsey/uuid-console (A console application for generating UUIDs with ramsey/uuid)psy/psysh suggests installing ext-pdo-sqlite (The doc command requires SQLite to work.)monolog/monolog suggests installing aws/aws-sdk-php (Allow sending log messages to AWS services like DynamoDB)monolog/monolog suggests installing doctrine/couchdb (Allow sending log messages to a CouchDB server)monolog/monolog suggests installing ext-amqp (Allow sending log messages to an AMQP server (1.0+ required))monolog/monolog suggests installing ext-mongo (Allow sending log messages to a MongoDB server)monolog/monolog suggests installing graylog2/gelf-php (Allow sending log messages to a GrayLog2 server)monolog/monolog suggests installing mongodb/mongodb (Allow sending log messages to a MongoDB server via PHP Driver)monolog/monolog suggests installing php-amqplib/php-amqplib (Allow sending log messages to an AMQP server using php-amqplib)monolog/monolog suggests installing php-console/php-console (Allow sending log messages to Google Chrome)monolog/monolog suggests installing rollbar/rollbar (Allow sending log messages to Rollbar)monolog/monolog suggests installing ruflin/elastica (Allow sending log messages to an Elastic Search server)monolog/monolog suggests installing sentry/sentry (Allow sending log messages to a Sentry server)league/flysystem suggests installing league/flysystem-aws-s3-v2 (Allows you to use S3 storage with AWS SDK v2)league/flysystem suggests installing league/flysystem-aws-s3-v3 (Allows you to use S3 storage with AWS SDK v3)league/flysystem suggests installing league/flysystem-azure (Allows you to use Windows Azure Blob storage)league/flysystem suggests installing league/flysystem-cached-adapter (Flysystem adapter decorator for metadata caching)league/flysystem suggests installing league/flysystem-copy (Allows you to use Copy.com storage)league/flysystem suggests installing league/flysystem-dropbox (Allows you to use Dropbox storage)league/flysystem suggests installing league/flysystem-eventable-filesystem (Allows you to use EventableFilesystem)league/flysystem suggests installing league/flysystem-rackspace (Allows you to use Rackspace Cloud Files)league/flysystem suggests installing league/flysystem-sftp (Allows you to use SFTP server storage via phpseclib)league/flysystem suggests installing league/flysystem-webdav (Allows you to use WebDAV storage)league/flysystem suggests installing league/flysystem-ziparchive (Allows you to use ZipArchive adapter)laravel/framework suggests installing aws/aws-sdk-php (Required to use the SQS queue driver and SES mail driver (~3.0).)laravel/framework suggests installing doctrine/dbal (Required to rename columns and drop SQLite columns (~2.4).)laravel/framework suggests installing guzzlehttp/guzzle (Required to use the Mailgun and Mandrill mail drivers and the ping methods on schedules (~5.3|~6.0).)laravel/framework suggests installing league/flysystem-aws-s3-v3 (Required to use the Flysystem S3 driver (~1.0).)laravel/framework suggests installing league/flysystem-rackspace (Required to use the Flysystem Rackspace driver (~1.0).)laravel/framework suggests installing pda/pheanstalk (Required to use the beanstalk queue driver (~3.0).)laravel/framework suggests installing predis/predis (Required to use the redis cache and queue drivers (~1.0).)laravel/framework suggests installing pusher/pusher-php-server (Required to use the Pusher broadcast driver (~2.0).)laravel/framework suggests installing symfony/psr-http-message-bridge (Required to use psr7 bridging features (0.2.*).)sebastian/global-state suggests installing ext-uopz (*)phpunit/phpunit-mock-objects suggests installing ext-soap (*)phpunit/php-code-coverage suggests installing ext-xdebug (>=2.4.0)phpunit/phpunit suggests installing phpunit/php-invoker (~1.1)phpunit/phpunit suggests installing ext-xdebug (*)Writing lock fileGenerating autoload files> Illuminate\Foundation\ComposerScripts::postUpdate> php artisan optimizeGenerating optimized class loaderThe compiled class file has been removed.> php artisan key:generateApplication key [base64:bcsSsz8gPXQrB5rmUX4zXCmfkbIt6QW7IFiC/01QpRQ=] set successfully.
- Download materialize from the above link if haven’t downloaded it. Then extract the file. Here is how the folders and files look after extracting
 Only 3 folders (css, fonts and js) and 2 files.
Then copy/cut the above folders and file into ‘public’ in our laravel project directory (/crud-materialize/public/). It’ll merge the css and js folders. - Go into the project directory ‘crud-materialize’ then create a controller with name ‘CrudController’
123teddy@teddy-K43SJ:~/Documents/works/laravel$ cd crud-materialize/teddy@teddy-K43SJ:~/Documents/works/laravel/crud-materialize$ php artisan make:controller CrudController --resourceController created successfully.
We can look up the new file CrudController.php in /app/Http/Controllers/ directory. - Modify CrudController.php then edit ‘index’ function to call our view. It’d be like this:
1234public function index(){return view('show');}
- Modify /routes/web.php to change the default route (welcome) to call index function in CrudController:
1234/*Route::get('/', function () {return view('welcome');});*/Route::get('/','CrudController@index'); - It’s time to mess with the views. Create a new directory ‘layouts’ in /resources/views/. Then in it (layouts), create two blades files: index.blade.php and header.blade.php. Also create a new blade file show.blade.php in /resources/views/:
/resources/views/layouts/index.blade.php:
123456789101112131415161718192021222324252627282930313233<!DOCTYPE html><html><head><title>CRUD Laravel With Materializecss</title><link rel="stylesheet" href="{{asset('css/materialize.min.css')}}"><link href="https://fonts.googleapis.com/icon?family=Material+Icons" rel="stylesheet"><meta content="width=device-width, initial-scale=1, maximum-scale=1, user-scalable=no" name="viewport">@section('css')@show</head><body>@section('header')@include('layouts.header')@show<div class="container">@yield('content')</div><script src="https://code.jquery.com/jquery-2.1.1.min.js"></script><script src="{{asset('js/materialize.min.js')}}"></script><script type="text/javascript">(function($){$(function(){$('.button-collapse').sideNav();}); // end of document ready})(jQuery); // end of jQuery name space</script></body></html>
/resources/views/layouts/header.blade.php:
12345678910111213<nav class="pink accent-3" role="navigation"><div class="nav-wrapper container"><a id="logo-container" href="#" class="brand-logo">Laravel</a><ul class="right hide-on-med-and-down"><li><a href="{{ url('/')}}">Home</a></li></ul><ul id="nav-mobile" class="side-nav"><li><a href="{{ url('/')}}">Home</a></li></ul><a href="#" data-activates="nav-mobile" class="button-collapse"><i class="material-icons">menu</i></a></div></nav>
/resources/views/show.blade.php:
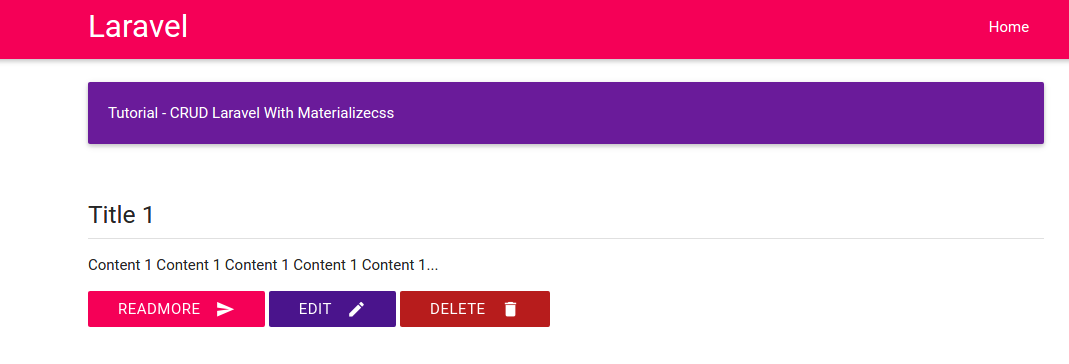
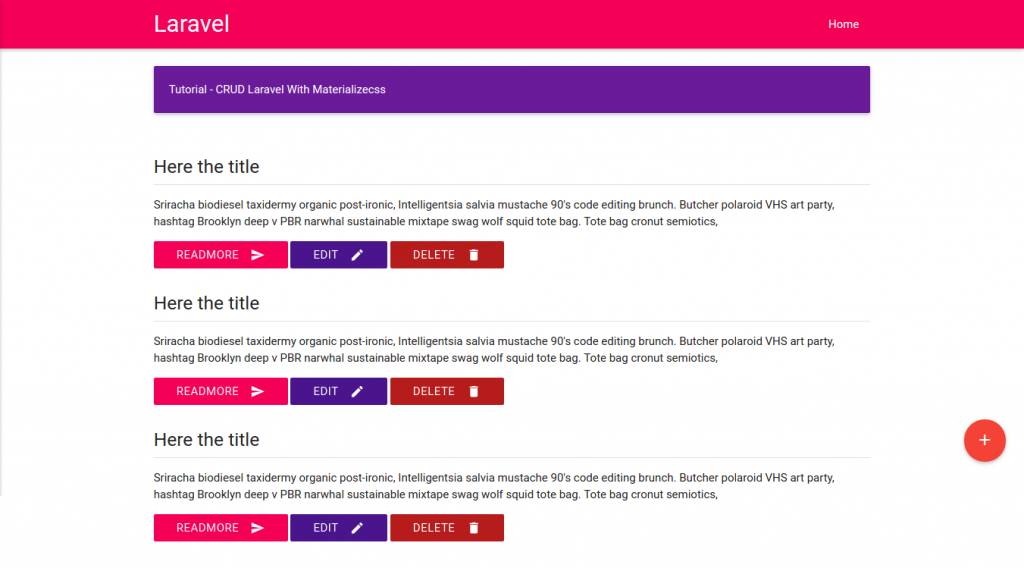
123456789101112131415161718192021222324252627282930313233343536373839404142434445464748495051525354555657@extends('layouts.index')@section('content')<div class="section"><div class="card-panel purple darken-3 white-text">Tutorial - CRUD Laravel With Materializecss</div></div><div class="section"><div class="row"><div class="col s12"><h5>Here the title</h5><div class="divider"></div><p>Sriracha biodiesel taxidermy organic post-ironic, Intelligentsia salvia mustache 90's code editing brunch. Butcher polaroid VHS art party, hashtag Brooklyn deep v PBR narwhal sustainable mixtape swag wolf squid tote bag. Tote bag cronut semiotics,</p><button class="btn btn-flat pink accent-3 waves-effect waves-light white-text">Readmore <i class="material-icons right">send</i></button><button class="btn btn-flat purple darken-4 waves-effect waves-light white-text">Edit <i class="material-icons right">mode_edit</i></button><button class="btn btn-flat red darken-4 waves-effect waves-light white-text">Delete <i class="material-icons right">delete</i></button></div></div><div class="row"><div class="col s12"><h5>Here the title</h5><div class="divider"></div><p>Sriracha biodiesel taxidermy organic post-ironic, Intelligentsia salvia mustache 90's code editing brunch. Butcher polaroid VHS art party, hashtag Brooklyn deep v PBR narwhal sustainable mixtape swag wolf squid tote bag. Tote bag cronut semiotics,</p><button class="btn btn-flat pink accent-3 waves-effect waves-light white-text">Readmore <i class="material-icons right">send</i></button><button class="btn btn-flat purple darken-4 waves-effect waves-light white-text">Edit <i class="material-icons right">mode_edit</i></button><button class="btn btn-flat red darken-4 waves-effect waves-light white-text">Delete <i class="material-icons right">delete</i></button></div></div><div class="row"><div class="col s12"><h5>Here the title</h5><div class="divider"></div><p>Sriracha biodiesel taxidermy organic post-ironic, Intelligentsia salvia mustache 90's code editing brunch. Butcher polaroid VHS art party, hashtag Brooklyn deep v PBR narwhal sustainable mixtape swag wolf squid tote bag. Tote bag cronut semiotics,</p><button class="btn btn-flat pink accent-3 waves-effect waves-light white-text">Readmore <i class="material-icons right">send</i></button><button class="btn btn-flat purple darken-4 waves-effect waves-light white-text">Edit <i class="material-icons right">mode_edit</i></button><button class="btn btn-flat red darken-4 waves-effect waves-light white-text">Delete <i class="material-icons right">delete</i></button></div></div></div><div class="fixed-action-btn horizontal" style="bottom: 45px; right: 24px;"><a class="btn-floating btn-large red"><i class="large material-icons">add</i></a></div>@endsection
- Turn on the server (‘php artisan serve’) and see the look (http://localhost:8000/)
- Setting database! Modify .env file in /crud-materialize/ directory to set the database setting:
123456DB_CONNECTION=mysqlDB_HOST=127.0.0.1DB_PORT=3306DB_DATABASE=crud-materializeDB_USERNAME=your-usernameDB_PASSWORD=your-password
Now we’re not going to use phpmyadmin to create the database. We’ll do it by ‘php artisan migrate’ commandI dont know how to do it and it seems more complicated than I expected so I create the database ‘crud-materialize’ (collation: utf8-general-ci) through phpmyadmin. - Create a new table ‘crud’
12teddy@teddy-K43SJ:~/Documents/works/laravel/crud-materialize$ php artisan make:migration create_crud_table --create=crudCreated Migration: 2016_10_29_030815_create_crud_table
Check /database/migrations/ directory for the script to create ‘crud’ table (2016_10_29_030815_create_crud_table.php). It’d also create two more scripts to create ‘users’ (2014_10_12_000000_create_users_table.php) and ‘password_reset’ table (2014_10_12_100000_create_password_resets_table.php) automatically (if they are not existed yet!). It’s safe to remove its or leave its because we only focus on the ‘crud’ table. - Edit 2016_10_29_030815_create_crud_table.php to add two more fields (‘title’ and ‘content’).
Defaultly, there are two fields available in the file, they are ‘id’ and timestamps. Just insert the above two more fields between them
123456789public function up(){Schema::create('crud', function (Blueprint $table) {$table->increments('id');$table->string('title');$table->text('content');$table->timestamps();});} - Migrate (push) the tables to our database
12345teddy@teddy-K43SJ:~/Documents/works/laravel/crud-materialize$ php artisan migrateMigration table created successfully.Migrated: 2014_10_12_000000_create_users_tableMigrated: 2014_10_12_100000_create_password_resets_tableMigrated: 2016_10_29_030815_create_crud_table
Check those tables in ‘crud-materialize’ database. - Create a new model ‘Crud’
12teddy@teddy-K43SJ:~/Documents/works/laravel/crud-materialize$ php artisan make:model CrudModel created successfully.
Check a new file ‘Crud.php’ in /app/ directory! - Modify Crud.php like this:
1234567class Crud extends Model{protected $table = 'crud';protected $primaryKey = 'id';protected $fillable = ['title','content'];public $timestamps = true;}
Then create a new data in ‘crud’ table via phpmyadmin:
‘title’: ‘Title 1’
‘content’: ‘Content 1 Content 1 Content 1 Content 1 Content 1’ - Retrieve the new data through CrudController
12345678910111213...use App\Crud;class CrudController extends Controller{public function index(){$data=Crud::orderBy('id','DESC')->paginate(10);//return view('show');return view('show')->with('data',$data);}...}
We’ll throw the ‘data’ into our view ‘show’. - Modify show.blade.php in /resources/views/ to get and show the data from CrudController above
123456789101112131415161718...<div class="section">@foreach($data as $d)<div class="row"><div class="col s12"><h5>{{$d->title}}</h5><div class="divider"></div><p>{!!substr($d->content,0,100) !!}...</p><button class="btn btn-flat pink accent-3 waves-effect waves-light white-text">Readmore <i class="material-icons right">send</i></button><button class="btn btn-flat purple darken-4 waves-effect waves-light white-text">Edit <i class="material-icons right">mode_edit</i></button><button class="btn btn-flat red darken-4 waves-effect waves-light white-text">Delete <i class="material-icons right">delete</i></button></div></div>@endforeach</div>...
We use ‘foreach’ loop, so just use one ‘row’ class and remove the others two. - Test!

- Now we want to make the Add, Edit and Delete buttons can be functioned properly. For the Add function, modify /app/Http/Controllers/CrudController.php at ‘create’ function to view ‘add’:
1234public function create(){return view('add');}
Then create a new route for this in /routes/web.app:
1Route::get('/add','CrudController@create');
Create a new blade file ‘add.blade.php’ in /resources/views/ to show the form:
123456789101112131415161718192021222324252627@extends('layouts.index')@section('content')<div class="section"><div class="card-panel purple darken-3 white-text">Tutorial - CRUD Laravel With Materializecss</div></div><div class="section"><form action="{{ url('store') }}" method="POST">{{ csrf_field() }}<div class="row"><div class="input-field col s12"><input type="text" class="validate" name="title"><label for="title">Title</label></div></div><div class="row"><div class="input-field col s12"><textarea id="textarea1" class="materialize-textarea" name="content"></textarea><label for="textarea1">Content</label></div></div><button type="submit" class="btn btn-flat pink accent-3 waves-effect waves-light white-text right">Submit <i class="material-icons right">send</i></button></form></div>@endsection
In ‘show.blade.php’ we can add an url to ‘add’ route when anyone click the ‘add’ button:
1234567...<div class="fixed-action-btn horizontal" style="bottom: 45px; right: 24px;"><a class="btn-floating btn-large red" href="{{url('add')}}"><i class="large material-icons">add</i></a></div>...
OK. Here is the add form when we click the add (+) button (http://localhost:8000/add) Now we’re going to make ‘Submit’ button work. First, add a new route for ‘store’ in /routes/web.app. ATTENTION! Here we use POST (Route::post) NOT GET (Route::get):
1Route::post('/store','CrudController@store');
Then modify ‘store’ function in /app/Http/Controllers/CrudController.php to validate and store the form:
1234567891011121314public function store(Request $request){$this->validate($request, ['title'=>'required','content'=>'required']);$add=new Crud();$add->title=$request['title'];$add->content=$request['content'];$add->save();return redirect()->to('/');}
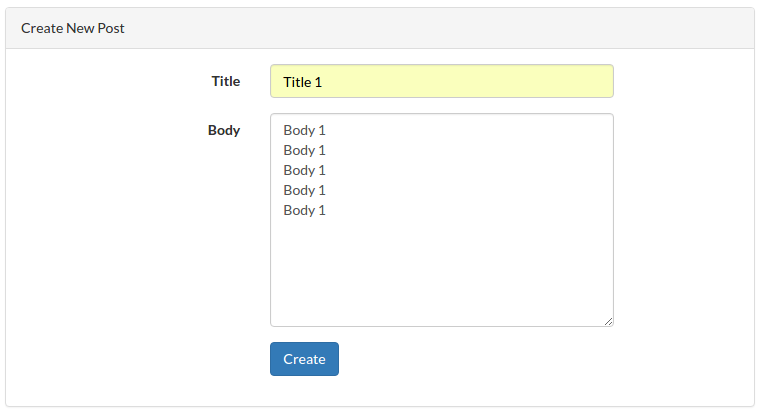
OK. Try to add a new data (http://localhost:8000/add)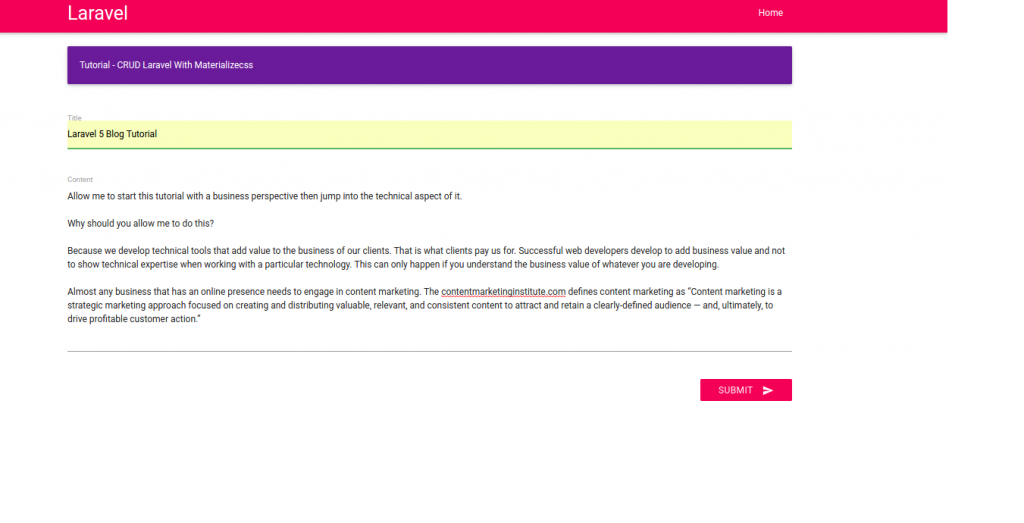 Here is the result
- Show individual data. We want to show the data if anyone click ‘Readmore’ button.
Add a new route ‘read’ that need ‘id’ parameter in /routes/web.app:
1Route::get('/read/{id}','CrudController@show');
Apply the route at ‘Readmore’ link in /resources/views/show.blade.php:
1<a href="{{url('read',$d->id)}}" class="btn btn-flat pink accent-3 waves-effect waves-light white-text">Readmore <i class="material-icons right">send</i></a>
Modify ‘show’ function in /app/Http/Controllers/CrudController.php to get the data based on id and show the data by throwing it to our new view ‘showdata’:
12345public function show($id){$show=Crud::find($id);return view('showdata')->with('show',$show);}
Create a new blade file ‘showdata.blade.php’ in /resources/views/ like this:
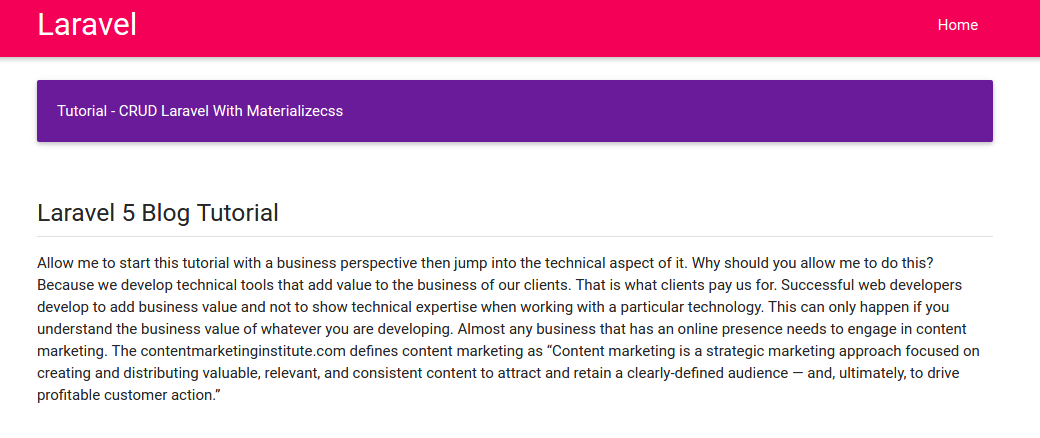
1234567891011121314151617181920212223@extends('layouts.index')@section('content')<div class="section"><div class="card-panel purple darken-3 white-text">Tutorial - CRUD Laravel With Materializecss</div></div><div class="section"><div class="row"><div class="col s12"><h5>{{ $show->title }}</h5><div class="divider"></div><p>{!! $show->content !!}</p><a href="{{url('/')}}" class="btn btn-flat pink accent-3 waves-effect waves-light white-text">Back <i class="material-icons right">undo</i></a></div></div></div>@endsection
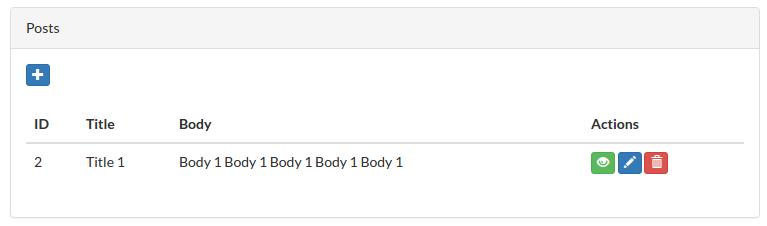
OK. Test it by clicking ‘Readmore’ or directly by url like http://localhost:8000/read/2 I added a new ‘Back’ button. please see the complete materialize icon. Click ‘Back’ button to redirect back to the homepage.
 - Pagination. To show the pagination, we need to add more data. Just use ‘add’ button. Now we want to show just two data per page. So modify ‘index’ function in /app/Http/Controllers/CrudController.php like this:
12345public function index(){$data=Crud::orderBy('id','DESC')->paginate(2); //display 2 data per pagereturn view('show')->with('data',$data);}
To show the pagination counter and the pages, modify /resources/views/show.blade.php to add ‘{{$data->render()}}’ just before @endsection:
123...{{$data->render()}}@endsection
Here is the result (the url would be like http://localhost:8000/?page=1):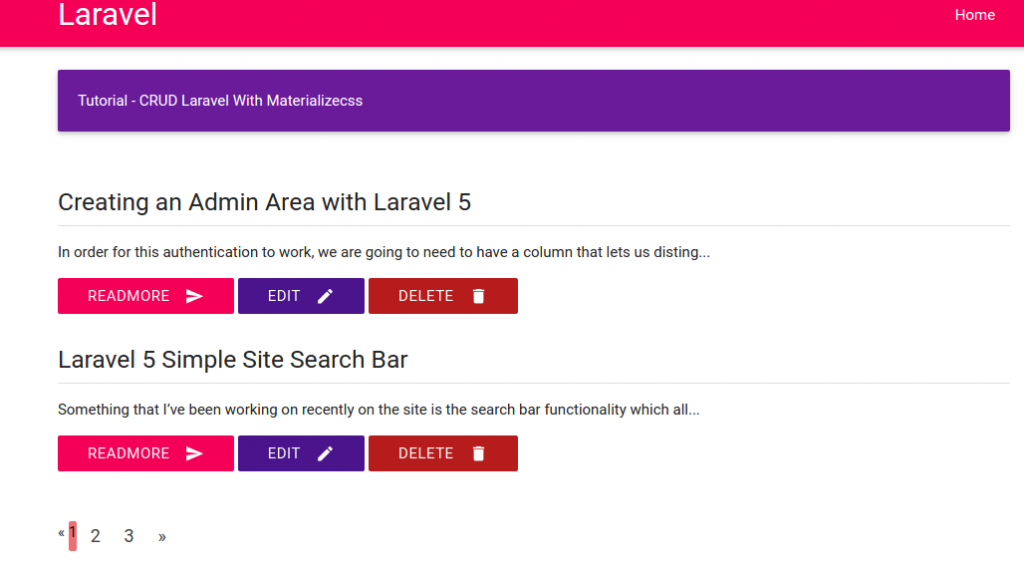
- Edit data.
Create two new routes in /routes/web.php. the first to edit the data and the last to update the changes:
12Route::get('/edit/{id}','CrudController@edit');Route::post('/update/{id}','CrudController@update');
Modify ‘edit’ and ‘update’ function in /app/Http/Controllers/CrudController.php:
123456789101112131415161718...public function edit($id){//$data=Crud::find($id); //SAME WITH BELOW$data=Crud::where('id',$id)->first();return view('edit')->with('data',$data);}...public function update(Request $request, $id){$update=Crud::where('id',$id)->first();$update->title=$request['title'];$update->content=$request['content'];$update->update();return redirect()->to('/');}...
Then create a new blade file ‘edit.blade.php’ in /resources/views/. this file basically same with ‘add.blade.php’ but the form url and the input values are different:
12345678910111213141516171819202122232425262728@extends('layouts.index')@section('content')<div class="section"><div class="card-panel purple darken-3 white-text">Tutorial - CRUD Laravel With Materializecss</div></div><div class="section"><form action="{{ url('update',$data->id) }}" method="POST">{{ csrf_field() }}<div class="row"><div class="input-field col s12"><input type="text" class="validate" name="title" value="{{$data->title}}"><label for="title">Title</label></div></div><div class="row"><div class="input-field col s12"><textarea id="textarea1" class="materialize-textarea" name="content">{{$data->content}}</textarea><label for="textarea1">Content</label></div></div><a href="{{url('/')}}" class="btn btn-flat purple accent-3 waves-effect waves-light white-text">Back <i class="material-icons right">undo</i></a><button type="submit" class="btn btn-flat pink accent-3 waves-effect waves-light white-text right">Submit <i class="material-icons right">send</i></button></form></div>@endsection
Dont forget to modify ‘Edit’ button/link in ‘show.blade.php’ to add the ‘edit’ route:
123...<a href="{{url('edit',$d->id)}}" class="btn btn-flat purple darken-4 waves-effect waves-light white-text">Edit <i class="material-icons right">mode_edit</i></a>...
- Delete data.
Create a new route ‘delete’ in /routes/web.php:
1Route::get('/delete/{id}','CrudController@destroy');
Then modify ‘destroy’ function in /app/Http/Controllers/CrudController.php to delete the data:
1234567public function destroy($id){$delete=Crud::find($id);$delete->delete();return redirect()->to('/');}
Modify ‘Delete’ button/link in /resources/views/show.blade.php to apply the delete route and give javascript confirmation about the deletion:
1<a href="{{url('delete',$d->id)}}" onclick="return confirm('Are you sure to delete this data?')" class="btn btn-flat red darken-4 waves-effect waves-light white-text">Delete <i class="material-icons right">delete</i></a>
FINISH!
NEXT: Add User authentication and comment section! - User Authentication.
Use default scaffolding ‘auth’
12teddy@teddy-K43SJ:~/Documents/works/laravel/crud-materialize$ php artisan make:authAuthentication scaffolding generated successfully.
Like I said before, it’ll create user authentication (login, register, password, etc) automatically. Please check the views in /resources/views/auth/ directory!
Also check the routes in /routes/web.php. It’ll create two new routes:
1234...Auth::routes();Route::get('/home', 'HomeController@index');
About this route ‘Auth::routes()’, from http://stackoverflow.com/questions/39196968/laravel-5-3-new-authroutes/39197278#39197278, it said
1Auth::routes() is just a helper class that helps you generate all the routes required for user authentication. You can browse the code here https://github.com/laravel/framework/blob/5.3/src/Illuminate/Routing/Router.php instead.
More read https://laracasts.com/discuss/channels/laravel/laravel-53-routing-as-authroutes?page=1. - Modify /resources/views/layouts/header.blade.php, to add new links ‘login’ and ‘register’:
1234567<ul class="right hide-on-med-and-down"><li><a href="{{ url('/')}}">Home</a></li>@if(Route::has('login'))<li><a href="{{ url('/login')}}">Login</a></li><li><a href="{{ url('/register')}}">Register</a></li>@endif</ul>
Here is the looks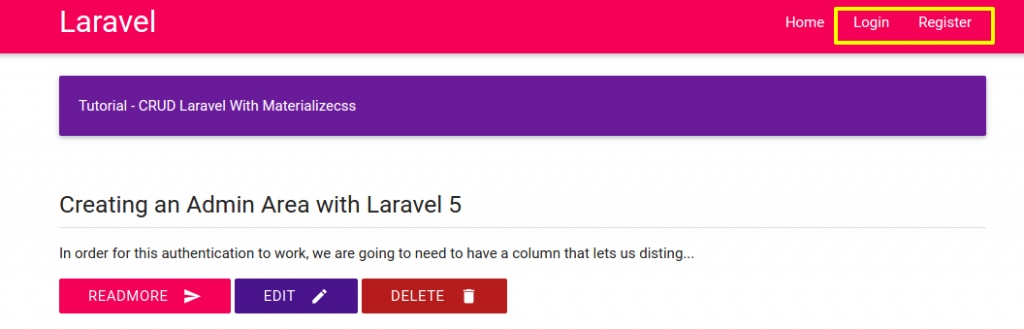 Click ‘Login’ link, it’d display the login page. But we can see the layout (header, color, etc) is different with our homepage.
 - Edit /resources/views/auth/login.blade.php.
Replace the first line ‘@extends(‘layouts.app’)’ with ‘@extends(‘layouts.index’)’. When we refresh our website, the header show the same layout with our homepage. But the others element are still different. ‘auth’ scaffolding create the views based on bootstrap css but we use materialize css for homepage. Modify login.blade.php to add some elements like validation, error,etc like this: NOTE: somehow {!! csrf_field() !!} DIDN’T WORK (verifycsrftoken error) SO I WRITE {{ csrf_field() }}
1234567891011121314151617181920212223242526272829303132333435363738394041424344454647484950@extends('layouts.index')@section('content')<div class="section"><div class="card-panel purple darken-3 white-text">Tutorial - CRUD Laravel With Materializecss</div></div><div class="section"><form id="formValidate" action="{{ url('/login') }}" method="POST">{{ csrf_field() }}<div class="row {{ $errors->has('email') ? ' has-error' : '' }}"><div class="input-field col s6 push-s3"><i class="small material-icons prefix">email</i><input id="email" type="email" class="validate" name="email" value="{{ old('email') }}" data-error=".errorEmail" required><label for="email">E-Mail Address</label><div class="errorEmail">@if ($errors->has('email'))<div class="error">{{ $errors->first('email') }}</div>@endif</div></div></div><div class="row {{ $errors->has('password') ? ' has-error' : '' }}"><div class="input-field col s6 push-s3"><i class="small material-icons prefix">vpn_key</i><input id="password" type="password" class="validate" name="password" data-error=".errorPassword" required><label for="password">Password</label><div class="errorPassword">@if ($errors->has('password'))<div class="error">{{ $errors->first('password') }}</div>@endif</div></div></div><div class="row"><div class="input-field col s6 push-s3"><input id="remember" type="checkbox" class="checkbox" name="remember"><label for="remember">Remember Me</label></div></div><div class="row"><div class="input-field col s6 push-s3"><button type="submit" class="btn btn-flat pink accent-3 waves-effect waves-light white-text">Login <i class="material-icons right">send</i></button><a href="{{url('/password/reset')}}" class="btn btn-flat purple accent-3 waves-effect waves-light white-text">Forgot Your Password? <i class="material-icons right">help</i></a></div></div></form></div>@endsection
The validations need jquery-validation library, so download and put the jquery files (jquery.validate.min.js and additional-methods.min.js) in /public/js/. Then link them in /resources/views/layouts/index.blade.php also write the jquery validation (here i changed the jquery to the newer version 1.11.2). Please read Forms Validation to learn more about the validation form for materialize css.
123456789101112131415161718192021222324252627282930313233343536373839404142434445464748495051525354555657585960616263<script src="https://code.jquery.com/jquery-1.11.2.min.js"></script><script src="{{asset('js/materialize.min.js')}}"></script><script src="{{asset('js/jquery-validation/jquery.validate.min.js')}}"></script><script src="{{asset('js/jquery-validation/additional-methods.min.js')}}"></script><script type="text/javascript">(function($){$(function(){$('.button-collapse').sideNav();$("#formValidate").validate({rules: {uname: {required: true,minlength: 5},email: {required: true,email:true},password: {required: true,minlength: 5},cpassword: {required: true,minlength: 5,equalTo: "#password"},curl: {required: true,url:true},crole:"required",ccomment: {required: true,minlength: 15},cgender:"required",cagree:"required",},//For custom messagesmessages: {uname:{required: "Enter a username",minlength: "Enter at least 5 characters"},curl: "Enter your website",},errorElement : 'div',errorPlacement: function(error, element) {var placement = $(element).data('error');if (placement) {$(placement).append(error)} else {error.insertAfter(element);}}});}); // end of document ready})(jQuery); // end of jQuery name space</script>
We also need to create a new css file ‘style.css’ in /public/css/ to style the error messages:
123456789101112.input-field div.error {position: relative;top: -1rem;left: 0rem;font-size: 0.8rem;color: #FF4081;margin-left: 3rem;-webkit-transform: translateY(0%);-ms-transform: translateY(0%);-o-transform: translateY(0%);transform: translateY(0%);}
Don’t forget to link the css in /resources/views/layouts/index.blade.php
1234...<link rel="stylesheet" href="{{asset('css/materialize.min.css')}}"><link rel="stylesheet" href="{{asset('css/style.css')}}">...
Here is the result (http://localhost:8000/login) To find out the materialize icons, see https://material.io/icons/. Note: the naming for displaying the icon for materialize css is pretty tricky. For example to show icon for name/username like ‘account box’, we have to write it with underscore (_). so it should be ‘account_box’:
1<i class="small material-icons prefix">account_box</i>
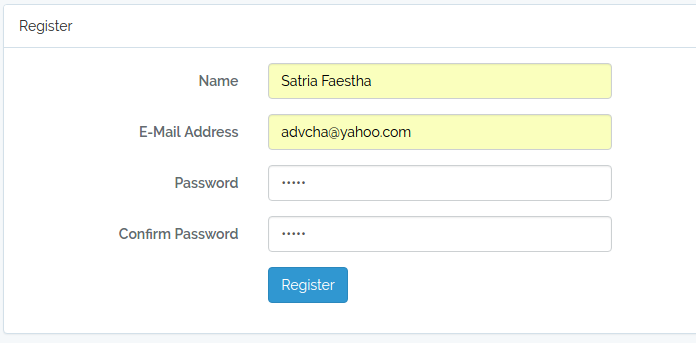
- Do the same for ‘Register’ link.
Here is the modification for /resources/views/auth/register.blade.php
1234567891011121314151617181920212223242526272829303132333435363738394041424344454647484950515253545556575859606162@extends('layouts.index')@section('content')<div class="section"><div class="card-panel purple darken-3 white-text">Register</div></div><div class="section"><form id="formValidate" action="{{ url('/register') }}" method="POST">{{ csrf_field() }}<div class="row {{ $errors->has('name') ? ' has-error' : '' }}"><div class="input-field col s6 push-s3"><i class="small material-icons prefix">account_box</i><input id="name" type="text" class="validate" name="name" value="{{ old('name') }}" data-error=".errorName" required><label for="name">Name</label><div class="errorName">@if ($errors->has('name'))<div class="error">{{ $errors->first('name') }}</div>@endif</div></div></div><div class="row {{ $errors->has('email') ? ' has-error' : '' }}"><div class="input-field col s6 push-s3"><i class="small material-icons prefix">email</i><input id="email" type="email" class="validate" name="email" value="{{ old('email') }}" data-error=".errorEmail" required><label for="email">E-Mail Address</label><div class="errorEmail">@if ($errors->has('email'))<div class="error">{{ $errors->first('email') }}</div>@endif</div></div></div><div class="row {{ $errors->has('password') ? ' has-error' : '' }}"><div class="input-field col s6 push-s3"><i class="small material-icons prefix">lock_outline</i><input id="password" type="password" class="validate" name="password" data-error=".errorPassword" required><label for="password">Password</label><div class="errorPassword">@if ($errors->has('password'))<div class="error">{{ $errors->first('password') }}</div>@endif</div></div></div><div class="row"><div class="input-field col s6 push-s3"><i class="small material-icons prefix">lock_outline</i><input id="password-confirm" type="password" class="validate" name="password_confirmation" data-error=".errorPasswordConfirmation" required><label for="password">Confirm Password</label><div class="errorPasswordConfirmation"></div></div></div><div class="row"><div class="input-field col s6 push-s3"><button type="submit" class="btn btn-flat pink accent-3 waves-effect waves-light white-text">Register <i class="material-icons right">send</i></button></div></div></form></div>@endsection
Here is the looks We need to modify a few things like the page redirection after the log in and the register. I also notice the dropdown menu to show the logged in user still not correct. For modifying the redirection page, it’s simple. Modify the controllers (LoginController.php and RegisterController.php) in /app/Http/Controllers/Auth/ directory. Set $redirectTo variable to the homepage (‘/’) instead of ‘/home’ like this:
12//protected $redirectTo = '/home';protected $redirectTo = '/';
Then for the dropdown menu, we need to modify /resources/views/layouts/header.blade.php like this:
12345678910111213141516171819202122232425262728293031323334353637383940<nav class="pink accent-3" role="navigation"><div class="nav-wrapper container"><div class="col s12"><a id="logo-container" href="#" class="brand-logo">Laravel</a><ul class="right hide-on-med-and-down"><li><a href="{{ url('/')}}">Home</a></li><!-- Authentication Links -->@if (Auth::guest())<li><a href="{{ url('/login') }}">Login</a></li><li><a href="{{ url('/register') }}">Register</a></li>@else<li><a href="#" class="dropdown-button" data-beloworigin="true" data-activates="dropdown1">{{ Auth::user()->name }} <i class="small material-icons prefix right">arrow_drop_down</i></a><ul id="dropdown1" class="dropdown-content pink accent-3"><li><a href="{{ url('/logout') }}"onclick="event.preventDefault();document.getElementById('logout-form').submit();">Logout</a><form id="logout-form" action="{{ url('/logout') }}" method="POST" style="display: none;">{{ csrf_field() }}</form></li></ul></li>@endif</ul><ul id="nav-mobile" class="side-nav"><li><a href="{{ url('/')}}">Home</a></li></ul><a href="#" data-activates="nav-mobile" class="button-collapse"><i class="material-icons">menu</i></a></div></div></nav>
To find out the complete dropdown function for materialized css, please see http://materializecss.com/dropdown.html and http://demo.geekslabs.com/materialize/v3.1/ui-navbar.html.
I also need to make a slightly modification in /public/css/style.css to make the dropdown display the correct font color:
123.dropdown-content li>a, .dropdown-content li>span {color: #ffffff;}
Here is the looks:
- Now, we want to restrict some functions like ‘Add’, ‘Edit’ and ‘Delete’ can only be proceeded when the user is logged in. So we’re going to check the logged in user (‘Auth::check()’) in /app/Http/Controllers/CrudController.php for some functions ‘create’, ‘edit’ and ‘destroy’ like this: (ref: Authentication and Check if user is logged in):
1234567891011121314151617181920212223242526272829303132...public function create(){if(Auth::check()){return view('add');}else{return redirect()->to('/login');}}...public function edit($id){if(Auth::check()){//$data=Crud::find($id); //SAME WITH BELOW$data=Crud::where('id',$id)->first();return view('edit')->with('data',$data);}else{return redirect()->to('/login');}}...public function destroy($id){if(Auth::check()){$delete=Crud::find($id);$delete->delete();return redirect()->to('/');}else{return redirect()->to('/login');}}
OK. When we click the Add, edit and delete icon/buttons, it’d redirect us to the login page if we haven’t logged in!
NEXT: User access/level, go to / proceed to the aim page after logging in, admin panel and comments!