Ref: https://www.mageplaza.com/magento-2-module-development/
The module is a directory that contains blocks, controllers, models, helper, etc – that are related to a specific business feature. In Magento 2, modules will be live in app/code directory of a Magento installation, with this format: app/code/<Vendor>/<ModuleName>. I use Magento 2.1.5 CE. Here is the installation steps.
Create Hello World module for Magento 2
Step 1: Create a directory for the module like above format.
Here I use Advcha as a Vendor name and HelloWorld as a ModuleName.
So create a directory: app/code/Advcha/HelloWorld.
Step 2: Declare module by using configuration file module.xml
Create a new file module.xml in app/code/Advcha/HelloWorld/etc/ directory. Here is the full path: app/code/Advcha/HelloWorld/etc/module.xml
Here is the file content:
|
1 2 3 4 |
<?xml version="1.0"?> <config xmlns:xsi="http://www.w3.org/2001/XMLSchema-instance" xsi:noNamespaceSchemaLocation="urn:magento:framework:Module/etc/module.xsd"> <module name="Advcha_HelloWorld" setup_version="1.0.0" /> </config> |
Here I register a module with name Advcha_HelloWorld and the version is 1.0.0.
Step 3: Register module by registration.php
Magento 2 module must be registered in the Magento system through the magento ComponentRegistrar class. This file will be placed in module root directory. Create a new file registration.php (beware the file name case-sensitive, it must be registration.php NOT Registration.php) in app/code/Advcha/HelloWorld/ directory. Here is the full path: app/code/Advcha/HelloWorld/registration.php
Here is the file content:
|
1 2 3 4 5 6 |
<?php \Magento\Framework\Component\ComponentRegistrar::register( \Magento\Framework\Component\ComponentRegistrar::MODULE, 'Advcha_HelloWorld', __DIR__ ); |
Step 4: Enable the module
Before enable the module, we must check to make sure Magento has recognize our module or not by enter the following at the command line: php bin/magento module:status
|
1 2 3 4 |
www-data@teddy-K43SJ:/home/teddy/Documents/works/magentoce215$ php bin/magento module:status ... List of disabled modules: Advcha_HelloWorld |
Run this command php bin/magento module:enable Advcha_HelloWorld to enable it:
|
1 2 3 4 5 6 7 8 |
www-data@teddy-K43SJ:/home/teddy/Documents/works/magentoce215$ php bin/magento module:enable Advcha_HelloWorld The following modules have been enabled: - Advcha_HelloWorld To make sure that the enabled modules are properly registered, run 'setup:upgrade'. Cache cleared successfully. Generated classes cleared successfully. Please run the 'setup:di:compile' command to generate classes. Info: Some modules might require static view files to be cleared. To do this, run 'module:enable' with the --clear-static-content option to clear them. |
Magento require to check and upgrade module database. We need to run this command php bin/magento setup:upgrade.
|
1 2 3 4 5 6 7 8 9 10 11 12 13 14 15 16 17 |
www-data@teddy-K43SJ:/home/teddy/Documents/works/magentoce215$ php bin/magento setup:upgrade Cache cleared successfully ... Updating modules: Schema creation/updates: Module 'Advcha_HelloWorld': ... Schema post-updates: Module 'Advcha_HelloWorld': ... Data install/update: Module 'Advcha_HelloWorld': ... Data post-updates: Module 'Advcha_HelloWorld': ... Please re-run Magento compile command |
Now you can check under Stores -> Configuration -> Advanced -> Advanced that the module is present.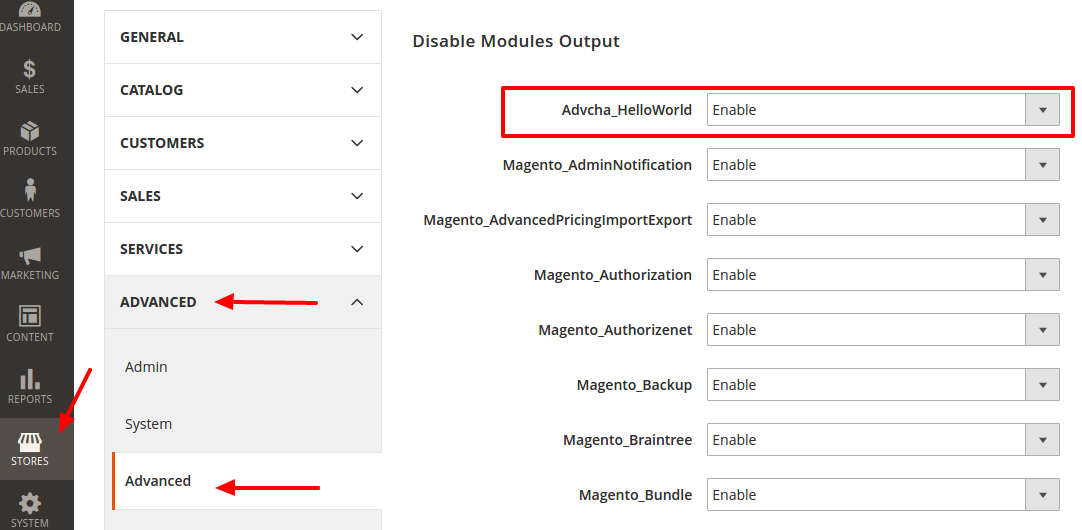 Step 5: Create a Routers for the module.
A request URL has the following format:
|
1 |
http://magentoce215.dev/<router_id>/<controller_name>/<action_name> |
NOTE: Here I replaced <router_name> to <router_id> after I read this article Magento 2: Advanced Routing.
“The id identifies the route node uniquely in the Magento system, and the frontName defines the first segment of your URL.”
At first I thought it was <router_name> before I found the article. But I confused because this tutorial is working even if I didn’t change the id from ‘advcha’ to ‘helloworld.??? So the url would be http://magentoce215.dev/helloworld/*
In this module, we need to create a route for frontend area. So we need to add this file: app/code/Advcha/HelloWorld/etc/frontend/routes.xml.
Here is the content:
|
1 2 3 4 5 6 7 8 |
<?xml version="1.0"?> <config xmlns:xsi="http://www.w3.org/2001/XMLSchema-instance" xsi:noNamespaceSchemaLocation="urn:magento:framework:App/etc/routes.xsd"> <router id="standard"> <route id="advcha" frontName="helloworld"> <module name="Advcha_HelloWorld" /> </route> </router> </config> |
After define the route, the URL path to our module will be: http://magentoce215.dev/helloworld/*
So our <router_name> is helloworld ???
Step 6: Create controller and action.
we will create controller and action to display ‘Hello World’. Our <controller_name> would be index and <action_name> would be display. We need to create a new php file: app/code/Advcha/HelloWorld/Controller/Index/Display.php
Here is the file content:
|
1 2 3 4 5 6 7 8 9 10 11 12 13 14 |
<?php namespace Advcha\HelloWorld\Controller\Index; class Display extends \Magento\Framework\App\Action\Action { public function __construct(\Magento\Framework\App\Action\Context $context){ return parent::__construct($context); } public function execute(){ echo 'Hello World!'; exit; } } |
Now we can open the url to show ‘Hello World!’ from our module: http://magentoce215.dev/helloworld/index/display
Note: If there is no change, please flush the cache with this command: php bin/magento cache:flush.
Step 7: Add to github.
It’s a good way to store also our code in github. Here is how to do it:
Exit from ‘www-data’ user then Go into /app/code/Advcha/HelloWorld/ directory:
|
1 2 3 |
www-data@teddy-K43SJ:/home/teddy/Documents/works/magentoce215/app/code/Advcha/HelloWorld/$ exit exit teddy@teddy-K43SJ:~/Documents/works/magentoce215$ cd app/code/Advcha/HelloWorld/ |
Initialize with git init:
|
1 2 |
teddy@teddy-K43SJ:~/Documents/works/magentoce215/app/code/Advcha/HelloWorld$ git init Initialized empty Git repository in /home/teddy/Documents/works/magentoce215/app/code/Advcha/HelloWorld/.git/ |
Go into your github account and create a new repository. I created a new repo ‘magento2-sample-module’ (https://github.com/advcha/magento2-sample-module). Then use git remote add origin https://github.com/advcha/magento2-sample-module.git and git push -u origin master to update the remote reposity.
|
1 2 3 4 5 6 7 8 9 10 11 12 13 |
teddy@teddy-K43SJ:~/Documents/works/magentoce215/app/code/Advcha/HelloWorld$ git remote add origin https://github.com/advcha/magento2-sample-module.git teddy@teddy-K43SJ:~/Documents/works/magentoce215/app/code/Advcha/HelloWorld$ git push -u origin master Username for 'https://github.com': advcha Password for 'https://advcha@github.com': Counting objects: 10, done. Delta compression using up to 4 threads. Compressing objects: 100% (7/7), done. Writing objects: 100% (10/10), 1.08 KiB | 0 bytes/s, done. Total 10 (delta 1), reused 0 (delta 0) remote: Resolving deltas: 100% (1/1), done. To https://github.com/advcha/magento2-sample-module.git * [new branch] master -> master Branch master set up to track remote branch master from origin. |
Then we can use git add command to prepare our files or use git GUI to make it easier. I use gitcola. First, stage the files, then commit and push. Done!
Create Controllers in Magento 2
ref: https://www.mageplaza.com/magento-2-module-development/how-to-create-controllers-magento-2.html
In Magento 2 Controller has one or more files in Controller folder of module, it includes actions of class which contain execute() method. There are 2 different controllers, they are frontend controller and backend controller. They are generally similar of workflow, but admin controller is a little different. There is a checking permission method in admin controller.
Here for the first step, we follow the same step as above like create routes.xml in /app/Advcha/HelloWorld/etc/frontend/ directory. But we change the id to ‘helloworld’.
|
1 2 3 4 5 6 7 8 |
<?xml version="1.0"?> <config xmlns:xsi="http://www.w3.org/2001/XMLSchema-instance" xsi:noNamespaceSchemaLocation="urn:magento:framework:App/etc/routes.xsd"> <router id="standard"> <route id="helloworld" frontName="helloworld"> <module name="Advcha_HelloWorld" /> </route> </router> </config> |
Then create controller file Index.php in /app/Advcha/HelloWorld/Controller/Index/ directory.
|
1 2 3 4 5 6 7 8 9 10 11 12 13 14 15 16 17 18 19 20 21 22 23 24 25 26 27 28 29 30 31 32 33 |
<?php namespace Advcha\HelloWorld\Controller\Index; class Index extends \Magento\Framework\App\Action\Action { protected $resultPageFactory; /** * Constructor * * @param \Magento\Framework\App\Action\Context $context * @param \Magento\Framework\View\Result\PageFactory $resultPageFactory */ public function __construct( \Magento\Framework\App\Action\Context $context, \Magento\Framework\View\Result\PageFactory $resultPageFactory) { $this->resultPageFactory = $resultPageFactory; parent::__construct($context); } /** * Execute view action * * @return \Magento\Framework\Controller\ResultInterface */ public function execute() { //echo 'Hello Advcha!'; //exit; return $this->resultPageFactory->create(); } } |
All controller must extend from \Magento\Framework\App\Action\Action class which has dispatched method which will call execute method in action class. In this execute() method, we will write all of our controller logic and will return response for the request.
Then create layout file helloworld_index_index.xml in /app/Advcha/HelloWorld/view/frontend/layout/ directory. the layout filename has a pattern <router_name>_<controller_name>_<action_name>.xml. Therefore <router_name> is helloworld, <controller_name> is index and <action_name> is index (the classname). The Frontend layout always in /view/frontend/layout/ directory.
|
1 2 3 4 5 6 7 8 |
<?xml version="1.0" ?> <page layout="1column" xmlns:xsi="http://www.w3.org/2001/XMLSchema-instance" xsi:noNamespaceSchemaLocation="urn:magento:framework:View/Layout/etc/page_configuration.xsd"> <body> <referenceContainer name="content"> <block class="Advcha\HelloWorld\Block\Index\Index" name="index.index" template="Advcha_HelloWorld::index/index.phtml"/> </referenceContainer> </body> </page> |
For the block “Advcha\HelloWorld\Block\Index\Index“, create a new file Index.php. The full path is in /app/code/Advcha/HelloWorld/Block/Index/Index.php.
|
1 2 3 4 5 6 7 8 |
<?php namespace Advcha\HelloWorld\Block\Index; class Index extends \Magento\Framework\View\Element\Template{ public function _prepareLayout() { return parent::_prepareLayout(); } } |
For the template is “Advcha_HelloWorld::index/index.phtml“. The full path is in /app/code/Advcha/HelloWorld/view/frontend/templates/index/index.phtml. The Frontend template always in /view/frontend/templates/ directory. Create a new file index.phtml and here is the content:
|
1 |
<h1>Welcome Advcha.</h1> |
Okay. It’s time to test but first flush magento cache with command: php bin/magento cache:flush. Then open this url: http://magentoce215.dev/helloworld/index/index. IT SHOULD SHOW Welcome Advcha.
IF IT SHOW EMPTY PAGE, Please flush the magento cache or check again the id in routes.xml or make sure the ‘block’ is exist or modify ‘layout=”empty”‘ in helloworld_index_index.xml (ref: http://magento.stackexchange.com/questions/84370/magento-2-sample-module-displays-blank-page).
We can also inspect the elements with Magento DevTools.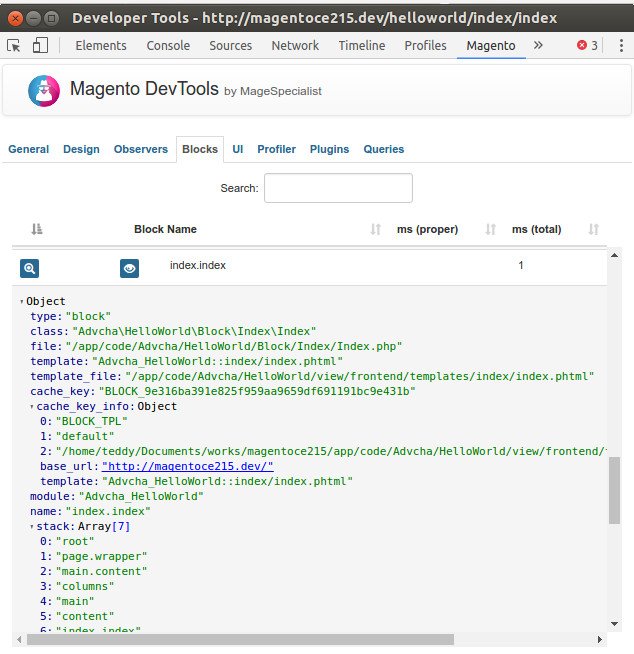 CRUD
CRUD
ref: https://www.mageplaza.com/magento-2-module-development/how-to-create-crud-model-magento-2.html
Here I want to create a new table ‘advcha_post‘ with these following columns:
post_id – the post unique identifier
title – the title of the post
content – the content of the post
creation_time – the date created
To create a magento model, first setup a script in InstallSchema.php to create the table. Here is the full path: app/code/Advcha/HelloWorld/Setup/InstallSchema.php. Here is the file content:
NOTE: I updated the content from the github link: https://github.com/mageplaza/magento-2-sample-module/blob/master/Setup/InstallSchema.php
|
1 2 3 4 5 6 7 8 9 10 11 12 13 14 15 16 17 18 19 20 21 22 23 24 25 26 27 28 29 30 31 32 33 34 35 36 37 38 39 40 41 42 43 44 45 46 47 48 49 50 51 52 53 54 55 56 57 58 59 60 61 62 63 64 65 66 67 68 69 70 71 72 73 74 75 76 77 78 79 80 81 82 83 84 85 86 87 88 89 90 91 92 93 94 95 96 97 98 99 100 101 102 103 104 105 106 107 108 109 110 111 112 113 114 115 116 117 118 119 120 121 122 123 124 125 126 127 128 129 130 131 |
<?php namespace Advcha\HelloWorld\Setup; use \Magento\Framework\Setup\SchemaSetupInterface; use \Magento\Framework\Setup\ModuleContextInterface; use \Magento\Framework\DB\Ddl\Table; use \Magento\Framework\DB\Adapter\AdapterInterface; class InstallSchema implements \Magento\Framework\Setup\InstallSchemaInterface{ /** * install tables * * @param \Magento\Framework\Setup\SchemaSetupInterface $setup * @param \Magento\Framework\Setup\ModuleContextInterface $context * @return void * @SuppressWarnings(PHPMD.ExcessiveMethodLength) */ public function install(SchemaSetupInterface $setup, ModuleContextInterface $context) { $installer = $setup; $installer->startSetup(); if (!$installer->tableExists('advcha_helloworld_post')) { $table = $installer->getConnection()->newTable( $installer->getTable('advcha_helloworld_post') ) ->addColumn( 'post_id', Table::TYPE_INTEGER, null, [ 'identity' => true, 'nullable' => false, 'primary' => true, 'unsigned' => true, ], 'Post ID' ) ->addColumn( 'name', Table::TYPE_TEXT, 255, ['nullable => false'], 'Post Name' ) ->addColumn( 'url_key', Table::TYPE_TEXT, 255, [], 'Post URL Key' ) ->addColumn( 'post_content', Table::TYPE_TEXT, '64k', [], 'Post Post Content' ) ->addColumn( 'tags', Table::TYPE_TEXT, 255, [], 'Post Tags' ) ->addColumn( 'status', Table::TYPE_INTEGER, 1, [], 'Post Status' ) ->addColumn( 'featured_image', Table::TYPE_TEXT, 255, [], 'Post Featured Image' ) ->addColumn( 'sample_country_selection', Table::TYPE_TEXT, 3, [], 'Post Sample Country Selection' ) ->addColumn( 'sample_upload_file', Table::TYPE_TEXT, 255, [], 'Post Sample File' ) ->addColumn( 'sample_multiselect', Table::TYPE_TEXT, '64k', [], 'Post Sample Multiselect' ) ->addColumn( 'created_at', Table::TYPE_TIMESTAMP, null, [], 'Post Created At' ) ->addColumn( 'updated_at', Table::TYPE_TIMESTAMP, null, [], 'Post Updated At' ) ->setComment('Post Table'); $installer->getConnection()->createTable($table); $installer->getConnection()->addIndex( $installer->getTable('advcha_helloworld_post'), $setup->getIdxName( $installer->getTable('advcha_helloworld_post'), ['name','url_key','post_content','tags','featured_image','sample_upload_file'], AdapterInterface::INDEX_TYPE_FULLTEXT ), ['name','url_key','post_content','tags','featured_image','sample_upload_file'], AdapterInterface::INDEX_TYPE_FULLTEXT ); } $installer->endSetup(); } } |
Then run php bin/magento setup:upgrade
This should create a new table ‘advcha_helloworld_post‘ in your magento database. If it didn’t create it, please check ‘setup_module‘ table, then find ‘Advcha_HelloWorld’ record and remove it. Then run again php bin/magento setup:upgrade.
If you find this error
|
1 2 |
[Zend_Db_Exception] There is no field "sample_upload_file" that you are trying to create an index on "advcha_helloworld_post" |
This mean you haven’t define ‘sample_upload_file’ field in InstallSchema.php file above. Please look again the above file carefully or see the file from the github: https://github.com/mageplaza/magento-2-sample-module/blob/master/Setup/InstallSchema.php.
Create Model
First create an interface in PostInterface.php file in app/code/Advcha/HelloWorld/Model/Api/Data/ directory.
|
1 2 3 4 5 6 7 8 9 10 11 12 13 14 |
<?php namespace Advcha\HelloWorld\Model\Api\Data; interface PostInterface { public function getId(); public function setId(); public function getName(); public function setName(); public function getPostContent(); public function setPostContent(); } |
This interface has defined the set and get method to table data which we would use when interacting with the model. This interface plays an important role when it comes time to exporting CRUD models to Magento service contracts based API.
Now create a model Post in app/code/Advcha/HelloWorld/Model/Post.php.
|
1 2 3 4 5 6 7 8 9 10 11 12 13 14 15 16 17 18 19 20 21 22 23 24 25 26 27 28 |
<?php namespace Advcha\HelloWorld\Model; use Magento\Framework\Model\AbstractModel; use Magento\Framework\DataObject\IdentityInterface; use Advcha\HelloWorld\Model\Api\Data\PostInterface; class Post extends AbstractModel implements IdentityInterface,PostInterface { const CACHE_TAG = 'advcha_helloworld_post'; protected $_cacheTag = 'advcha_helloworld_post'; protected $_eventPrefix = 'advcha_helloworld_post'; protected function __construct() { $this->_init('Advcha\HelloWorld\Model\ResourceModel\Post'); } public function getIdentities(){ return [self::CACHE_TAG . '_' . $this->getId()]; } public function getDefaultValues(){ $values = []; return $values; } } |
$_eventPrefix – a prefix for events to be triggered
$_eventObject – a object name when access in event
$_cacheTag – a unique identifier for use within caching
Create a Resource Model
the model file contain overall database logic, it do not execute sql queries. The resource model will do that. Now we will create the Resource Model for this table: Advcha\HelloWorld\Model\ResourceModel\Post.php.
|
1 2 3 4 5 6 7 8 9 10 11 12 13 14 15 16 17 18 19 20 21 22 23 24 25 26 27 28 29 30 31 32 33 34 35 36 37 38 39 40 41 42 43 44 45 46 47 48 49 50 51 52 53 54 55 56 57 58 59 60 61 62 |
<?php namespace Advcha\HelloWorld\Model\ResourceModel; use Magento\Framework\Model\ResourceModel\Db\AbstractDb; use Magento\Framework\Stdlib\DateTime\DateTime; use Magento\Framework\Model\ResourceModel\Db\Context; use Magento\Framework\Model\AbstractModel; class Post extends AbstractDb { /** * Date model * * @var \Magento\Framework\Stdlib\DateTime\DateTime */ protected $_date; /** * constructor * * @param \Magento\Framework\Stdlib\DateTime\DateTime $date * @param \Magento\Framework\Model\ResourceModel\Db\Context $context */ protected function __construct(DateTime $date, Context $context) { $this->_date = $date; parent::__construct($context); } /** * Initialize resource model * * @return void */ public function _construct(){ $this->_init('advcha_helloworld_post', 'post_id'); } /** * Retrieves Post Name from DB by passed id. * * @param string $id * @return string|bool */ public function getPostNameById($id){ $adapter = $this->getConnection(); $select = $adapter->select() ->from($this->getMainTable(), 'name') ->where('post_id = :post_id'); $binds = ['post_id' => (int)$id]; return $adapter->fetchOne($select, $binds); } /** * before save callback * * @param \Magento\Framework\Model\AbstractModel|\Mageplaza\HelloWorld\Model\Post $object * @return $this */ protected function _beforeSave(AbstractModel $object) { $object->setUpdateAt($this->_date->date()); if($object->isObjectNew()){ $object->setCreatedAt($this->_date->date()); } return parent::_beforeSave($object); } } |
Resource Model Collection – Get Model Collection
The collection model is considered a resource model which allow us to filter and fetch a collection table data. The collection model will be placed in: Advcha\HelloWorld\Model\ResourceModel\Post\Collection.php.
|
1 2 3 4 5 6 7 8 9 10 11 12 13 14 15 16 17 18 19 20 21 22 23 24 25 26 27 28 29 30 31 32 33 34 35 36 37 38 39 40 41 42 43 44 |
<?php namespace Advcha\HelloWorld\Model\ResourceModel\Post; use Magento\Framework\Model\ResourceModel\Db\Collection\AbstractCollection; class Collection extends AbstractCollection { protected $_idFieldName = 'post_id'; protected $_eventPrefix = 'advcha_helloworld_post_collection'; protected $_eventObject = 'post_collection'; /** * Define resource model * * @return void */ protected function _construct() { $this->_init('Advcha\HelloWorld\Model\Post', 'Advcha\HelloWorld\Model\ResourceModel\Post'); } /** * Get SQL for get record count. * Extra GROUP BY strip added. * * @return \Magento\Framework\DB\Select */ public function getSelectCountSql() { $countSelect = parent::getSelectCountSql(); $countSelect->reset(\Zend_Db_Select::GROUP); return $countSelect; } /** * @param string $valueField * @param string $labelField * @param array $additional * @return array */ protected function _toOptionArray($valueField = 'post_id', $labelField = 'name', $additional = []) { return parent::_toOptionArray($valueField, $labelField, $additional); } } |
Factory Object and create Block Post
Create a Post block: Advcha\HelloWorld\Block\Post.php.
|
1 2 3 4 5 6 7 8 9 10 11 12 13 14 15 16 17 18 19 20 21 22 23 24 25 |
<?php namespace Advcha\HelloWorld\Block; use Magento\Framework\View\Element\Template; use Magento\Framework\View\Element\Template\Context; use Advcha\HelloWorld\Model\PostFactory; class Post extends Template { protected $_postFactory; public function _construct(Context $context, PostFactory $postFactory){ $this->_postFactory = $postFactory; parent::_construct($context); } public function _prepareLayout() { $post = $this->_postFactory->create(); $collection = $post->getCollection(); foreach($collection as $item){ var_dump($item->getData()); } exit; } } |
Then how to run this CRUD?
Create View: Block, Layouts, Templates
ref: https://www.mageplaza.com/magento-2-module-development/view-block-layout-template-magento-2.html
Here we want to create a module to show/display a text on the magento frontend.
A View will be use to output representation of the page. In Magento 2, View is built by three path: block, layout and template.
Call view in controller
In the previous Hello World Module topic, we have build a simple module and show the Hello World message on the screen directly by controller. Now we will edit it to call view to render page. File: app/code/Advcha/HelloWorld/Controller/Index/Display.php.
|
1 2 3 4 5 6 7 8 9 10 11 12 13 14 15 16 17 18 19 20 21 |
<?php namespace Advcha\HelloWorld\Controller\Index; use Magento\Framework\App\Action\Action; use Magento\Framework\App\Action\Context; use Magento\Framework\View\Result\PageFactory; class Display extends Action { protected $_pageFactory; public function __construct(Context $context, PageFactory $pageFactory){ $this->_pageFactory = $pageFactory; return parent::__construct($context); } public function execute(){ //echo 'Hello World!'; //exit; return $this->_pageFactory->create(); } } |
Create layout file .xml
The Layout is the major path of view layer in Magento 2 module. The layout file is a XML file which will define the page structure and will be locate in {module_root}/view/{area}/layout/ directory. The Area path can be frontend or adminhtml which define where the layout will be applied.
There is a special layout file name default.xml which will be applied for all the page in it’s area. Otherwise, the layout file will have name as format: {router_id}_{controller_name}_{action_name}.xml. We can find the frontend {router_id} is helloworld in app/code/Advcha/HelloWorld/etc/frontend/routes.xml. The {controller_name} is index and {action_name} is display (from Display.php where Action exist: Magento\Framework\App\Action\Action). We will create a layout handle file for this module: File: app/code/Advcha/HelloWorld/view/frontend/layout/helloworld_index_display.xml.
|
1 2 3 4 5 6 |
<?xml version="1.0"?> <page xmlns:xsi="http://www.w3.org/2001/XMLSchema-instance" layout="1column" xsi:noNamespaceSchemaLocation="urn:magento:framework:View/Layout/etc/page_configuration.xsd"> <referenceContainer name="content"> <block class="Advcha\HelloWorld\Block\Display" name="helloworld_display" template="Advcha_HelloWorld::sayhello.phtml" /> </referenceContainer> </page> |
Block class: Advcha\HelloWorld\Block\Display, Template file: Advcha_HelloWorld::sayhello.phtml.
Create block
The Block file should contain all the view logic required, it should not contain any kind of html or css. Block file are supposed to have all application view logic. Create a file: app/code/Advcha/HelloWorld/Block/Display.php.
|
1 2 3 4 5 6 7 8 9 10 11 12 13 14 15 |
<?php namespace Advcha\HelloWorld\Block; use Magento\Framework\View\Element\Template; use Magento\Framework\View\Element\Template\Context; class Display extends Template { public function __construct(Context $context) { parent::__construct($context); } public function sayHello(){ return __('Hello World, Advcha!'); } } |
Every block in Magento 2 must extend from Magento\Framework\View\Element\Template. In this block we will define a method sayHello() to show the word “Hello World, Advcha!”. We will use it in template file.
Create template file
Create a template file call sayhello.phtml: app/code/Advcha/HelloWorld/view/frontend/templates/sayhello.phtml.
|
1 2 |
<?php echo $block->sayHello(); |
In the layout file, we define the template by Advcha_HelloWorld::sayhello.phtml. It mean that Magento will find the file name sayhello.phtml in templates folder of module Advcha_HelloWorld. The template folder of the module is app/code/{vendor_name}/{module_name}/view/frontend/templates/.
In the template file, we can use the variable $block for the block object. As you see, we call the method sayHello() in Block. It’s done, please access to this page again (http://magentoce215.dev/helloworld/index/display) and see the result.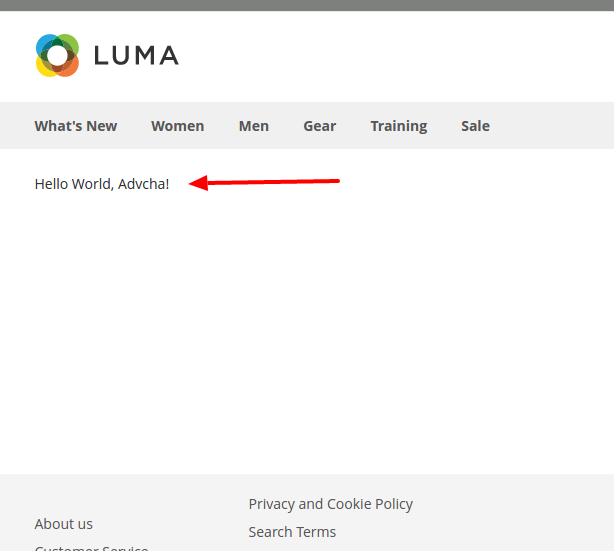 If you find an error like this (put “ini_set(‘display_errors’, ‘1’);” in root index.php and /pub/index.php):
|
1 |
Fatal error: Uncaught TypeError: Argument 2 passed to Advcha\HelloWorld\Controller\Index\Display::__construct() must be an instance of Magento\Framework\View\Result\PageFactory, none given, called in /home/teddy/Documents/works/magentoce215/var/generation/Advcha/HelloWorld/Controller/Index/Display/Interceptor.php on line 14 and defined in /home/teddy/Documents/works/magentoce215/app/code/Advcha/HelloWorld/Controller/Index/Display.php on line 1 |
Then run this command: php bin/magento setup:upgrade then refresh your browser.
The Backend – system.xml Configuration
ref: https://www.mageplaza.com/magento-2-module-development/create-system-xml-configuration-magento-2.html
Create System.xml
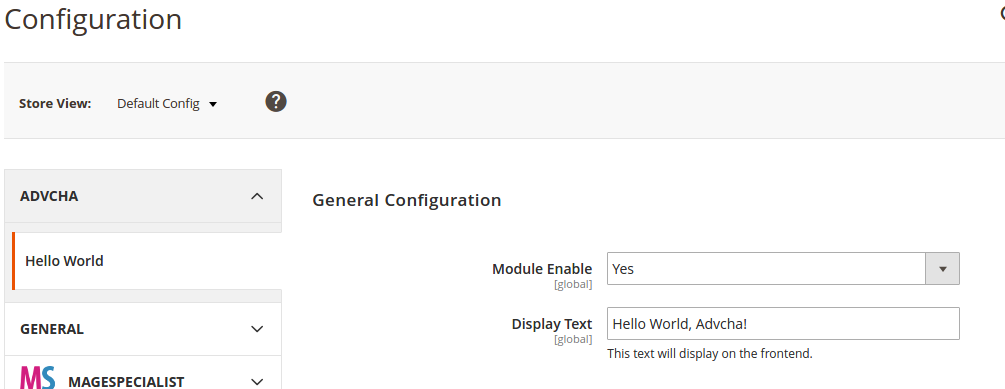
In the admin page, the magento 2 system configuration page is divided logically in few parts: Tabs, Sections, Groups, Fields. 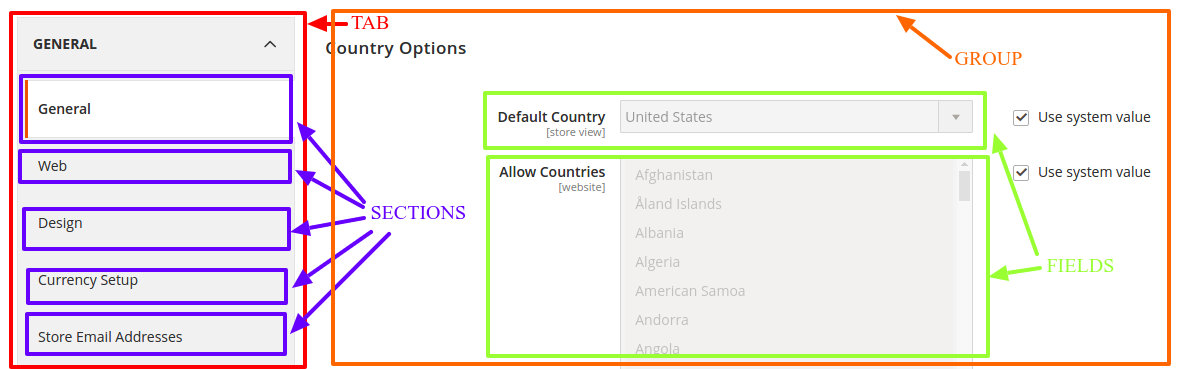 So let’s start to create a simple configuration for the simple Module Hello World. The system.xml is located in etc/adminhtml directory of the module, we will create it a new Tab for our vendor “Advcha”, a new Section for our module Hello World, a Group to contain some simple fields: enable module and text. File: app/code/Advcha/HelloWorld/etc/adminhtml/system.xml.
|
1 2 3 4 5 6 7 8 9 10 11 12 13 14 15 16 17 18 19 20 21 22 23 24 25 |
<?xml version="1.0"?> <config xmlns:xsi="http://www.w3.org/2001/XMLSchema-instance" xsi:noNamespaceSchemaLocation="urn:magento:module:Magento_Config:etc/system_file.xsd"> <system> <tab id="advcha" translate="label" sortOrder="10"> <label>Advcha</label> </tab> <section id="helloworld" translate="label" sortOrder="130" showInDefault="1" showInWebsite="1" showInStore="1"> <class>separator-top</class> <label>Hello World</label> <tab>advcha</tab> <resource>Advcha_HelloWorld::hello_configuration</resource> <group id="general" translate="label" type="text" sortOrder="10" showInDefault="1" showInWebsite="0" showInStore="0"> <label>General Configuration</label> <field id="enable" translate="label" type="select" sortOrder="1" showInDefault="1" showInWebsite="0" showInStore="0"> <label>Module Enable</label> <source_model>Magento\Config\Model\Config\Source\Yesno</source_model> </field> <field id="display_text" translate="label" type="text" sortOrder="1" showInDefault="1" showInWebsite="0" showInStore="0"> <label>Display Text</label> <comment>This text will display on the frontend.</comment> </field> </group> </section> </system> </config> |
Set default value
Each field in system.xml after create will not have any value. When you call them, you will receive ‘null’ result. So for the module, we will need to set the default value for the field and you will call the value without go to config, set value and save it. This default value will be saved in config.xml which is located in etc folder. Let’s create it for this simple configuration: File: app/code/Advcha/HelloWorld/etc/config.xml.
|
1 2 3 4 5 6 7 8 9 10 11 |
<?xml version="1.0"?> <config xmlns:xsi="http://www.w3.org/2001/XMLSchema-instance" xsi:noNamespaceSchemaLocation="urn:magento:module:Magento_Store:etc/config.xsd"> <default> <helloworld> <general> <enable>1</enable> <display_text>Hello World, Advcha!</display_text> </general> </helloworld> </default> </config> |
You can put the path to the field in the <default> element to set value default for it. The format is:
|
1 2 3 4 5 6 7 |
<default> <section_id> <group_id> <field_id>{value}</field_id> </group_id> </section_id> </default_id> |
 We need to flush the cache and see the result above.
Get value from configuration
First all of let’s save value and flush cache, then you can get saved value from database. In the system.xml, we have added 2 fields: enable and display_text. So the path should be: helloworld/general/enable and helloworld/general/display_text. We can call them through simple calling or use helper (recommended). Also please read for more samples: http://magento.stackexchange.com/questions/87789/magento2-how-to-get-data-from-system-configuration
Simple calling:
|
1 2 |
$this->scopeConfig->getValue('helloworld/general/enable', \Magento\Store\Model\ScopeInterface::SCOPE_STORE); $this->scopeConfig->getValue('helloworld/general/display_text', \Magento\Store\Model\ScopeInterface::SCOPE_STORE); |
Create a helper file (standard)
Create file: Advcha/HelloWorld/Helper/Data.php.
|
1 2 3 4 5 6 7 8 9 10 11 12 13 14 15 16 17 18 19 20 21 22 23 24 25 26 27 28 29 30 31 32 33 34 35 36 37 38 |
<?php namespace Advcha\HelloWorld\Helper; use Magento\Framework\App\Helper\AbstractHelper; use Magento\Store\Model\StoreManagerInterface; use Magento\Framework\ObjectManagerInterface; use Magento\Framework\App\Helper\Context; use Magento\Store\Model\ScopeInterface; class Data extends AbstractHelper { protected $storeManager; protected $objectManager; const XML_PATH_HELLOWORLD = 'helloworld/'; public function __construct(Context $context, ObjectManagerInterface $objectManager, StoreManagerInterface $storeManager ) { $this->objectManager = $objectManager; $this->storeManager = $storeManager; parent::__construct($context); } public function getConfigValue($field, $storeId = null) { return $this->scopeConfig->getValue( $field, ScopeInterface::SCOPE_STORE, $storeId ); } public function getGeneralConfig($code, $storeId = null) { return $this->getConfigValue(self::XML_PATH_HELLOWORLD . $code, $storeId); } } |
Now we can get those value and call the helper from .phtml file like this:
|
1 2 3 |
$helper = $this->objectManager->create('Advcha\HelloWorld\Helper\Data'); echo $helper->getGeneralConfig('enable'); echo $helper->getGeneralConfig('display_text'); |