Ref: https://www.humankode.com/ssl/create-a-selfsigned-certificate-for-nginx-in-5-minutes
https://www.digitalocean.com/community/tutorials/how-to-create-a-self-signed-ssl-certificate-for-nginx-in-ubuntu-16-04
In this tutorial, I’m going to show you how you can create a self-signed SSL/TLS certificate and use it on Nginx in 5 minutes or less. I’m using Ubuntu for this tutorial, but if you’re on Mac OSX you can follow along as the syntax and commands are nearly identical.
Why Create a Self-Signed Certificate?
Self-signed certificates are useful for local development where you want to simulate an HTTPS environment. Take note that self-signed certificates are not meant for production, but they are ideal for localhost development.
An Overview of Creating a Self-Signed Certificate
Before continuing, let’s take a step back and look at the steps involved in generating a self-signed certificate for Nginx:
Generate a self-signed certificate using OpenSSL
Copy the certificate to the certificates folder on Ubuntu
Update the Nginx configuration file to load the certificate
Copy the certificate’s public key to the CA trusted root database to prevent Google Chrome from showing the site as insecure
Step 1: Generate a Self-Signed Certificate using OpenSSL
I’ll use OpenSSL to generate the certificate on Ubuntu. OpenSSL is installed on Mac OSX by default and the commands are exactly the same.
OpenSSL will generate 2 files which consist of a private key and a public key. Even though most people refer to an SSL/TLS certificate in the singular sense, it is the combination of the private key and the public key that makes a certificate.
Before running the OpenSSL command to generate a self-signed certificate, I’m going to create a certificate configuration file that will specify the certificate bits and the Subject Alternative Names. The Subject Alt Names are required in Google Chrome 58 and later, and is used to match the domain name and the certificate. If the domain name is not listed in the certificate’s Subject Alternative Names list, you’ll get a NET::ERR_CERT_COMMON_NAME_INVALID error message.
Create the Certificate Configuration File
|
1 2 3 |
teddy@teddy:~$ mkdir Documents/self_signed_cert teddy@teddy:~$ cd Documents/self_signed_cert/ teddy@teddy:~/Documents/self_signed_cert$ sudo gedit fontaineind.test.conf |
I want to make a self-signed certificate for my local magento 2 site. The site is fontaineind.test
Here is the content of fontaineind.test.conf file:
|
1 2 3 4 5 6 7 8 9 10 11 12 13 14 15 16 17 18 19 20 21 22 23 24 25 26 27 28 29 30 31 |
[req] default_bits = 2048 default_keyfile = f.key distinguished_name = req_distinguished_name req_extensions = req_ext x509_extensions = v3_ca [req_distinguished_name] countryName = Country Name (2 letter code) countryName_default = US stateOrProvinceName = State or Province Name (full name) stateOrProvinceName_default = New York localityName = Locality Name (eg, city) localityName_default = Rochester organizationName = Organization Name (eg, company) organizationName_default = localhost organizationalUnitName = organizationalunit organizationalUnitName_default = Development commonName = Common Name (e.g. server FQDN or YOUR name) commonName_default = localhost commonName_max = 64 [req_ext] subjectAltName = @alt_names [v3_ca] subjectAltName = @alt_names [alt_names] DNS.1 = fontaineind.test DNS.2 = 127.0.0.1 |
Create the Certificate using OpenSSL
|
1 |
sudo openssl req -x509 -nodes -days 365 -newkey rsa:2048 -keyout fontaineind.test.key -out fontaineind.test.crt -config fontaineind.test.conf |
Here is the terminal output. For the inputs on the terminal asking like country name, etc, just click enter key to accept the default values:
|
1 2 3 4 5 6 7 8 9 10 11 12 13 14 15 16 17 18 19 |
teddy@teddy:~/Documents/self_signed_cert$ sudo openssl req -x509 -nodes -days 365 -newkey rsa:2048 -keyout fontaineind.test.key -out fontaineind.test.crt -config fontaineind.test.conf Generating a 2048 bit RSA private key ............+++++ ................................................................................+++++ writing new private key to 'fontaineind.test.key' ----- You are about to be asked to enter information that will be incorporated into your certificate request. What you are about to enter is what is called a Distinguished Name or a DN. There are quite a few fields but you can leave some blank For some fields there will be a default value, If you enter '.', the field will be left blank. ----- Country Name (2 letter code) [US]: State or Province Name (full name) [New York]: Locality Name (eg, city) [Rochester]: Organization Name (eg, company) [localhost]: organizationalunit [Development]: Common Name (e.g. server FQDN or YOUR name) [localhost]: |
It’ll create two new files. There are fontaineind.test.crt and fontaineind.test.key:
|
1 2 |
teddy@teddy:~/Documents/self_signed_cert$ ls fontaineind.test.conf fontaineind.test.crt fontaineind.test.key |
Step 2: Copy the Certificate Key Pair to the Certificates folder on Ubuntu
Copy the public key to the /etc/ssl/certs directory
|
1 |
teddy@teddy:~/Documents/self_signed_cert$ sudo cp fontaineind.test.crt /etc/ssl/certs/ |
Copy the private key to the /etc/ssl/private directory
|
1 |
teddy@teddy:~/Documents/self_signed_cert$ sudo cp fontaineind.test.key /etc/ssl/private/ |
Step 3: Update the Nginx Configuration File to Load the Certificate Key Pair
|
1 |
teddy@teddy:~/Documents/self_signed_cert$ sudo gedit /etc/nginx/sites-available/fontaineind.test |
Change it like this:
|
1 2 3 4 5 6 7 8 9 10 11 12 13 14 |
server { listen 8080; listen 443 ssl http2; listen [::]:443 ssl http2; server_name fontaineind.test; ssl_certificate /etc/ssl/certs/fontaineind.test.crt; ssl_certificate_key /etc/ssl/private/fontaineind.test.key; ssl_protocols TLSv1.2 TLSv1.1 TLSv1; set $MAGE_ROOT /home/teddy/Documents/works/fontaineind; .... } |
Reload the Nginx configuration changes
|
1 |
sudo service nginx reload |
Then don’t forget to change the secure url on the database. Just find it :
|
1 |
SELECT * FROM `core_config_data` WHERE value like '%fontaineind.test%' |
Change ‘http’ to ‘https’ for ‘web/secure/base_url’ and ‘web/secure/base_link_url’
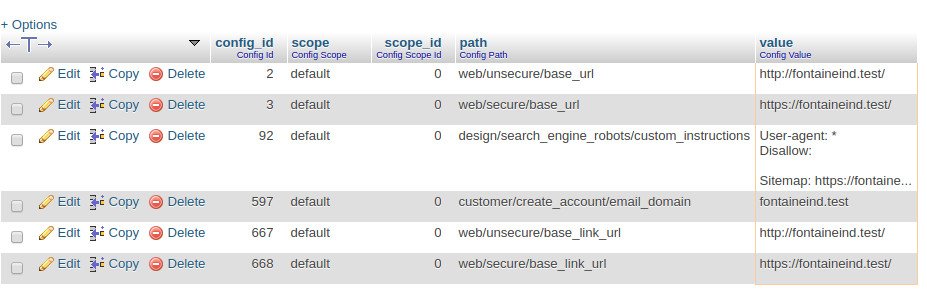 NOTE: It’d be better to change to https also for ‘unsecure’ url
Open up the Google Chrome to Verify that Nginx Loads the Site Over HTTP and HTTPS
Since I haven’t added the self-signed certificate to Chrome’s CA Root store, Chrome shows the site as insecure. Click proceed to fontaineind.test to verify that Nginx is correctly configured
open: https://fontaineind.test/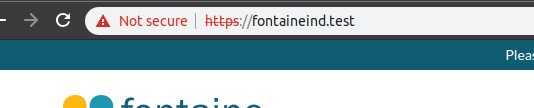 Step 4: Configure Chrome to Trust the Certificate and to Show the Site as Secure
Add the certificate to the trusted CA root store but need to check if ‘certutil’ if exist. If not install it with sudo apt install libnss3-tools:
|
1 2 3 4 5 6 7 8 9 10 11 12 13 14 15 16 17 18 19 20 21 22 23 24 25 26 27 28 |
teddy@teddy:~/Documents/self_signed_cert$ certutil bash: teddy@teddy:~/Documents/self_signed_cert$: No such file or directory teddy@teddy:~/Documents/self_signed_cert$ The program 'certutil' is currently not installed. You can install it by typing: No command 'The' found, did you mean: Command 'the' from package 'the' (universe) The: command not found teddy@teddy:~/Documents/self_signed_cert$ sudo apt install libnss3-tools Reading package lists... Done Building dependency tree Reading state information... Done libnss3-tools is already the newest version (2:3.28.4-0ubuntu0.16.04.3). The following packages were automatically installed and are no longer required: libtidy5 libzip4 linux-headers-4.15.0-29 linux-headers-4.15.0-29-generic linux-headers-4.15.0-30 linux-headers-4.15.0-30-generic linux-headers-4.15.0-32 linux-headers-4.15.0-32-generic linux-headers-4.15.0-33 linux-headers-4.15.0-33-generic linux-headers-4.15.0-34 linux-headers-4.15.0-34-generic linux-image-4.15.0-29-generic linux-image-4.15.0-30-generic linux-image-4.15.0-32-generic linux-image-4.15.0-33-generic linux-image-4.15.0-34-generic linux-modules-4.15.0-29-generic linux-modules-4.15.0-30-generic linux-modules-4.15.0-32-generic linux-modules-4.15.0-33-generic linux-modules-4.15.0-34-generic linux-modules-extra-4.15.0-29-generic linux-modules-extra-4.15.0-30-generic linux-modules-extra-4.15.0-32-generic linux-modules-extra-4.15.0-33-generic linux-modules-extra-4.15.0-34-generic qtdeclarative5-controls-plugin qtdeclarative5-dialogs-plugin Use 'sudo apt autoremove' to remove them. 0 upgraded, 0 newly installed, 0 to remove and 25 not upgraded. |
Then run this on the terminal:
|
1 |
teddy@teddy:~/Documents/self_signed_cert$ certutil -d sql:$HOME/.pki/nssdb -A -t "P,," -n "fontaineind.test" -i fontaineind.test.crt |
Close all the Google Chrome windows and reopen. Chrome is now showing the site as secure.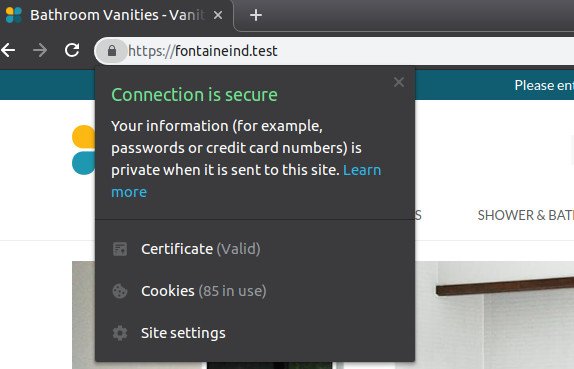 Now I want to redirect all connection from http to https.
Make sure you changed the ‘unsecure’ url on the database to use https instead. Then modify the nginx setting for fontaineind.test
|
1 |
teddy@teddy:~/Documents/self_signed_cert$ sudo gedit /etc/nginx/sites-available/fontaineind.test |
Then change like this:
|
1 2 3 4 5 6 7 8 9 10 11 12 13 14 15 16 17 18 19 20 |
server { listen 8080; server_name fontaineind.test; return 301 https://$server_name$request_uri; } server { listen 443 ssl http2; listen [::]:443 ssl http2; #server_name fontaineind.test; ssl_certificate /etc/ssl/certs/fontaineind.test.crt; ssl_certificate_key /etc/ssl/private/fontaineind.test.key; ssl_protocols TLSv1.2 TLSv1.1 TLSv1; set $MAGE_ROOT /home/teddy/Documents/works/fontaineind; ... } |
Reload the nginx server. But if you check the nginx config setting, it’d show error like this:
|
1 2 3 4 5 |
teddy@teddy:~/Documents/self_signed_cert$ nginx -t nginx: [alert] could not open error log file: open() "/var/log/nginx/error.log" failed (13: Permission denied) 2019/02/09 22:33:47 [warn] 25899#25899: the "user" directive makes sense only if the master process runs with super-user privileges, ignored in /etc/nginx/nginx.conf:1 2019/02/09 22:33:47 [emerg] 25899#25899: SSL_CTX_use_PrivateKey_file("/etc/ssl/private/fontaineind.test.key") failed (SSL: error:0200100D:system library:fopen:Permission denied:fopen('/etc/ssl/private/fontaineind.test.key','r') error:20074002:BIO routines:FILE_CTRL:system lib error:140B0002:SSL routines:SSL_CTX_use_PrivateKey_file:system lib) nginx: configuration file /etc/nginx/nginx.conf test failed |
It shows error about the certificate. Probably because it’s a self-signed certificate. Anyway we can ignore it on the development stage. If you open http://fontaineind.test:8080, it’d be redirected to https://fontaineind.test
So all good.