References:
1. https://www.howtoforge.com/tutorial/install-laravel-on-ubuntu-for-apache/
2. https://laravel.com/docs/5.2
How to install:
- Laravel uses composer much for installation. So first check the composer version (I already installed the composer) through the terminal.
1teddy@teddy-K43SJ:~$ composer --version
Here is the result for my system.
123You are running composer with xdebug enabled. This has a major impact on runtime performance. See https://getcomposer.org/xdebugWarning: This development build of composer is over 60 days old. It is recommended to update it by running "/usr/local/bin/composer self-update" to get the latest version.Composer version 1.0-dev (6eb50623e6e00bac4ed893802836e50b62c83434) 2016-02-08 19:03:10
 My composer version is 1.0-dev. It says my composer version is over 60 days old. Let update it.
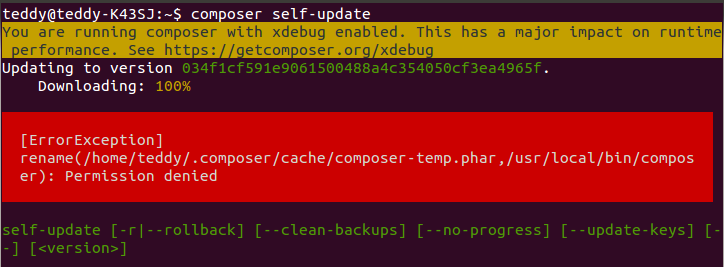
1teddy@teddy-K43SJ:~$ composer self-update
But the result shows complain about permission.
123[ErrorException]rename(/home/teddy/.composer/cache/composer-temp.phar,/usr/local/bin/composer): Permission denied
 Here we need ‘sudo’ to update it.
1teddy@teddy-K43SJ:~$ sudo composer self-update
Here is the success result.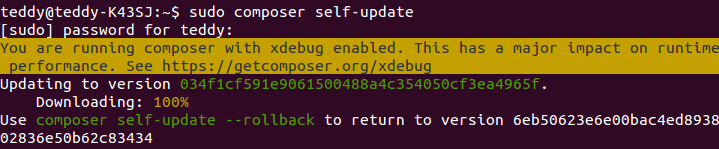 Okay. Lets check it again.
  My latest composer version is 1.2-dev.
 - Ready to install Laravel. First I need to go in laravel directory in Documents/works/. Then there are two ways how to install it. They are ‘Laravel Installer’ and ‘composer create-project’. Somehow Laravel Doc mention the installer first. I dont know which one is the best but this QA from stackoverflow can give a perspective. First I used ‘composer create-project’ way to create a new project ‘mylaravelproject’. Here is the installation:
123456789101112131415161718192021222324252627282930313233343536373839404142434445464748495051525354555657585960616263646566676869707172737475767778798081828384858687888990919293949596979899100101102103104105106107108109110111112113114115116117118119120121122123124125126127128129130131132133134135136137138139140141142143144145146147148149150151152153154155156157158159160161162163164165166167168169170171172173174175176177178179180181182183184185186187188189190191192193194195196197198199200201202203204205206207208209210211212213214215216217218219220221222223224225226227228229230231232teddy@teddy-K43SJ:~$ cd Documents/works/laravel/teddy@teddy-K43SJ:~/Documents/works/laravel$ composer create-project --prefer-dist laravel/laravel mylaravelprojectYou are running composer with xdebug enabled. This has a major impact on runtime performance. See https://getcomposer.org/xdebugInstalling laravel/laravel (v5.2.31)- Installing laravel/laravel (v5.2.31)Downloading: 100%Created project in mylaravelproject> php -r "copy('.env.example', '.env');"Loading composer repositories with package informationUpdating dependencies (including require-dev)- Installing vlucas/phpdotenv (v2.3.0)Downloading: 100%- Installing symfony/polyfill-mbstring (v1.2.0)Downloading: 100%- Installing symfony/var-dumper (v3.0.9)Downloading: 100%- Installing symfony/translation (v3.0.9)Downloading: 100%- Installing symfony/routing (v3.0.9)Downloading: 100%- Installing symfony/process (v3.0.9)Downloading: 100%- Installing symfony/polyfill-util (v1.2.0)Downloading: 100%- Installing symfony/polyfill-php56 (v1.2.0)Downloading: 100%- Installing symfony/http-foundation (v3.0.9)Downloading: 100%- Installing symfony/event-dispatcher (v3.1.3)Downloading: 100%- Installing psr/log (1.0.0)Downloading: 100%- Installing symfony/debug (v3.0.9)Downloading: 100%- Installing symfony/http-kernel (v3.0.9)Downloading: 100%- Installing symfony/finder (v3.0.9)Downloading: 100%- Installing symfony/console (v3.0.9)Downloading: 100%- Installing swiftmailer/swiftmailer (v5.4.3)Downloading: 100%- Installing jakub-onderka/php-console-color (0.1)Downloading: 100%- Installing jakub-onderka/php-console-highlighter (v0.3.2)Downloading: 100%- Installing dnoegel/php-xdg-base-dir (0.1)Downloading: 100%- Installing nikic/php-parser (v2.1.0)Downloading: 100%- Installing psy/psysh (v0.7.2)Downloading: 100%- Installing paragonie/random_compat (v1.4.1)Downloading: 100%- Installing nesbot/carbon (1.21.0)Downloading: 100%- Installing mtdowling/cron-expression (v1.1.0)Downloading: 100%- Installing monolog/monolog (1.21.0)Downloading: 100%- Installing league/flysystem (1.0.26)Downloading: 100%- Installing jeremeamia/superclosure (2.2.0)Downloading: 100%- Installing doctrine/inflector (v1.1.0)Downloading: 100%- Installing classpreloader/classpreloader (3.0.0)Downloading: 100%- Installing laravel/framework (v5.2.42)Downloading: 100%- Installing fzaninotto/faker (v1.6.0)Downloading: 100%- Installing hamcrest/hamcrest-php (v1.2.2)Downloading: 100%- Installing mockery/mockery (0.9.5)Downloading: 100%- Installing symfony/yaml (v3.1.3)Downloading: 100%- Installing sebastian/version (1.0.6)Downloading: 100%- Installing sebastian/global-state (1.1.1)Downloading: 100%- Installing sebastian/recursion-context (1.0.2)Downloading: 100%- Installing sebastian/exporter (1.2.2)Downloading: 100%- Installing sebastian/environment (1.3.7)Downloading: 100%- Installing sebastian/diff (1.4.1)Downloading: 100%- Installing sebastian/comparator (1.2.0)Downloading: 100%- Installing doctrine/instantiator (1.0.5)Downloading: 100%- Installing phpunit/php-text-template (1.2.1)Downloading: 100%- Installing phpunit/phpunit-mock-objects (2.3.8)Downloading: 100%- Installing phpunit/php-timer (1.0.8)Downloading: 100%- Installing phpunit/php-file-iterator (1.4.1)Downloading: 100%- Installing phpunit/php-token-stream (1.4.8)Downloading: 100%- Installing phpunit/php-code-coverage (2.2.4)Downloading: 100%- Installing webmozart/assert (1.0.2)Downloading: 100%- Installing phpdocumentor/reflection-common (1.0)Downloading: 100%- Installing phpdocumentor/type-resolver (0.2)Downloading: 100%- Installing phpdocumentor/reflection-docblock (3.1.0)Downloading: 100%- Installing phpspec/prophecy (v1.6.1)Downloading: 100%- Installing phpunit/phpunit (4.8.27)Downloading: 100%- Installing symfony/css-selector (v3.0.9)Downloading: 100%- Installing symfony/dom-crawler (v3.0.9)Downloading: 100%symfony/var-dumper suggests installing ext-symfony_debug ()symfony/translation suggests installing symfony/config ()symfony/routing suggests installing doctrine/annotations (For using the annotation loader)symfony/routing suggests installing symfony/config (For using the all-in-one router or any loader)symfony/routing suggests installing symfony/dependency-injection (For loading routes from a service)symfony/routing suggests installing symfony/expression-language (For using expression matching)symfony/event-dispatcher suggests installing symfony/dependency-injection ()symfony/http-kernel suggests installing symfony/browser-kit ()symfony/http-kernel suggests installing symfony/class-loader ()symfony/http-kernel suggests installing symfony/config ()symfony/http-kernel suggests installing symfony/dependency-injection ()psy/psysh suggests installing ext-pdo-sqlite (The doc command requires SQLite to work.)paragonie/random_compat suggests installing ext-libsodium (Provides a modern crypto API that can be used to generate random bytes.)monolog/monolog suggests installing aws/aws-sdk-php (Allow sending log messages to AWS services like DynamoDB)monolog/monolog suggests installing doctrine/couchdb (Allow sending log messages to a CouchDB server)monolog/monolog suggests installing ext-amqp (Allow sending log messages to an AMQP server (1.0+ required))monolog/monolog suggests installing ext-mongo (Allow sending log messages to a MongoDB server)monolog/monolog suggests installing graylog2/gelf-php (Allow sending log messages to a GrayLog2 server)monolog/monolog suggests installing mongodb/mongodb (Allow sending log messages to a MongoDB server via PHP Driver)monolog/monolog suggests installing php-amqplib/php-amqplib (Allow sending log messages to an AMQP server using php-amqplib)monolog/monolog suggests installing php-console/php-console (Allow sending log messages to Google Chrome)monolog/monolog suggests installing rollbar/rollbar (Allow sending log messages to Rollbar)monolog/monolog suggests installing ruflin/elastica (Allow sending log messages to an Elastic Search server)monolog/monolog suggests installing sentry/sentry (Allow sending log messages to a Sentry server)league/flysystem suggests installing league/flysystem-aws-s3-v2 (Allows you to use S3 storage with AWS SDK v2)league/flysystem suggests installing league/flysystem-aws-s3-v3 (Allows you to use S3 storage with AWS SDK v3)league/flysystem suggests installing league/flysystem-azure (Allows you to use Windows Azure Blob storage)league/flysystem suggests installing league/flysystem-cached-adapter (Flysystem adapter decorator for metadata caching)league/flysystem suggests installing league/flysystem-copy (Allows you to use Copy.com storage)league/flysystem suggests installing league/flysystem-dropbox (Allows you to use Dropbox storage)league/flysystem suggests installing league/flysystem-eventable-filesystem (Allows you to use EventableFilesystem)league/flysystem suggests installing league/flysystem-rackspace (Allows you to use Rackspace Cloud Files)league/flysystem suggests installing league/flysystem-sftp (Allows you to use SFTP server storage via phpseclib)league/flysystem suggests installing league/flysystem-webdav (Allows you to use WebDAV storage)league/flysystem suggests installing league/flysystem-ziparchive (Allows you to use ZipArchive adapter)laravel/framework suggests installing aws/aws-sdk-php (Required to use the SQS queue driver and SES mail driver (~3.0).)laravel/framework suggests installing doctrine/dbal (Required to rename columns and drop SQLite columns (~2.4).)laravel/framework suggests installing guzzlehttp/guzzle (Required to use the Mailgun and Mandrill mail drivers and the ping methods on schedules (~5.3|~6.0).)laravel/framework suggests installing league/flysystem-aws-s3-v3 (Required to use the Flysystem S3 driver (~1.0).)laravel/framework suggests installing league/flysystem-rackspace (Required to use the Flysystem Rackspace driver (~1.0).)laravel/framework suggests installing pda/pheanstalk (Required to use the beanstalk queue driver (~3.0).)laravel/framework suggests installing predis/predis (Required to use the redis cache and queue drivers (~1.0).)laravel/framework suggests installing pusher/pusher-php-server (Required to use the Pusher broadcast driver (~2.0).)laravel/framework suggests installing symfony/psr-http-message-bridge (Required to psr7 bridging features (0.2.*).)sebastian/global-state suggests installing ext-uopz (*)phpunit/phpunit suggests installing phpunit/php-invoker (~1.1)Writing lock fileGenerating autoload files> Illuminate\Foundation\ComposerScripts::postUpdate> php artisan optimizeGenerating optimized class loader> php artisan key:generateApplication key [base64:ANAqub0Biko5oe7BYFuleX15JW/QbYb3lWvFocHvHyU=] set successfully.
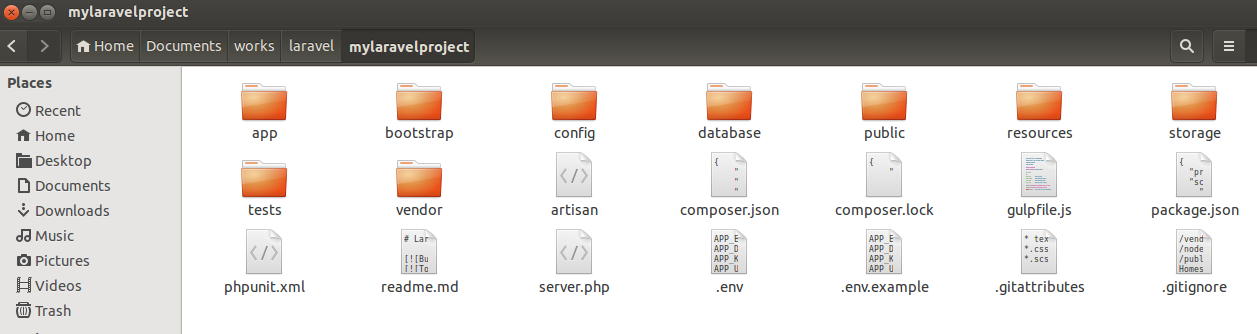
Here is the files and directories are created. It seems ‘composer create-project’ installation download all the component required to start developing laravel project at one shot! Please see all component in ‘vendor’ directory. Before I try to give a shot on this new installation, I need to set some permission on a few directories suggested on the laravel doc like ‘storage’ and ‘bootstrap/cache’.
12sudo chmod -R 777 storagesudo chmod -R 777 bootstrap/cache/
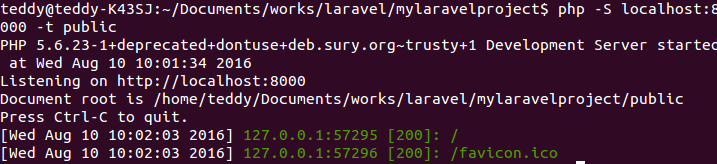
 Now, I am ready to try it on my web browser. Many article suggest to setup a virtual host but I want to test it right away without it. I can use PHP CLI to do that. Here is the command on my linux terminal.
1php -S localhost:8000 -t public
PHP CLI is running.
1234567teddy@teddy-K43SJ:~/Documents/works/laravel/mylaravelproject$ php -S localhost:8000 -t publicPHP 5.6.23-1+deprecated+dontuse+deb.sury.org~trusty+1 Development Server started at Wed Aug 10 10:01:34 2016Listening on http://localhost:8000Document root is /home/teddy/Documents/works/laravel/mylaravelproject/publicPress Ctrl-C to quit.[Wed Aug 10 10:02:03 2016] 127.0.0.1:57295 [200]: /[Wed Aug 10 10:02:03 2016] 127.0.0.1:57296 [200]: /favicon.ico
 Open it on the web browser with url:
1http://localhost:8000
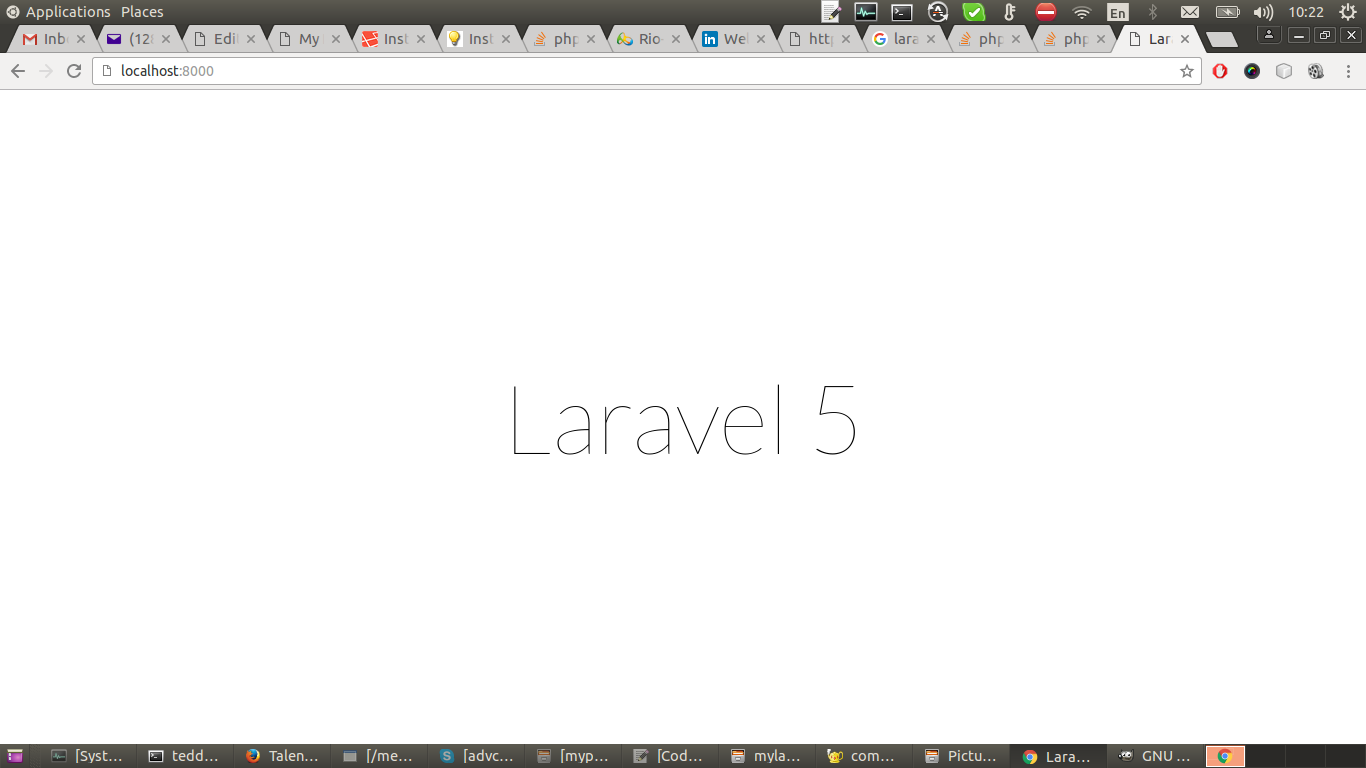
Here is the welcome screen.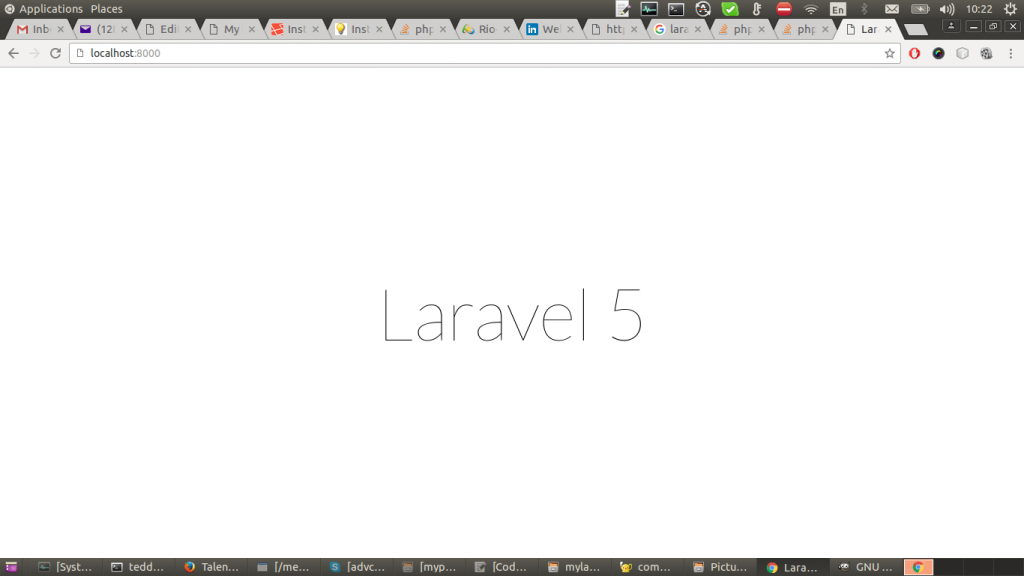
laravel welcome screen The another way is to use ‘Laravel Installer’. From this stackoverflow QA, this way seems to download just required ‘vendor’ component/bundle. It may be for the expert level that needed more thought about laravel (CMIIW). I hope I can learn it later.
- Setup the virtualhost. after the successful first try, I think it need to setup a virtualhost config so I dont need to run/stop the PHP CLI on my linux terminal everytime when I want to give it a try. First, I need to create a new apache configuration file. I name it ‘mylaravel.conf’.
1sudo gedit /etc/ache2/sites-available/mylaravel.conf
 Here is the file content.
123456789101112<VirtualHost *:80>ServerName mylaravelproject.devDocumentRoot /home/teddy/Documents/works/laravel/mylaravelproject/public<Directory /home/teddy/Documents/works/laravel/mylaravelproject>AllowOverride AllRequire all granted</Directory>ErrorLog ${APACHE_LOG_DIR}/error.logCustomLog ${APACHE_LOG_DIR}/access.log combined</VirtualHost>
Make sure the ‘Document root’ path is written correctly. the entry ‘Require all granted’ is required here or I would get an error like this: ‘Forbidden You don’t have permission to access / on this server’. Then I need apache to enable the site and reload it.
12sudo a2ensite mylaravelsudo service apache2 reload
Here is the process.
123456teddy@teddy-K43SJ:~/Documents/works/laravel/mylaravelproject$ sudo a2ensite mylaravelEnabling site mylaravel.To activate the new configuration, you need to run:service apache2 reloadteddy@teddy-K43SJ:~/Documents/works/laravel/mylaravelproject$ sudo service apache2 reload* Reloading Apache httpd web server apache2 *
‘mylaravel’ on ‘sudo a2ensite mylaravel’ is the config file name without .conf extension. then I need to register the site so I can open it through localhost with this command ‘sudo gedit /etc/hosts’.
1teddy@teddy-K43SJ:~/Documents/works/laravel/mylaravelproject$ sudo gedit /etc/hosts
then add this entry in the ‘hosts’ file.
1127.0.0.1 mylaravelproject.dev
then restart the apache server ‘sudo service apache2 restart’. Now I can open it through my web browser with this url: http://mylaravelproject.dev/ - The next step is to learn more about laravel like Application Structure, Configuration, Router, etc. This tutorial Laravel Tutorial and Belajar Laravel Ala Indonesia are worth to be read. I hope I can write my experience on this blog someday.